[Tensorflow]模型持久化的原理,将CKPT转为pb文件,使用pb模型预测
文章目录
[Tensorflow]模型持久化的原理,将CKPT转为pb文件,使用pb模型预测
由题目就可以看出,本节内容分为三部分,第一部分就是如何将训练好的模型持久化,并学习模型持久化的原理,第二部分就是如何将CKPT转化为pb文件,第三部分就是如何使用pb模型进行预测。
这里新增一个h5转tflite,h5转pb,pb转 tflite的文件代码,代码直接展示,不写什么了,我感觉其实也没有必要写什么了,该说的都说了,只不过h5模型是Keras中训练的。
一、模型持久化
为了让训练得到的模型保存下来方便下次直接调用,我们需要将训练得到的神经网络模型持久化。下面学习通过TensorFlow程序来持久化一个训练好的模型,并从持久化之后的模型文件中还原被保存的模型,然后学习TensorFlow持久化的工作原理和持久化之后文件中的数据格式。
1.持久化代码实现
TensorFlow提供了一个非常简单的API来保存和还原一个神经网络模型。这个API就是 tf.train.Saver 类。使用 tf.train.saver() 保存模型时会产生多个文件,会把计算图的结构和图上参数取值分成了不同的文件存储。这种方式是在TensorFlow中是最常用的保存方式。
下面代码给出了保存TensorFlow计算图的方法:
#_*_coding:utf-8_*_

import tensorflow as tf

import os

# 声明两个变量并计算他们的和

v1 = tf.Variable(tf.constant(1.0, shape=[1]), name='v1')

v2 = tf.Variable(tf.constant(2.0, shape=[1]), name='v2')

result = v1 + v2

init_op = tf.global_variables_initializer()

# 声明 tf.train.Saver类用于保存模型

saver = tf.train.Saver()

with tf.Session() as sess:

    sess.run(init_op)

    # 将模型保存到model.ckpt文件中

    model_path = 'model/model.ckpt'

    saver.save(sess, model_path)
上面的代码实现了持久化一个简单的TensorFlow模型的功能。在这段代码中,通过saver.save 函数将TensorFlow模型保存到了 model/model.path 文件中。TensorFlow模型一般会保存在后缀为 .ckpt 的文件中,虽然上面的程序只指定了一个文件路径,但是这个文件目录下面会出现三个文件。这是因为TensorFlow会将计算图的结构和图上参数取值分开保存。
运行上面代码,我们查看model文件里面的文件如下:
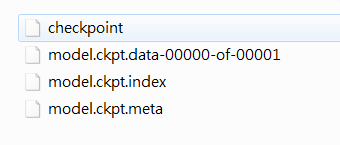
下面解释一下文件分别是干什么的:
- checkpoint文件是检查点文件,文件保存了一个目录下所有模型文件列表。
- model.ckpt.data文件保存了TensorFlow程序中每一个变量的取值
- model.ckpt.index文件则保存了TensorFlow程序中变量的索引
- model.ckpt.meta文件则保存了TensorFlow计算图的结构(可以简单理解为神经网络的网络结构),该文件可以被 tf.train.import_meta_graph 加载到当前默认的图来使用。
下面代码给出加载这个模型的方法:
#_*_coding:utf-8_*_

import tensorflow as tf

#使用和保存模型代码中一样的方式来声明变量

v1 = tf.Variable(tf.constant(1.0, shape=[1]), name='v1')

v2 = tf.Variable(tf.constant(2.0, shape=[1]), name='v2')

result = v1 + v2

saver = tf.train.Saver()

with tf.Session() as sess:

    # 加载已经保存的模型,并通过已经保存的模型中的变量的值来计算加法

    model_path = 'model/model.ckpt'

    saver.restore(sess, model_path)

    print(sess.run(result))

# 结果如下:[3.]
这段加载模型的代码基本上和保存模型的代码是一样的。在加载模型的程序中也是先定义了TensorFlow计算图上所有运算,并声明了一个 tf.train.Saver类。两段代码唯一不同的是,在加载模型的代码中没有运行变量的初始化过程,而是将变量的值通过已经保存的模型加载出来。如果不希望重复定义图上的运算,也可以直接加载已经持久化的图,以下代码给出一个样例:
import tensorflow as tf

# 直接加载持久化的图

model_path = 'model/model.ckpt'

model_path1 = 'model/model.ckpt.meta'

saver = tf.train.import_meta_graph(model_path1)

with tf.Session() as sess:

    saver.restore(sess, model_path)

    # 通过张量的的名称来获取张量

    print(sess.run(tf.get_default_graph().get_tensor_by_name('add:0')))

# 结果如下:[3.]
其上面给出的程序中,默认保存和加载了TensorFlow计算图上定义的所有变量。但是有时可能只需要保存或者加载部分变量。比如,可能有一个之前训练好的五层神经网络模型,现在想尝试一个六层神经网络,那么可以将前面五层神经网络中的参数直接加载到新的模型,而仅仅将最后一层神经网络重新训练。
为了保存或者加载部分变量,在声明 tf.train.Saver 类时可以提供一个列表来指定需要保存或者加载的变量。比如在加载模型的代码中使用 saver = tf.train.Saver([v1]) 命令来构建 tf.train.Saver 类,那么只有变量 v1 会被加载进来。如果运行修改后只加载了 v1 的代码会得到变量未初始化的错误:
tensorflow.python.framework.errors.FailedPreconditionError:Attempting to

use uninitialized value v2
因为 v2 没有被加载,所以v2在运行初始化之前是没有值的。除了可以选取需要被加载的变量,tf.train.Saver 类也支持在保存或者加载时给变量重命名。
下面给出一个简单的样例程序说明变量重命名是如何被使用的。
import tensorflow as tf

# 这里声明的变量名称和已经保存的模型中变量的的名称不同

v1 = tf.Variable(tf.constant(1.0, shape=[1]), name='other-v1')

v2 = tf.Variable(tf.constant(2.0, shape=[1]), name='other-v2')

# 如果直接使用 tf.train.Saver() 来加载模型会报变量找不到的错误,下面显示了报错信息

# tensorflow.python.framework.errors.FailedPreconditionError:Tensor name 'other-v2'

# not found in checkpoint file model/model.ckpt

# 使用一个字典来重命名变量就可以加载原来的模型了

# 这个字典指定了原来名称为 v1 的变量现在加载到变量 v1中(名称为 other-v1)

# 名称为v2 的变量加载到变量 v2中(名称为 other-v2)

saver = tf.train.Saver({'v1': v1, 'v2': v2})
在这个程序中,对变量 v1 和 v2 的名称进行了修改。如果直接通过 tf.train.Saver 默认的构造函数来加载保存的模型,那么程序会报变量找不到的错误,因为保存时候的变量名称和加载时变量的名称不一致。为了解决这个问题,Tensorflow 可以通过字典(dictionary)将模型保存时的变量名和需要加载的变量联系起来。这样做的主要目的之一就是方便使用变量的滑动平均值。在之前介绍了使用变量的滑动平均值可以让神经网络模型更加健壮(robust)。在TensorFlow中,每一个变量的滑动平均值是通过影子变量维护的,所以要获取变量的滑动平均值实际上就是获取这个影子变量的取值。如果在加载模型时将影子变量映射到变量本身,那么在使用训练好的模型时就不需要再调用函数来获取变量的滑动平均值了。这样就大大方便了滑动平均模型的时域。
下面代码给出了一个保存滑动平均模型的样例:
import tensorflow as tf

v = tf.Variable(0, dtype=tf.float32, name='v')

# 在没有申明滑动平均模型时只有一个变量 v,所以下面语句只会输出 v:0

for variables in tf.global_variables():

    print(variables.name)

ema = tf.train.ExponentialMovingAverage(0.99)

maintain_averages_op = ema.apply(tf.global_variables())

# 在申明滑动平均模型之后,TensorFlow会自动生成一个影子变量 v/ExponentialMovingAverage

# 于是下面的语句会输出 v:0 和 v/ExponentialMovingAverage:0

for variables in tf.global_variables():

    print(variables.name)

saver = tf.train.Saver()

with tf.Session() as sess:

    init_op = tf.global_variables_initializer()

    sess.run(init_op)

    sess.run(tf.assign(v, 10))

    sess.run(maintain_averages_op)

    # 保存时,TensorFlow会将v:0 和 v/ExponentialMovingAverage:0 两个变量都保存下来

    saver.save(sess, 'model/modeltest.ckpt')

    print(sess.run([v, ema.average(v)]))

    # 输出结果 [10.0, 0.099999905]
下面代码给出了如何通过变量重命名直接读取变量的滑动平均值。从下面程序的输出可以看出,读取的变量 v 的值实际上是上面代码中变量 v 的滑动平均值。通过这个方法,就可以使用完全一样的代码来计算滑动平均模型前向传播的结果:
v = tf.Variable(0, dtype=tf.float32, name='v')

# 通过变量重命名将原来变量v的滑动平均值直接赋值给 V

saver = tf.train.Saver({'v/ExponentialMovingAverage': v})

with tf.Session() as sess:

    saver.restore(sess, 'model/modeltest.ckpt')

    print(sess.run(v))

    # 输出 0.099999905  这个值就是原来模型中变量 v 的滑动平均值
为了方便加载时重命名滑动平均变量,tf.train.ExponentialMovingAverage 类提供了 variables_tp_restore 函数来生成 tf.train.Saver类所需要的变量重命名字典,下面代码给出了 variables_to_restore 函数的使用样例:
v = tf.Variable(0, dtype=tf.float32, name='v')

ema = tf.train.ExponentialMovingAverage(0.99)

# 通过使用 variables_to_restore 函数可以直接生成上面代码中提供的字典

# {'v/ExponentialMovingAverage': v}

# 下面代码会输出 {'v/ExponentialMovingAverage': <tf.Variable 'v:0' shape=() dtype=float32_ref>}

print(ema.variables_to_restore())

saver = tf.train.Saver(ema.variables_to_restore())

with tf.Session() as sess:

    saver.restore(sess, 'model/modeltest.ckpt')

    print(sess.run(v))

    # 输出 0.099999905  即原来模型中变量 v 的滑动平均值
使用 tf.train.Saver 会保存进行TensorFlow程序所需要的全部信息,然后有时并不需要某些信息。比如在测试或者离线预测时,只需要知道如何从神经网络的输出层经过前向传播计算得到输出层即可,而不需要类似于变量初始化,模型保存等辅助接点的信息。而且,将变量取值和计算图结构分成不同的文件存储有时候也不方便,于是TensorFlow提供了 convert_variables_to_constants 函数,通过这个函数可以将计算图中的变量及其取值通过常量的方式保存,这样整个TensorFlow计算图可以统一存放在一个文件中,该方法可以固化模型结构,而且保存的模型可以移植到Android平台。
convert_variables_to_constants固化模型结构
下面给出一个样例:
import tensorflow as tf

from tensorflow.python.framework import graph_util

v1 = tf.Variable(tf.constant(1.0, shape=[1]), name='v1')

v2 = tf.Variable(tf.constant(2.0, shape=[1]), name='v2')

result = v1 + v2

init_op = tf.global_variables_initializer()

with tf.Session() as sess:

    sess.run(init_op)

    # 导出当前计算图的GraphDef部分,只需要这一步就可以完成从输入层到输出层的过程

    graph_def = tf.get_default_graph().as_graph_def()

    # 将图中的变量及其取值转化为常量,同时将图中不必要的节点去掉

    # 在下面,最后一个参数['add']给出了需要保存的节点名称

    # add节点是上面定义的两个变量相加的操作

    # 注意这里给出的是计算节点的的名称,所以没有后面的 :0

    output_graph_def = graph_util.convert_variables_to_constants(sess, graph_def, (['add']))

    # 将导出的模型存入文件

    with tf.gfile.GFile('model/combined_model.pb', 'wb') as f:

        f.write(output_graph_def.SerializeToString())
通过下面的程序可以直接计算定义加法运算的结果,当只需要得到计算图中某个节点的取值时,这提供了一个更加方便的方法,以后将使用这种方法来使用训练好的模型完成迁移学习。
import tensorflow as tf

from tensorflow.python.platform import gfile

with tf.Session() as sess:

    model_filename = 'model/combined_model.pb'

    # 读取保存的模型文件,并将文件解析成对应的GraphDef Protocol Buffer

    with gfile.FastGFile(model_filename, 'rb') as f:

        graph_def = tf.GraphDef()

        graph_def.ParseFromString(f.read())

    # 将graph_def 中保存的图加载到当前的图中,

    # return_elements = ['add: 0'] 给出了返回的张量的名称

    # 在保存的时候给出的是计算节点的名称,所以为add

    # 在加载的时候给出的张量的名称,所以是 add:0

    result = tf.import_graph_def(graph_def, return_elements=['add: 0'])

    print(sess.run(result))

    # 输出 [array([3.], dtype=float32)]
2. 持久化原理及数据格式
上面学习了当调用 saver.save 函数时,TensorFlow程序会自动生成四个文件。TensorFlow模型的持久化就是通过这个四个文件完成的。这里我们详细学习一下这个三个文件中保存的内容以及数据格式。
TensorFlow是一个通过图的形式来表述计算的编程系统,TensorFlow程序中所有计算都会被表达为计算图上的节点。TensorFlow通过元图(MetaGraph)来记录计算图中节点的信息以及运行计算图中节点所需要的元数据。TensorFlow中元图是由 MetaGraphDef Protocol Buffer 定义的。MetaGraphDef 中的内容就构成了TensorFlow 持久化的第一个文件,以下代码给出了MetaGraphDef类型的定义:
message MetaGraphDef{

    MeatInfoDef meta_info_def = 1;

    GraphDef graph_def = 2;

    SaverDef saver_def = 3;

    map<string,CollectionDef> collection_def = 4;

    map<string,SignatureDef> signature_def = 5;

}
从上面代码中可以看到,元图中主要记录了五类信息,下面结合变量相加样例的持久化结果,逐一介绍MetaGraphDef类型的每一个属性中存储的信息。保存 MetaGraphDef 信息的文件默认为以 .meta 为后缀名,在上面,文件 model.ckpt.meta 中存储的就是元图的数据。直接运行其样例得到的是一个二进制文件,无法直接查看。为了方便调试,TensorFlow提供了 export_meta_graph 函数,这函数支持以json格式导出 MetaGraphDef Protocol Buffer。下面代码展示了如何使用这个函数:
import tensorflow as tf

# 定义变量相加的计算

v1 = tf.Variable(tf.constant(1.0, shape=[1]), name='v1')

v2 = tf.Variable(tf.constant(2.0, shape=[1]), name='v2')

result = v1 + v2

saver = tf.train.Saver()

# 通过  export_meta_graph() 函数导出TensorFlow计算图的元图,并保存为json格式

saver.export_meta_graph('model/model.ckpt.meda.json', as_text=True)
通过上面给出的代码,我们可以将计算图元图以json的格式导出并存储在 model.ckpt.meda.json 文件中。下面给出这个文件的大概内容:
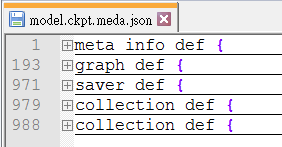
我们从JSON文件中可以看到确实是五类信息。下面结合这JSON文件的具体内容来学习一下TensorFlow中元图存储的信息。
1. meta_info_def属性
meta_info_def 属性是通过MetaInfoDef定义的。它记录了TensorFlow计算图中的元数据以及TensorFlow程序中所有使用到的运算方法的信息,下面是 MetaInfoDef Protocol Buffer 的定义:
message MetaInfoDef{

    #saver没有特殊指定,默认属性都为空。meta_info_def属性里只有stripped_op_list属性不能为空。

    #该属性不能为空

    string meta_graph_version = 1;

    #该属性记录了计算图中使用到的所有运算方法的信息,该函数只记录运算信息,不记录计算的次数

    OpList stripped_op_list = 2;

    google.protobuf.Any any_info = 3;

    repeated string tags = 4;

}
TensorFlow计算图的元数据包括了计算图的版本号(meta_graph_version属性)以及用户指定的一些标签(tags属性)。如果没有在 saver中特殊指定,那么这些属性都默认为空。
在model.ckpt.meta.json文件中,meta_info_def 属性里只有 stripped_op_list属性是不为空的。stripped_op_list 属性记录了TensorFlow计算图上使用到的所有运算方法的信息。注意stripped_op_list 属性保存的是 TensorFlow 运算方法的信息,所以如果某一个运算在TensorFlow计算图中出现了多次,那么在 stripped_op_list 也只会出现一次。比如在 model.ckpt.meta.jspm 文件的 stripped_op_list 属性只有一个 Variable运算,但是这个运算在程序中被使用了两次。
stripped_op_list 属性的类型是 OpList。OpList 类型是一个 OpDef类型的列表,以下代码给出了 OpDef 类型的定义:
message opDef{

    string name = 1;#定义了运算的名称

    repeated ArgDef input_arg = 2; #定义了输入,属性是列表

    repeated ArgDef output_arg =3; #定义了输出,属性是列表

    repeated AttrDef attr = 4;#给出了其他运算的参数信息

    string summary = 5;

    string description = 6;

    OpDeprecation deprecation = 8;

    bool is_commutative = 18;

    bool is_aggregate = 16

    bool is_stateful = 17;

    bool allows_uninitialized_input = 19;

};
OpDef 类型中前四个属性定义了一个运算最核心的信息。OpDef 中的第一个属性 name 定义了运算的名称,这也是一个运算唯一的标识符。在TensorFlow计算图元图的其他属性中,比如下面要学习的GraphDef属性,将通过运算名称来引用不同的运算。OpDef 的第二个和第三个属性为 input_arg 和 output_arg,他们定义了运算的输出和输入。因为输入输出都可以有多个,所以这两个属性都是列表。第四个属性Attr给出了其他的运算参数信息。在JSON文件中共定义了七个运算,下面将给出比较有代表性的一个运算来辅助说明OpDef 的数据结构。
op {

    name: "Add"

    input_arg{

        name: "x"

        type_attr:"T"

    }

    input_arg{

        name: "y"

        type_attr:"T"

    }

    output_arg{

        name: "z"

        type_attr:"T"

    }

    attr{

        name:"T"

        type:"type"

        allow_values{

            list{

                type:DT_HALF

                type:DT_FLOAT

                ...

            }

        }

    }

}
上面给出了名称为Add的运算。这个运算有两个输入和一个输出,输入输出属性都指定了属性 type_attr,并且这个属性的值为 T。在OpDef的Attr属性中,必须要出现名称(name)为 T的属性。以上样例中,这个属性指定了运算输入输出允许的参数类型(allowed_values)。
2. graph_def 属性
graph_def 属性主要记录了TensorFlow 计算图上的节点信息。TensorFlow计算图的每一个节点对应了TensorFlow程序中一个运算,因为在 meta_info_def 属性中已经包含了所有运算的具体信息,所以 graph_def 属性只关注运算的连接结构。graph_def属性是通过 GraphDef Protocol Buffer 定义的,graph_def主要包含了一个 NodeDef类型的列表。一下代码给出了 graph_def 和NodeDef类型中包含的信息:
message GraphDef{

    #GraphDef的主要信息存储在node属性中,他记录了Tensorflow计算图上所有的节点信息。

    repeated NodeDef node = 1;

    VersionDef versions = 4; #主要储存了Tensorflow的版本号

};

message NodeDef{

    #NodeDef类型中有一个名称属性name,他是一个节点的唯一标识符,在程序中,通过节点的名称来获得相应的节点。

    string name = 1;

    '''

    op属性给出了该节点使用的Tensorflow运算方法的名称。

    通过这个名称可以在TensorFlow计算图元图的meta_info_def属性中找到该运算的具体信息。

    '''

    string op = 2;

    '''

    input属性是一个字符串列表,他定义了运算的输入。每个字符串的取值格式为弄的:src_output

    node部分给出节点名称,src_output表明了这个输入是指定节点的第几个输出。

    src_output=0时可以省略src_output部分

    '''

    repeated string input = 3;

    #制定了处理这个运算的设备,可以是本地或者远程的CPU or GPU。属性为空时自动选择

    string device = 4;

    #制定了和当前运算有关的配置信息

    map<string, AttrValue> attr = 5;

};
GraphDef中的versions属性比较简单,它主要存储了TensorFlow的版本号。和其他属性类似,NodeDef 类型中有一个名称属性 name,它是一个节点的唯一标识符,在TensorFlow程序中可以通过节点的名称来获取响应节点。 NodeDef 类型中 的 device属性指定了处理这个运算的设备。运行TensorFlow运算的设备可以是本地机器的CPU或者GPU,当device属性为空时,TensorFlow在运行时会自动选取一个最适合的设备来运行这个运算,最后NodeDef类型中的Attr属性指定了和当前运算相关的配置信息。
下面列举了 model.ckpt.meta.json 文件中的一个计算节点来更加具体的了解graph_def属性:
graph def {

    node {

        name: "v1"

        op: "Variable"

        attr {

            key:"_output_shapes"

            value {

                list{ shape { dim { size: 1 } } }

            }

        }

    }

    attr {

        key :"dtype"

        value {

            type: DT_FLOAT

            }

        }

        ...

    }

    node {

        name :"add"

        op :"Add"

        input :"v1/read" #read指读取变量v1的值

        input: "v2/read"

        ...

    }

    node {

        name: "save/control_dependency" #指系统在完成tensorflow模型持久化过程中自动生成一个运算。

        op:"Identity"

        ...

    }

    versions {

        producer :24 #给出了文件使用时的Tensorflow版本号。

    }

}
上面给出了 model.ckpt.meta.json文件中 graph_def 属性里面比较有代表性的几个节点。第一个节点给出的是变量定义的运算。在TensorFlow中变量定义也是一个运算,这个运算的名称为 v1(name:),运算方法的名称是Variable(op: “Variable”)。定义变量的运算可以有很多个,于是在NodeDef类型的node属性中可以有多个变量定义的节点。但是定义变量的运算方法只用到了一个,于是在MetaInfoDef类型的 stripped_op_list 属性中只有一个名称为Variable 的运算方法。除了制定计算图中的节点的名称和运算方法。NodeDef类型中还定义了运算相关的属性。在节点 v1中,Attr属性指定了这个变量的维度以及类型。
给出的第二个节点是代表加法运算的节点。它指定了2个输入,一个为 v1/read,另一个为 v2/read。其中 v1/read 代表的节点可以读取变量 v1的值,因为 v1的值是节点 v1/read的第一个输出,所以后面的:0就可以省略了。v2/read也类似的代表了变量v2的取值。以上样例文件中给出的最后一个名称为 save/control_dependency,该节点是系统在完成TensorFlow模型持久化过程中自动生成的一个运算。在样例文件的最后,属性versions给出了生成 model.ckpt.meta.json 文件时使用的TensorFlow版本号。
3. saver_def 属性
saver_def 属性中记录了持久化模型时需要用到的一些参数,比如保存到文件的文件名,保存操作和加载操作的名称以及保存频率,清理历史记录等。saver_def 属性的类型为SaverDef,其定义如下:
message SaverDef {

    string filename_tensor_name = 1;

    string save_tensor_name = 2;

    string restore_op_name = 3;

    int32 max_to_keep = 4;

    bool sharded = 5;

    float keep_checkpoint_every_n_hours = 6;

    enum CheckpointFormatVersion {

        LEGACY = 0;

        V1 = 1;

        V2 = 2;

    }

    CheckpointFormatVersion version = 7;

}
下面给出了JSON文件中 saver_def 属性的内容:
saver_def {

  filename_tensor_name: "save/Const:0"

  save_tensor_name: "save/control_dependency:0"

  restore_op_name: "save/restore_all"

  max_to_keep: 5

  keep_checkpoint_every_n_hours: 10000.0

  version: V2

}
filename_tensor_name 属性给出了保存文件名的张量名称,这个张量就是节点 save/Const的第一个输出。save_tensor_name属性给出了持久化TensorFlow模型的运算所对应的节点名称。从上面的文件中可以看出,这个节点就是在 graph_def 属性中给出的 save/control_dependency节点。和持久化TensorFlow模型运算对应的是加载TensorFlow模型的运算,这个运算的名称是由 restore_op_name 属性指定。max_to_keep 属性和 keep_checkpoint_every_n_hours属性设置了 tf.train.Saver 类清理之前保存的模型的策略。比如当 max_to_keep 为5的时候,在第六次调用 saver.save 时,第一次保存的模型就会被自动删除,通过设置 keep_checkpoint_every_n_hours,每n小时可以在 max_to_keep 的基础上多保存一个模型。
4. collection def 属性
在TensorFlow的计算图(tf.Graph)中可以维护不同集合,而维护这些集合的底层实现就是通过collection_def 这个属性。collection_def 属性是一个从集合名称到集合内容的映射,其中集合名称为字符串,而集合内容为 CollectionDef Protocol Buffer。以下代码给出了 CollectionDef类型的定义:
message CollectionDef {

    message Nodelist {

    #用于维护计算图上的节点集合

        repeated string value = 1;

    }

    message BytesList {

    #维护字符串或者系列化之后的Procotol Buffer的集合。例如张量是通过Protocol Buffer表示的,而张量的集合是通过BytesList维护的。

        repeated bytes value = 1 ;

    }

    message Int64List {

        repeated int64 value = 1[packed = true];

    }

    message FloatList {

        repeated float value = 1[packed = true] ;

    }

    message AnyList {

        repeated google.protobuf.Any value= 1;

    }

    oneof kind {

        NodeList node_list = 1;

        BytesList bytes_lista = 2;

        Int64List int64_list = 3;

        Floatlist float_list = 4;

        AnyList any_list = 5;

    }

}
通过上面的定义可以看出,TensorFlow计算图上的集合主要可以维护四类不同的集合。NodeList用于维护计算图上节点的集合。BytesList 可以维护字符串或者系列化之后 Procotol Buffer的集合。比如张量是通过Procotol Buffer表示的,而张量的集合是通过BytesList维护的,我们将在JSON文件中看到具体样例。Int64List用于维护整数集合,FloatList用于维护实数集合。下面给出了JSON文件中collection_def 属性的内容:
collection_def {

  key: "trainable_variables"

  value {

    bytes_list {

      value: "\n\004v1:0\022\tv1/Assign\032\tv1/read:0"

      value: "\n\004v2:0\022\tv2/Assign\032\tv2/read:0"

    }

  }

}

collection_def {

  key: "variables"

  value {

    bytes_list {

      value: "\n\004v1:0\022\tv1/Assign\032\tv1/read:0"

      value: "\n\004v2:0\022\tv2/Assign\032\tv2/read:0"

    }

  }

}
从上面的文件可以看到样例程序中维护了两个集合。一个是所有变量的集合,这个集合的名称是Variables。另外一个是可训练变量的集合。名为 trainable_variables。在样例程序中,这两个集合中的元素是一样的,都是变量 v1和 v2,他们是系统自动维护的。
model.ckpt 文件中列表的第一行描述了文件的元信息,比如在这个文件中存储的变量列表,列表剩下的每一行保存了一个变量的片段。变量片段的信息是通过SavedSlice Protocol Buffer 定义的。SavedSlice 类型中保存了变量的名称,当前片段的信息以及变量取值。TensorFlow提供了 tf.train.NewCheckpointReader 类来查看 model.ckpt文件中保存的变量信息,下面代码展示了如何使用tf.train.NewCheckpointReader 类:
#_*_coding:utf-8_*_

import tensorflow as tf

# tf.train.NewCheckpointReader()  可以读取 checkpoint文件中保存的所有变量

reader = tf.train.NewCheckpointReader('model/model.ckpt')

# 获取所有变量列表,这是一个从变量名到变量维度的字典

all_variables = reader.get_variable_to_shape_map()

for variable_name in all_variables:

    # variable_name 为变量名称, all_variables[variable_name]为变量的维度

    print(variable_name, all_variables[variable_name])

#获取名称为v1 的变量的取值

print('Value for variable v1 is ', reader.get_tensor('v1'))

'''

v1 [1]     # 变量v1的维度为[1]

v2 [1]     # 变量v2的维度为[1]

Value for variable v1 is  [1.]   # 变量V1的取值为1

'''
最后一个文件的名字是固定的,叫checkpoint。这个文件是 tf.train.Saver类自动生成且自动维护的。在 checkpoint 文件中维护了由一个 tf.train.Saver类持久化的所有 TensorFlow模型文件的文件名。当某个保存的TensorFlow模型文件被删除的,这个模型所对应的文件名也会从checkpoint文件中删除。checkpoint中内容格式为 CheckpointState Protocol Buffer,下面给出了 CheckpointState 类型的定义。
message CheckpointState {

    string model_checkpoint_path = 1,

    repeated string all_model_checkpoint_paths = 2;

}
model_checkpoint_path 属性保存了最新的TensorFlow模型文件的文件名。 all_model_checkpoint_paths 属性列表了当前还没有被删除的所有TensorFlow模型文件的文件名。下面给出了生成的某个checkpoint文件:
model_checkpoint_path: "modeltest.ckpt"

all_model_checkpoint_paths: "modeltest.ckpt"
二、将CKPT转化为pb格式
很多时候,我们需要将TensorFlow的模型导出为单个文件(同时包含模型结构的定义与权重),方便在其他地方使用(如在Android中部署网络)。利用 tf.train.write_graph() 默认情况下只能导出了网络的定义(没有权重),而利用 tf.train.Saver().save() 导出的文件 graph_def 与权重时分离的,因此需要采用别的方法。我们知道,graph_def 文件中没有包含网络中的 Variable值(通常情况存储了权重),但是却包含了constant 值,所以如果我们能把Variable 转换为 constant,即可达到使用一个文件同时存储网络架构与权重的目标。
(PS:利用tf.train.write_graph() 保存模型,该方法只是保存了模型的结构,并不保存训练完毕的参数值。)
TensorFlow 为我们提供了 convert_variables_to_constants() 方法,该方法可以固化模型结构,将计算图中的变量取值以常量的形式保存,而且保存的模型可以移植到Android平台。
将CKPT转换成 PB格式的文件的过程如下:
- 1,通过传入 CKPT模型的路径得到模型的图和变量数据
- 2,通过 import_meta_graph 导入模型中的图
- 3,通过saver.restore 从模型中恢复图中各个变量的数据
- 4,通过 graph_util.convert_variables_to_constants 将模型持久化
下面的CKPT 转换成 PB格式例子,是之前训练的GoogleNet InceptionV3模型保存的ckpt转pb文件的例子:
#_*_coding:utf-8_*_

import tensorflow as tf

from tensorflow.python.framework import graph_util

from create_tf_record import *

resize_height = 224  # 指定图片高度

resize_width = 224   # 指定图片宽度

def freeze_graph(input_checkpoint, output_graph):

    '''

    :param input_checkpoint:

    :param output_graph:  PB 模型保存路径

    :return:

    '''

    # 检查目录下ckpt文件状态是否可用

    # checkpoint = tf.train.get_checkpoint_state(model_folder)

    # 得ckpt文件路径

    # input_checkpoint = checkpoint.model_checkpoint_path

    # 指定输出的节点名称,该节点名称必须是元模型中存在的节点

    output_node_names = "InceptionV3/Logits/SpatialSqueeze"

    saver = tf.train.import_meta_graph(input_checkpoint + '.meta', clear_devices=True)

    graph = tf.get_default_graph()  # 获得默认的图

    input_graph_def = graph.as_graph_def()  # 返回一个序列化的图代表当前的图

    with tf.Session() as sess:

        saver.restore(sess, input_checkpoint)  # 恢复图并得到数据

        # 模型持久化,将变量值固定

        output_graph_def = graph_util.convert_variables_to_constants(

            sess=sess,

            # 等于:sess.graph_def

            input_graph_def=input_graph_def,

            # 如果有多个输出节点,以逗号隔开

            output_node_names=output_node_names.split(","))

        # 保存模型

        with tf.gfile.GFile(output_graph, "wb") as f:

            f.write(output_graph_def.SerializeToString())  # 序列化输出

        # 得到当前图有几个操作节点

        print("%d ops in the final graph." % len(output_graph_def.node))

        # for op in graph.get_operations():

        #     print(op.name, op.values())
说明
- 1,函数 freeze_graph中,最重要的就是要确定“指定输出的节点名称”,这个节点名称必须是原模型中存在的节点,对于 freeze 操作,我们需要定义输出节点的名字。因为网络其实是比较复杂的,定义了输出节点的名字,那么freeze操作的时候就只把输出该节点所需要的子图都固化下来,其他无关的就舍弃掉。因为我们 freeze 模型的目的是接下来做预测,所以 output_node_names 一般是网络模型最后一层输出的节点名称,或者说我们预测的目标。
- 2,在保存的时候,通过 convert_variables_to_constants 函数来指定需要固化的节点名称,对于下面的代码,需要固化的节点只有一个:output_node_names。注意节点名称与张量名称的区别。比如:“input:0 是张量的名称”,而“input” 表示的是节点的名称。
- 3,源码中通过 graph=tf.get_default_graph() 获得默认的图,这个图就是由 saver=tf.train.import_meta_graph(input_checkpoint + ‘.meta’, clear_devices=True) 恢复的图,因此必须先执行 tf.train.import_meta_graph,再执行 tf.get_default_graph()。
- 4,实质上,我们可以直接在恢复的会话 sess 中,获得默认的网络图,更简单的方法,如下:
def freeze_graph(input_checkpoint, output_graph):

    '''

    :param input_checkpoint:

    :param output_graph: PB模型保存路径

    :return:

    '''

    # checkpoint = tf.train.get_checkpoint_state(model_folder) #检查目录下ckpt文件状态是否可用

    # input_checkpoint = checkpoint.model_checkpoint_path #得ckpt文件路径

    # 指定输出的节点名称,该节点名称必须是原模型中存在的节点

    output_node_names = "InceptionV3/Logits/SpatialSqueeze"

    saver = tf.train.import_meta_graph(input_checkpoint + '.meta', clear_devices=True)

    with tf.Session() as sess:

        # 恢复图并得到数据

        saver.restore(sess, input_checkpoint)

        # 模型持久化,将变量值固定

        output_graph_def = graph_util.convert_variables_to_constants(

            sess=sess,

            input_graph_def=sess.graph_def,  # 等于:sess.graph_def

            # 如果有多个输出节点,以逗号隔开

            output_node_names=output_node_names.split(","))

        # 保存模型

        with tf.gfile.GFile(output_graph, "wb") as f:

            # 序列化输出

            f.write(output_graph_def.SerializeToString())

        # 得到当前图有几个操作节点

        print("%d ops in the final graph." % len(output_graph_def.node))
调用方法很简单,输入 ckpt 模型路径,输出 Pb模型的路径即可:
# 输入ckpt模型路径

input_checkpoint='model/model.ckpt-10000'

# 输出pb模型的路径

out_pb_path="model/frozen_model.pb"

# 调用freeze_graph将ckpt转为pb

freeze_graph(input_checkpoint,out_pb_path)
注意:在保存的时候,通过convert_variables_to_constants 函数来指定需要固化的节点名称,对于上面的代码,需要固化的节点只有一个 : output_nideo_names。因此,其他网络模型,也可以通过简单的修改输出的节点名称output_node_names将ckpt转为pb文件。
PS:注意节点名称,应包含 name_scope 和 variable_scope命名空间,并用“/”隔开,如“InceptionV3/Logits/SpatialSqueeze”。
2.1 对指定输出的节点名称的理解
如果说我们使用InceptionV3算法进行训练,那么指定输出的节点名称如下:
# 指定输出的节点名称,该节点名称必须是原模型中存在的节点

output_node_names = "InceptionV3/Logits/SpatialSqueeze"
那么为什么呢?
我去查看了InceptionV3的源码,首先模型的输入名字叫做 InceptionV3;
其次它要的是输出的节点,我们看InceptionV3算法的输出,也就是最后一层的源码,部分源码如下:
# Final pooling and prediction

with tf.variable_scope('Logits'):

  if global_pool:

    # Global average pooling.

    net = tf.reduce_mean(net, [1, 2], keep_dims=True, name='GlobalPool')

    end_points['global_pool'] = net

  else:

    # Pooling with a fixed kernel size.

    kernel_size = _reduced_kernel_size_for_small_input(net, [8, 8])

    net = slim.avg_pool2d(net, kernel_size, padding='VALID',

                          scope='AvgPool_1a_{}x{}'.format(*kernel_size))

    end_points['AvgPool_1a'] = net

  if not num_classes:

    return net, end_points

  # 1 x 1 x 2048

  net = slim.dropout(net, keep_prob=dropout_keep_prob, scope='Dropout_1b')

  end_points['PreLogits'] = net

  # 2048

  logits = slim.conv2d(net, num_classes, [1, 1], activation_fn=None,

                       normalizer_fn=None, scope='Conv2d_1c_1x1')

  if spatial_squeeze:

    logits = tf.squeeze(logits, [1, 2], name='SpatialSqueeze')

  # 1000

end_points['Logits'] = logits

end_points['Predictions'] = prediction_fn(logits, scope='Predictions')
我们会发现最后一层的名字为 Logits,输出的的name = ‘SpatialSqueeze’。
所以我的理解是指定输出的节点名称是模型在代码中的名称+最后一层的名称+输出节点的名称。当然这里只有一个输出。
如果不知道网络节点名称,或者说不想去模型中找节点名称,那么我们可以在加载完模型的图数据之后,可以输出图中的节点信息查看一下模型的输入输出节点:
for op in tf.get_default_graph().get_operations():

    print(op.name, op.values())
也就是不添加模型名称和最后一层的名称,添加模型名称不添加最后一层的名称。均报错:
AssertionError: MobilenetV1/SpatialSqueeze ``is` `not ``in` `graph
所以这里还是乖乖使用全称。
那最后输出的节点名称到底是什么呢?怎么样可以直接高效的找出呢?
首先呢,我个人认为,最后输出的那一层,应该必须把节点名称命名出来,另外怎么才能确定我们的图结构里有这个节点呢?百度了一下,有人说可以在TensorBoard中查找到,TensorBoard只能在Linux中使用,在Windows中得到的TensorBoard查看不了,是乱码文件,在Linux中就没有问题。所以如果你的Windows可以查看,就不需要去Linux中跑了。
查看TensorBoard
tensorboard --logdir = “保存tensorboard的绝对路径”
敲上面的命令,然后就可以得到一个网址,把这个网址复制到浏览器上打开,就可以得到图结构,然后点开看看,有没有output这个节点,也可以顺便查看一下自己的网络图。但是这个方法我没有尝试。我继续百度了一下,哈哈哈哈,查到了下面的方法。
就是如果可以按照下面四步骤走的话基本就不需要上面那么麻烦了:
首先在ckpt模型的输入输出张量名称,然后将ckpt文件生成pb文件;再查看生成的pb文件的输入输出节点,运行pb文件,进行网络预测。所以这里关注的重点就是如何查看ckpt网络的输入输出张量名称和如何查看生成的pb文件的输入输出节点。
2.2 查看ckpt网络的输入输出张量名称
首先我们找到网络训练后生成的ckpt文件,运行下面代码查看自己模型的输入输出张量名称(用于保存pb文件时保留这两个节点):
def check_out_pb_name(checkpoint_path):

    reader = pywrap_tensorflow.NewCheckpointReader(checkpoint_path)

    var_to_shape_map = reader.get_variable_to_shape_map()

    for key in var_to_shape_map:

        res = reader.get_tensor(key)

        print('tensor_name: ', key)

        print('a.shape: %s'%[res.shape])

if __name__ == '__main__':

    # 输入ckpt模型路径

    checkpoint_path = 'modelsmobilenet/model.ckpt-100000'

    check_out_pb_name(checkpoint_path)
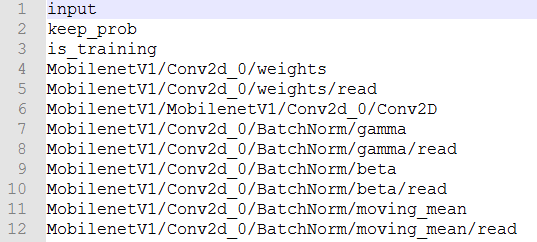
这里我继续使用自己用的mobilenetV1模型,运行后的代码部分结果如下:
tensor_name: MobilenetV1/Conv2d_10_depthwise/BatchNorm/gamma
a.shape: [(512,)]
tensor_name: MobilenetV1/Conv2d_0/weights
a.shape: [(3, 3, 3, 32)]
tensor_name: MobilenetV1/Conv2d_9_depthwise/BatchNorm/gamma
a.shape: [(512,)]
tensor_name: MobilenetV1/Conv2d_11_depthwise/BatchNorm/gamma/Adadelta
a.shape: [(512,)]
tensor_name: MobilenetV1/Conv2d_11_depthwise/BatchNorm/gamma/Adadelta_1
a.shape: [(512,)]
tensor_name: MobilenetV1/Conv2d_5_depthwise/depthwise_weights/Adadelta_1
a.shape: [(3, 3, 256, 1)]
tensor_name: MobilenetV1/Conv2d_10_pointwise/BatchNorm/gamma/Adadelta_1
a.shape: [(512,)]
tensor_name: MobilenetV1/Conv2d_5_depthwise/depthwise_weights/Adadelta
a.shape: [(3, 3, 256, 1)]
tensor_name: MobilenetV1/Conv2d_0/BatchNorm/moving_variance
a.shape: [(32,)]
tensor_name: MobilenetV1/Conv2d_10_pointwise/BatchNorm/gamma/Adadelta
a.shape: [(512,)]
tensor_name: MobilenetV1/Conv2d_5_depthwise/BatchNorm/beta/Adadelta_1
a.shape: [(256,)]
tensor_name: MobilenetV1/Conv2d_0/BatchNorm/beta
a.shape: [(32,)]
tensor_name: MobilenetV1/Conv2d_8_pointwise/BatchNorm/gamma/Adadelta
a.shape: [(512,)]
tensor_name: MobilenetV1/Conv2d_10_depthwise/BatchNorm/moving_variance
a.shape: [(512,)]
tensor_name: MobilenetV1/Conv2d_7_depthwise/BatchNorm/beta
a.shape: [(512,)]
tensor_name: MobilenetV1/Conv2d_0/BatchNorm/beta/Adadelta
a.shape: [(32,)]
tensor_name: MobilenetV1/Conv2d_0/BatchNorm/gamma
a.shape: [(32,)]
... ...
tensor_name: MobilenetV1/Conv2d_9_depthwise/BatchNorm/beta/Adadelta
a.shape: [(512,)]
tensor_name: MobilenetV1/Conv2d_9_depthwise/BatchNorm/gamma/Adadelta
a.shape: [(512,)]
tensor_name: MobilenetV1/Conv2d_9_depthwise/BatchNorm/gamma/Adadelta_1
a.shape: [(512,)]
tensor_name: MobilenetV1/Conv2d_9_depthwise/depthwise_weights/Adadelta_1
a.shape: [(3, 3, 512, 1)]
tensor_name: MobilenetV1/Conv2d_9_pointwise/BatchNorm/beta
a.shape: [(512,)]
tensor_name: MobilenetV1/Conv2d_9_pointwise/BatchNorm/beta/Adadelta
a.shape: [(512,)]
tensor_name: MobilenetV1/Conv2d_9_pointwise/BatchNorm/gamma/Adadelta
a.shape: [(512,)]
tensor_name: MobilenetV1/Conv2d_9_pointwise/BatchNorm/gamma/Adadelta_1
a.shape: [(512,)]
tensor_name: MobilenetV1/Conv2d_9_pointwise/BatchNorm/moving_mean
a.shape: [(512,)]
tensor_name: MobilenetV1/Conv2d_9_pointwise/weights
a.shape: [(1, 1, 512, 512)]
tensor_name: MobilenetV1/Conv2d_9_pointwise/weights/Adadelta
a.shape: [(1, 1, 512, 512)]
tensor_name: MobilenetV1/Conv2d_9_pointwise/weights/Adadelta_1
a.shape: [(1, 1, 512, 512)]
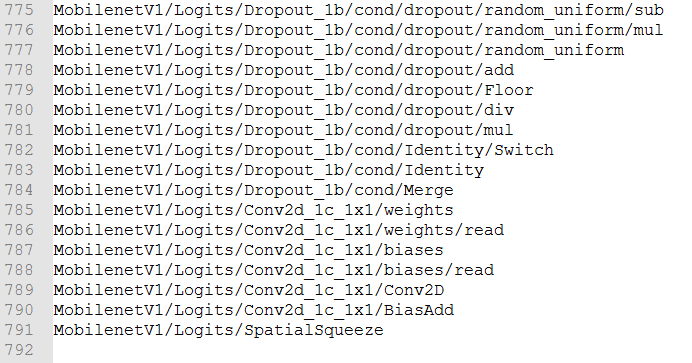
tensor_name: MobilenetV1/Logits/Conv2d_1c_1x1/weights
a.shape: [(1, 1, 1024, 51)]
tensor_name: MobilenetV1/Logits/Conv2d_1c_1x1/weights/Adadelta_1
a.shape: [(1, 1, 1024, 51)]
tensor_name: MobilenetV1/Logits/Conv2d_1c_1x1/weights/Adadelta
a.shape: [(1, 1, 1024, 51)]
我的模型是使用TensorFlow官网中标准的MoiblenetV1模型,所以输入输出张量比较容易找到,那如果自己的模型比较复杂(或者说是别人重构的模型),那如何找呢?
那找到模型的定义,然后在模型的最前端打印出输入张量,在最后打印出输出张量。
注意上面虽然最后输出的张量名称为:MobilenetV1/Logits/Conv2d_1c_1x1,但是如果我们直接用这个,还是会报错的,这是为什么呢?这就得去看模型文件,上面也有,这里再粘贴一下(还是利用MobilenetV1模型):
with tf.variable_scope(scope, 'MobilenetV1', [inputs], reuse=reuse) as scope:

  with slim.arg_scope([slim.batch_norm, slim.dropout],

                      is_training=is_training):

    net, end_points = mobilenet_v1_base(inputs, scope=scope,

                                        min_depth=min_depth,

                                        depth_multiplier=depth_multiplier,

                                        conv_defs=conv_defs)

    with tf.variable_scope('Logits'):

      if global_pool:

        # Global average pooling.

        net = tf.reduce_mean(net, [1, 2], keep_dims=True, name='global_pool')

        end_points['global_pool'] = net

      else:

        # Pooling with a fixed kernel size.

        kernel_size = _reduced_kernel_size_for_small_input(net, [7, 7])

        net = slim.avg_pool2d(net, kernel_size, padding='VALID',

                              scope='AvgPool_1a')

        end_points['AvgPool_1a'] = net

      if not num_classes:

        return net, end_points

      # 1 x 1 x 1024

      net = slim.dropout(net, keep_prob=dropout_keep_prob, scope='Dropout_1b')

      logits = slim.conv2d(net, num_classes, [1, 1], activation_fn=None,

                           normalizer_fn=None, scope='Conv2d_1c_1x1')

      if spatial_squeeze:

        logits = tf.squeeze(logits, [1, 2], name='SpatialSqueeze')

    end_points['Logits'] = logits

    if prediction_fn:

      end_points['Predictions'] = prediction_fn(logits, scope='Predictions')
最后这里,他对Logits变量进行了删除维度为1的过程。并且将名称重命名为SpatialSqueeze,一般如果不进行这一步就没问题。所以我们如果出问题了,就对模型进行查看,当然第二个方法是可行的。
2.3 查看生成的pb文件的输入输出节点
查看pb文件的节点,只是为了验证一下,当然也可以不查看,直接去上面拿到结果即可,就是输出节点的名称。
def create_graph(out_pb_path):

    # 读取并创建一个图graph来存放训练好的模型

    with tf.gfile.FastGFile(out_pb_path, 'rb') as f:

        # 使用tf.GraphDef() 定义一个空的Graph

        graph_def = tf.GraphDef()

        graph_def.ParseFromString(f.read())

        # Imports the graph from graph_def into the current default Graph.

        tf.import_graph_def(graph_def, name='')

def check_pb_out_name(out_pb_path, result_file):

    create_graph(out_pb_path)

    tensor_name_list = [tensor.name for tensor in

                        tf.get_default_graph().as_graph_def().node]

    with open(result_file, 'w+') as f:

        for tensor_name in tensor_name_list:

            f.write(tensor_name+'\n')
我们运行后,查看对应的TXT文件,可以看到,输入输出的节点和前面是对应的:
或者这样查看:
pb_path=["./test.pb",'./my_frozen_mobilenet_v1.pb'][1]

with tf.Session() as sess:

    with open(pb_path, 'rb') as f:

        graph_def = tf.GraphDef()

        print('>>>打印输入节点的结构如下:\n', graph_def.node[0])

        print('>>>打印输出节点的结构如下:\n',graph_def.node[-1])
这样就解决了这个问题,最后使用pb模型进行预测即可。下面是这两个查找输出节点的完整代码:
# _*_coding:utf-8_*_

from tensorflow.python import pywrap_tensorflow

import os

import tensorflow as tf

def check_out_pb_name(checkpoint_path):

    reader = pywrap_tensorflow.NewCheckpointReader(checkpoint_path)

    var_to_shape_map = reader.get_variable_to_shape_map()

    for key in var_to_shape_map:

        res = reader.get_tensor(key)

        print('tensor_name: ', key)

        print('res.shape: %s'%[res.shape])

def create_graph(out_pb_path):

    # 读取并创建一个图graph来存放训练好的模型

    with tf.gfile.FastGFile(out_pb_path, 'rb') as f:

        # 使用tf.GraphDef() 定义一个空的Graph

        graph_def = tf.GraphDef()

        graph_def.ParseFromString(f.read())

        # Imports the graph from graph_def into the current default Graph.

        tf.import_graph_def(graph_def, name='')

def check_pb_out_name(out_pb_path, result_file):

    create_graph(out_pb_path)

    tensor_name_list = [tensor.name for tensor in

                        tf.get_default_graph().as_graph_def().node]

    with open(result_file, 'w+') as f:

        for tensor_name in tensor_name_list:

            f.write(tensor_name+'\n')

if __name__ == '__main__':

    # 输入ckpt模型路径

    checkpoint_path = 'modelsmobilenet/model.ckpt-100000'

    check_out_pb_name(checkpoint_path)

    # 输出pb模型的路径

    out_pb_path = 'modelmobilenet.pb'

    result_file = 'mobilenet_graph.txt'

    check_pb_out_name(out_pb_path, result_file)
2.4 查看h5文件的输入输出节点
如果训练的模型是h5类型的,我们可以直接在h5中查看输入输出的节点名称,然后在 Pb中使用。
代码如下:
def contrastive_loss(y_true, y_pred):

    '''Contrastive loss from Hadsell-et-al.'06

        http://yann.lecun.com/exdb/publis/pdf/hadsell-chopra-lecun-06.pdf

        '''

    margin = 1

    square_pred = K.square(y_pred)

    margin_square = K.square(K.maximum(margin - y_pred, 0))

    return K.mean(y_true * square_pred + (1 - y_true) * margin_square)

def h5_to_pb(h5_file, output_dir, model_name, out_prefix="output_"):

    h5_model = load_model(h5_file, custom_objects={'contrastive_loss': contrastive_loss})

    print(h5_model.input)

    # [<tf.Tensor 'input_2:0' shape=(?, 80, 80) dtype=float32>, <tf.Tensor 'input_3:0' shape=(?, 80, 80) dtype=float32>]

    print(h5_model.output)  # [<tf.Tensor 'lambda_1/Sqrt:0' shape=(?, 1) dtype=float32>]

    print(len(h5_model.outputs))  # 1
三、使用pb模型预测
下面是pb模型预测的代码:
def freeze_graph_test(pb_path, image_path):

    '''

    :param pb_path: pb文件的路径

    :param image_path: 测试图片的路径

    :return:

    '''

    with tf.Graph().as_default():

        output_graph_def = tf.GraphDef()

        with open(pb_path, "rb") as f:

            output_graph_def.ParseFromString(f.read())

            tf.import_graph_def(output_graph_def, name="")

        with tf.Session() as sess:

            sess.run(tf.global_variables_initializer())

            # 定义输入的张量名称,对应网络结构的输入张量

            # input:0作为输入图像,keep_prob:0作为dropout的参数,测试时值为1,is_training:0训练参数

            input_image_tensor = sess.graph.get_tensor_by_name("input:0")

            input_keep_prob_tensor = sess.graph.get_tensor_by_name("keep_prob:0")

            input_is_training_tensor = sess.graph.get_tensor_by_name("is_training:0")

            # 定义输出的张量名称

            output_tensor_name = sess.graph.get_tensor_by_name("InceptionV3/Logits/SpatialSqueeze:0")

            # 读取测试图片

            im = read_image(image_path, resize_height, resize_width, normalization=True)

            im = im[np.newaxis, :]

            # 测试读出来的模型是否正确,注意这里传入的是输出和输入节点的tensor的名字,不是操作节点的名字

            # out=sess.run("InceptionV3/Logits/SpatialSqueeze:0", feed_dict={'input:0': im,'keep_prob:0':1.0,'is_training:0':False})

            out = sess.run(output_tensor_name, feed_dict={input_image_tensor: im,

                                                          input_keep_prob_tensor: 1.0,

                                                          input_is_training_tensor: False})

            print("out:{}".format(out))

            score = tf.nn.softmax(out, name='pre')

            class_id = tf.argmax(score, 1)

            print("pre class_id:{}".format(sess.run(class_id)))
3.1 说明
1、与ckpt预测不同的是,pb文件已经固化了网络模型结构,因此,即使不知道原训练模型(train)的源码,我们也可以恢复网络图,并进行预测。恢复模型非常简单,只需要从读取的序列化数据中导入网络结构即可:
tf.import_graph_def(output_graph_def, name="")
2、但是必须知道原网络模型的输入和输出的节点名称(当然了,传递数据时,是通过输入输出的张量来完成的)。由于InceptionV3模型的输入有三个节点,因此这里需要定义输入的张量名称,它对应的网络结构的输入张量:
input_image_tensor = sess.graph.get_tensor_by_name("input:0")

input_keep_prob_tensor = sess.graph.get_tensor_by_name("keep_prob:0")

input_is_training_tensor = sess.graph.get_tensor_by_name("is_training:0")
以及输出的张量名称:
output_tensor_name = sess.graph.get_tensor_by_name(

                                        "InceptionV3/Logits/SpatialSqueeze:0")
如何获取输入输出张量的名称,上面有写,这里不再赘述。需要注意的是:使用pb获取的张量名称和使用 h5获取的张量名称有一个区别,如下:
pb 获取的张量名称是:

        ['input_2', 'input_3', 'output_1']

而 h5 获取的张量名称是:

        ['input_2:0',  'input_3:0',  'lambda_1/Sqrt:0']

需要注意的是,我们下面肯定需要使用张量名称,而使用哪个呢?

如果使用Pb获取的张量名称,则会报下面的错误:

ValueError: The name 'conv2d_1_input' refers to an Operation,

 not a Tensor. Tensor names must be of the form "<op_name>:<output_index>".

所以我们需要使用 h5 获取的张量名称,即格式为tensor格式:<op_name>:<output_index>
虽然我们使用的是pb预测,但是格式必须是 tensor格式,不然会报错。
3、预测时,需要 feed输入数据
# 测试读出来的模型是否正确

# 注意这里传入的是输出和输入节点的tensor的名字,不是操作节点的名字

# out=sess.run("InceptionV3/Logits/SpatialSqueeze:0",

                 feed_dict={'input:0': im,'keep_prob:0':1.0,'is_training:0':False})

out=sess.run(output_tensor_name, feed_dict={input_image_tensor: im,

                                            input_keep_prob_tensor:1.0,

                                            input_is_training_tensor:False})
4、其他网络模型预测时,也可以通过修改输入和输出的张量的名称。
(PS:注意张量的名称,即为:节点名称+ “:”+“id号”,如"InceptionV3/Logits/SpatialSqueeze:0")
完整的CKPT转换成PB格式和预测的代码如下:
# _*_coding:utf-8_*_

import tensorflow as tf

from tensorflow.python.framework import graph_util

import numpy as np

import cv2

'''

checkpoint文件是检查点文件,文件保存了一个目录下所有模型文件列表。

model.ckpt.data文件保存了TensorFlow程序中每一个变量的取值

model.ckpt.index文件则保存了TensorFlow程序中变量的索引

model.ckpt.meta文件则保存了TensorFlow计算图的结构

'''

def freeze_graph(input_checkpoint, output_graph):

    '''

    指定输出的节点名称

    将模型文件和权重文件整合合并为一个文件

    :param input_checkpoint:

    :param output_graph: PB模型保存路径

    :return:

    '''

    # checkpoint = tf.train.get_checkpoint_state(model_folder)

    # 检查目录下的ckpt文件状态是否可以用

    # input_checkpoint = checkpoint.model_checkpoint_path  # 得ckpt文件路径

    # 指定输出的节点名称,该节点名称必须是原模型中存在的节点

    # PS:注意节点名称,应包含name_scope 和 variable_scope命名空间,并用“/”隔开,

    output_node_names = 'MobilenetV1/Logits/SpatialSqueeze'

    # 首先通过下面函数恢复图

    saver = tf.train.import_meta_graph(input_checkpoint + '.meta', clear_devices=True)

    # 然后通过下面函数获得默认的图

    graph = tf.get_default_graph()

    # 返回一个序列化的图代表当前的图

    input_graph_def = graph.as_graph_def()

    with tf.Session() as sess:

        # 加载已经保存的模型,恢复图并得到数据

        saver.restore(sess, input_checkpoint)

        # 在保存的时候,通过下面函数来指定需要固化的节点名称

        output_graph_def = graph_util.convert_variables_to_constants(

            # 模型持久化,将变量值固定

            sess=sess,

            input_graph_def=input_graph_def,  # 等于:sess.graph_def

            # freeze模型的目的是接下来做预测,

            # 所以 output_node_names一般是网络模型最后一层输出的节点名称,或者说我们预测的目标

            output_node_names=output_node_names.split(',')  # 如果有多个输出节点,以逗号隔开

        )

        with tf.gfile.GFile(output_graph, 'wb') as f:  # 保存模型

            # 序列化输出

            f.write(output_graph_def.SerializeToString())

        # # 得到当前图有几个操作节点

        print('%d ops in the final graph' % (len(output_graph_def.node)))

        # 这个可以得到各个节点的名称,如果断点调试到输出结果,看看模型的返回数据

        # 大概就可以猜出输入输出的节点名称

        for op in graph.get_operations():

            print(op.name)

            # print(op.name, op.values())

def read_image(filename, resize_height, resize_width, normalization=False):

    '''

    读取图片数据,默认返回的是uint8,[0,255]

    :param filename:

    :param resize_height:

    :param resize_width:

    :param normalization:是否归一化到[0.,1.0]

    :return: 返回的图片数据

    '''

    bgr_image = cv2.imread(filename)

    if len(bgr_image.shape) == 2:  # 若是灰度图则转为三通道

        print("Warning:gray image", filename)

        bgr_image = cv2.cvtColor(bgr_image, cv2.COLOR_GRAY2BGR)

    rgb_image = cv2.cvtColor(bgr_image, cv2.COLOR_BGR2RGB)  # 将BGR转为RGB

    # show_image(filename,rgb_image)

    # rgb_image=Image.open(filename)

    if resize_height > 0 and resize_width > 0:

        rgb_image = cv2.resize(rgb_image, (resize_width, resize_height))

    rgb_image = np.asanyarray(rgb_image)

    if normalization:

        # 不能写成:rgb_image=rgb_image/255

        rgb_image = rgb_image / 255.0

    # show_image("src resize image",image)

    return rgb_image

def freeze_graph_test(pb_path, image_path):

    '''

    预测pb模型的代码

    :param pb_path: pb文件的路径

    :param image_path: 测试图片的路径

    :return:

    '''

    with tf.Graph().as_default():

        output_graph_def = tf.GraphDef()

        with open(pb_path, 'rb') as f:

            output_graph_def.ParseFromString(f.read())

            # 恢复模型,从读取的序列化数据中导入网络结构即可

            tf.import_graph_def(output_graph_def, name="")

        with tf.Session() as sess:

            sess.run(tf.global_variables_initializer())

            # 定义输入的张量名称,对应网络结构的输入张量

            # input: 0 作为输入图像,

            # keep_prob:0作为dropout的参数,测试时值为1,

            # is_training: 0 训练参数

            input_image_tensor = sess.graph.get_tensor_by_name('input:0')

            input_keep_prob_tensor = sess.graph.get_tensor_by_name('keep_prob:0')

            input_is_training_tensor = sess.graph.get_tensor_by_name('is_training:0')

            # 定义输出的张量名称:注意为节点名称 + “:”+id好

            name = 'MobilenetV1/Logits/SpatialSqueeze:0'

            output_tensor_name = sess.graph.get_tensor_by_name(name=name)

            # 读取测试图片

            im = read_image(image_path, resize_height, resize_width, normalization=True)

            im = im[np.newaxis, :]

            # 测试读出来的模型是否正确,注意这里传入的时输出和输入节点的tensor的名字,不是操作节点的名字

            out = sess.run(output_tensor_name, feed_dict={

                input_image_tensor: im,

                input_keep_prob_tensor: 1.0,

                input_is_training_tensor: False

            })

            print("out:{}".format(out))

            score = tf.nn.softmax(out, name='pre')

            class_id = tf.argmax(score, 1)

            print('Pre class_id:{}'.format(sess.run(class_id)))

if __name__ == '__main__':

    # 输入ckpt模型路径

    input_checkpoint = 'modelsmobilenet/model.ckpt-100000'

    # 输出pb模型的路径

    out_pb__path = 'modelmobilenet.pb'

    # 指定图片的高度,宽度

    resize_height, resize_width = 224, 224

    depth = 3

    # 调用freeze_graph将ckpt转pb

    # freeze_graph(input_checkpoint, out_pb__path)

    # 测试pb模型

    image_path = '5.png'

    freeze_graph_test(pb_path=out_pb__path, image_path=image_path)
结果如下:
out:[[ -6.41409     -7.542293    -4.79263     -0.8360114   -5.9790826

    4.5435553   -0.36825374  -6.4866605   -2.4342375   -0.77123785

   -3.8730755   -2.9347122   -1.2668624   -2.0682898   -4.8219028

   -4.0054555   -4.929347    -4.3350396   -1.3294952   -5.2482243

   -5.6148944   -0.5199025   -2.8043954   -7.536846    -8.050901

   -5.4447656   -6.8323407   -6.221056    -8.040736    -7.3237658

  -10.494858    -9.077686    -6.8210897  -10.038142    -9.5562935

   -3.884094    -4.31197     -7.0326185   -2.3761833   -9.571469

    1.0321844   -9.319367    -5.5040984   -4.881267    -6.99698

   -9.591501    -8.059127    -7.494555   -10.593867    -6.862433

   -4.373736  ]]

Pre class_id:[5]
我将测试图片命名为5,就是与结果相对应,结果一致。表明使用pb预测出来了,并且预测正确。
这里解释一下,我是使用MobileNetV1模型进行训练一个51个分类的数据,而拿到的第6个类的数据进行测试(我的标签是从0开始的),这里测试正确。
更多信息请关注公众号:

[Tensorflow]模型持久化的原理,将CKPT转为pb文件,使用pb模型预测的更多相关文章
- tensorflow学习笔记——模型持久化的原理,将CKPT转为pb文件,使用pb模型预测
由题目就可以看出,本节内容分为三部分,第一部分就是如何将训练好的模型持久化,并学习模型持久化的原理,第二部分就是如何将CKPT转化为pb文件,第三部分就是如何使用pb模型进行预测. 一,模型持久化 为 ...
- tensorflow实战笔记(19)----使用freeze_graph.py将ckpt转为pb文件
一.作用: https://blog.csdn.net/yjl9122/article/details/78341689 这节是关于tensorflow的Freezing,字面意思是冷冻,可理解为整合 ...
- Tensorflow 模型持久化saver及加载图结构
主要内容: 1. 直接保存,加载模型; (可以指定加载,保存的var_list) 2. 加载,保存指定变量的模型 3. slim加载模型使用 4. 加载模型图结构和参数等 tensorflow 恢复部 ...
- tensorflow 模型前向传播 保存ckpt tensorbard查看 ckpt转pb pb 转snpe dlc 实例
参考: TensorFlow 自定义模型导出:将 .ckpt 格式转化为 .pb 格式 TensorFlow 模型保存与恢复 snpe tensorflow 模型前向传播 保存ckpt tensor ...
- tensorflow模型持久化保存和加载
模型文件的保存 tensorflow将模型保持到本地会生成4个文件: meta文件:保存了网络的图结构,包含变量.op.集合等信息 ckpt文件: 二进制文件,保存了网络中所有权重.偏置等变量数值,分 ...
- tensorflow模型持久化保存和加载--深度学习-神经网络
模型文件的保存 tensorflow将模型保持到本地会生成4个文件: meta文件:保存了网络的图结构,包含变量.op.集合等信息 ckpt文件: 二进制文件,保存了网络中所有权重.偏置等变量数值,分 ...
- tensorflow核心概念和原理介绍
关于 TensorFlow TensorFlow 是一个采用数据流图(data flow graphs),用于数值计算的开源软件库. 节点(Nodes)在图中表示数学操作,图中的线(edges)则表示 ...
- 把ResNet-L152模型的ckpt文件转化为pb文件
import tensorflow as tf from tensorflow.python.tools import freeze_graph #os.environ['CUDA_VISIBLE_D ...
- 4. Tensorflow的Estimator实践原理
1. Tensorflow高效流水线Pipeline 2. Tensorflow的数据处理中的Dataset和Iterator 3. Tensorflow生成TFRecord 4. Tensorflo ...
- 1 如何使用pb文件保存和恢复模型进行迁移学习(学习Tensorflow 实战google深度学习框架)
学习过程是Tensorflow 实战google深度学习框架一书的第六章的迁移学习环节. 具体见我提出的问题:https://www.tensorflowers.cn/t/5314 参考https:/ ...
随机推荐
- 中国移动光猫(吉比特h2-3S)超级用户名与密码
超级用户名 CMCCAdmin 密码 aDm8H%MdA
- How to enable CIFS in kernel 4.9
kernel config 要打开这几项
- ASP.NET利用JQuery实现AJAX(前台脚本代码)调用后台静态方法
前台页面的script代码 PS: 如果不需要参数的话,就把data那一行删除 $(function () { //AJAX同步后台 var orderid = parseInt($(this).pa ...
- 开发者工具与idea代码缺失
开发者工具与idea代码缺失 当categoryList为空时,<dd></dd>之间显示结果为无,所以开发者工具也无这段代码.
- ffmpeg均匀分割视频命令
ffmpeg -y -i input.wav -f segment -segment_time 5 output-%d.wav -segment_time 分割视频片段大小 -segmenet_lis ...
- U-Boot 常用命令介绍
U-Boot简介 U-Boot常用命令 帮助类 - help/?:该命令输出u-boot支持的所有命令及命令的功能 - help/? cmd:可以查看相应cmd的详细介绍及使用方法 查询类 - bdi ...
- MongoRepository查询数据常用语法
安装 查看mongo可用版本 docker search mongo 安装指定版本的mogo或者拉取最新版本的镜像 docker pull mongo:latest 或者官网下载安装包 https:/ ...
- Java日常
学习Java第3天的小总结 一.感受总结 Java是目前市场上的主流语言,相对于C和C++语言来说,竞争更为激烈,而这一大特点也在激励着我不断去探索,去学习: 在下载相应编译环境的过程中,由于IDEA ...
- 声网传输层协议 AUT 的总结与展望丨Dev for Dev 专栏
本文为「Dev for Dev 专栏」系列内容,作者为声网大后端传输协议负责人 夏天. 针对实时互动应用对网络传输带来的新需求和新挑战,声网通过将实时互动中的应用层业务需求与传输策略的分层和解耦,于 ...
- 被冰封的 Bug:Fishhook Crash 修复纪实
作者:郝连福,业界资深计算机技术专家,现任声网Agora 首席前端架构师.先后担任过 Principal Engineer/Engineering Director(UTStarcom).Sr. ar ...