
tensorflow 模型前向传播 保存ckpt tensorbard查看 ckpt转pb pb 转snpe dlc 实例
参考:
TensorFlow 自定义模型导出:将 .ckpt 格式转化为 .pb 格式
TensorFlow 模型保存与恢复
tensorflow 模型前向传播 保存ckpt tensorbard查看 ckpt转pb pb 转snpe dlc 实例
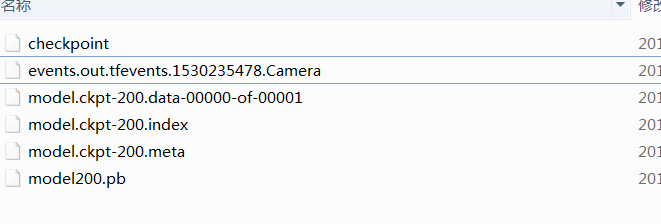
log文件
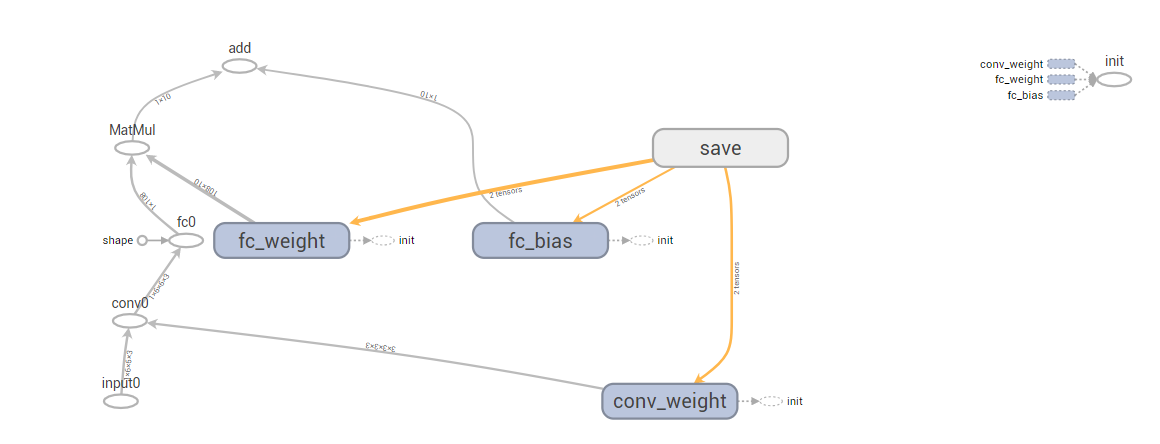
输入节点 图像高度 图像宽度 图像通道数
input0 6,6,3
输出节点
--out_node add
snpe-tensorflow-to-dlc --graph ./simple_snpe_log/model200.pb -i input0 6,6,3 --out_node add
#coding:utf-8

#http://blog.csdn.net/zhuiqiuk/article/details/53376283

#http://blog.csdn.net/gan_player/article/details/77586489

from __future__ import absolute_import, unicode_literals

import tensorflow as tf

import shutil

import os.path

from tensorflow.python.framework import graph_util

import mxnet as mx

import numpy as np

import random

import cv2

from time import sleep

from easydict import EasyDict as edict

import logging

import math

import tensorflow as tf

import numpy as np

def FullyConnected(input, fc_weight, fc_bias, name):

    fc = tf.matmul(input, fc_weight) + fc_bias

    return fc

def inference(body, name_class,outchannel):

    wkernel = 3

    inchannel = body.get_shape()[3].value

    conv_weight = np.arange(wkernel * wkernel * inchannel * outchannel,dtype=np.float32).reshape((outchannel,inchannel,wkernel,wkernel))

    conv_weight =  conv_weight / (outchannel*inchannel*wkernel*wkernel)

    print("conv_weight ", conv_weight)

    conv_weight = conv_weight.transpose(2,3,1,0)

    conv_weight = tf.Variable(conv_weight, dtype=np.float32, name = "conv_weight")

    body = tf.nn.conv2d(body, conv_weight, strides=[1, 1, 1, 1], padding='SAME', name = "conv0")

    conv = body

    conv_shape = body.get_shape()

    dim = conv_shape[1].value * conv_shape[2].value * conv_shape[3].value

    body = tf.reshape(body, [1, dim], name = "fc0")

    fc_weight = np.ones((dim, name_class))

    fc_bias = np.zeros((1, name_class))

    fc_weight = tf.Variable(fc_weight, dtype=np.float32, name="fc_weight")

    fc_bias = tf.Variable(fc_bias, dtype=np.float32, name="fc_bias")

    # tf.constant(100,dtype=np.float32, shape=(body.get_shape()[1] * body.get_shape()[2]  * body.get_shape()[3], name_class])

    # fc_bias = tf.constant(10, dtype=np.float32, shape=(1, name_class])

    body = FullyConnected(body, fc_weight, fc_bias, "fc0")

    return conv, body

export_dir = "simple_snpe_log"

def saveckpt():

    height = 6

    width = 6

    inchannel = 3

    outchannel = 3

    graph = tf.get_default_graph()

    with tf.Graph().as_default():

        input_image = tf.placeholder("float", [1, height, width, inchannel], name = "input0")

        conv, logdit = inference(input_image,10,outchannel)

        init = tf.global_variables_initializer()

        with tf.Session() as sess:

            sess.run(init)

            img = np.arange(height * width * inchannel, dtype=np.float32).reshape((1,inchannel,height,width)) \

                  / (1 * inchannel * height * width) * 255.0 - 127.5

            print("img",img)

            img = img.transpose(0,2,3,1)

            import time

            since = time.time()

            fc = sess.run(logdit,{input_image:img})

            conv = sess.run(conv, {input_image: img})

            time_elapsed = time.time() - since

            print("tf inference time ", str(time_elapsed))

            print("conv", conv.transpose(0, 2, 3, 1))

            print("fc", fc)

            #np.savetxt("tfconv.txt",fc)

            #print( "fc", fc.transpose(0,3,2,1))

            #np.savetxt("tfrelu.txt",fc.transpose(0,3,2,1)[0][0])

            # #save ckpt

            export_dir = "simple_snpe_log"

            saver = tf.train.Saver()

            step = 200

            # if os.path.exists(export_dir):

            #     os.system("rm -rf " + export_dir)

            if not os.path.isdir(export_dir): # Create the log directory if it doesn't exist

                os.makedirs(export_dir)

            checkpoint_file = os.path.join(export_dir, 'model.ckpt')

            saver.save(sess, checkpoint_file, global_step=step)

def LoadModelToTensorBoard():

    graph = tf.get_default_graph()

    checkpoint_file = os.path.join(export_dir, 'model.ckpt-200.meta')

    saver = tf.train.import_meta_graph(checkpoint_file)

    print(saver)

    summary_write = tf.summary.FileWriter(export_dir , graph)

    print(summary_write)

def ckptToPb():

    checkpoint_file = os.path.join(export_dir, 'model.ckpt-200.meta')

    ckpt = tf.train.get_checkpoint_state(export_dir)

    print("model ", ckpt.model_checkpoint_path)

    saver = tf.train.import_meta_graph(ckpt.model_checkpoint_path +'.meta')

    graph = tf.get_default_graph()

    with tf.Session() as sess:

        saver.restore(sess,ckpt.model_checkpoint_path)

        height = 6

        width = 6

        input_image = tf.get_default_graph().get_tensor_by_name("input0:0")

        fc0_output = tf.get_default_graph().get_tensor_by_name("add:0")

        sess.run(tf.global_variables_initializer())

        output_graph_def = tf.graph_util.convert_variables_to_constants(

            sess, graph.as_graph_def(), ['add'])

        model_name = os.path.join(export_dir, 'model200.pb')

        with tf.gfile.GFile(model_name, "wb") as f:

            f.write(output_graph_def.SerializeToString())

def PbTest():

    with tf.Graph().as_default():

        output_graph_def = tf.GraphDef()

        output_graph_path = os.path.join(export_dir,'model200.pb')

        with open(output_graph_path, "rb") as f:

            output_graph_def.ParseFromString(f.read())

            tf.import_graph_def(output_graph_def, name="")

        with tf.Session() as sess:

            tf.initialize_all_variables().run()

            height = 6

            width = 6

            inchannel = 3

            outchannel = 3

            input_image = tf.get_default_graph().get_tensor_by_name("input0:0")

            fc0_output = tf.get_default_graph().get_tensor_by_name("add:0")

            conv = tf.get_default_graph().get_tensor_by_name("conv0:0")

            img = np.arange(height * width * inchannel, dtype=np.float32).reshape((1,inchannel,height,width)) \

                  / (1 * inchannel * height * width) * 255.0 - 127.5

            print("img",img)

            img = img.transpose(0,2,3,1)

            import time

            since = time.time()

            fc0_output = sess.run(fc0_output,{input_image:img})

            conv = sess.run(conv, {input_image: img})

            time_elapsed = time.time() - since

            print("tf inference time ", str(time_elapsed))

            print("conv", conv.transpose(0, 2, 3, 1))

            print("fc0_output", fc0_output)

if __name__ == '__main__':

    saveckpt() #1

    LoadModelToTensorBoard()#2

    ckptToPb()#3

    PbTest()#
tensorflow 模型前向传播 保存ckpt tensorbard查看 ckpt转pb pb 转snpe dlc 实例的更多相关文章
- Tensorflow模型加载与保存、Tensorboard简单使用
先上代码: from __future__ import absolute_import from __future__ import division from __future__ import ...
- TensorFlow模型加载与保存
我们经常遇到训练时间很长,使用起来就是Weight和Bias.那么如何将训练和测试分开操作呢? TF给出了模型的加载与保存操作,看了网上都是很简单的使用了一下,这里给出一个神经网络的小程序去测试. 本 ...
- 利用tensorflow实现前向传播
import tensorflow as tf w1 = tf.Variable(tf.random_normal((2, 3), stddev=1, seed=1))w2 = tf.Variable ...
- Tensorflow笔记——神经网络图像识别(一)前反向传播,神经网络八股
第一讲:人工智能概述 第三讲:Tensorflow框架 前向传播: 反向传播: 总的代码: #coding:utf-8 #1.导入模块,生成模拟数据集 import t ...
- tensorflow模型的保存与恢复,以及ckpt到pb的转化
转自 https://www.cnblogs.com/zerotoinfinity/p/10242849.html 一.模型的保存 使用tensorflow训练模型的过程中,需要适时对模型进行保存,以 ...
- tensorflow模型持久化保存和加载
模型文件的保存 tensorflow将模型保持到本地会生成4个文件: meta文件:保存了网络的图结构,包含变量.op.集合等信息 ckpt文件: 二进制文件,保存了网络中所有权重.偏置等变量数值,分 ...
- Tensorflow模型变量保存
Tensorflow:模型变量保存 觉得有用的话,欢迎一起讨论相互学习~Follow Me 参考文献Tensorflow实战Google深度学习框架 实验平台: Tensorflow1.4.0 pyt ...
- tensorflow模型持久化保存和加载--深度学习-神经网络
模型文件的保存 tensorflow将模型保持到本地会生成4个文件: meta文件:保存了网络的图结构,包含变量.op.集合等信息 ckpt文件: 二进制文件,保存了网络中所有权重.偏置等变量数值,分 ...
- 超详细的Tensorflow模型的保存和加载(理论与实战详解)
1.Tensorflow的模型到底是什么样的? Tensorflow模型主要包含网络的设计(图)和训练好的各参数的值等.所以,Tensorflow模型有两个主要的文件: a) Meta graph: ...
随机推荐
- [svc]linux正则实战(grep/sed/awk)
企业实战: 过滤ip 过滤出第二行的 192.168.2.11. eth0: flags=4163<UP,BROADCAST,RUNNING,MULTICAST> mtu 1500 ine ...
- linux 查看系统编码和修改系统 编码方法
]# locale LANG=en_US.UTF-8 LC_CTYPE="en_US.UTF-8" LC_NUMERIC=en_US.utf8 LC_TIME=en_US.utf8 ...
- HTML5学习笔记(十八):闭包
高阶函数 JavaScript的函数其实都指向某个变量.既然变量可以指向函数,函数的参数能接收变量,那么一个函数就可以接收另一个函数作为参数,也可以返回一个函数,这种函数就称之为高阶函数. 函数作为参 ...
- HHH
https://data-artisans.com/flink-forward/resources/alibabas-common-algorithm-platform-on-flink https: ...
- vim学习笔记(11):vim 去掉<200b>
vim查看文件,发现多了<200b>字符,使用/200b搜索匹配不上:grep 200b 也匹配不上 查询后才知道:200b是:Unicode Character 'ZERO WIDTH ...
- Beginning SDL 2.0(3) SDL介绍及BMP渲染
SDL是一个跨平台的多媒体库.为了实现跨平台,SDL提供了一个简单的界面库抽象,比如提供了SDL_Window用于表示窗口句柄,SDL_Surface.SDL_Texture.SDL_Renderer ...
- Machine Learning、Date Mining、IR&NLP 会议期刊论文推荐
核心期刊排名查询 http://portal.core.edu.au/conf-ranks/ http://portal.core.edu.au/jnl-ranks/ 1.机器学习推荐会议 ICML— ...
- .net 微信Token验证
首次接受这个项目,看了微信的API,云里雾里,经过几经测试,理清思路 开发者自个申请,微信API给出四个参数: 下面我解释下 signature 是微信加密签名 即:微信服务器将 timetamp n ...
- java基础篇---XML解析(二)
XML解析之最流行的方式:DOM4J dom4j是使用java语言编写的,用于读,写,操作XML的一套组件 dom4j是一个开源的java组件,可从http://sourceforge.net/pro ...
- Robo 可视化mongoDb的操作
因为公司的项目出现了MongodbCpu 100%的问题,所以最近在开始排查,也开始更加深入的接触Mongodb这个缓存型的数据库. 简单的就不说了,前面几张有安装和简单的使用,因为需要开始添加索引, ...