
Vue 路由模块化配置
博客地址:https://ainyi.com/77
企业运营后台页面很多,路由如若不区分模块化配置,所有路由挤在同一个文件将不好维护,所以路由的配置也要模块化
分享两个解决方案 —— Vue 路由配置的模块化(Plan A and Plan B)
注册需要
首先路由注册需要啥
// main.js

new Vue({

  el: '#app',

  router,

  store,

  components: { App },

  template: '<App/>'

})

// 这里的 router 是这样的

export default new Router({

  mode: 'history',

  routes: [],

  ... // 其他配置

})
也就是说注册需要 new 一个 Router 实例,实例里的 routes 是数组,里面配置每个页面的路由
模块拆分(Plan A)
src 下 router 的目录结构
---src

----router

------modules

--------xxxx.js // 模块 xxx

--------other.js // 模块 other

------index.js // 路由配置入口和出口 index
例如
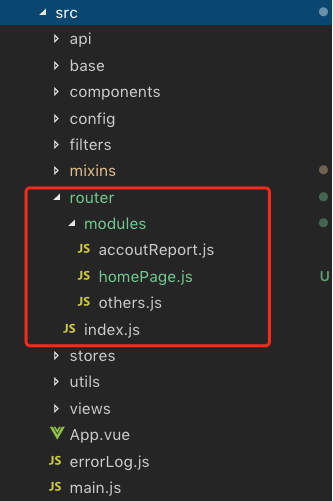
然后配置 modules 里面模块路由
// 配置 other

import err from '@/views/others/Error.vue'

export default function(router) {

  router.push({

    path: '/error',

    name: 'error',

    component: err

  })

}
// 配置 accoutReport

export default function(router) {

  router.push({

    path: '/accout-report',

    redirect: '/accout-report/list'

  })

  // 列表

  router.push({

    path: '/accout-report/list',

    name: 'list',

    component: () => import('@/views/accoutReport/List.vue')

  })

  // 新增

  router.push({

    path: '/accout-report/create',

    name: 'create',

    component: () => import('@/views/accoutReport/Create.vue')

  })

  // 编辑

  router.push({

    path: '/accout-report/edit/:id',

    name: 'edit',

    component: () => import('@/views/accoutReport/steps/CreateStep2.vue')

  })

  // 详情

  router.push({

    path: '/accout-report/detail/:id',

    name: 'detail',

    component: () => import('@/views/accoutReport/Detail.vue')

  })

}
如有其他模块,依次像上面一样配置
关键是路由配置入口出口文件 index.js
// index.js

import Vue from 'vue'

import Router from 'vue-router'

import App from '@/views/Layouts.vue'

import otherRouter from '@/router/modules/others'

import accoutReport from '@/router/modules/accoutReport'

// import store from '@/stores'

Vue.use(Router)

let routes = []

let rootRouter = {

  path: '/',

  component: App,

  children: [],

  redirect: '/accout-report/list'

}

let redirectRouter = {

  path: '*',

  redirect: '/error'

}

otherRouter(rootRouter.children)

accoutReport(rootRouter.children)

// 如有多个模块,依次在这里配置

const router = new Router({

  mode: 'history',

  routes: routes.concat([rootRouter, redirectRouter])

})

export default router
上述代码,除了 other,所有页面路由配置在 rootRouter 的 children 下面,有一个父级 router 包裹着
代码都看得懂,这里就不多说哈~
最后在 main.js 中注册
模块拆分(Plan B)
该方法较为难懂一些,可以看看
目录结构跟 Plan A 类似,不过在 src 下多了一个 router.js 配置文件作为路由出口文件
src 下 router 的目录结构
---src

----router

------modules

--------xxxx.js // 模块 xxx

--------other.js // 模块 other

------index.js // 路由配置中转文件

----router.js // 路由配置出口文件
例如
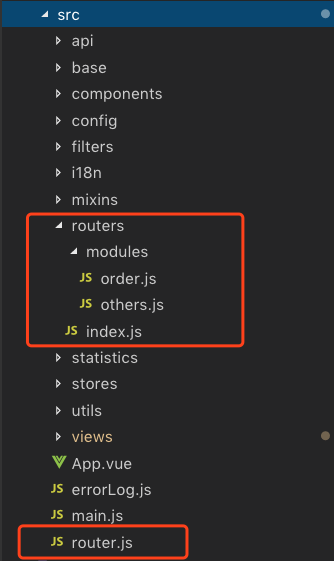
模块 modules 里文件配置
// order.js

import { getFindBusinessServiceList } from '@/utils/config-utils'

const OrderRouter = [

  {

    path: '/',

    redirect: '/cost/order-list'

  },

  {

    path: '/cost',

    component: () => import('@/views/Layouts'),

    redirect: '/cost/order-list',

    children: [

      {

        path: 'order-list',

        component: () => import('@/views/orderManagement/List'),

        beforeEnter: async (to, from, next) => {

          await getFindBusinessServiceList() // 进入该路由前异步请求,结束后进入该路由

          next()

        }

      },

      {

        path: 'order-detail',

        component: () => import('@/views/orderManagement/Detail')

      },

      // 下面是重定向,可不配置

      {

        path: 'orderDetail',

        redirect: 'order-detail'

      },

      {

        path: 'order',

        redirect: 'order-list'

      }

    ]

  }

]

export default OrderRouter
上述路由配置在 Layouts 路由下的 children
接下来关键,路由配置中转文件 index.js
遍历 modules 文件夹下的每个模块文件,赋值和导出
// index.js

import { camelCase } from 'lodash-es'

const requiredModules = require.context('./modules', false, /\.js$/)

const routers = {}

requiredModules.keys().forEach(fileName => {

  // 不加载index.js

  if (fileName === './index.js') return

  // 转为驼峰命名

  const moduleName = camelCase(fileName.replace(/(\.\/|\.js)/g, ''))

  routers[moduleName] =

    requiredModules(fileName).default || requiredModules(fileName)

})

export default routers
然后在 src 下的出口文件 router.js 包装
// router.js

import Vue from 'vue'

import Router from 'vue-router'

import routers from '@/routers/index'

Vue.use(Router)

let routes = []

Object.values(routers).forEach(router => {

  routes.push(...router)

})

export default new Router({

  mode: 'history',

  routes

})
最后在 main.js 中注册
博客地址:https://ainyi.com/77
Vue 路由模块化配置的更多相关文章
- Vue路由模块化的实现方法
分享一个Vue路由模块化方法,简单实用,好用到飞起 路由模块化 1.router/index.js 配置路由 import Vue from 'vue' import VueRouter from ' ...
- vue路由的配置
一.准备工作 1安装vue-cli npm install vue-cli -g 2检查是否安装成功 vue -V(大写V) 3初始化一个新的项目 vue init webpack vue-dem ...
- Vue路由相关配置
什么是路由? 1.在以前页面跳转使用的是超链接a标签或者js location.href,而路由是跳转切换组件的跳转方式 2.路由就是监听url的改变并提供相对应的组件用于展示 3.vue-route ...
- vue 路由模块化
第一. 在 router 文件夹下 新建个个模块的文件夹,存放对应的路由js文件 如图1: 第二.修改router文件夹下的index.js 如图2 三.在main.js 修改如下代码 图3
- vue 模块化 路由拆分配置
一.普通路由配置 通常我们编写vue路由配置都会写在 /src/router/index.js 这个文件下.但是,随着我们的vue项目变得越来越大后,路由也随之变得越来越多,出现的问题就是我们所有的路 ...
- Vue-Router路由 Vue-CLI脚手架和模块化开发 之 路由常用配置与路由嵌套
vue-router路由常用配置 1.mode:配置路由模式,默认为hash,由于URL很丑,可以修改为history,但是需要服务端的支持: 以上一篇的博文为实例: 初始时url的显示: 使用mod ...
- vue路由的两种模式配置以及history模式下面后端如何配置
vue路由的两种模式配置以及history模式下面后端如何配置 1.hash ——即地址栏URL中的#符号.hash 虽然出现URL中,但不会被包含在HTTP请求中,对后端完全没有影响,因此改变has ...
- vue 路由(二级)配置及详细步骤
1.安装插件(可以选择在初始化项目的时候安装) cnpm install vue-router --save-dev 2.将插件全局引入到项目中(main.js) import VueRouter f ...
- 简单配置Vue路由
简单配置Vue路由 1. 创建一个单文件组件Test.vue <template> <div>Test</div> </template> <s ...
随机推荐
- http文件传输
上传端: File uploadFile =new File(); PostMethod mPost = null; try{ String targetURL ="; HttpClient ...
- Django中使用JS通过DataTable实现表格前端分页,每页显示页数,搜索等功能
Django架构中自带了后端分页的技术,通过Paginator进行分页,前端点击按钮提交后台进行页面切换. 优缺点:后端分页对于数据量大的场景有其优势,但页面切换比较慢. 后端分页python3代码如 ...
- 页面的隐藏或显示:hidden与visibilityState
我们在很多地方都需要判断用户是不是在当前页面,如果离开了当前页面我们需要捕捉到并进行一些操作. 例如:当视频处于播放状态时,我们需要判断用户是不是在当前页面以继续播放,如果离开了我们需要暂停播放. 有 ...
- C语言学习书籍推荐《Practical C++ Programming》下载
下载链接 :点我 C++ is a powerful, highly flexible, and adaptable programming language that allows software ...
- VS2012 BIDS之Reporting Service/SSRS 项目
最近资讯部门需要:网页/sharepoint提供事实表RawData下载功能,以下是项目大概: 工具:VS(BIDS)Report Designer+Reporting Service配置管理器
- 字符串翻转demo
1.利用char数组 public class stringfanzhaun { public static void main(String[] args) { String str="1 ...
- c语言进阶7-结构体
一. 结构体: 在程序设计基础当中我们学习了变量,变量可以节省使用空间相对于常量而言,大家来看下表: 学号 姓名 职位 性别 数学 英语 语文 总成绩 1 刘琳 班委 女 50 61 56 167 ...
- JVM(一):久识你名,初居我心
聊聊JVM JVM,一个熟悉又陌生的名词,从认识Java的第一天起,我们就会听到这个名字,在参加工作的前一两年,面试的时候还会经常被问到JDK,JRE,JVM这三者的区别. JVM可以说和我们是老朋友 ...
- 1. 两数之和 Java解法
这题属于Leetcode的签到题,基本上每个人一进来就是这题. 用哈希思想来做就是最好的解答. 如果一个target - num[i] 存在那么就返回那个数字对应的下标和当前元素的下标. public ...
- 微信小程序 「柒留言」 — 实现微信公众号留言功能(限时免费入驻,建议收藏)
「柒留言」小程序留言助手使用指南(接近原生界面) 前言 从去年 3 月以后新公众号就没得留言功能了,新申请的微信公众号没有留言功能,没有留言就无法跟读者进行互动,写出去的文章得不到反馈,着实感觉有蛮难 ...