PopupWindow弹出框
使用PopupWindow实现一个悬浮框,悬浮在Activity之上,显示位置可以指定
首先创建pop_window.xml:
<?xml version="1.0" encoding="utf-8"?>

<android.support.constraint.ConstraintLayout

    xmlns:android="http://schemas.android.com/apk/res/android"

    xmlns:app="http://schemas.android.com/apk/res-auto"

    android:background="#bbbbbb"

    android:layout_width="match_parent"

    android:layout_height="match_parent">

    <TextView

        android:id="@+id/tv_title"

        android:layout_width="wrap_content"

        android:layout_height="wrap_content"

        android:layout_marginStart="8dp"

        android:layout_marginLeft="8dp"

        android:layout_marginTop="8dp"

        android:layout_marginEnd="8dp"

        android:layout_marginRight="8dp"

        android:layout_marginBottom="8dp"

        app:layout_constraintBottom_toTopOf="@+id/tv_msg"

        app:layout_constraintEnd_toEndOf="parent"

        app:layout_constraintStart_toStartOf="parent"

        app:layout_constraintTop_toTopOf="parent" />

    <TextView

        android:id="@+id/tv_msg"

        android:layout_width="wrap_content"

        android:layout_height="wrap_content"

        android:layout_marginStart="8dp"

        android:layout_marginLeft="8dp"

        android:layout_marginTop="8dp"

        android:layout_marginEnd="8dp"

        android:layout_marginRight="8dp"

        android:layout_marginBottom="8dp"

        app:layout_constraintBottom_toTopOf="@+id/linearLayout"

        app:layout_constraintEnd_toEndOf="parent"

        app:layout_constraintStart_toStartOf="parent"

        app:layout_constraintTop_toTopOf="parent" />

    <LinearLayout

        android:id="@+id/linearLayout"

        android:layout_width="match_parent"

        android:layout_height="wrap_content"

        android:layout_marginStart="8dp"

        android:layout_marginLeft="8dp"

        android:layout_marginTop="8dp"

        android:layout_marginEnd="8dp"

        android:layout_marginRight="8dp"

        android:layout_marginBottom="8dp"

        android:orientation="horizontal"

        app:layout_constraintBottom_toBottomOf="parent"

        app:layout_constraintEnd_toEndOf="parent"

        app:layout_constraintHorizontal_bias="1.0"

        app:layout_constraintStart_toStartOf="parent"

        app:layout_constraintTop_toTopOf="parent"

        app:layout_constraintVertical_bias="0.625">

        <Button

            android:id="@+id/btn_cancel"

            android:layout_width="wrap_content"

            android:layout_height="wrap_content"

            android:text="取消" />

        <Button

            android:id="@+id/btn_ok"

            android:layout_width="wrap_content"

            android:layout_height="wrap_content"

            android:text="确定" />

    </LinearLayout>

</android.support.constraint.ConstraintLayout>
使用ConstraintLayout看起来比较麻烦,用拖拽还是很方便的。这里设置四个组件,两个TextView,两个Button
activity_main.xml:
<?xml version="1.0" encoding="utf-8"?>

<android.support.constraint.ConstraintLayout

	xmlns:android="http://schemas.android.com/apk/res/android"

    xmlns:app="http://schemas.android.com/apk/res-auto"

    xmlns:tools="http://schemas.android.com/tools"

    android:layout_width="match_parent"

    android:layout_height="match_parent"

    tools:context=".MainActivity">

    <Button

        android:id="@+id/btn_pop_window"

        android:layout_width="wrap_content"

        android:layout_height="wrap_content"

        android:layout_marginStart="8dp"

        android:layout_marginLeft="8dp"

        android:layout_marginTop="8dp"

        android:layout_marginEnd="8dp"

        android:layout_marginRight="8dp"

        android:layout_marginBottom="8dp"

        android:text="pop_window"

        app:layout_constraintBottom_toBottomOf="parent"

        app:layout_constraintEnd_toEndOf="parent"

        app:layout_constraintStart_toStartOf="parent"

        app:layout_constraintTop_toTopOf="parent" />

</android.support.constraint.ConstraintLayout>
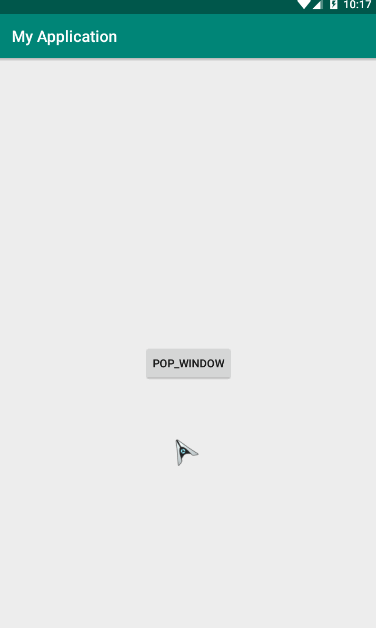
主界面放置一个按钮。
MainActivity:
package com.fitsoft;

import android.os.Bundle;

import android.support.v7.app.AppCompatActivity;

import android.view.Gravity;

import android.view.LayoutInflater;

import android.view.View;

import android.view.WindowManager;

import android.widget.Button;

import android.widget.PopupWindow;

import android.widget.TextView;

import android.widget.Toast;

public class MainActivity extends AppCompatActivity {

    Button button;

    PopupWindow popupWindow;

    @Override

    protected void onCreate(Bundle savedInstanceState) {

        super.onCreate(savedInstanceState);

        setContentView(R.layout.activity_main);

        button = findViewById(R.id.btn_pop_window);

        button.setOnClickListener(new View.OnClickListener() {

            @Override

            public void onClick(View v) {

                popupWindow.showAsDropDown(v);

            }

        });

        //载入界面

        View view = LayoutInflater.from(this).inflate(R.layout.pop_window, null);

        {

            TextView textView = view.findViewById(R.id.tv_title);

            textView.setText("标题");

        }

        {

            TextView textView = view.findViewById(R.id.tv_msg);

            textView.setText("这里是popwindow的消息内容");

        }

        {

            Button button = view.findViewById(R.id.btn_ok);

            button.setOnClickListener(new View.OnClickListener() {

                @Override

                public void onClick(View v) {

                    Toast.makeText(v.getContext(), "您点击了确定按钮", Toast.LENGTH_SHORT).show();

                    popupWindow.dismiss();

                }

            });

        }

        {

            Button button = view.findViewById(R.id.btn_cancel);

            button.setOnClickListener(new View.OnClickListener() {

                @Override

                public void onClick(View v) {

                    Toast.makeText(v.getContext(), "您点击了取消按钮", Toast.LENGTH_SHORT).show();

                    popupWindow.dismiss();

                }

            });

        }

        //绑定

        popupWindow = new PopupWindow(view, WindowManager.LayoutParams.WRAP_CONTENT,

                WindowManager.LayoutParams.WRAP_CONTENT);

    }

}
这里调用了PopupWindow的构造方法:
/**

 * <p>Create a new non focusable popup window which can display the

 * <tt>contentView</tt>. The dimension of the window must be passed to

 * this constructor.</p>

 *

 * <p>The popup does not provide any background. This should be handled

 * by the content view.</p>

 *

 * @param contentView the popup's content

 * @param width the popup's width

 * @param height the popup's height

 */

public PopupWindow(View contentView, int width, int height) {

    this(contentView, width, height, false);

}
绑定视图,设置宽高...很好用...
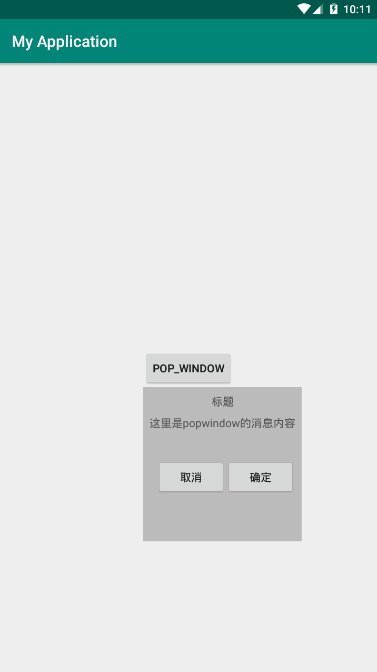
最后用按钮的点击事件弹出窗口:
popupWindow.showAsDropDown(v);
效果图:
左对齐,显示在下方....调整一下弹出代码,将刚刚的弹出代码注释掉,用下面的代码替换:
popupWindow.showAtLocation(MainActivity.this.getWindow().getDecorView(),

                    Gravity.CENTER, 0, 0);
获取顶级布局,设置居中显示,x、y不偏移。
效果图:
PopupWindow弹出框的更多相关文章
- 练习PopupWindow弹出框之实现界面加载的时候显示弹出框到指定的view下面--两种延迟方法
今天在练习PopupWindow弹出框的时候,打算在界面加载的时候将弹出框展现出来并显示在指定的view下面. 初步方法是直接在OnResume方法里面直接执行showPopupWindows方法. ...
- 自定义PopupWindow弹出框(带有动画)
使用PopupWindow来实现弹出框,并且带有动画效果 首先自定义PopupWindow public class LostPopupWindow extends PopupWindow { pub ...
- android 三种弹出框之一PopupWindow
PopupWindow 在android的弹出框我目前了解到的是有三种:AlertDialog,PopupWindow,Activity伪弹框, AlertDialog太熟悉了,这里就不介绍了 就先看 ...
- 通用的popupwindow底部弹出框
前段时间做项目的时候,有几个底部弹出框,当时因为忙着赶进度所有就单独写了好几个popupwindow.后来就想着怎么实现一个通用的PopupWindow工具类 就是在要用到的时候创建该工具类的对象,并 ...
- appium 定位弹出框时报错
今天在做APP自动化时,发现定位弹出框无法定位,无奈,百度去找.发现了一篇不错的博客,故转载过来,供大家参考.后续会验证这个方法的可行性. 本博客转自:http://blog.csdn.net/qq7 ...
- Android 自定义界面的弹出框(可输入数据)
上午写了一篇博文,介绍了如何定义从屏幕底部弹出PopupWindow,写完之后,突然想起之前写过自定义内容显示的弹出框,就随手写了两个实例,分享出来: 第一种实现方式:继承Dialog 1.1 线定义 ...
- 关于Layer弹出框初探
layer至今仍作为layui的代表作,她的受众广泛并非偶然,而是这五年多的坚持,不断完善和维护.不断建设和提升社区服务,使得猿们纷纷自发传播,乃至于成为今天的Layui最强劲的源动力.目前,laye ...
- angularjs 弹出框 $modal
angularjs 弹出框 $modal 标签: angularjs 2015-11-04 09:50 8664人阅读 评论(1) 收藏 举报 分类: Angularjs(3) $modal只有一 ...
- 【代码笔记】iOS-自定义弹出框
代码: - (void)viewDidLoad { [super viewDidLoad]; // Do any additional setup after loading the view. [s ...
随机推荐
- (二十五)c#Winform自定义控件-有确定取消的窗体(一)
前提 入行已经7,8年了,一直想做一套漂亮点的自定义控件,于是就有了本系列文章. 开源地址:https://gitee.com/kwwwvagaa/net_winform_custom_control ...
- 曹工杂谈:Java 类加载还会死锁?这是什么情况?
一.前言 今天事不是很多,正好在Java交流群里,看到一个比较有意思的问题,于是花了点时间研究了一下,这里做个简单的分享. 先贴一份测试代码,大家可以先猜测一下,执行结果会是怎样的: import j ...
- django分页的写法,前端后端!
django有一个自带的分页,虽然功能很全面,但是不适合我应用的场景,所以自己写了一个代码 拿走不谢! 应用的场景 : 1.最好是 django中使用 使用方法: 要的数据是( quesset 类型的 ...
- LoRaWAN_stack移植笔记(三)__SPI
stm32相关的配置 由于例程使用的主控芯片为STM32L151C8T6,而在本设计中使用的主控芯片为STM32L051C8T6,内核不一样,并且Cube库相关的函数接口及配置也会有不同,所以芯片的驱 ...
- CSS布局:元素水平垂直居中
CSS布局:元素水平垂直居中 本文将依次介绍在不同条件下实现水平垂直居中的多种方法 水平垂直居中是在写网页时经常会用到的需求,在上两篇博客中,分别介绍了水平居中和垂直居中的方法.本文的水平垂直居中就是 ...
- C++ 重载运算符(详)
C++ 重载运算符 C 重载运算符 一重载函数 1例程 2备注 二重载运算符 11 二元运算符重载 11 一元运算符重载 111 -- 2备注 3 特殊运算符重载 31 号运算符 32 下标运算符 3 ...
- Linux use apktool problem包体变大GLIBC2.14等问题
Linux服务器在线打包遇到的问题 转载请标明出处: https://dujinyang.blog.csdn.net/article/details/80110942 本文出自:[奥特曼超人的博客] ...
- Cassandra查询操作趟坑记录
例子表 CREATE TABLE employee ( name TEXT, age SMALLINT, phone TEXT, bornDate DATE, createDate timestamp ...
- HDU 4685
题意略. 思路: 本题和POJ1904颇为相似,只是那个最大匹配没有现成的,要我们自己求出来.并且要给每一个单身的王子/公主现找一个虚拟的对象. 这也是合乎情理的,王子每一次换一个公主时,可能会导致某 ...
- ACM-数论-广义欧拉降幂
https://www.cnblogs.com/31415926535x/p/11447033.html 曾今一时的懒,造就今日的泪 记得半年前去武大参加的省赛,当时的A题就是一个广义欧拉降幂的板子题 ...