通用的popupwindow底部弹出框
前段时间做项目的时候,有几个底部弹出框,当时因为忙着赶进度所有就单独写了好几个popupwindow.后来就想着怎么实现一个通用的PopupWindow工具类
就是在要用到的时候创建该工具类的对象,并传入相应的框体布局,就可以实现了.
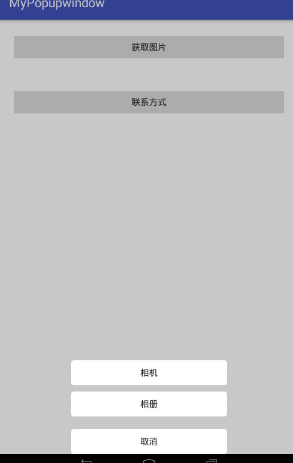
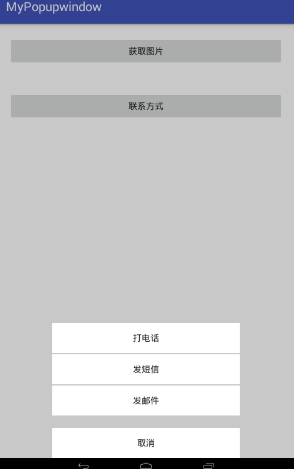
先看看效果,下面的两是调用同一个PopupWindowUtils创建的:
ok,先看看popupWindow的具体实现
import android.app.Activity;

import android.graphics.drawable.ColorDrawable;

import android.view.Gravity;

import android.view.LayoutInflater;

import android.view.MotionEvent;

import android.view.View;

import android.view.ViewGroup;

import android.view.WindowManager;

import android.widget.PopupWindow;

/**

 * Created by 95 on 2017/8/22.

 */

public class PopupWindowUtils extends View implements View.OnTouchListener{

    private Activity mContext;

    private int mXml;

    public View mMenuView;

    public PopupWindow popupWindow;

    public PopupWindowUtils(Activity mContext, int mXml) {

        super(mContext);

        this.mContext = mContext;

        this.mXml = mXml;

        newPopu();

    }

//创建popupWinow对象

    private void newPopu() {

        LayoutInflater inflater = LayoutInflater.from(mContext);

        mMenuView = inflater.inflate(mXml, null);

        popupWindow = new PopupWindow(mMenuView, ViewGroup.LayoutParams.MATCH_PARENT, ViewGroup.LayoutParams.WRAP_CONTENT, true);

        popupWindow.setAnimationStyle(R.style.popwin_anim_style);//弹出,关闭动画

        ColorDrawable dw = new ColorDrawable(mContext.getResources().getColor(R.color.btn));//popupWindow的背景设置为透明

        popupWindow.setBackgroundDrawable(dw);

        //popupWindow 的取消监听当dismiss()被调用的时候发生

        popupWindow.setOnDismissListener(new PopupWindow.OnDismissListener() {

            @Override

            public void onDismiss() {

              background(1f);

            }

        });

        //触摸监听

        mMenuView.setOnTouchListener(this);

    }

//popupWindow状态改变的时候修改整体背景

    private void background(float mfloat) {

        WindowManager.LayoutParams lp = mContext.getWindow().getAttributes();

        lp.alpha = mfloat;

        mContext.getWindow().setAttributes(lp);

        mContext.getWindow().addFlags(WindowManager.LayoutParams.FLAG_DIM_BEHIND);

    }

    //触摸关闭

    @Override

    public boolean onTouch(View v, MotionEvent event) {

        int height = mMenuView.getHeight();

        int y = (int) event.getY();

        if (event.getAction() == MotionEvent.ACTION_UP) {

            if (y < height) {

                popupWindow.dismiss();

            }

        }

        return true;

    }

    //弹出

    public void show() {

        background(0.5f);

        View rootView = ((ViewGroup) mContext.findViewById(android.R.id.content)).getChildAt(0);

        popupWindow.showAtLocation(rootView, Gravity.BOTTOM | Gravity.CENTER_HORIZONTAL, 0, 0);

    }

//外部调用关闭

    public void dismiss() {

        popupWindow.dismiss();

    }

}
弹出,关闭的动画
在style.xml添加
 <style name="popwin_anim_style">

        <item name="android:windowEnterAnimation">@anim/ppwindow_show_anim</item>

        <item name="android:windowExitAnimation">@anim/ppwindow_hide_anim</item>

    </style>
并创建anim文件和动画
1.开启
<?xml version="1.0" encoding="utf-8"?>

<set xmlns:android="http://schemas.android.com/apk/res/android">

    <translate

        android:duration="300"

        android:fromXDelta="0"

        android:toXDelta="0"

        android:fromYDelta="200"

        android:toYDelta="0"

        />

    <alpha

        android:duration="300"

        android:fromAlpha="0"

        android:toAlpha="1"

        />

</set>
2.关闭
<?xml version="1.0" encoding="utf-8"?>

<set xmlns:android="http://schemas.android.com/apk/res/android">

    <translate

        android:duration="300"

        android:fromXDelta="0"

        android:toXDelta="0"

        android:fromYDelta="0"

        android:toYDelta="200"

        />

    <alpha

        android:duration="300"

        android:fromAlpha="1"

        android:toAlpha="0"

        />

</set>
popupWindow的背景设置为透明
<?xml version="1.0" encoding="utf-8"?>

<selector xmlns:android="http://schemas.android.com/apk/res/android">

    <item android:color="#00000000"/>

</selector>
ok,popupWindowUtils就完成了,现在就该调用了
import android.os.Bundle;

import android.support.v7.app.AppCompatActivity;

import android.view.View;

import android.widget.Toast;

public class MainActivity extends AppCompatActivity implements View.OnClickListener{

    private PopupWindowUtils popup;

    private PopupWindowUtils popup2;

    @Override

    protected void onCreate(Bundle savedInstanceState) {

        super.onCreate(savedInstanceState);

        setContentView(R.layout.activity_main);

        findViewById(R.id.button1).setOnClickListener(this);

        findViewById(R.id.button2).setOnClickListener(this);

    }

    @Override

    public void onClick(View v) {

        switch (v.getId()) {

            case R.id.button1://创建第一个

                popup = new PopupWindowUtils(this, R.layout.activity_popu1);

                popup.mMenuView.findViewById(R.id.popupbtn1).setOnClickListener(this);

                popup.mMenuView.findViewById(R.id.popupbtn2).setOnClickListener(this);

                popup.mMenuView.findViewById(R.id.popupbtn3).setOnClickListener(this);

                popup.show();//弹出

                break;

            case R.id.button2://创建第二个

                popup2 = new PopupWindowUtils(this, R.layout.activity_popu2);

                popup2.mMenuView.findViewById(R.id.popup2btn1).setOnClickListener(this);

                popup2.mMenuView.findViewById(R.id.popup2btn2).setOnClickListener(this);

                popup2.mMenuView.findViewById(R.id.popup2btn3).setOnClickListener(this);

                popup2.mMenuView.findViewById(R.id.popup2btn4).setOnClickListener(this);

                popup2.show();//弹出

                break;

            //------------------第一个的使用-----------------

            case R.id.popupbtn1:

                Toast.makeText(MainActivity.this, "相机", Toast.LENGTH_LONG).show();

                break;

            case R.id.popupbtn2:

                Toast.makeText(MainActivity.this, "相册", Toast.LENGTH_LONG).show();

                break;

            case R.id.popupbtn3:

                Toast.makeText(MainActivity.this, "退出", Toast.LENGTH_LONG).show();

                popup.dismiss();//关闭

                break;

            //--------------------第二个的使用-----------------

            case R.id.popup2btn1:

                Toast.makeText(MainActivity.this,"popup2打电话",Toast.LENGTH_LONG).show();

                break;

            case R.id.popup2btn2:

                Toast.makeText(MainActivity.this,"popup2发短信",Toast.LENGTH_LONG).show();

                break;

            case R.id.popup2btn3:

                Toast.makeText(MainActivity.this,"popup2发邮件",Toast.LENGTH_LONG).show();

                break;

            case R.id.popup2btn4:

                Toast.makeText(MainActivity.this,"popup2退出",Toast.LENGTH_LONG).show();

                popup2.dismiss();//关闭

                break;

        }

    }

}
MainActivity的布局文件
<?xml version="1.0" encoding="utf-8"?>

<RelativeLayout xmlns:android="http://schemas.android.com/apk/res/android"

    xmlns:tools="http://schemas.android.com/tools"

    android:id="@+id/activity_main"

    android:layout_width="match_parent"

    android:layout_height="match_parent"

    tools:context="map.com.mypopupwindow.MainActivity">

    <Button

        android:id="@+id/button1"

        android:layout_margin="20dp"

        android:layout_width="match_parent"

        android:layout_height="wrap_content"

        android:text="获取图片" />

    <Button

        android:layout_below="@+id/button1"

        android:id="@+id/button2"

        android:layout_margin="20dp"

        android:layout_width="match_parent"

        android:layout_height="wrap_content"

        android:text="联系方式" />

</RelativeLayout>
popup1布局
<?xml version="1.0" encoding="utf-8"?>

<LinearLayout xmlns:android="http://schemas.android.com/apk/res/android"

    android:layout_width="match_parent"

    android:layout_height="wrap_content"

    android:background="#00000000"

    android:orientation="vertical">

    <LinearLayout

        android:layout_width="match_parent"

        android:layout_height="wrap_content"

        android:background="#00000000"

        android:gravity="center"

        android:orientation="vertical">

        <Button

            android:clickable="true"

            android:id="@+id/popupbtn1"

            android:layout_width="250dp"

            android:layout_height="40dp"

            android:layout_marginTop="20dp"

            android:background="@drawable/btn"

            android:text="相机" />

        <Button

            android:id="@+id/popupbtn2"

            android:layout_width="250dp"

            android:layout_height="40dp"

            android:layout_marginTop="10dp"

            android:background="@drawable/btn"

            android:text="相册" />

        <Button

            android:id="@+id/popupbtn3"

            android:layout_width="250dp"

            android:layout_height="40dp"

            android:layout_marginTop="20dp"

            android:background="@drawable/btn"

            android:text="取消" />

    </LinearLayout>

</LinearLayout>
popup2布局
<?xml version="1.0" encoding="utf-8"?>

<LinearLayout xmlns:android="http://schemas.android.com/apk/res/android"

    android:orientation="vertical" android:layout_width="match_parent"

    android:layout_height="match_parent">

<LinearLayout

    android:layout_gravity="center"

    android:orientation="vertical"

    android:gravity="center"

    android:layout_width="300dp"

    android:layout_height="wrap_content">

    <Button

        android:id="@+id/popup2btn1"

        android:layout_marginTop="2dp"

        android:text="打电话"

        android:background="#ffffff"

        android:layout_width="match_parent"

        android:layout_height="wrap_content" />

    <Button

        android:id="@+id/popup2btn2"

        android:layout_marginTop="2dp"

        android:text="发短信"

        android:background="#ffffff"

        android:layout_width="match_parent"

        android:layout_height="wrap_content" />

    <Button

        android:id="@+id/popup2btn3"

        android:layout_marginTop="2dp"

        android:text="发邮件"

        android:background="#ffffff"

        android:layout_width="match_parent"

        android:layout_height="wrap_content" />

    <Button

        android:id="@+id/popup2btn4"

        android:layout_marginTop="20dp"

        android:layout_width="match_parent"

        android:layout_height="wrap_content"

        android:background="#ffffff"

        android:text="取消" />

</LinearLayout>

</LinearLayout>
ok.所有代码都在这了,
使用的话直接使用popupWindowUtils就可以了
通用的popupwindow底部弹出框的更多相关文章
- UIActionSheet底部弹出框
<底部弹出框来提示用户信息> 1.遵循代理方法<UIActionSheetDelete> 2.调用放法 [UIActionSheet *sheet=[UIActio ...
- PopupWindow底部弹出
说明:从屏幕底部弹出PopupWindow,有弹出隐藏动画效果.背景设置透明度. 效果图如下: 1.MainActivity.java 显示popwindow,宽高跟屏幕大小一样,设置一个透明度背 ...
- 微信小程序之自定义底部弹出框动画
最近做小程序时,会经常用到各种弹框.直接做显示和隐藏虽然也能达到效果,但是体验性太差,也比较简单粗暴.想要美美地玩,添加点动画还是非常有必要的.下面做一个底部上滑的弹框. wxml <view ...
- IOS UIActionSheet(底部 弹出框的使用)
UIActionSheet *sheet = [[UIActionSheet alloc] initWithTitle:@"确定要注销?" delegate:self cancel ...
- Android仿ios底部弹出框效果
准备: public class ActionSheet { public interface OnActionSheetSelected { void onClick(int whichButton ...
- Android 底部弹出Dialog(横向满屏)
项目中经常需要底部弹出框,这里我整理一下其中我用的比较顺手的一个方式(底部弹出一个横向满屏的dialog). 效果图如下所示(只显示关键部分): 步骤如下所示: 1.定义一个dialog的布局(lay ...
- 移动端页面 弹出框滚动,底部body锁定,不滚动 / 微信网页禁止回弹效果
需求:页面有弹出层菜单,当弹出层菜单超出屏幕可视区域时,不能滚动.加上滚动后,底部body的滚动事件如何禁止,加上了overflow:hidden;还是不可用. 如下图:地区弹出框可以滚动,而底部的b ...
- android PopupWindow实现从底部弹出或滑出选择菜单或窗口
本实例弹出窗口主要是继承PopupWindow类来实现的弹出窗体,布局可以根据自己定义设计.弹出效果主要使用了translate和alpha样式实现,具体实习如下: 第一步:设计弹出窗口xml: &l ...
- 仿iOS底部弹出popUpWindow
上面为弹出来的效果 popUpWindow布局: <?xml version="1.0" encoding="utf-8"?> <Linear ...
随机推荐
- 安装jdk1.8,编写环境变量
好记性不如烂笔头!!!(我这是把jdk放在的/usr/local下,且命令为jdk1.8...复制的时候别搞错位置了) JAVA_HOME=/usr/local/jdk1./ JAVA_BIN=/us ...
- Spring Eureka的使用入门--服务端与客户端
接上篇: Eureka作为注册中心,连接服务端与客户端: 服务端: 依赖包: apply plugin: 'org.springframework.boot' apply plugin: 'io.sp ...
- paraview plot over line
- 【算法笔记】B1047 编程团体赛
1047 编程团体赛 (20 分) 编程团体赛的规则为:每个参赛队由若干队员组成:所有队员独立比赛:参赛队的成绩为所有队员的成绩和:成绩最高的队获胜. 现给定所有队员的比赛成绩,请你编写程序找出冠军队 ...
- CodeForces 1043D Mysterious Crime 区间合并
题目传送门 题目大意: 给出m个1-n的全排列,问这m个全排列中有几个公共子串. 思路: 首先单个的数字先计算到答案中,有n个. 然后考虑多个数字,如果有两个数字相邻,那么在m个串中必定都能找到这两个 ...
- 2018年江西理工大学C语言程序设计竞赛(初级组)一
C语言竞赛初级组第一.二场答案:https://www.cnblogs.com/xingkongyihao/p/10046918.html A: 逆序对 时间限制: 1 s 内存限制: ...
- C#.net 设置Access-Control-Allow-Origin来实现跨域
<system.webServer> <httpProtocol> <customHeaders> <add name="Access-Contro ...
- [转] Spring Boot实战之Filter实现使用JWT进行接口认证
[From] http://blog.csdn.net/sun_t89/article/details/51923017 Spring Boot实战之Filter实现使用JWT进行接口认证 jwt(j ...
- Ubuntu下的UNITY和GNOME界面
[转自] http://www.tuicool.com/articles/nUbMVbU 从Ubuntu 11.04后,UNITY就作为默认界面来推广.如果用户需要体验GNOME 3,还需要用户自己安 ...
- PIE SDK栅格数据的创建
1. 功能简介 目前在地理信息领域中数据包括矢量和栅格两种数据组织形式.每一种数据有不同的数据格式,目前PIE SDK支持多种数据格式的数据创建,下面对栅格数据格式的数据创建功能进行介绍. 2. 功能 ...