
爬虫基本库的使用---urllib库
使用urllib---Python内置的HTTP请求模块
- urllib包含模块:request模块、error模块、parse模块、robotparser模块
发送请求
- 使用 urllib 的 request模块,实现请求的发送并得到响应
urlopen()
用urllib.request 里的urlopen()方法发送一个请求
输入:
import urllib.request

# 向指定的url发送请求,并返回服务器响应的类文件对象

response = urllib.request.urlopen('https://www.python.org')         # 这里所指定的url是https://www.python.org

# read()方法读取文件全部内容

html = response.read()

# decode()的作用是将其他编码的字符串转换成unicode编码

print(html.decode('utf-8'))
部分输出:
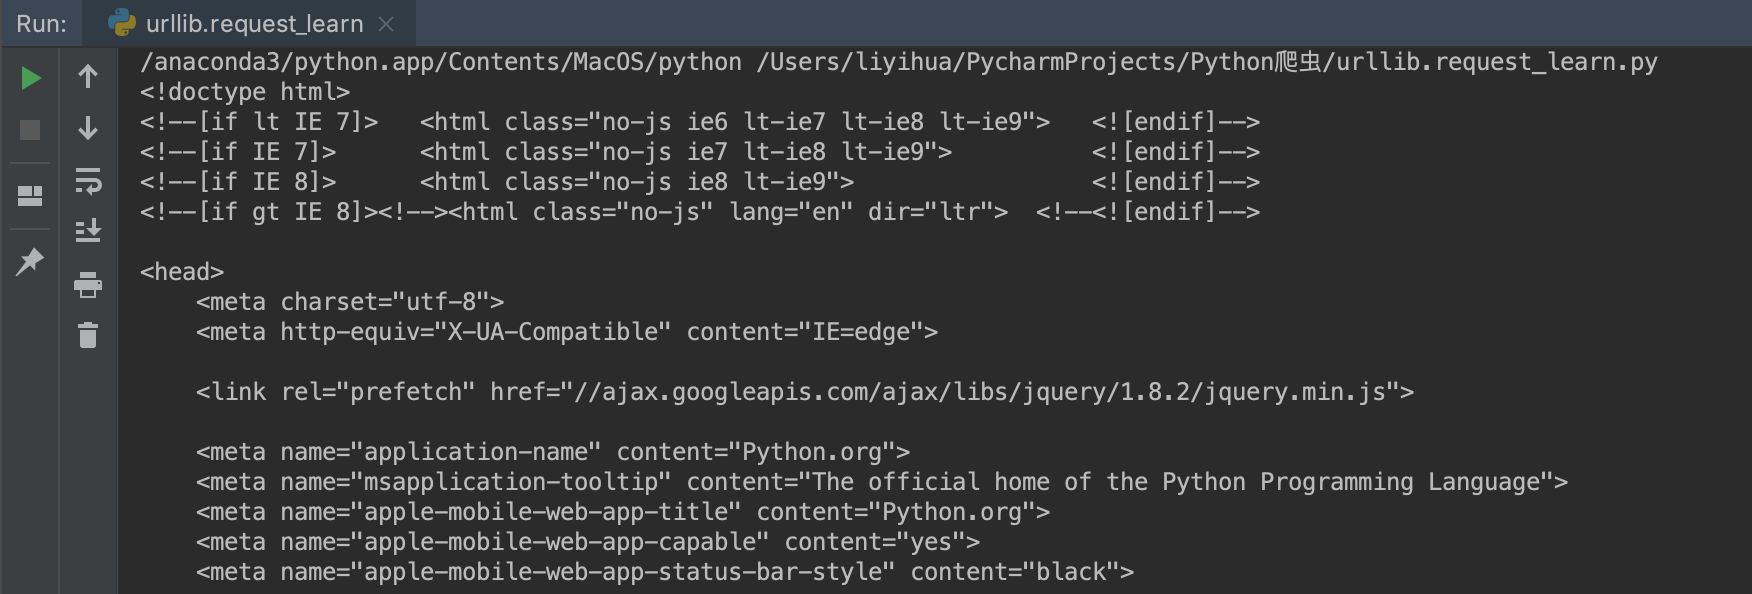
涉及方法decode()---该方法返回解码后的字符串。其中有编码方法encode()
备注:urllib.request 里的 urlopen()不支持构造HTTP请求,不能给编写的请求添加head,无法模拟真实的浏览器发送请求。
type()方法输出响应的类型:
import urllib.request

# 向指定的url发送请求,并返回服务器响应的类文件对象

response = urllib.request.urlopen('https://www.python.org')

print(type(response))

# 输出结果如下:

<class 'http.client.HTTPResponse'>

# 它是一个 HTTPResposne类型的对象,主要包含 read()、 readinto()、 getheader(name)、getheaders()、 fileno()等方法,以及 msg、 version、 status、 reason、 debuglevel、 ιlosed等属性
- 实例(部分方法或属性):
import urllib.request

response = urllib.request.urlopen('https://www.python.org')

print(response.status)          # status属性:返回响应的状态码,如200代表请求成功

print(response.getheaders())        # getheaders()方法:返回响应的头信息

print(response.getheader('Server'))         # getheader('name')方法:获取响应头中的name值

# 输出:

200

[('Server', 'nginx'), ('Content-Type', 'text/html; charset=utf-8'), ('X-Frame-Options', 'DENY'), ('Via', '1.1 vegur'), ('Via', '1.1 varnish'), ('Content-Length', ''), ('Accept-Ranges', 'bytes'), ('Date', 'Fri, 14 Jun 2019 04:36:05 GMT'), ('Via', '1.1 varnish'), ('Age', ''), ('Connection', 'close'), ('X-Served-By', 'cache-iad2125-IAD, cache-hnd18748-HND'), ('X-Cache', 'HIT, HIT'), ('X-Cache-Hits', '3, 736'), ('X-Timer', 'S1560486966.523393,VS0,VE0'), ('Vary', 'Cookie'), ('Strict-Transport-Security', 'max-age=63072000; includeSubDomains')]

nginx - urllib.request.urlopen(url, data=None, [timeout,]*, cafile=None, capath=None, cadefault=False, context=None)
重要参数:
url:可以是请求的链接,也可以是请求(Request)的对象;
data: 请求中附加送给服务器的数据(如:用户名和密码等);
timeout:超时的时间,以秒为单位,超过多长时间即报错;- data参数
- 使用参数data,需要使用bytes()方法将参数转化为字节流编码格式的内容,即bytes类型
实例:
import urllib.parse
import urllib.request data = bytes(urllib.parse.urlencode({'word': 'hello'}), encoding='utf-8')
response = urllib.request.urlopen('http://httpbin.org/post', data=data)
print(response.read())
# 请求的站点是httpbin.org,它可以提供HTTP测试请求。
# 次例子中的URL是http://httpbin.org/post,这个链接可以用来测试POST请求,
# 它可以输出请求的一些信息,其中包含我们传递的data参数代码使用的其他方法:
- urllib.parse模块里的urlencode()方法将参数字典转化为字符串
- bytes() 返回值为一个新的不可修改字节数组,每个数字元素都必须在0 - 255范围内,和bytearray函数的具有相同的行为,差别仅仅是返回的字节数组不可修改
# bytes([source[, encoding[, errors]]])

# 第一个参数需要是str(字符串)类型

# 第二个参数指定编码格式

# 如果没有输入任何参数,默认就是初始化数组为0个元素

# 例如

byte = bytes('LiYihua', encoding='utf-8')

print(byte)

# 输出:

b'LiYihua'
- timeout参数
- timeout参数用于设置超时时间,单位为秒,即如果请求超出了设置的这个时间, 还没有得到响应 , 就会抛出异常。
- 例子1:
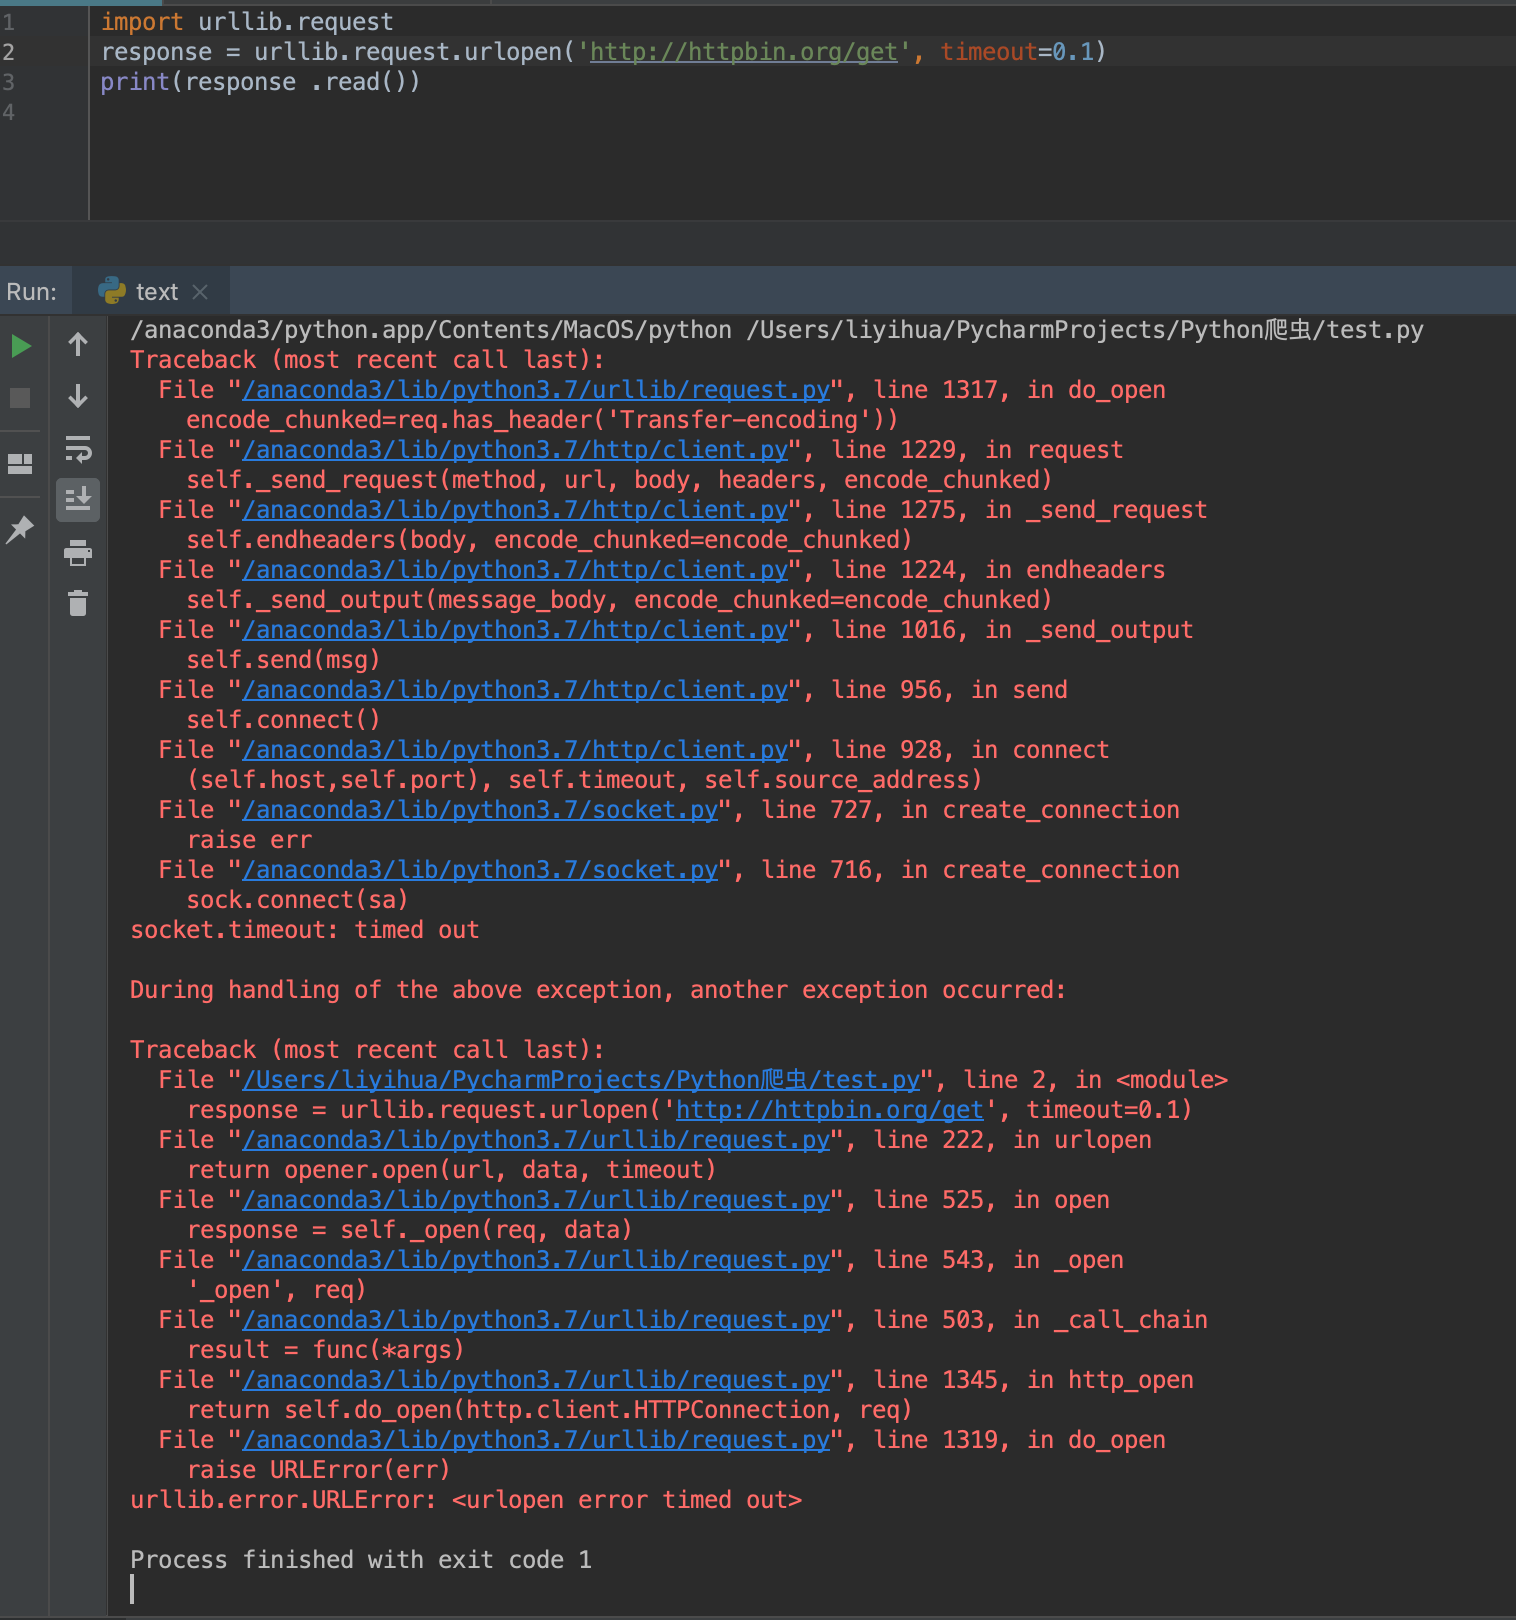
该程序在运行时间0.1s过后,服务器没有响应,于是抛出错误URL Error异常(错误原因是超时)
- 例子2:
 import socket

 import urllib.request

 import urllib.error

 try:

     response = urllib.request.urlopen('http://httpbin.org/get', timeout=0.1)            # 设置超时时间0.1s

 except urllib.error.URLError as e:

     # 判断异常是socket.timeout类型(意思就是超时异常)  e.reason获取的是错误的原因

     if isinstance(e.reason, socket.timeout):

         print('TIME OUT')

 # 输出:

 TIME OUT

 在python中:

 e 一般是捕捉到的错误对象

 e.code 是错误代码

 e.reason获取的是错误的原因
其他参数
- context参数,它必须是ssl.SSLContext类型,用来指定SSL设置
- cafile和capath两个参数分别是指定CA证书和它的路径,这个在请求HTTPS链接时会有用
Request
- urlopen()方法可以实现最基本请求的发起,Request更强大(比urlopen()方法)
- Request例子:
 import urllib.request

 request = urllib.request.Request('https://python.org')              # 将请求独立成一个对象

 response = urllib.request.urlopen(request)                  # 同样用urlopen()方法来发送请求

 print(response.read().decode('utf-8'))

 # 输出:

 <!doctype html>

 <!--[if lt IE 7]>   <html class="no-js ie6 lt-ie7 lt-ie8 lt-ie9">   <![endif]-->

 <!--[if IE 7]>      <html class="no-js ie7 lt-ie8 lt-ie9">          <![endif]-->

 <!--[if IE 8]>      <html class="no-js ie8 lt-ie9">                 <![endif]-->

 <!--[if gt IE 8]><!--><html class="no-js" lang="en" dir="ltr">  <!--<![endif]-->

 <head>

     <meta charset="utf-8">..............

 ....................此处省略XXX字符

     <![endif]-->

     <!--[if lte IE 8]>

     <script type="text/javascript" src="/static/js/plugins/getComputedStyle-min.c3860be1d290.js" charset="utf-8"></script>

     <![endif]-->

 </body>

</html> - class urllib.request.Request(url, data=None, headers={ }, origin_req_host=None, unverifiable=False, mothod=None)
- url参数: 请求URL
- data参数:Post 提交的数据, 默认为 None ,当 data 不为 None 时, urlopen() 提交方式为 Post
- headers参数:也就是请求头,headers参数可以在构造请求时使用,也可以用add_header()方法来添加
- 请求头最常用的用法:修改User-Agent来伪装浏览器(如伪装Firefox:
Mozilla/s.o (X11; U; Linux i686) Gecko/20071127 Firefox/2.0.0.11
)
- origin_req_host参数:指的是请求方的host名称或者IP地址
unverifiable参数:
表示这个请求是否是无法验证 的,默认是 False,意思就是说用户没
有足够权限来选择接收这个请求的结果。 例如,我们请求一个 HTML文档中的图片,但是我
们没有向动抓取图像的权限,这时 unverifiable 的值就是 True。
- method参数:它是一个字符串,用来指示请求使用的方法(如:GET、POST、PUT等)
- 例子:
 from urllib import request, parse

 url = 'https://python.org/post'             # 要请求的URL

 headers = {

     'User-Agent': 'Mozilla/4.0 (compatible; MSIE 5.5; Windows NT',

     'Host': 'httpbin.org'

 }               # 指定请求头User-Agent,Host

 dict = {

     'name': 'Germey'

 }              # 要提交的数据

 data = bytes(parse.urlencode(dict), encoding='utf-8')           # 要提交的数据是dict类型,先用bytes()方法,将其转为字符串

 req = request.Request(url=url, data=data, headers=headers, method='POST')

 # 这里使用Request()方法,用了四个参数

 response = request.urlopen(req)         # urlopen()发送请求

 print(response.read().decode('utf-8'))          # 用decode()方法,解码所获得的字符串,即读取到的response,解码格式为utf-8

 # 输出:

 {

     "args”:{},

     ”data”: ""

     "files”{},

     ” form": {

         ”name”:”Germey”

     },

     ”headers”:{

     ”Accept-Encoding”.”identity”,

     ”Content-Length " : ” 11”, "Content-Type”·”application/x-www-form-    urlencoded”, ”Host”·”httpbin.org”,

     ”User-Agent”:”问。zilla/4.0 (compatible;问SIE S.S; Windows NT)”

 },

 "json": null,

 ”origin”.”219.224.169.11”,

 ” url ” : ” http://httpbin.org/post ”

 }
add_header()方法来添加headers
req =request.Request(url=url, data=data, method='POST’)

req .add_header('User-Agent', 'Mozilla/4 .0 (compatible; MSIE 5.5; Windows NT)')
高级用法
- Request虽然可以构造请求,但是对于一些更高级的操作(比如Cookies处理,代理设置等),就需要更强大的工具Handler了
BaseHandler
- 各种Handler子类继承BaseHandler类
- 部分例子:
HITPDefaultErrorHandler:用于处理HTTP响应错误,错误都会抛出 HTTPError类型的异常。
HTTPRedirectHandler:用于处理重定向 。
HTTPCookieProcessor: 用于处理 Cookies。
ProxyHandler:用于设置代理 , 默认代理为空 。
HπPPasswordMgr:用于管理密码,它维护了用户名和密码的表。
HTTPBasicAuthHandler: 用于管理认证,如果一个链接打开时需要认证,那么可以用它来解决认证问题 。
Handler类官方文档:https://docs.python.org/3/library/urllib.request.html#urllib.request.BaseHandler
- 部分例子:
验证
:在登录某些网站时,需要输入用户名和密码,验证成功后才能查看页面,这时可以借助HTTPBasicAuthHandler
from urllib.request import HTTPPasswordMgrWithDefaultRealm, HTTPBasicAuthHandler, build_opener

from urllib.error import URLError

username = 'username'

password = 'password'

url = 'http://localhost:5000/'

p = HTTPPasswordMgrWithDefaultRealm()           # 创建一个密码管理对象,用来保存 HTTP 请求相关的用户名和密码

p.add_password(None, url, username, password)   # 添加url,用户名,密码

auth_handler = HTTPBasicAuthHandler(p)          # 来处理代理的身份验证

opener = build_opener(auth_handler)             # 利用build_opener()方法构建一个Opener

try:

    result = opener.open(url)                   # 利用Opener的open()方法打开链接,完成验证

    html = result.read().decode('utf-8')        # 读取返回的结果,解码返回结果

    print(html)

except URLError as e:

    print(e.reason)                             # 获取错误的原因
可以修改username、password、url来爬取自己想爬取的网站
代理
from urllib.error import URLError

from urllib.request import ProxyHandler, build_opener

# ProxyHandler()使用代理IP, 它的参数是一个字典,键名是协议类型(比如HTTP或者HTTPS等),键值是代理链接,可以添加多个代理

proxy_handler = ProxyHandler(

    {

        'http': 'http://127.0.0.1:9743',

        'https': 'https://127.0.0.1:9743'

    }

)

opener = build_opener(proxy_handler)            # 利用build_opener()方法,构造一个Opener

try:

    response = opener.open('https://www.baidu.com')         # 发送请求

    print(response.read().decode('utf-8'))

except URLError as e:

    print(e.reason)
Cookies
- 爬一些需要登录的网站,就要用到cookie相关的一些模块来操作了
http.cookiejar.CookieJar()
import http.cookiejar

# http.cookiejar.CookieJar()

#   1、管理储存cookie,向传出的http请求添加cookie

#   2、cookie存储在内存中,CookieJar示例回收后cookie将自动消失

import urllib.request

cookie = http.cookiejar.CookieJar()                         # 创建cookiejar实例对象

handler = urllib.request.HTTPCookieProcessor(cookie)        # 根据创建的cookie生成cookie的管理器

opener = urllib.request.build_opener(handler)

response = opener.open('http://www.baidu.com')

for item in cookie:

    print(item.name+"="+item.value)

# 输出

BAIDUID=FB2B1F3E51F9DD2626C586989E016F7B:FG=1

BIDUPSID=FB2B1F3E51F9DD2626C586989E016F7B

H_PS_PSSID=29272_1443_21084_29135_29238_28519_29098_29369_28839_29221_20718

PSTM=1560654641

delPer=0

BDSVRTM=0

BD_HOME=0
http.cookiejar.MozillaCookiejar()
- 该方法在生成文件时用到,可以用来处理Cookies和文件相关的事件,比如读取和保存Cookies,可以将Cookies保存成Mozilla型浏览器的Cookies格式
import http.cookiejar

# http.cookiejar.MozillaCookiejar

#   1、是FileCookieJar的子类

#   2、与moccilla浏览器兼容

import urllib.request

file_name = 'cookies.txt'

cookie = http.cookiejar.MozillaCookieJar(file_name)                        # 创建cookiejar实例对象

handler = urllib.request.HTTPCookieProcessor(cookie)        # 根据创建的cookie生成cookie的管理器

opener = urllib.request.build_opener(handler)

response = opener.open('http://www.baidu.com')

cookie.save(ignore_discard=True, ignore_expires=True)           # 保存cookie到文件

# 运行后,生成文件cookies.txt,文件内容如下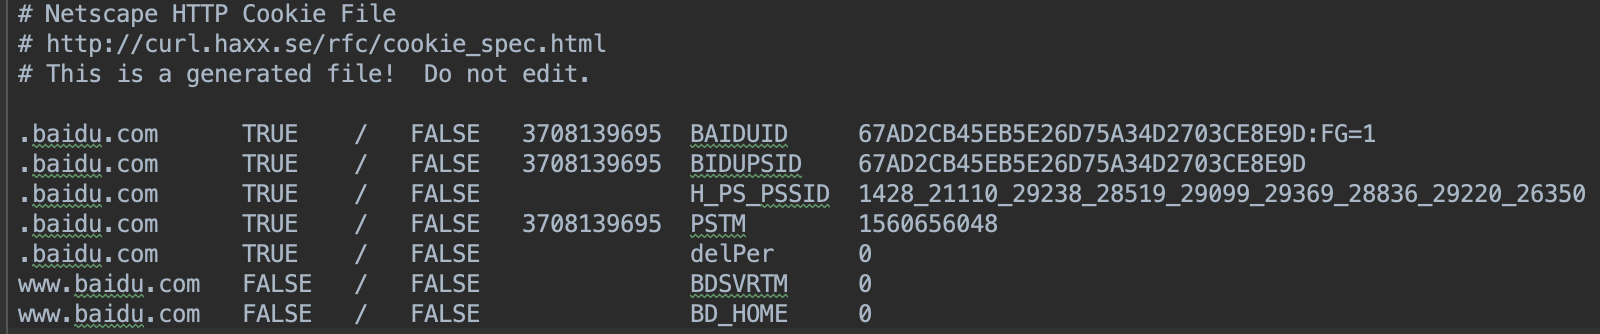
http.cookiejar.LWPCookieJar()
LWPCookieJar,可以保存Cookies,保存成
libwww-perl
- (LWP)格式的Cookies文件
LwpCookieJar
- 是FileCookieJar的子类
- 与libwww-perl标准兼容
改变上面一个代码例子中的一句代码

将

cookie = http.cookiejar.MozillaCookieJar(file_name)

改为

cookie = http.cookiejar.LWPCookieJar(file_name)

# 运行后,生成一个文件cookies.txt,文件内容如下
读取并利用 生成的Cookies文件
- 例如打开LWPCookies格式文件
 import http.cookiejar

 import urllib.request

 cookie = http.cookiejar.LWPCookieJar()                                      # 创建cookiejar实例对象

 cookie.load('cookies.txt', ignore_discard=True, ignore_expires=True)        # load()方法来读取本地的Cookies文件

 handler = urllib.request.HTTPCookieProcessor(cookie)                        # 根据创建的cookie生成cookie的管理器

 opener = urllib.request.build_opener(handler)                               # 利用build_opener()方法,构造一个Opener

 response = opener.open('http://www.baidu.com')                              # 利用Opener的open()方法打开链接,发送请求

 print(response.read().decode('utf-8'))                                      # 读取、解码
运行结果正常的话,会输出百度网页的源代码
处理异常
URLError
 from urllib import request, error

 try:

     response = request.urlopen('https://www.bucunzai_tan90.com/index.htm')

     print(response.read().decode('utf8'))

 except error.URLError as e:

     print(e.reason)

 # 打开一个不存在的页面时,输出结果是:[Errno 8] nodename nor servname provided, or not known

 # 打开一个存在的页面时,输出结果是网页的源代码
HTTPError
- 它是URLError的子类,专门用来处理HTTP请求错误,比如认证请求失败等
code: 返回 HTTP状态码,比如 404表示网页不存在, 500表示服务器内部错误等。
reason:同父类一样,用于返回错误的原因 。
headers: 返回请求头。
 from urllib import request, error

 try:

     response = request.urlopen('https://cuiqingcai.com/index.htm')

     print(response.read().decode('utf8'))

 except error.HTTPError as e:

     print(e.reason, e.code, e.headers, sep='\n\n')

 # 参数sep是实现分隔符,比如多个参数输出时想要输出中间的分隔字符

 # 输出结果:

 Not Found

 404

 Server: nginx/1.10.3 (Ubuntu)

 Date: Sun, 16 Jun 2019 10:53:09 GMT

 Content-Type: text/html; charset=UTF-8

 Transfer-Encoding: chunked

 Connection: close

 Set-Cookie: PHPSESSID=vrvrfqq88eck9speankj0ogus0; path=/

 Pragma: no-cache

 Vary: Cookie

 Expires: Wed, 11 Jan 1984 05:00:00 GMT

 Cache-Control: no-cache, must-revalidate, max-age=0

 Link: <https://cuiqingcai.com/wp-json/>; rel="https://api.w.org/"
index.html通常是一个网站的首页,也叫导航页,也就是在这个页面上包含了网站上的基本链接
 # 更好的写法是,先处理子类,再处理父类,最后处理正常逻辑

 from urllib import request, error

 try:

     response = request.urlopen('https://cuiqingcai.com/index.htm')

     # print(response.read().decode('utf8'))

 except error.HTTPError as e:                      # 处理HTTPError子类

     print(e.reason, e.code, e.headers, sep='\n\n')

 except error.URLError as e:                       # 处理URLError父类

     print(e.reason)

 else:                                             # 处理正常逻辑

     print('Request Successful')
关于上面的reason属性,返回的不一定是字符串,也可能是一个对象。如返回: <class 'socket.timeout'> 等等
- 它是URLError的子类,专门用来处理HTTP请求错误,比如认证请求失败等
解析链接
- ullib.parse定义了处理URL的标准接口
- 它支持file、ftp、 hdl、 https、 imap、mms 、 news 、 prospero 、 telnet等协议的URL处理
urlparse()
- 实现URL的识别和分段
 from urllib.parse import urlparse

 # 实现URL的分段

 result = urlparse('http://www.baidu.com/index.html;user?id=5#comment')

 print(type(result), result, sep='\n')       # 输出的result是一个元组

 # 输出:

 <class 'urllib.parse.ParseResult'>

 ParseResult(scheme='http', netloc='www.baidu.com', path='/index.html', params='user', query='id=5', fragment='comment')

 # scheme='协议', netloc='域名', path='访问路径', params='参数', query='查询条件'(?后面), fragment='锚点'(#号后面)
网页链接标准格式 scheme://netloc/path ;params?query#fragment
urllib.parse.urlparse(urlstring, scheme='', allwo_fragments=True)
uelstring:要解析的URL。 scheme:所给URL没协议时,scheme='XXX',XXX是默认协议,否则scheme='所给URL协议'。
allwo_fragments:是否可以忽略fragament。
- 实现URL的识别和分段
urlunparse()
- 实现URL的构造:
 from urllib.parse import urlunparse

 # urllib.parse.urlunparse(),接受的参数是一个可迭代对象,它的长度必须是6

 # 这里的data用了列表,也可以用元组或者特定的数据结构

 data1 = ['http', 'www.baidu.com', '/index.html', 'user', 'id=5', 'comment']

 data2 = ['', 'www.baidu.com', '/index.html', 'user', 'id=5', 'comment']

 data3 = ['http', '', '/index.html', 'user', 'id=5', 'comment']

 data4 = ['http', 'www.baidu.com', '', 'user', 'id=5', 'comment']

 data5 = ['http', 'www.baidu.com', '/index.html', '', 'id=5', 'comment']

 data6 = ['http', 'www.baidu.com', '/index.html', 'user', '', 'comment']

 data7 = ['http', 'www.baidu.com', '/index.html', 'user', 'id=5', '']

 print("缺少协议:\t"+urlunparse(data2), "缺少域名:\t"+urlunparse(data3),

       "缺少访问路径:\t"+urlunparse(data4), "缺少参数:\t"+urlunparse(data5),

       "缺少查询条件:\t"+urlunparse(data6), "缺少锚点:\t"+urlunparse(data7),

       "标准链接:\t"+urlunparse(data1), sep='\n\n')

 # 输出对比: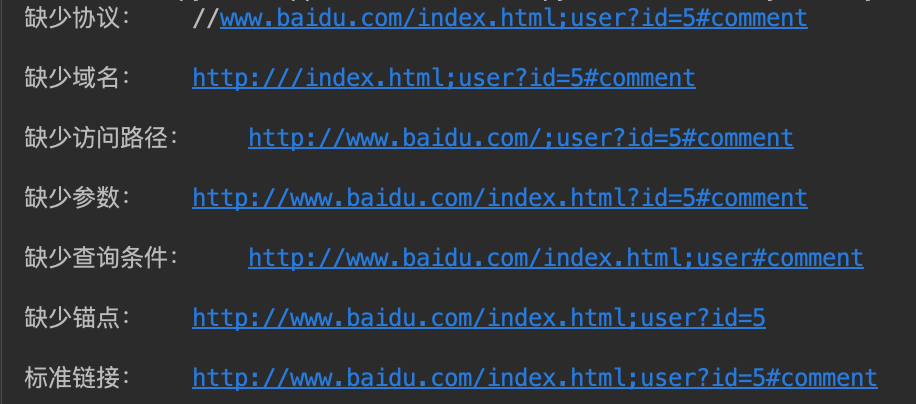
- 实现URL的构造:
urlsplit()
- 实现URL的识别和分段:
 from urllib.parse import urlsplit

 result = urlsplit('http://www.baidu.com/index.html;user?id=5#comment')

 print(result, result.scheme, result[4], sep='\n')

 # 输出结果:

 SplitResult(scheme='http', netloc='www.baidu.com', path='/index.html;user', query='id=5', fragment='comment')

 http

 comment

 # urlsplit()方法与urlparse()方法很相似,urlsplit()方法与urlparse()相比,urlsplit()将path和params合在一起放在path中,而urlparse()中,path和params是分开的
- 实现URL的识别和分段:
urlunsplit()
- 实现URL的构造:
 from urllib.parse import urlunsplit

 # urlunsplit()方法与urlunparse()方法类似,urlunsplit()传入的参数是一个可迭代的对象,

 # 不同之处是path和params是否合在一起(urlunsplit是合在一起的)

 data = ('http', 'wwww.baidu.com', 'index.html;user', 'id=5', 'comment')

 print(urlunsplit(data))

 # 输出结果:

 http://wwww.baidu.com/index.html;user?id=5#comment
urljoin()
- 完成链接的合并:
 from urllib.parse import urljoin

 # 完成链接的合并(前提是必须有特定长度的对象,链接的每一部分都要清晰分开)

 print(urljoin('http://www.baidu.com', 'FAQ.html'))

 print(urljoin('http://www.baidu.com', 'https://cuiqingcai.com/FAQ.html'))

 print(urljoin ('http://www.baidu.com/about.html', 'https://cuiqingcai.com/FAQ.html'))

 print(urljoin('http://www.baidu.com/about.html', 'https://cuiqingcai.com/FAQ.html?question=2'))

 print(urljoin ('http://www.baidu.com d=abc', 'https://cuiqingcai.com/index.php'))

 print(urljoin('http://www.baidu.com', '?category=2#comment'))

 print(urljoin('www.baidu.com', '?category=2#comment'))

 print(urljoin('www.baidu.com#comment', '?category=2'))

 # 输出:

 http://www.baidu.com/FAQ.html
 https://cuiqingcai.com/FAQ.html

 https://cuiqingcai.com/FAQ.html

 https://cuiqingcai.com/FAQ.html?question=2

 https://cuiqingcai.com/index.php

 http://www.baidu.com?category=2#comment

 www.baidu.com?category=2#comment

 www.baidu.com?category=2
- 完成链接的合并:
urlencode()
- urlencode()可以把key-value这样的键值对转换成我们想要的格式,返回的是a=1&b=2这样的字符串
 from urllib.parse import urlencode

 params = {}

 params['name'] = 'Tom'

 params['age'] = 21

 base_url = 'http://wwww.baidu.com?'

 url = base_url + urlencode(params)

 print(url)

 # 输出:

 http://wwww.baidu.com?name=Tom&age=21
- urlencode()可以把key-value这样的键值对转换成我们想要的格式,返回的是a=1&b=2这样的字符串
- parse_qs()
- 如果说urlencode()方法实现序列化,那么parse_qs()就是反序列化
 from urllib.parse import parse_qs

 query = 'name=Tom&age=21'

 print(parse_qs(query))

 # 输出:

 {'name': ['Tom'], 'age': ['']}
- 如果说urlencode()方法实现序列化,那么parse_qs()就是反序列化
parse_qsl()
- parse_qsl()方法与parse_qs()方法很相似,parse_qsl()返回的是列表,列表中的每个元素是一个元组,parse_qs()返回的是字典
 from urllib.parse import parse_qsl

 query = 'name=Tom&age=21'

 print(parse_qsl(query))

 # 输出:

 [('name', 'Tom'), ('age', '')]
- parse_qsl()方法与parse_qs()方法很相似,parse_qsl()返回的是列表,列表中的每个元素是一个元组,parse_qs()返回的是字典
quote()
- 将内容转化为URL编码的格式
 from urllib.parse import quote

 keyword = '壁纸'

 url = 'https://www.baidu.com/s?wd=' + quote(keyword)

 print(url)

 # 输出:

 https://www.baidu.com/s?wd=%E5%A3%81%E7%BA%B8
- 将内容转化为URL编码的格式
unquote()
- 进行URL解码
 from urllib.parse import unquote

 url = 'https://www.baidu.com/s?wd=%E5%A3%81%E7%BA%B8'

 print(unquote(url))

 # 输出:

 https://www.baidu.com/s?wd=壁纸
- 进行URL解码
分析Robots协议
Robots协议(爬虫协议、机器人协议)---网络爬虫排除标准(Robots Exclusion Protocol)
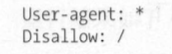
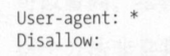
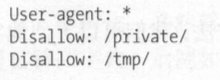
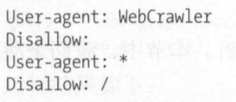
- 爬虫访问一个站点时,它首先会检查这个站点根目录下是否存在robots.txt文件,如果存在,搜索爬虫会根据其中定义的范围来爬取。
- robots.txt样例:

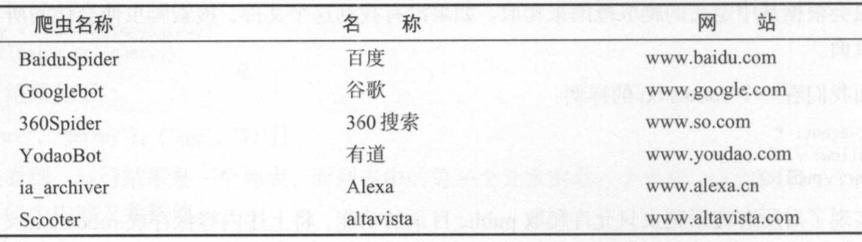
User-agent: Baiduspider 代表规则对百度爬虫是有效的(还有很多,例如Googlebot、360Spider等)
常见爬虫名称
robotparser
- urllib.robotparser.RobotFileParser(url='')根据某网站的robots.txt文件来判断一个爬取爬虫是否有权限来爬取这个网页
- set_url() 用来设置robot.txt文件的链接
- read() 读取robots.txt文件并进行分析
- parse() 解析robots.txt文件,传入的参数是robots.txt某些行内容
- can_fetch(User-agent='', URL='') 返回内容是该搜索引擎是否可以抓取这个URL,返回结果是True或False
- mtime() 返回上一次抓取和分析robots.txt的时间
- modified() 将当前时间设置为上次抓取和分析robots.txt的时间
 from urllib.robotparser import RobotFileParser

 rp = RobotFileParser()

 rp.set_url('http://www.jianshu.com/robots.txt')                 # 设置robots.txt文件的链接

 rp.read()                   # 读取robots.txt文件并进行分析

 print(rp.can_fetch('*', 'http://www.jianshu.com/p/b67554025d7d'))           # 输出该搜索引擎是否可以抓取这个URL

 print(rp.can_fetch('*', 'http://www.jianshu.com/search?q=python&page=1&type=collections'))

 # 输出:

 False

 False

 # False也就是说该搜索引擎不能抓取这个URL
from urllib.robotparser import RobotFileParser
from urllib.request import urlopen rp = RobotFileParser()
rp.parse(urlopen('http://www.jianshu.com/robots.txt').read().decode('utf-8').split('\n'))
print(rp.can_fetch('*', 'http://www.jianshu.com/p/b67554025d7d'))
print(rp.can_fetch('*', 'http://www.jianshu.com/search?q=python&page=1&type=collections')) # 输出结果与上面一个例子一样,只是上一个例子用read()方法,这个例子用parse()方法
- urllib.robotparser.RobotFileParser(url='')根据某网站的robots.txt文件来判断一个爬取爬虫是否有权限来爬取这个网页
- urllib包含模块:request模块、error模块、parse模块、robotparser模块
爬虫基本库的使用---urllib库的更多相关文章
- python爬虫---从零开始(二)Urllib库
接上文再继续我们的爬虫,这次我们来述说Urllib库 1,什么是Urllib库 Urllib库是python内置的HTTP请求库 urllib.request 请求模块 urllib.error 异常 ...
- 【Python爬虫】HTTP基础和urllib库、requests库的使用
引言: 一个网络爬虫的编写主要可以分为三个部分: 1.获取网页 2.提取信息 3.分析信息 本文主要介绍第一部分,如何用Python内置的库urllib和第三方库requests库来完成网页的获取.阅 ...
- Python爬虫(2):urllib库
爬虫常用库urllib 注:运行环境为PyCharm urllib是Python3内置的HTTP请求库 urllib.request:请求模块 urllib.error:异常处理模块 urllib.p ...
- 爬虫(二):Urllib库详解
什么是Urllib: python内置的HTTP请求库 urllib.request : 请求模块 urllib.error : 异常处理模块 urllib.parse: url解析模块 urllib ...
- 爬虫(三)-之Urllib库的基本使用
什么是Urllib Urllib是python内置的HTTP请求库 包括以下模块 urllib.request 请求模块 urllib.error 异常处理模块 urllib.parse url解 ...
- python爬虫之urllib库(一)
python爬虫之urllib库(一) urllib库 urllib库是python提供的一种用于操作URL的模块,python2中是urllib和urllib2两个库文件,python3中整合在了u ...
- python爬虫 - Urllib库及cookie的使用
http://blog.csdn.net/pipisorry/article/details/47905781 lz提示一点,python3中urllib包括了py2中的urllib+urllib2. ...
- 对于python爬虫urllib库的一些理解(抽空更新)
urllib库是Python中一个最基本的网络请求库.可以模拟浏览器的行为,向指定的服务器发送一个请求,并可以保存服务器返回的数据. urlopen函数: 在Python3的urllib库中,所有和网 ...
- (爬虫)urllib库
一.爬虫简介 什么是爬虫?通俗来讲爬虫就是爬取网页数据的程序. 要了解爬虫,还需要了解HTTP协议和HTTPS协议:HTTP协议是超文本传输协议,是一种发布和接收HTML页面的传输协议:HTTPS协议 ...
随机推荐
- ArcSDE编辑数据ArcMap系统崩溃
问题描述:用ArcMap编辑Oracle中ArcSDE空间数据,一修改,ArcMap系统就停止响应,然后崩溃 开发的Engine系统操作数据库,然后在客户端蓝屏后,数据库空间数据就出现了不可编辑状态. ...
- 解决Git报错:error: You have not concluded your merge (MERGE_HEAD exists).
Git fetch和git pull的区别, 解决Git报错:error: You have not concluded your merge (MERGE_HEAD exists). 2017年02 ...
- SpringBoot 连接kafka ssl 报 CertificateException: No subject alternative names present 异常解决
当使用较新版本SpringBoot时,对应的 kafka-client 版本也比较新,如果使用了 2.x 以上的 kafka-client ,并且配置了 kafka ssl 连接方式时,可能会报如下异 ...
- linux shell 统计当前目录下的文件个数
shell 统计当前目录下文件个数,使用管道组合命令: ls -1 | wc -l 解释: ls -1 表示一行一个列出文件名. wc -l 表示打印统计的行数. 两个命令通过管道连在一起表示打印列出 ...
- spring5 源码深度解析----- @Transactional注解的声明式事物介绍(100%理解事务)
面的几个章节已经分析了spring基于@AspectJ的源码,那么接下来我们分析一下Aop的另一个重要功能,事物管理. 事务的介绍 1.数据库事物特性 原子性多个数据库操作是不可分割的,只有所有的操作 ...
- Redis持久化的方式有哪些?优缺点分别是什么?
Redis持久化方式 持久化的目的主要是做灾难恢复,数据恢复.由于Redis的数据全都放在内存里面,如果Redis挂了,没有配置持久化的话,重启的时候数据会全部丢失. 突 ...
- 解决MVC中Model上的特性在EF框架刷新时清空的问题
MVC中关于前端数据的效验一般都是通过在Model中相关的类上打上特性来实现. 但是在我们数据库发生改变,EF框架需要刷新时会把我们在Model上的特性全部清除,这样的话,我们前端的验证就会失效. 因 ...
- uniapp 用户拒绝授权再次调起授权-语音识别、微信地址、附近地址
小程序重构,采用 uniapp 框架.记录一下踩过的坑.关于用户拒绝再次调起授权,及如何识别语音识别.微信地址.附近地址的处理. 语音识别 组件 语音识别,小程序只有录音功能,若要识别录音文件,常规做 ...
- Windows搭建SVN服务器
安装 1.下载地址:https://www.visualsvn.com/files/VisualSVN-Server-4.0.3-x64.msi 2.开始安装: 3.安装配置: 4.Next直到完成 ...
- html5视频常用API接口
一.虽然有的属性是boolean类型,但仍旧建议按照XHTML书写(属性名=”属性值”)格式,避免出现错误 (下面加粗的属性为常用属性) 属性 值 功能描述 controls controls 是否显 ...