【朝花夕拾】Android自定义View篇之(十一)View的滑动,弹性滑动与自定义PagerView
前言
转载请声明,转载自【https://www.cnblogs.com/andy-songwei/p/11213718.html】,谢谢!
由于手机屏幕尺寸有限,但是又经常需要在屏幕中显示大量的内容,这就使得必须有部分内容显示,部分内容隐藏。这就需要用一个Android中很重要的概念——滑动。滑动,顾名思义就是view从一个地方移动到另外一个地方,我们平时看到的各种很炫的移动效果,都是在基本的滑动基础上加入一些动画技术实现的。在Android中实现滑动的方式有多种,比如通过scrollTo/scrollBy,动画位移,修改位置参数等。本文主要介绍通过scrollTo/scrollBy方式来实现View的滑动,并通过该方法来实现一个自定义PagerView。
本文的主要内容如下:

一、 scrollTo/scrollBy实际滑动的是控件的内容
这里我们必须要先理解一个基本概念:使用scrollTo/scrollBy来实现滑动时,滑动的不是控件本身的位置,而是控件的内容。理解这一点,可以结合ScrollView控件,我们平时使用的使用会在xml布局文件中固定ScrollView的大小和位置,这也是我们肉眼看到的信息。但是如果我们左右/上下滑动滚动条,会发现里面原来还“藏”了许多“风景”。控件就像一个窗户,我们看到的只有窗户大小的内容,实际上窗户中“另有乾坤”。就像下面这张图显示的一样:
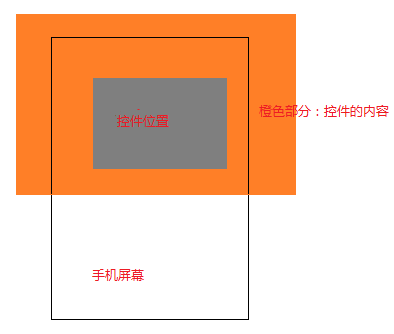
当我们手指在控件上滑动时,移动的其实是橙色部分表示的内容,而不是灰色部分表示的控件位置。
二、scrollBy实际上通过调用scrollTo来实现
scrollTo(int x, int y)方法的作用是:滑动到(x,y)这个坐标点,是一个绝对位置。
scrollBy(int x, int y)方法的作用是:在原来的位置上,水平方向向左滑动x距离,竖直方向向上滑动的y距离(滑动方向问题我们后面会详细讲),是一个相对位置。
这里我们先看看这两个函数的源码:
 //===========View.java=========

 /**

      * Set the scrolled position of your view. This will cause a call to

      * {@link #onScrollChanged(int, int, int, int)} and the view will be

      * invalidated.

      * @param x the x position to scroll to

      * @param y the y position to scroll to

      */

     public void scrollTo(int x, int y) {

         if (mScrollX != x || mScrollY != y) {

             int oldX = mScrollX;

             int oldY = mScrollY;

             mScrollX = x;

             mScrollY = y;

             invalidateParentCaches();

             onScrollChanged(mScrollX, mScrollY, oldX, oldY);

             if (!awakenScrollBars()) {

                 postInvalidateOnAnimation();

             }

         }

     }

     /**

      * Move the scrolled position of your view. This will cause a call to

      * {@link #onScrollChanged(int, int, int, int)} and the view will be

      * invalidated.

      * @param x the amount of pixels to scroll by horizontally

      * @param y the amount of pixels to scroll by vertically

      */

     public void scrollBy(int x, int y) {

         scrollTo(mScrollX + x, mScrollY + y);

     }
注释中也说明了这两个方法的功能,也可以看到scrollBy,就是调用的scrollTo来实现的,所以实际上这两个方法功能一样,实际开发中看那个方便就用那个。这部分源码逻辑比较简单,这里就不啰嗦了,需要注意的是mScrollX/mScrollY这两个变量,后面会用到,它们表示当前内容已经滑动的距离(向左/上滑动为正,向右/下滑动为负,方向问题下面详细讲)。
三、滑动坐标系和View坐标系正好相反
上面一节中介绍过,内容向左/上滑动时mScrollX/mScrollY为正,向右/下滑动时为负,这似乎和我们所理解的正好相反。我们平时理解的是基于View的坐标系,水平向右为X轴正方向,竖直向下为Y轴正方向。但是滑动坐标系和View坐标系正好相反,对于滑动而言,水平向左为X轴正方向,竖直向上为Y轴正方向,原点都还是View控件的左上角顶点。如下图所示:
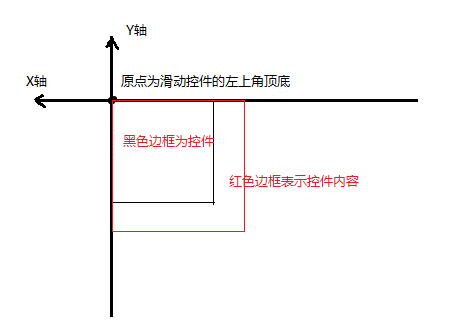
仅从数值上看,mScrollX表示控件内容左边缘到控件左边缘的偏移距离,mScrollY表示控件内容上边缘的距离与控件上边缘的偏移距离。在实际开发中,经常通过getScrollX()/getScrollY()来获取mScrollX/mScrollY的值。
 //===========View.java=========

 public final int getScrollX() {

     return mScrollX;

 }

 ......

 public final int getScrollY() {

     return mScrollY;

 }
对于其值的正负问题,读者可以自己通过打印log的方式来演示一下,比较简单,此处不赘述了。这里再提供几个图来体会一下滑动方向的问题。

水平方向的滑动
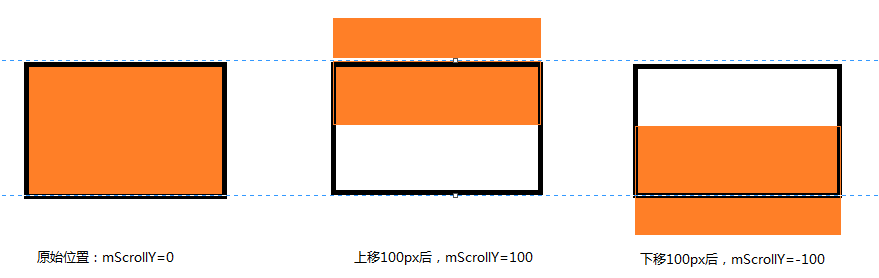
竖直方向的滑动
四、通过Scroller实现弹性滑动
通过scrollTo/scrollBy实现滑动时,是一瞬间来实现的。这样看起来会比较生硬和突兀,用户体验显然是不友好的,很多场景下,我们希望这个滑动是一个渐近式的,在给定的一段时间内缓慢移动到目标坐标。Android提供了一个Scroller类,来辅助实现弹性滑动,至于它的使用方法,下一点的代码中有详细演示,红色加粗的文字部分显示了使用步骤,这里结合该示例进行讲解。
通过Scroller实现弹性滑动的基本思想是,将一整段的滑动分为很多段微小的滑动,并在一定时间段内一一完成。
我们来看看CustomPagerView中第111行startScroll方法的源码:
 //===================Scroller.java==================

 /**

      * Start scrolling by providing a starting point, the distance to travel,

      * and the duration of the scroll.

      *

      * @param startX Starting horizontal scroll offset in pixels. Positive

      *        numbers will scroll the content to the left.

      * @param startY Starting vertical scroll offset in pixels. Positive numbers

      *        will scroll the content up.

      * @param dx Horizontal distance to travel. Positive numbers will scroll the

      *        content to the left.

      * @param dy Vertical distance to travel. Positive numbers will scroll the

      *        content up.

      * @param duration Duration of the scroll in milliseconds.

      */

     public void startScroll(int startX, int startY, int dx, int dy, int duration) {

         mMode = SCROLL_MODE;

         mFinished = false;

         mDuration = duration;

         mStartTime = AnimationUtils.currentAnimationTimeMillis();

         mStartX = startX;

         mStartY = startY;

         mFinalX = startX + dx;

         mFinalY = startY + dy;

         mDeltaX = dx;

         mDeltaY = dy;

         mDurationReciprocal = 1.0f / (float) mDuration;

     }
startScroll方法实际上没有做移动的操作,只是提供了本次完整滑动的开始位置,需要滑动的距离,以及完成这次滑动所需要的时间。
第113行的invalidate()方法会让CustomPagerView重绘,这会调用View中的draw(...)方法,
 boolean draw(Canvas canvas, ViewGroup parent, long drawingTime) {

     ......

     computeScroll();

     ......

 }

 ......

 /**

  * Called by a parent to request that a child update its values for mScrollX

  * and mScrollY if necessary. This will typically be done if the child is

  * animating a scroll using a {@link android.widget.Scroller Scroller}

  * object.

  */

 public void computeScroll() {

 }
draw()方法调用了computeScroll(),这是一个空方法,在CustomPagerView的126行重写了该方法,重绘时会进入到这个方法体中。第127行中有一个判断条件,看看它的源码:
 /**

      * Call this when you want to know the new location.  If it returns true,

      * the animation is not yet finished.

      */

     public boolean computeScrollOffset() {

         if (mFinished) {

             return false;

         }

         int timePassed = (int)(AnimationUtils.currentAnimationTimeMillis() - mStartTime);

         if (timePassed < mDuration) {

             switch (mMode) {

             case SCROLL_MODE:

                 final float x = mInterpolator.getInterpolation(timePassed * mDurationReciprocal);

                 mCurrX = mStartX + Math.round(x * mDeltaX);

                 mCurrY = mStartY + Math.round(x * mDeltaY);

                 break;

             case FLING_MODE:

                 ......

                 break;

             }

         }

         else {

             mCurrX = mFinalX;

             mCurrY = mFinalY;

             mFinished = true;

         }

         return true;

     }
这个判断语句是在判断本次滑动是否在在继续,如果还没结束,会返回false,重写的computeScroll()中第130~135行会继续执行,直到滑动完成为止。同时这个方法还会根据已经滑动的时间来更新当前需要移动到位置mCurrX/mCurrY。所以我们可以看到,在滑动还没结束时,第134行就执行scrollTo方法来滑动一段距离。第134行又是一个刷新,让CustomPagerView重绘,又会调用draw(...)方法,computeScroll方法又被调用了,这样反复调用,直到整个滑动过程结束。(至于多长时间会执行一直刷新,笔者目前还没找到更深入的代码,有兴趣的读者可以自己再深入研究研究)
最后这里做个总结,Scroller辅助实现弹性滑动的原理为: Scroller本身不能实现滑动,而是通过startScroll方法传入起始位置、要滑动的距离和执行完滑动所需的时间,再通过invalidate刷新界面来调用重写的computeScroll方法,在没有结束滑动的情况下,computeScroll中执行scrollTo方法来滑动一小段距离,并再次刷新界面调用重写的computeScroll方法,如此反复,直到滑动过程结束。
五、实现一个自定义PagerView
本示例结合了该系列前面文章中提到的自定义View,View的绘制流程,触摸事件处理,速度等方面的知识,不明白的可以先去看看这些文章,打一下基础。本示例的项目结构非常简单,这里就不提供下载地址了。
这里先看看效果,一睹为快吧。

自定义一个view,继承自ViewGroup
 public class CustomPagerView extends ViewGroup {

     private static final String TAG = "songzheweiwang";

     private Scroller mScroller;

     private VelocityTracker mVelocityTracker;

     private int mMaxVelocity;

     private int mCurrentPage = 0;

     private int mLastX = 0;

     private List<Integer> mImagesList;

     public CustomPagerView(Context context, @Nullable AttributeSet attrs) {

         super(context, attrs);

         init(context);

     }

     private void init(Context context) {

         //第一步:实例化一个Scroller实例

         mScroller = new Scroller(context);

         mVelocityTracker = VelocityTracker.obtain();

         mMaxVelocity = ViewConfiguration.get(context).getScaledMinimumFlingVelocity();

         Log.i(TAG, "mMaxVelocity=" + mMaxVelocity);

     }

     //添加需要显示的图片,并显示

     public void addImages(Context context, List<Integer> imagesList) {

         if (imagesList == null) {

             mImagesList = new ArrayList<>();

         }

         mImagesList = imagesList;

         showViews(context);

     }

     private void showViews(Context context) {

         if (mImagesList == null) {

             return;

         }

         for (int i = 0; i < mImagesList.size(); i++) {

             ImageView imageView = new ImageView(context);

             LayoutParams params = new LayoutParams(LayoutParams.MATCH_PARENT, LayoutParams.MATCH_PARENT);

             imageView.setLayoutParams(params);

             imageView.setBackgroundResource(mImagesList.get(i));

             addView(imageView);

         }

     }

     @Override

     protected void onMeasure(int widthMeasureSpec, int heightMeasureSpec) {

         super.onMeasure(widthMeasureSpec, heightMeasureSpec);

         int count = getChildCount();

         for (int i = 0; i < count; i++) {

             View childView = getChildAt(i);

             childView.measure(widthMeasureSpec, heightMeasureSpec);

         }

     }

     @Override

     protected void onLayout(boolean changed, int l, int t, int r, int b) {

         int count = getChildCount();

         for (int i = 0; i < count; i++) {

             View childView = getChildAt(i);

             childView.layout(i * getWidth(), t, (i + 1) * getWidth(), b);

         }

     }

     @Override

     public boolean onTouchEvent(MotionEvent event) {

         mVelocityTracker.addMovement(event);

         int x = (int) event.getX();

         switch (event.getActionMasked()) {

             case MotionEvent.ACTION_DOWN:

                 //如果动画没有结束,先停止动画

                 if (!mScroller.isFinished()) {

                     mScroller.abortAnimation();

                 }

                 mLastX = x;

                 break;

             case MotionEvent.ACTION_MOVE:

                 int dx = x - mLastX;

                 //滑动坐标系正好和View坐标系是反的,dx为负数表示向右滑,为正表示向左滑

                 scrollBy(-dx, 0);

                 mLastX = x;

                 break;

             case MotionEvent.ACTION_UP:

                 mVelocityTracker.computeCurrentVelocity(1000);

                 int xVelocity = (int) mVelocityTracker.getXVelocity();

                 Log.i(TAG, "xVelocity=" + xVelocity);

                 if (xVelocity > mMaxVelocity && mCurrentPage > 0) {

                     //手指快速右滑后抬起,且当前页面不是第一页

                     scrollToPage(mCurrentPage - 1);

                 } else if (xVelocity < -mMaxVelocity && mCurrentPage < getChildCount() - 1) {

                     //手指快速左滑后抬起,且当前页面不是最后一页

                     scrollToPage(mCurrentPage + 1);

                 } else {

                     slowScrollToPage();

                 }

                 break;

         }

         return true;

     }

     private void scrollToPage(int pageIndex) {

         mCurrentPage = pageIndex;

         if (mCurrentPage > getChildCount() - 1) {

             mCurrentPage = getChildCount() - 1;

         }

         int scrollX = getScrollX();

         int dx = mCurrentPage * getWidth() - scrollX;

         int duration = Math.abs(dx) * 2;

         Log.i(TAG, "[scrollToPage]scrollX=" + scrollX + ";dx=" + dx + ";duration=" + duration);

         //第二步:调用startScroll方法,指定起始坐标,目的坐标和滑动时长

         mScroller.startScroll(scrollX, 0, dx, 0, duration);

         //第三步:让界面重绘

         invalidate();

     }

     private void slowScrollToPage() {

         int scrollX = getScrollX();

         //缓慢滑动式,滑动一半以上后自动换到下一张,滑动不到一半则还原

         int whichPage = (scrollX + getWidth() / 2) / getWidth();

         Log.i(TAG, "[slowScrollToPage]scrollX=" + scrollX + ";whichPage=" + whichPage);

         scrollToPage(whichPage);

     }

     //第四步:重写computeScroll方法,在该方法中通过scrollTo方法来完成滑动,并重绘

     @Override

     public void computeScroll() {

         boolean isAnimateRun = mScroller.computeScrollOffset();

         Log.i(TAG, "[computeScroll]isAnimateRun=" + isAnimateRun);

         if (isAnimateRun) {

             //当前页面的右上角,相对于第一页右上角的坐标

             int curX = mScroller.getCurrX();

             int curY = mScroller.getCurrY();

             Log.i(TAG, "[computeScroll]curX=" + curX + ";curY=" + curY);

             scrollTo(curX, curY);

             postInvalidate();

         }

     }

     @Override

     protected void onDetachedFromWindow() {

         super.onDetachedFromWindow();

         if (mVelocityTracker != null) {

             mVelocityTracker.recycle();

             mVelocityTracker = null;

         }

     }

 }
代码看起来有点长,其实逻辑很简单。基本思路是,使用者添加要显示的图片资源id列表,在CustomPagerView中为每一个要显示的图片实例一个ImageView进行显示。在滑动的过程中,如果速度比较快(大于某个阈值),手指抬起后,就会滑动下一页。如果速度很慢,手指抬起时,如果手指滑动的距离超过了屏幕的一半,则自动滑到下一页,如果没滑到一半,本次就不翻页,仍然停留在本页。
在布局文件中引入该控件
 //=========activity_scroller_demo.xml=========

 <?xml version="1.0" encoding="utf-8"?>

 <LinearLayout xmlns:android="http://schemas.android.com/apk/res/android"

     android:layout_width="match_parent"

     android:layout_height="match_parent"

     android:orientation="vertical">

     <com.example.demos.customviewdemo.CustomPagerView

         android:id="@+id/viewpager"

         android:layout_width="match_parent"

         android:layout_height="300dp" />

 </LinearLayout>
在Activity中使用该控件
 public class ScrollerDemoActivity extends AppCompatActivity {

     private static final String TAG = "ScrollerDemoActivity";

     @Override

     protected void onCreate(Bundle savedInstanceState) {

         super.onCreate(savedInstanceState);

         setContentView(R.layout.activity_scroller_demo);

         initViews();

     }

     private void initViews() {

         List<Integer> mImageList = new ArrayList<>();

         mImageList.add(R.drawable.dog);

         mImageList.add(R.drawable.test2);

         mImageList.add(R.drawable.test3);

         mImageList.add(R.drawable.test4);

         CustomPagerView customPagerView = findViewById(R.id.viewpager);

         customPagerView.addImages(this, mImageList);

     }

 }
这里再啰嗦一句,本示例很好地演示了一个自定义View的开发,包含了不少自定义View需要掌握的基础知识点。通过该代码,希望能够强化理解前面文章中介绍的相关知识。
六、其他实现滑动及弹性滑动的方法
前面只介绍了通过scrollTo/scrollBy,并结合Scroller来实现滑动和弹性滑动的方式,实际上还有很多方式来实现这些效果。比如,要实现滑动,还有使用动画以及修改控件位置参数等方式。要实现弹性滑动,已经知道了基本思路是把一整段滑动分为很多小段滑动来一一实现,那么还可以使用定时器,Handler,Thread/sleep等方式来实现。这些方法就不一一介绍了,在使用时可以根据实际的场景和需求选择实现方式。
结语
本文主要介绍通过scrollTo/scrollBy来实现控件内容的滑动,以及结合Scroller实现弹性滑动的方式。由于笔者水平和经验有限,有描述不准确或不正确的地方,欢迎来拍砖,谢谢!
参考资料
《Android开发艺术探索》
【朝花夕拾】Android自定义View篇之(十一)View的滑动,弹性滑动与自定义PagerView的更多相关文章
- 【朝花夕拾】Android自定义View篇之(八)多点触控(上)MotionEvent简介
前言 在前面的文章中,介绍了不少触摸相关的知识,但都是基于单点触控的,即一次只用一根手指.但是在实际使用App中,常常是多根手指同时操作,这就需要用到多点触控相关的知识了.多点触控是在Android2 ...
- 【朝花夕拾】Android自定义View篇之(六)Android事件分发机制(中)从源码分析事件分发逻辑及经常遇到的一些“诡异”现象
前言 转载请注明,转自[https://www.cnblogs.com/andy-songwei/p/11039252.html]谢谢! 在上一篇文章[[朝花夕拾]Android自定义View篇之(五 ...
- 【朝花夕拾】Android自定义View篇之(一)View绘制流程
前言 转载请申明转自[https://www.cnblogs.com/andy-songwei/p/10955062.html]谢谢! 自定义View.多线程.网络,被认为是Android开发者必须牢 ...
- 【朝花夕拾】Android自定义View篇之(四)自定义View的三种实现方式及自定义属性使用介绍
前言 转载请声明,转自[https://www.cnblogs.com/andy-songwei/p/10979161.html],谢谢! 尽管Android系统提供了不少控件,但是有很多酷炫效果仍然 ...
- Android查缺补漏(View篇)--自定义 View 的基本流程
View是Android很重要的一部分,常用的View有Button.TextView.EditView.ListView.GridView.各种layout等等,开发者通过对这些View的各种组合以 ...
- Android多线程之(一)——View.post()篇
前言 提起View.post(),相信不少童鞋一点都不陌生,它用得最多的有两个功能,使用简便而且实用: 1)在子线程中更新UI.从子线程中切换到主线程更新UI,不需要额外new一个Handler实例来 ...
- Android开源项目第一篇——个性化控件(View)篇
本文为那些不错的Android开源项目第一篇——个性化控件(View)篇,主要介绍Android上那些不错个性化的View,包括ListView.ActionBar.Menu.ViewPager.Ga ...
- Android开发UI之开源项目第一篇——个性化控件(View)篇
原文:http://blog.csdn.net/java886o/article/details/24355907 本文为那些不错的Android开源项目第一篇——个性化控件(View)篇,主要介绍A ...
- Android之开源项目view篇
本文转自:http://www.trinea.cn/android/android-open-source-projects-view/ 主要介绍Android上那些不错个性化的View,包括List ...
随机推荐
- WPF 添加外部ResourceDirectory
如果Resource资源文件在程序集中,可直接如下将资源文件添加当当前运行时 Application.Current.Resources.MergedDictionaries.Add(new Reso ...
- .NET错误提示之:无法更新EntitySet“TableName”因为它有一个DefiningQuery
使用LINQ 进行提交数据时发生的错误提示 原因:提交的对象表 没有设主键.
- Python:Numpy学习
import numpy as np # 基础属性 array = np.array([[[1,2,3], [0,0,1]], [[1,2,3], [0,0,1]]], dtype = np.int6 ...
- Windows下libevent C++封装类实现(为什么要使用封装好的网络库?)
题记 windows平台下对于服务器高并发的网络模型选型中,使用libevent是个不错的选择. 本文的背景基于:国内博客对于libevent大多介绍linux实现,大多是c语言的实现,Windows ...
- 国外优秀的UI设计资源库收集
国外优秀的UI设计资源库 网站设计或者说UI设计对于Web上的运用是非常的关键,一个站做得好不好,能不能吸引人的眼球,设计占了不低的地位,但话又说回来,Web前端人员又有多少人是设计专业毕业,具有这方 ...
- jQuery.media.js的使用方法
该插件可以播放多种类型的多媒体文件包括:Flash, Quicktime, Windows Media Player, Real Player, MP3, Silverlight, PDF等,前提 ...
- 图形界面编程成就了C++
听有人说C#.VB比C++好是因为做界面方便还算傻得可爱,听有人说用C++做数值计算而不屑于做界面可就对不起咱C++的恩人了.这我可要说道说道. 想当年C++刚出江湖,名门出身,自立门派,想抢Obje ...
- SpringBoot(十九)_spring.profiles.active=@profiles.active@ 的使用
现在在的公司用spring.profiles.active=@profiles.active@ 当我看到这个的时候,一脸蒙蔽,这个@ 是啥意思. 这里其实是配合 maven profile进行选择不同 ...
- Spring Boot:整合JdbcTemplate
综合概述 Spring对数据库的操作在jdbc上面做了更深层次的封装,而JdbcTemplate便是Spring提供的一个操作数据库的便捷工具.我们可以借助JdbcTemplate来执行所有数据库操作 ...
- vmware vSphere Data Protection 6.1 使用备份、恢复、报告
一.6个选项卡说明 1.getting started 开始,提供VDP功能概述以及指向创建备份作业向导.恢复向导.报告选项卡的快速连接 2.backup 提供已计划备份作业的列表以及有关备份作业的详 ...