
Hibernate基于【XML】和【注解】——完整实例
Eclipse中新建Java Project工程:
工程结构 和 需要的Jar包:
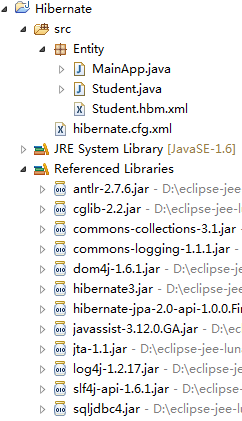
我用的SqlServer数据库,所以连接数据库的Jar包是sqljdbc4.jar
一、基于XML配置
1、实体类(对应数据表中的字段)
package Entity;

import javax.persistence.Column;

import javax.persistence.Entity;

import javax.persistence.GeneratedValue;

import javax.persistence.Id;

import javax.persistence.Table;

public class Student {

private int id;

    private String name;

    private int age;

    public Student(){}

    public Student(int id,String name,int age){

        this.id=id;

        this.name=name;

        this.age=age;

    }

    public int getId() {

        return id;

    }

    public void setId(int id) {

        this.id = id;

    }

    public String getName() {

        return name;

    }

    public void setName(String name) {

        this.name = name;

    }

    public int getAge() {

        return age;

    }

    public void setAge(int age) {

        this.age = age;

    }

}
2、Student.hbm.xml(XML文件 将实体类 对应 数据表 和 表中字段)
<?xml version="1.0" encoding="utf-8"?>

<!DOCTYPE hibernate-mapping PUBLIC

 "-//Hibernate/Hibernate Mapping DTD//EN"

 "http://www.hibernate.org/dtd/hibernate-mapping-3.0.dtd">

<hibernate-mapping>

   <class name="Entity.Student" table="Student">

      <meta attribute="class-description">

         This class contains the employee detail.

      </meta>

      <id name="id" type="int" column="id">

         <generator class="native"/>

      </id>

      <property name="name" column="name" type="string"/>

      <property name="age" column="age" type="int"/>

   </class>

</hibernate-mapping>
3、hibernate.cfg.xml(配置连接数据库、映射Student.hbm.xml文件)
<?xml version='1.0' encoding='utf-8'?>

<!DOCTYPE hibernate-configuration PUBLIC

        "-//Hibernate/Hibernate Configuration DTD 3.0//EN"

        "http://www.hibernate.org/dtd/hibernate-configuration-3.0.dtd">

<hibernate-configuration>

    <session-factory>

        <!-- Database connection settings 数据库连接配置-->

        <property name="connection.driver_class">com.microsoft.sqlserver.jdbc.SQLServerDriver</property>

        <property name="connection.url">jdbc:sqlserver://localhost:1433;database=test</property>

        <property name="connection.username">sa</property>

        <property name="connection.password">Zhutou0216</property>

        <!-- JDBC connection pool (use the built-in) -->

        <property name="connection.pool_size">1</property>

        <!-- SQL dialect 方言-->

        <property name="dialect">org.hibernate.dialect.SQLServerDialect</property>

        <!-- Echo all executed SQL to stdout 在控制台打印后台sql语句-->

        <property name="show_sql">true</property>

        <!-- 格式化语句 -->

       <property name="format_sql">true</property>

        <!-- Drop and re-create the database schema on startup -->

        <property name="hbm2ddl.auto">update</property>

        <!-- 映射数据库对应实体类: xml配置文件生效方式 -->

        <mapping resource="entity/Student.hbm.xml" />

    </session-factory>

</hibernate-configuration>
4、MainApp(运行类)
package Entity;

import org.hibernate.Session;

import org.hibernate.SessionFactory;

import org.hibernate.cfg.Configuration;

public class MainApp {

    public static void main(String[] args) {

        Configuration cfg = new Configuration().configure();

        SessionFactory factory = cfg.buildSessionFactory();

        Session session = null;

        try{

            session = factory.openSession();

            session.beginTransaction();

            Student student = new Student();

            student.setName("en");

            student.setAge(88);

            session.save(student);

            session.getTransaction().commit();

        }catch(Exception e){

            e.printStackTrace();

            session.getTransaction().rollback();

        }finally{

            if(session != null){

                if(session.isOpen()){

                    //关闭session

                    session.close();

                }

            }

        }

    }

}
二、基于注解配置
1、实体类(在实体类中用注解方式对应数据表和表中字段,因此用不着Student.hbm.xml了)
package Entity;

import javax.persistence.Column;

import javax.persistence.Entity;

import javax.persistence.GeneratedValue;

import javax.persistence.Id;

import javax.persistence.Table;

@Entity

@Table(name="Student")

public class Student {

    @Id @GeneratedValue

    @Column(name="id")

    private int id;

    @Column(name="name")

    private String name;

    @Column(name="age")

    private int age;

    public Student(){}

    public Student(int id,String name,int age){

        this.id=id;

        this.name=name;

        this.age=age;

    }

    public int getId() {

        return id;

    }

    public void setId(int id) {

        this.id = id;

    }

    public String getName() {

        return name;

    }

    public void setName(String name) {

        this.name = name;

    }

    public int getAge() {

        return age;

    }

    public void setAge(int age) {

        this.age = age;

    }

}
2、hibernate.cfg.xml(配置连接数据库,映射实体类)
<?xml version='1.0' encoding='utf-8'?>

<!DOCTYPE hibernate-configuration PUBLIC

        "-//Hibernate/Hibernate Configuration DTD 3.0//EN"

        "http://www.hibernate.org/dtd/hibernate-configuration-3.0.dtd">

<hibernate-configuration>

    <session-factory>

        <!-- Database connection settings 数据库连接配置-->

        <property name="connection.driver_class">com.microsoft.sqlserver.jdbc.SQLServerDriver</property>

        <property name="connection.url">jdbc:sqlserver://localhost:1433;database=test</property>

        <property name="connection.username">sa</property>

        <property name="connection.password">Zhutou0216</property>

        <!-- JDBC connection pool (use the built-in) -->

        <property name="connection.pool_size">1</property>

        <!-- SQL dialect 方言-->

        <property name="dialect">org.hibernate.dialect.SQLServerDialect</property>

        <!-- Echo all executed SQL to stdout 在控制台打印后台sql语句-->

        <property name="show_sql">true</property>

        <!-- 格式化语句 -->

       <property name="format_sql">true</property>

        <!-- Drop and re-create the database schema on startup -->

        <property name="hbm2ddl.auto">update</property>

        <!-- 映射数据库对应实体类: xml配置文件生效方式 -->

        <!-- <mapping resource="entity/Student.hbm.xml" /> -->

        <!-- 映射数据库对应实体类:注解生效方式生效方式 -->

        <mapping class="Entity.Student"/>

    </session-factory>

</hibernate-configuration>
3、MainApp(这里没有改变)
package Entity;

import org.hibernate.Session;

import org.hibernate.SessionFactory;

import org.hibernate.cfg.Configuration;

public class MainApp {

    public static void main(String[] args) {

        Configuration cfg = new Configuration().configure();

        SessionFactory factory = cfg.buildSessionFactory();

        Session session = null;

        try{

            session = factory.openSession();

            session.beginTransaction();

            Student student = new Student();

            student.setName("en");

            student.setAge(88);

            session.save(student);

            session.getTransaction().commit();

        }catch(Exception e){

            e.printStackTrace();

            session.getTransaction().rollback();

        }finally{

            if(session != null){

                if(session.isOpen()){

                    //关闭session

                    session.close();

                }

            }

        }

    }

}
Hibernate基于【XML】和【注解】——完整实例的更多相关文章
- mybatis学习一:基于xml与注解配置入门实例与问题
注:本case参考自:http://www.cnblogs.com/ysocean/p/7277545.html 一:Mybatis的介绍: MyBatis 本是apache的一个开源项目iBatis ...
- MyBatis 项目开发中是基于 XML 还是注解?
只要你对 MyBatis 有所认识和了解,想必知道 MyBatis 有两种 SQL 语句映射模式,一种是基于注解,一种是基于XML. 基于 XML <mapper namespace=" ...
- spring 基于XML和注解的两种事务配置方式
<?xml version="1.0" encoding="UTF-8"?> <beans xmlns="http://www.sp ...
- mybatis学习笔记(二)-- 使用mybatisUtil工具类体验基于xml和注解实现
项目结构 基础入门可参考:mybatis学习笔记(一)-- 简单入门(附测试Demo详细过程) 开始体验 1.新建项目,新建类MybatisUtil.java,路径:src/util/Mybatis ...
- spring的AspectJ基于XML和注解(前置、后置、环绕、抛出异常、最终通知)
1.概念 (1)AspectJ是一个基于Java语言的AOP框架 (2)Spring2.0以后新增了对AspectJ切入点表达式的支持 (3)AspectJ是AspectJ1.5的新增功能,通过JDK ...
- mybatis学习笔记(四)-- 为实体类定义别名两种方法(基于xml映射)
下面示例在mybatis学习笔记(二)-- 使用mybatisUtil工具类体验基于xml和注解实现 Demo的基础上进行优化 以新增一个用户为例子,原UserMapper.xml配置如下: < ...
- JavaWeb中点赞功能的实现及完整实例
实现原理1.功能描述:一个用户对同一文章只能点赞一次,第二次就是取消赞2.建立一个点赞表great,字段有文章ID(aid),点赞用户ID(uid)3.当有用户进行点赞行为时,使用aid和uid搜索点 ...
- hibernate中.hbm.xml和注解方式自动生成数据表的简单实例(由新手小白编写,仅适用新手小白)
绝逼新手小白,so 请大神指点! 如果真的错的太多,错的太离谱,错的误导了其他小伙伴,还望大神请勿喷,大神请担待,大神请高抬贵嘴......谢谢. 好了,正题 刚接触ssh,今天在搞使用.hbm.xm ...
- Hibernate+Oracle注解式完整实例
MyEclipse10,新建Web Project,取名hibernate, jar包 1.Cat.java (实体类) package com.hibernate.bean; import java ...
随机推荐
- Python3基础 os listdir curdir pardir 查看工作目录及其上一级目录的所有文件名
Python : 3.7.0 OS : Ubuntu 18.04.1 LTS IDE : PyCharm 2018.2.4 Conda ...
- DSDS,双模,双卡,双待,单待,双通,单通,概念及相互关系?【转】
本文转载自:https://blog.csdn.net/dirk_it/article/details/7178058?utm_source=blogxgwz9 DSDS:双卡双待 DualSimDu ...
- PyQt5 - 01 使用qt creator创建第一个pyqt5界面程序
1. 安装Qt Creator qt creator下载点我 2. 利用Qt Creator创建界面 点击文件 -> 新建文件或项目 选择Qt -> Qt设计师界面类 选择一个模版,创建一 ...
- grep如何结尾匹配
答:grep "jello$" 如:git branch输出以下内容: yes-jello-good yes-jellos yes-jello 那么使用以下命令只能过滤出一行: $ ...
- ubuntu搭建discuz论坛
a.安装mysql database 1.安装mysql服务端 sudo apt-get install mysql-server (在此过程中要求为mysql的root用户设置一个密码) 2.安装 ...
- P4 Tutorials Flowlet Switching
Github链接: Exercise 2: Implementing TCP flowlet switching P4 Tutorials Flowlet Switching 最近P4社区更新了Tut ...
- NYOJ 16 矩形嵌套(经典DP)
http://acm.nyist.net/JudgeOnline/problem.php?pid=16 矩形嵌套 时间限制:3000 ms | 内存限制:65535 KB 难度: ...
- blast 数据库说明
Peptide Sequence Databases蛋白序列的数据库 nrAll non-redundant GenBank CDS translations + RefSeq Proteins + ...
- python 集合从头部删除元素
num_set = , , , , ]) num_set.pop() print(num_set) num_set.pop() print(num_set)
- MSVC_代码优化
测试环境: Win7x64 cn_visual_studio_2010_ultimate_x86_dvd_532347.iso qt-opensource-windows-x86-msvc2010_o ...