HTML5 表单元素和属性
HTML5 表单元素和属性学习
版权声明:未经博主授权,内容严禁转载 !
表单元素简介
无论实现提交功能还是展示页面功能,表单在HTML中的作用都十分重要。
在其他版本的HTML中,表单能够包含的元素很少,属性也不多。
再起表单验证需要写大量的 JavaScript 代码去实现。
在HTML5中,增加了许多标签和属性,为开发带来了极大的便利。
表单元素 - datalist
<datalist> 元素规定输入与的选项列表。
此元素可以使用list属性穿件一组列表项,只作为输入框提示。
list 属性规定 form 或者 input 域拥有自动完成功能,例如:
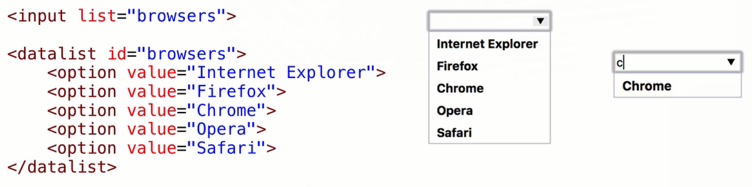
<input list="mybrowser">

<datalist id="mybrowser">

  <option value="internet explorer"></option>

  <option value="firfox"></option>

  <option value="chrome"></option>

  <option value="opera"></option>

  <option value="safari"></option>

</datalist>
list 属性需要和 id 属性相对应。
该元素可以实现内容的自动补全,但是仍然支持用户自己手动输入其他内容!
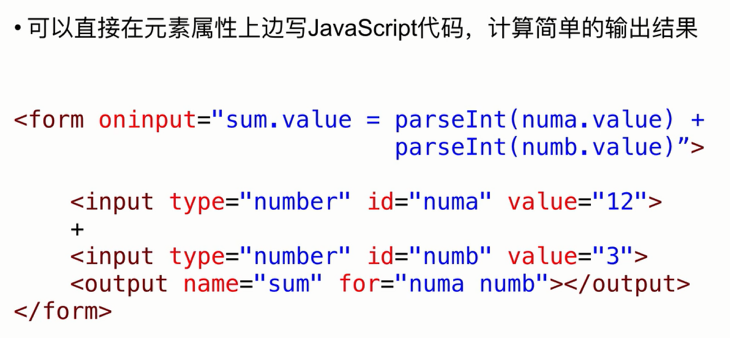
表单元素 - output
<output> 元素用于不同类型的输出,比如计算或脚本输出。
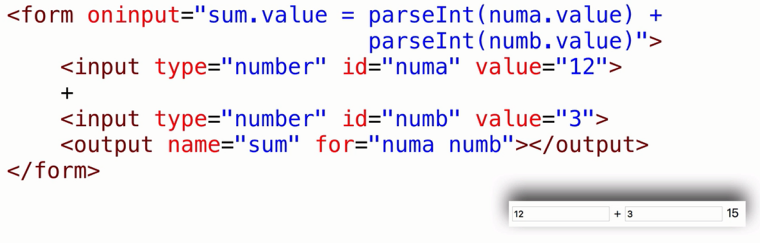
<form oninput="sum.value = parseInt(numa.value) + parseInt(numb.value)">

  <input type="number" id="numa" value="12"> +

  <input type="number" id="numb" value="3">

  <output name="sum" for="numa numb"></output>

</form>
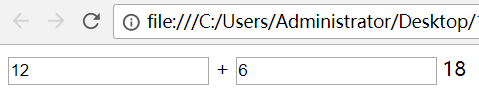
上边案例为标准案例,名字必须按照上边的格式编写。
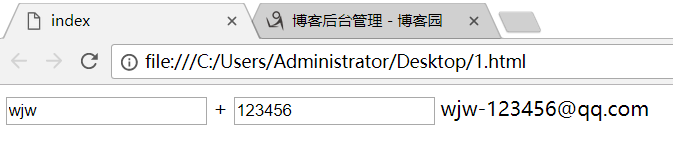
小练习:自动获取用户的邮箱地址
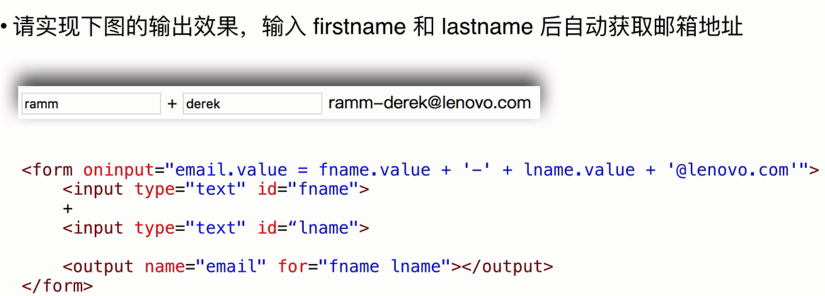
案例代码:
<form oninput="email.value = fname.value  + '-' + lname.value +'@qq.com' ">

  <input type="text" id="fname" value=""> +

  <input type="text" id="lname" value="">

  <output name="email" for="numa numb"></output>

</form>
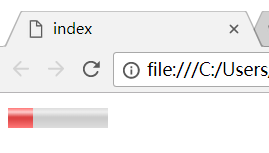
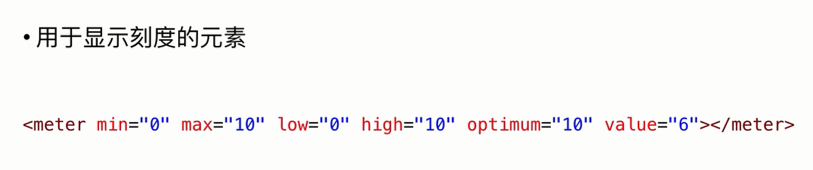
表单元素 - meter
<meter> 元素与 <progress> 元素相似,可用于显示刻度,而不是进度。
meter 元素的常用属性:
- min 和 max :设置最小值和最大值边界。
- value:确定测量的值。
- low、high 和 optimum :将范围划分为不同的部分和设置最佳位置。
案例代码:
<!-- 例如游戏血条 -->

<meter value="25" min="0" max="100"

  low="30"

  high="80"

  optimum="100">

</meter>
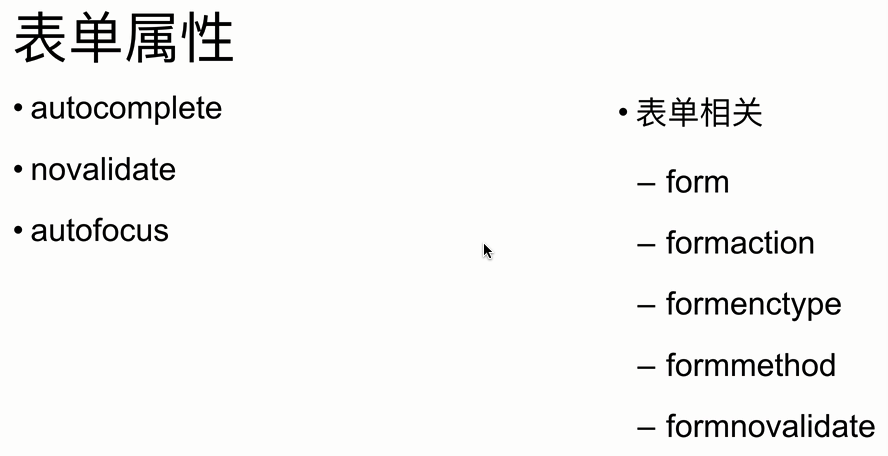
表单属性
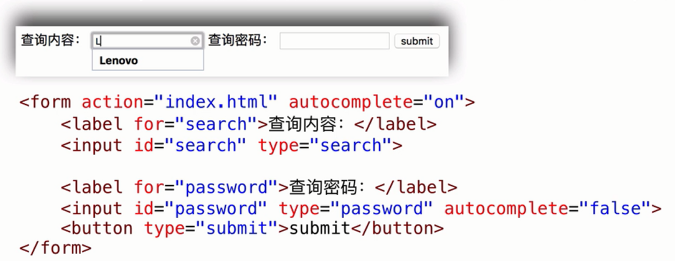
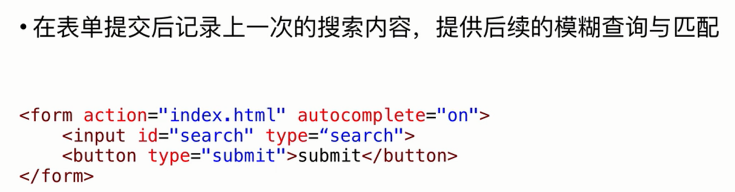
表单属性 - autocomplete
autocomplete 属性规定 form 或 input 域应该拥有自动完成功能。
当用户在自动完成域中开始输入时,浏览器应该在该域中显示填写的选项。
- autocomplete 属性有可能在 form 元素的中是开启的,而在 input 元素中是关闭的。
代码案例:
<form autocomplete="on" class="" action="index.html" method="post">

  <label for="search">查询内容:</label>

  <input type="search" id="search">

  <label for="password">密码查询:</label>

  <input type="password" id="password" autocomplete="false">

  <button type="submit" name="button">submit</button>

</form>

密码一定不要设置自动完成!! 表单 form 默认开启自动完成,小心喽!
autocomplete="false"
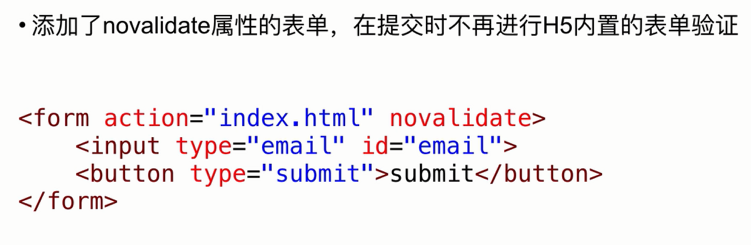
表单属性 - novalidate
novalidate 属性是一个 boolean(布尔)属性。
novalidate 属性规定在提交表单是不应该验证 form 或者 input 域。
- 在表单元素中添加 novalidate 属性,将不会对表单内的输入元素进行验证。
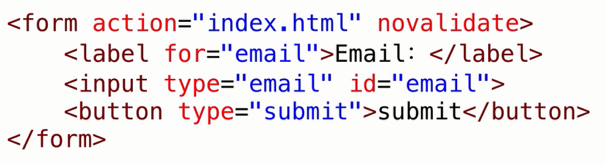
案例代码:
<form class="" action="index.html" method="post" novalidate>

  <input type="email" name="" value="">

  <input type="submit" name="" value="">

</form>
该属性不会对 input 单独起作用,所以说写在 input 里边,白搭!
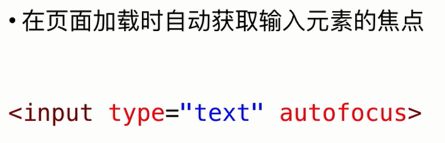
表单属性 - autofocus
autofocus 属性可以自动聚焦输入元素,也是一个 boolean(布尔)属性。
拥有 autofocus 属性的元素,在页面加载时自动获取焦点。
- 注意:当页面有多个控件时,第一个具有该属性的元素会聚焦。

这个属性是一个非常 人性化 的设置。因为有些时候,用户真他妈的懒,没错,用户说的就是你!
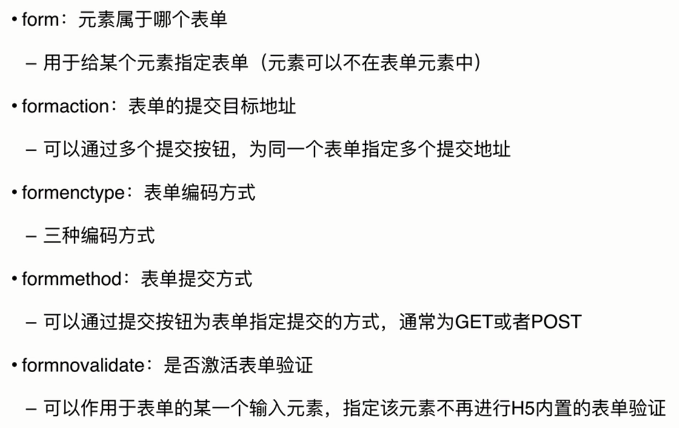
表单属性 input 属性 - 表单相关
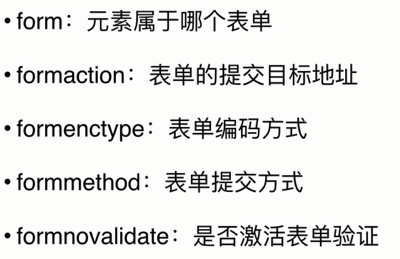
input 属性 - form 属性
注意:IE浏览器不支持 input 元素的 form 属性。
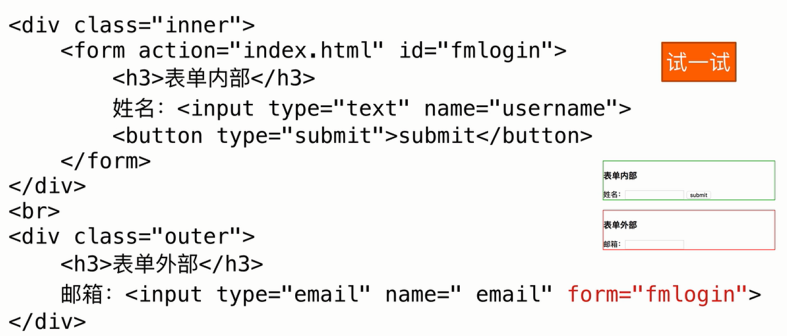
<form id="myform" class="" action="index.html" method="post">

  <h3>表单内部</h3>

  姓名:

  <input type="text" name="username" value="">

  <button type="submit" name="button">submit</button>

</form>

<input type="email" name="email" value="" form="myform">
input 属性 - formaction 属性
规定当表单提交时处理输入控件的文件的URL。
- 注意:只针对 type = “submit” 和 type = “image” 有效。
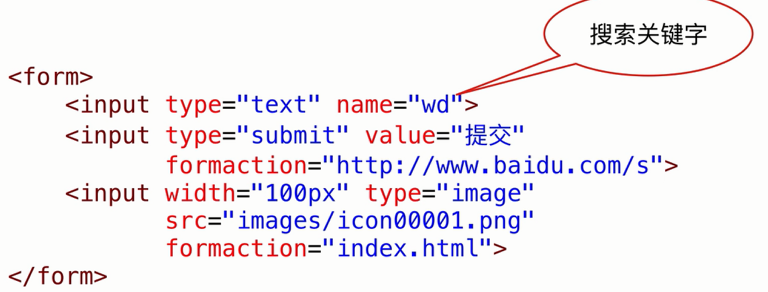
<form >

  <input type="text" name="wd" value="">

  <input type="submit" name="" value="提交" formaction="http://www.baidu.com/s">

  <input type="image" width="100px" src="" formaction="index.html">

</form>
点击图片会产生一个url:file:///C:/Users/Administrator/Desktop/1.html?wd=&x=33&y=13
其中x、y表示点击的图片的坐标位置。
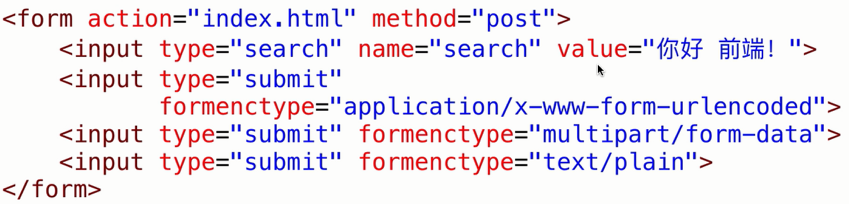
input 属性 - formectpye 属性
规定当前表单数据提交到服务器是如何进行编码,且提交方式为 POST 的时候。
- 注意:只针对 type = “submit” 和 type = “image” 有效。
- input 元素的 formetype 属性会覆盖表单的 formetype 属性。
formetype 属性的值:
- application/x-www-form-urlencoded (默认)
- multipart/form-data (通常用于文件或者图片)
- text/plain (通常用于纯文本格式)
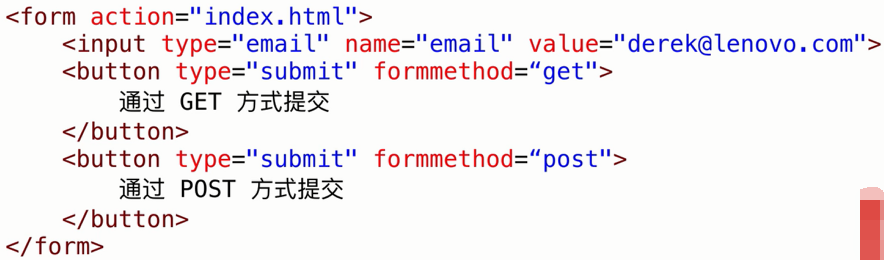
input 属性 - formmethod 属性
指定表单的提交方式。
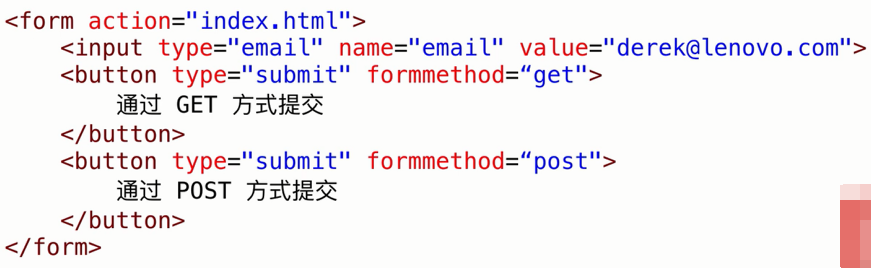
<form class="" action="index.html" method="post">

  <input type="text" name="text" value="hello">

  <button type="submit" formmethod="get" >GET方式提交</button>

  <button type="submit" formmethod="post">POST方式提交</button>

</form>
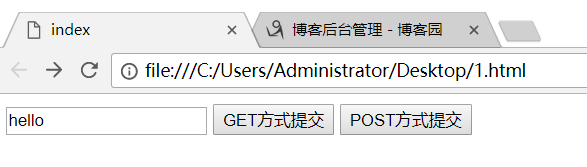
GET请求:

POST 请求:

input 属性 - formnovalidate 属性
formnvalidate 属性覆盖 <form> 元素的 novalidate 属性。
- 注意:formnvalidate 属性可以与 type = “submit” 配合使用。表单的提交方式:
formnvalidate 实现控件的表单不需要验证,添加在 submit 中,而不是添加在 input 中。
input 类型
表单输入类型
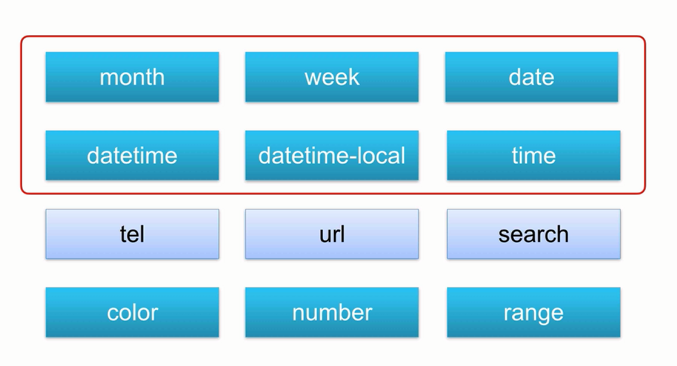
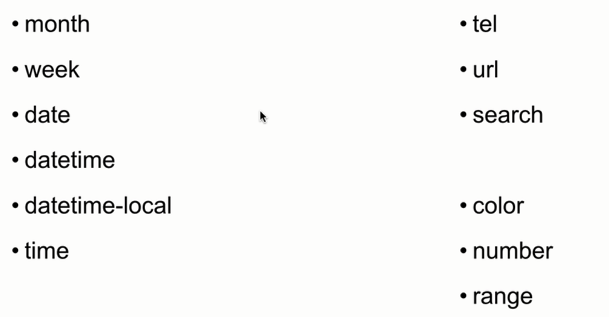
- month(月份) week(周) date (日期) datetime(日期+时间) datetime-local(本地时间和日期) time(时间)
- color (颜色) number (数字) range(范围)
- tel (电话) search(查询搜索) url(浏览器访问URL)
主要是给移动端提供,在PC端效果并不是很出色,很有代表性。
表单输入类型
通常用在页面的表单元素 <form>中,用来接收用户输入的子元素。
在HTML5中,新增了多种输入类型的子元素,提供了更好的输入控制和验证。
输入类型的分类
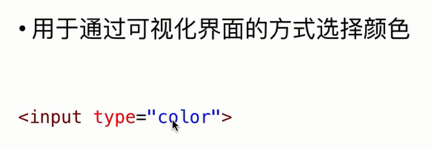
color 基本使用方法
color 类型用于选取颜色,使用语法如下:
<input type="color" name="color" id="color">
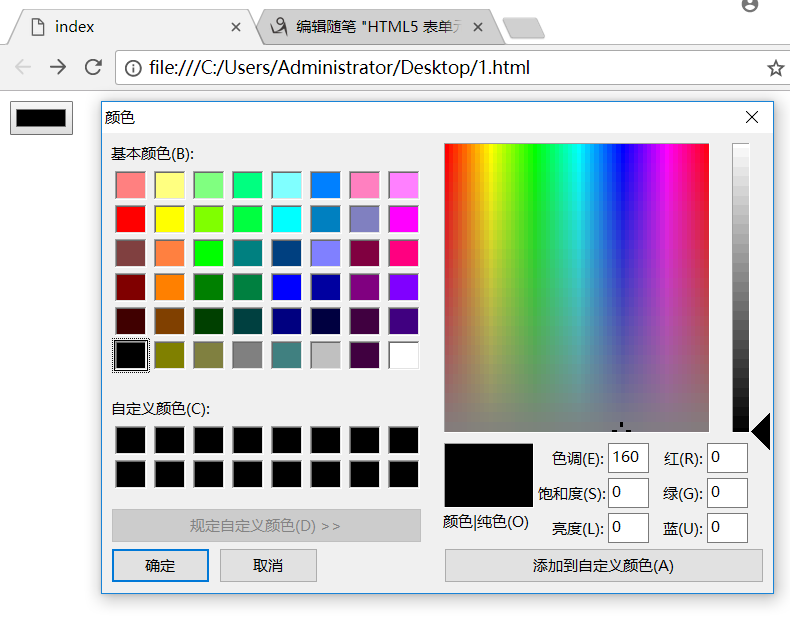
可以通过 color 元素的 value 属性获取用户选择的颜色值
- var c = document.getElementById("colorId");
- document.body.style.backgroundColor = c.value; // 修改界面的背景颜色
- 早期颜色的定义:
1. RGB
2.英文单词
3.十六进制数
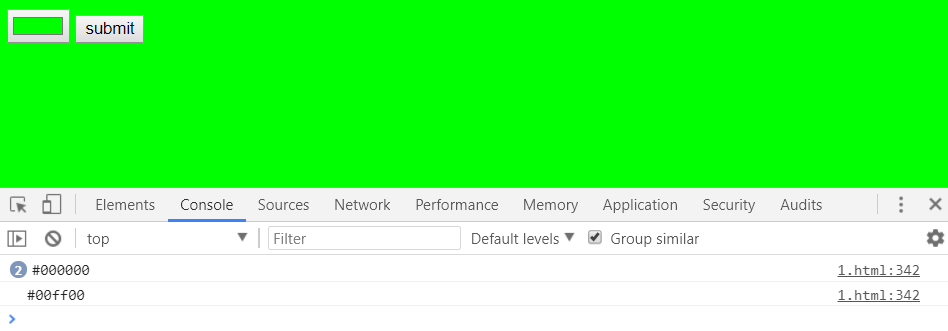
案例代码:
<form class="" action="1.html" method="post">

  <input type="color" id="color" name="color">

  <button type="button" id="btnsubmit" name="button" onclick="ChangeColor()">submit</button>

</form>

<script type="text/javascript">

  function ChangeColor() {

    var c = document.getElementById("color");

  document.body.style.backgroundColor = c.value;

    console.log(c.value);

  }

</script>
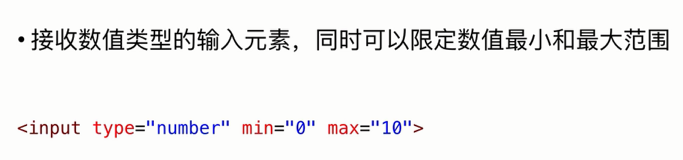
number 基本使用方法
数字类型只能接受数字值
number 类型用于数值的输入域,还能够设定对数字的限定。
- <input type = “number” >
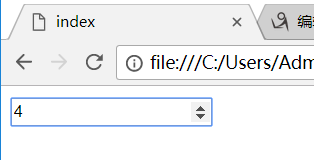
<form class="" action="index.html" method="post">

  <input type = "number" name="number" >

</form>
number 常见属性
max :规定允许的最大值。
min : 规定允许的最小值。
step : 规定输入字段的合法数字间隔,递增或者递减的步长。
value: 规定输入字段的默认值。
<input type="number" name="" value="6" min="0" max="10" step="2">
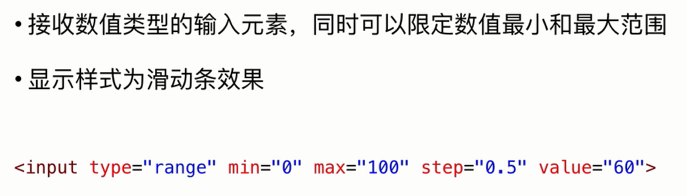
range 基本使用方法
range 类型用于应该包含一定范围内数字值得输入域,显示为滑动条。
- <input type="range" value="6" min="0" max="100" step="0.5">

range 常见属性
max :最大值
min :最小值
value :默认值
step :数字间隔
小案例:
<form class="" action="index.html" method="post">

  <input type="range" id="score" name="" value="6" min="0" max="100" step="0.5">

  <button type="button" onclick="showScore()" name="button">submit</button>

</form>

<script type="text/javascript">

  function showScore() {

    var r =document.getElementById('score');

    console.log(r.value);

  }

</script>
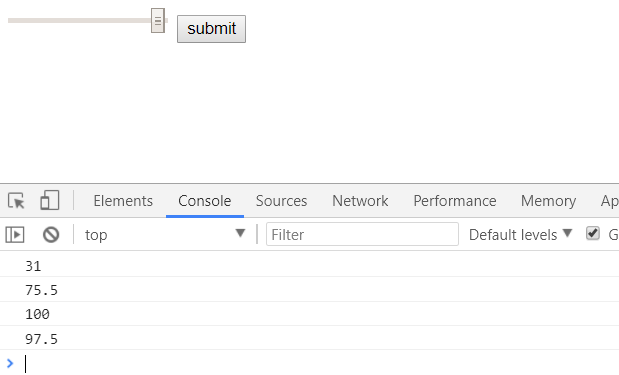
上面代码在点击提交按钮后才会显示数字值,十分的不友好,那么下面对上面的代码进行优化,使操作变得更加人性化。
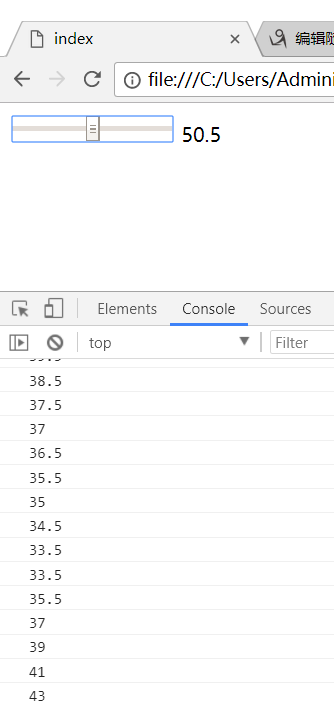
<form class="" action="index.html" method="post">

  <input type="range" id="score" name="" value="60" min="0" max="100" step="0.5" oninput="showScore()" onchange="showScore()">

  <label for="score" id="mylabel">60</label>

  <!-- <button type="button" onclick="showScore()" name="button">submit</button> -->

</form>

<script type="text/javascript">

  function showScore() {

    var r =document.getElementById('score');

    console.log(r.value);

    var ml = document.getElementById('mylabel');

    ml.innerHTML = r.value;

  }

</script>
search 基本使用方法
search 类型用于搜索域,比如站点搜索或Google搜索。
search 类型通常用于移动端设备上显示比较友好,如下图:
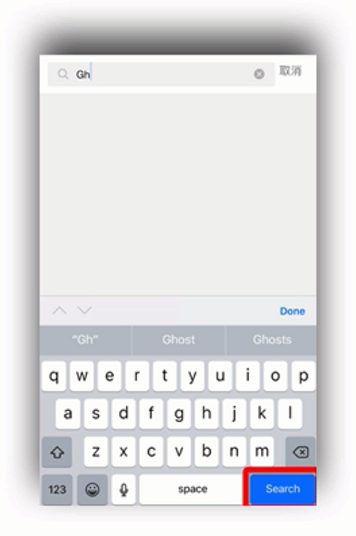
< input type=“search” >
<form class="" action="index.html" method="post">

  <input type="search" name="" value="">

  <button type="submit" name="button">submit</button>

</form>
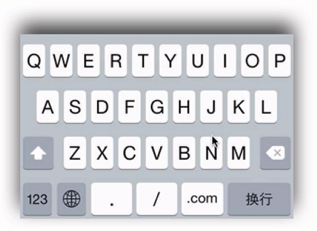
tel 基本使用方法
tel 类型用于输入电话号码。
tel 类型通常在移动端设备上显示比较好,如图所示:

< input type = "tel" >
url 基本使用方法
url 类型用于包含 URL 地址的输入域。
在提交表单时,会自动验证 url 域的值。
< input type = "url" >
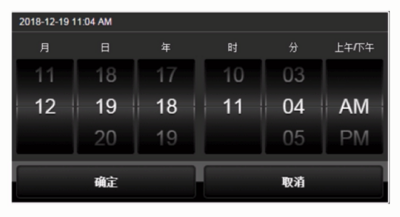
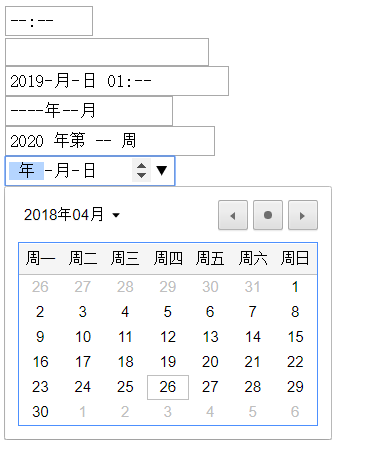
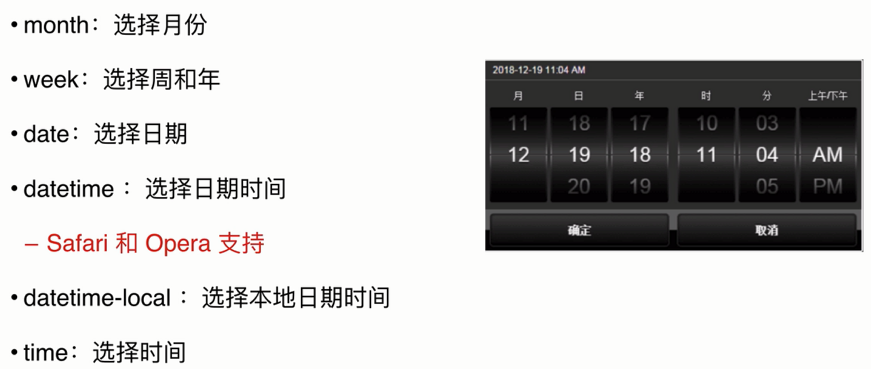
日期输入类型的使用方法
month:选择月份。
week:选择周和年。
date:选择日期。
datatime:选择日期时间。
- Safari 和 Opera 支持
datetime-local:选择贝蒂日期时间。
time:选择时间。
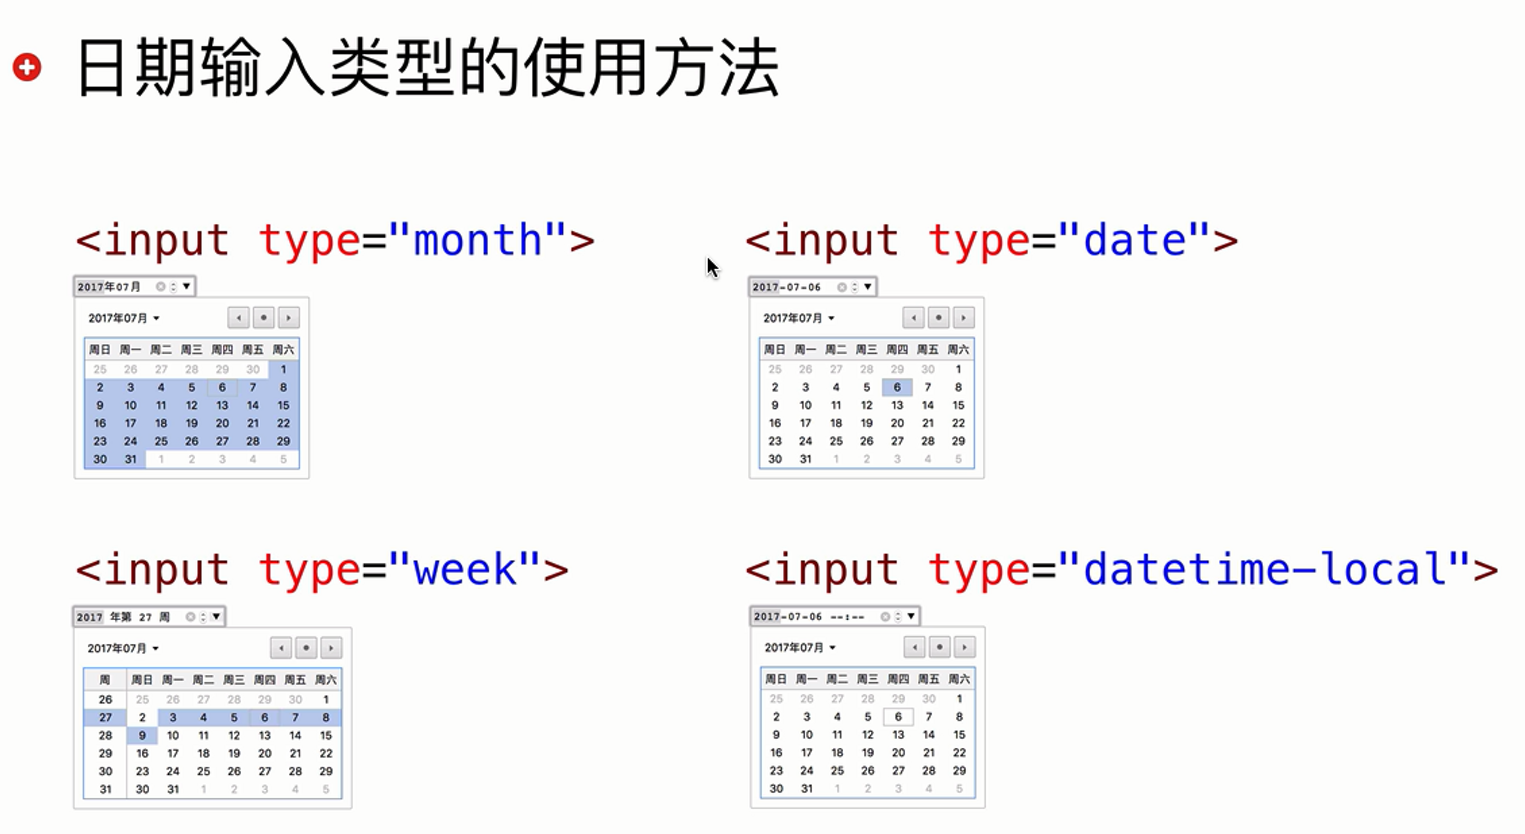
案例代码(感受一下)
<input type="time" name="" value=""><br>

<input type="datetime" name="" value=""><br>

<input type="datetime-local" name="" value=""><br>

<input type="month" name="" value=""><br>

<input type="week" name="" value=""><br>

<input type="date" name="" value="">
HTML5 表单验证
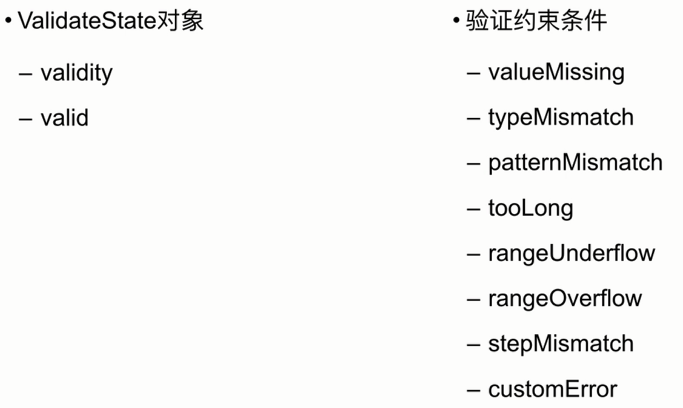
ValidateState 对象
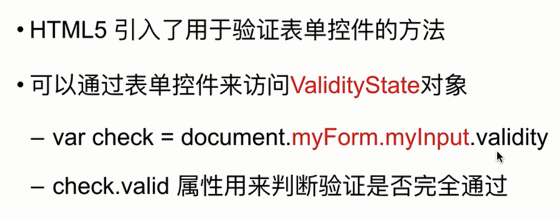
html5 引入了用于验证表单控件的方法。
可以通过表单控件来访问 ValidateState 对象。
- var check = document.myForm.myInput.validity
- check.valid 属性来判断验证是否完全通过。
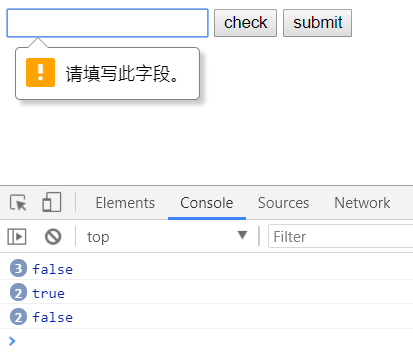
案例代码:
<form name="myform" class="" action="1.html" method="post">

  <input required type="text" name="fname" value="">

  <button onclick="check()" type="button" name="button">check</button>

  <input type="submit" name="" value="submit">

</form>

<script type="text/javascript">

  function check() {

  //  console.log("check method");

    var fnamestate = document.myform.fname.validity;

    console.log(fnamestate.valid);

  }

</script>
验证约束条件
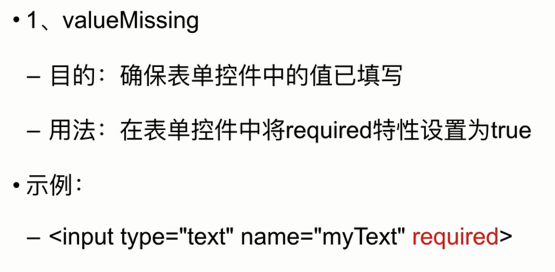
1、valueMissing
目的:确保表单控件中的值已填写。
用法:在表单中将 required 特性设置为 true。
示例:
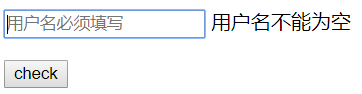
< input type = "text" name = "myText" required >
<form name="frm" action="valueMissing.html">

    <input oninput="check()" onchange="check()" type="text" name="un" required placeholder="用户名必须填写">

    <span id="errorMessage"></span>

    <p>

        <button onclick="check()" type="button">check</button>

    </p>

</form>

<script>

    var em = document.getElementById("errorMessage");

    function check() {

        var un = document.frm.un.validity;

        if (un.valueMissing) {

            em.innerHTML = "用户名不能为空";

        } else {

            em.innerHTML = "";

        }

    }

</script>
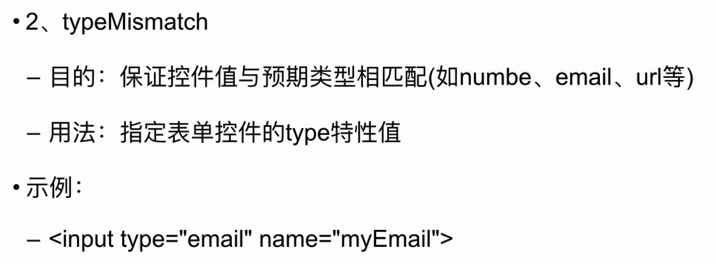
2、typeMismatch
目的:保证控件值和预期类型相匹配(如:number、email、url 等)。
用法:指定表单控件的 type 特性值。
示例:
<input type = "email" name = "myEmail" >
<form action="typemismacth.html" name="frm">

    <input type="email" name="email" id="email">

    <button onclick="check()" type="button">check</button>

</form>

<script>

    function check() {

        var emailState = document.frm.email.validity;

        console.log(emailState);

        if (emailState.typeMismatch) {

            alert("邮箱格式不正确!");

        }

    }

</script>
3、patternMismatch
目的:根据表单控件上设置的格式规则验证输入是否为有效格式。
用法:在表单控件上设置 pattern 特性,并且赋予适当的匹配规则。
示例:
<input type = "text" name = "creditcardnumber" pattern="[0-9]{16}"
title = "A credit card number is 16 djgjts with no spaces or dashes" >
<form action="patternmismatch.html" name="frm">

    <input type="text" name="stuNo"

           title="网址格式不正确"

           pattern="[a-zA-z]+://[^\s]*">

    <span id="em"></span>

    <button onclick="check()" type="button">check</button>

</form>

<script>

    var em = document.getElementById("em");

    function check() {

        var stuNoState = document.frm.stuNo.validity;

        if(stuNoState.patternMismatch){

            em.innerHTML = "网址格式不正确";

        }else{

            em.innerHTML = "";

        }

    }

</script>
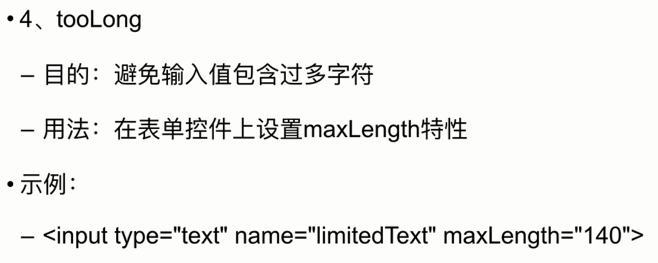
4、toolong
目的:避免输入的值包含过多字符串。
用法:在表单控件上设置 maxlength 特性。
示例:
< input type="text" name="limitesText" maxLength = "140" >
    <form name="frm" action="toolong.html">

        <input type="text" name="title" maxlength="6">

        <button type="button" onclick="check()">check</button>

    </form>

    <script>

        function check() {

            var titleState = document.frm.title.validity;

            console.log(titleState);

        }

    </script>
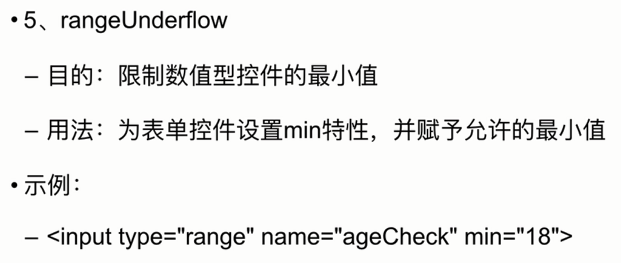
5、rangeUnderflow
目的:限制数值型控件的最小值。
用法: 为表单控件设置 min 特性,并且赋予最小值。
示例:
< input type = "range" name="ageCheck" min="18" >
<form name="frm" action="numberValidate.html">

    <input type="number" name="age" min="18" max="60" step="2">

    <em id="em"></em>

    <button onclick="check()" type="button">check</button>

</form>

<script>

    var em = document.getElementById("em");

    function check() {

        var ageState = document.frm.age.validity;

        if (ageState.rangeUnderflow) {

            em.innerHTML = "太小,不允许访问";

        } else if (ageState.rangeOverflow) {

            em.innerHTML = "太大,请访问我们的另一个主站";

        } else if (ageState.stepMismatch) {

            em.innerHTML = "18、20、22....的朋友才能访问";

        } else {

            em.innerHTML = "";

        }

    }

</script>
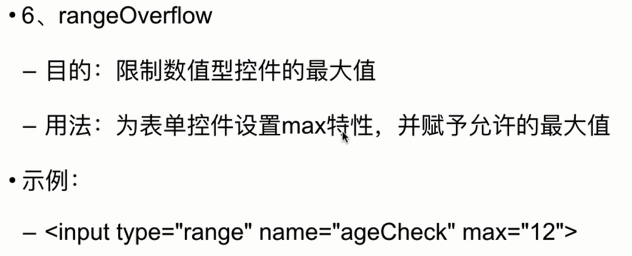
6、rangeOverflow
目的:限制数值型控件的最大值。
用法: 为表单控件设置 max 特性,并且赋予最大值。
示例:
< input type = "range" name="ageCheck" max="20" >
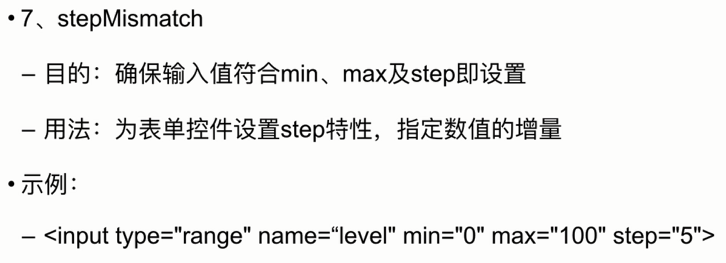
7、stepMismatch
目的:确保输入值符合 min、max 及 step 即设置。
用法: 为表单控件设置 step 特性,并且指定数值的增量。
示例:
< input type = "range" name="level" min="10" max="20" step="2">
8、customError
目的:处理应用代码明确设置及计算产生的错误。
用法:调用 setCustomValidity(message) 将表单控件置于 customError 状态。
示例:
input.setCustomValidity("自定义错误")
要清除错误,只需要在控件上吊用 setCustomValidity("") 即可。
<form action="customvalidity.html" name="frm">

    <input type="email" name="email" id="email" required>

    <button onclick="check()" type="submit">submit</button>

</form>

<script>

    function check() {

        var emailState = document.frm.email.validity;

        if(emailState.valueMissing) {

            document.frm.email.setCustomValidity("邮件不能为空!!!");

            return;

        }

        if(emailState.typeMismatch) {

            document.frm.email.setCustomValidity("邮件格式不正确!!!");

            return;

        }

        document.frm.email.setCustomValidity("");

    }

</script>
HTML5 表单元素和属性小结
学习内容汇总
1、表单元素
2、表单属性
3、输入类型
4、表单验证
表单元素
表单元素简介
表单元素 - datalist

表单元素 - output
表单元素 - meter
表单属性
表单属性 - autocomplete
表单属性 - novalidate
表单属性 - autofocus
input 属性 - 表单相关
表单的输入类型
输入类型 - color
输入类型 - number
输入类型 - range
输入类型 - search
输入类型 - tel

输入类型 - url
输入类型 - 日期时间型
表单验证
表单验证 - ValidateState对象
验证约束条件

HTML5 表单元素和属性的更多相关文章
- HTML5初步——新的表单元素和属性
HTML5初步--新的表单元素和属性 HTML5初步--新的表单元素和属性 <!DOCTYPE html> <html> <head> <meta chars ...
- HTML5 学习08——Input 类型、表单元素及属性
注意:并不是所有的主流浏览器都支持新的input类型,不过您已经可以在所有主流的浏览器中使用它们了.即使不被支持,仍然可以显示为常规的文本域. (1)Input 类型: color color 类型: ...
- html5-5 HTML5表单元素和内嵌框架
html5-5 HTML5表单元素和内嵌框架 一.总结 一句话总结:单选框和多选框选的时候外面加label就可以实现选后面文字也可以选中了 1.html5如何实现文件上传? 必须加上enctype ...
- HTML5: HTML5 表单元素
ylbtech-HTML5: HTML5 表单元素 1.返回顶部 1. HTML5 表单元素 HTML5 新的表单元素 HTML5 有以下新的表单元素: <datalist> <ke ...
- 疯狂的表单-html5新增表单元素和属性
疯狂的表单 2015/11/27 16:44:07 从三方面来介绍html5表单的新特性 表单结构更灵活 要提交数据的控件可以布局在form标签之外,看下面的代码,表单元素可以写到form元素之外,只 ...
- H5C3--语义标签以及语义标签IE8兼容,表单元素新属性,度量器,自定义属性,dataList,网络监听,文件读取
HTML5新增标签以及HTML5新增的api 1.H5并不是新的语言,而是html语言的第五次重大修改--版本 2.支持:所有的主流浏览器都支持h5.(chrome,firefox,s ...
- Html5 表单元素基础
表单元素 1.定义: 表单是提供让读者在网页上输入,勾选和选取数据,以便提交给服务器数据库的工具.(邮箱注册,用户登录,调查问卷等) 2.表单元素(下拉框,输入框……) 3.表单主结构: <fo ...
- HTML5表单元素的学习
本文内容 认识表单 基本元素的使用 表单高级元素的使用 现学现卖--创建用户反馈表单 ★ 认识 ...
- html5表单元素详解
表单是Html中获取用户输入的手段.此文对表单的元素进行了详细整理. 表单基本元素 form input button form元素 html4中,form元素相当于表单的外包装,其他都要在里面.ht ...
随机推荐
- POJ-放苹果(DP)
放苹果 Time Limit: 1000MS Memory Limit: 10000K Total Submissions: 29074 Accepted: 18376 Description 把M个 ...
- 11.21 CSS学习-下午
CSS框模型,看似一个盒子,封装周围的HTML元素,包括:边距.边框.填充和实际内容Margin:清除边框区域,没有背景色,完全透明Border:边框周围的填充和内容,边框是受到盒子的背景色影响Pad ...
- 编译x11版本qt
用buildroot 选择x11相关 在选择qt x11版本 export PATH=~/buildroot/output/host/usr/bin:$PATH 进入~/buildroot/out ...
- B. Berland National Library---cf567B(set|模拟)
题目链接:http://codeforces.com/problemset/problem/567/B 题意:题目大意: 一个计数器, +号代表一个人进入图书馆, -号代表一个人出去图书馆. 给一个 ...
- 常见的SQLALCHEMY列类型.配置选项和关系选项
类型名称 python类型 描述 Integer int 常规整形,通常为32位 SmallInteger int 短整形,通常为16位 BigInteger int或long 精度不受限整形 Flo ...
- 飞跃平野(sdut1124)
http://acm.sdut.edu.cn/sdutoj/problem.php?action=showproblem&problemid=1124 飞跃原野 Time Limit: 500 ...
- soapUI-property Transfer
1.1.1 Property Transfer 创建或双击现有的Property-Transfer TestStep将打开以下窗口: 左侧的列表显示了此TestStep中配置的传输,添加和管理所需的 ...
- Qt addStretch()详解
addStretch函数,是在布局的时候用到. 函数原型: void QBoxLayout::addStretch ( int stretch = 0 ) 作用:平均分配Layout 比如: QVBo ...
- rabbitmq_坑
一.None of the specified endpoints were reachable 这个异常在创建连接时抛出(CreateConnection()),原因一般是ConnectionF ...
- SP Flash Tool New Version v5.1352.01
Friends, Sp Tool updated to new version with whole new revamped interface New SP Flash Tool 3.1352.0 ...