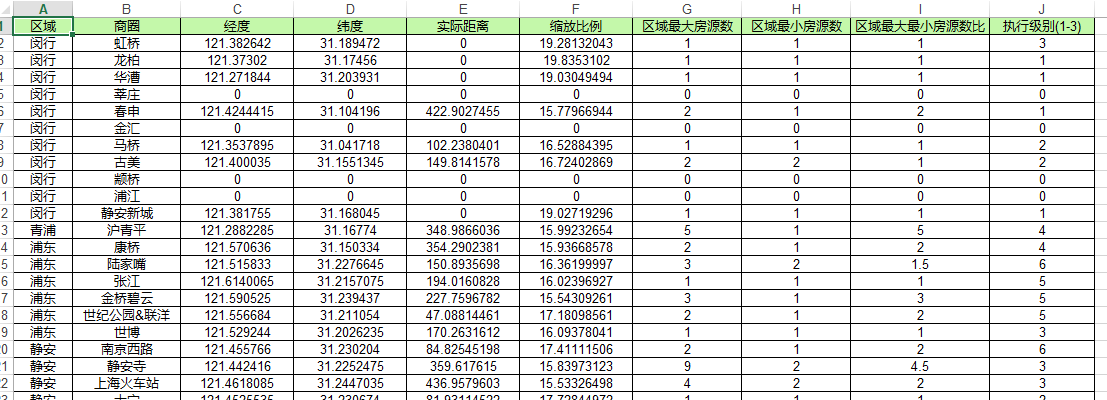
Aspose.cells常用用法1

代码:
var execl_path = @"G:\zhyue\backup\项目修改-工作日常\2018-11-12 区域楼盘中心点和放大比例计算\a.xlsx";

Workbook wb = new Workbook();

Worksheet sheet = wb.Worksheets[];

//添加表头

sheet.Cells[, ].SetCell("区域", Color.FromArgb(, , ));

sheet.Cells[, ].SetCell("商圈", Color.FromArgb(, , ));

sheet.Cells[, ].SetCell("经度", Color.FromArgb(, , ));

sheet.Cells[, ].SetCell("纬度", Color.FromArgb(, , ));

sheet.Cells[, ].SetCell("实际距离", Color.FromArgb(, , ));

sheet.Cells[, ].SetCell("缩放比例", Color.FromArgb(, , ));

sheet.Cells[, ].SetCell("区域最大房源数", Color.FromArgb(, , ));

sheet.Cells[, ].SetCell("区域最小房源数", Color.FromArgb(, , ));

sheet.Cells[, ].SetCell("区域最大最小房源数比", Color.FromArgb(, , ));

sheet.Cells[, ].SetCell("执行级别(1-3)", Color.FromArgb(, , ));

int row = ;//第几行

list_reach.ForEach(s =>

{

    int i = ;

    GetResult(s.SQID, out longitude, out latitude, out distance, out scale, out max_com_num, out min_com_num, out max_min_scale, ref i);

    sheet.Cells[row, ].SetCell(s.C_ReachName, Color.White);

    sheet.Cells[row, ].SetCell(s.SQName, Color.White);

    sheet.Cells[row, ].SetCell(longitude, Color.White);

    sheet.Cells[row, ].SetCell(latitude, Color.White);

    sheet.Cells[row, ].SetCell(distance, Color.White);

    sheet.Cells[row, ].SetCell(scale, Color.White);

    sheet.Cells[row, ].SetCell(max_com_num, Color.White);

    sheet.Cells[row, ].SetCell(min_com_num, Color.White);

    sheet.Cells[row, ].SetCell(max_min_scale, Color.White);

    sheet.Cells[row, ].SetCell(i - , Color.White);

    row++;

});

sheet.setColumnWithAuto();

wb.Save(execl_path);
引用扩展类
static class Cells1

{

    /// <summary>

    /// 设置cell的Value和Style

    /// </summary>

    /// <param name="cell"></param>

    /// <param name="name"></param>

    /// <param name="bgColor"></param>

    public static void SetCell(this Cell cell, object name, Color bgColor)

    {

        cell.PutValue(name);//单元格值

        Style style = new CellsFactory().CreateStyle();

        style.ForegroundColor = bgColor;

        style.Pattern = BackgroundType.Solid;//背景颜色不起作用,加入该行代码

        style.Borders[BorderType.LeftBorder].LineStyle = CellBorderType.Thin; //应用边界线 左边界线

        style.Borders[BorderType.RightBorder].LineStyle = CellBorderType.Thin; //应用边界线 右边界线

        style.Borders[BorderType.TopBorder].LineStyle = CellBorderType.Thin; //应用边界线 上边界线

        style.Borders[BorderType.BottomBorder].LineStyle = CellBorderType.Thin; //应用边界线 下边界线

        style.HorizontalAlignment = TextAlignmentType.Center;

        style.VerticalAlignment = TextAlignmentType.Center;

        cell.SetStyle(style);

    }

    /// <summary>

    /// 设置表页的列宽度自适应

    /// </summary>

    /// <param name="sheet">worksheet对象</param>

    public static void setColumnWithAuto(this Worksheet sheet)

    {

        Cells cells = sheet.Cells;

        int columnCount = cells.MaxColumn;  //获取表页的最大列数

        int rowCount = cells.MaxRow;        //获取表页的最大行数

        for (int col = ; col <= columnCount; col++)

        {

            sheet.AutoFitColumn(col, , rowCount);

        }

        for (int col = ; col <= columnCount; col++)

        {

            cells.SetColumnWidthPixel(col, cells.GetColumnWidthPixel(col) + );

        }

    }

}
Aspose.cells常用用法1的更多相关文章
- Aspose.Cells 基础用法
最近使用Aspose.Cells做Excel,在怎么添加批注和添加内部导航链接上耗费了一些时间,最后在官网上找到相关用法,记录一下. 代码不用过多介绍,看看即可明白. 测试代码下载 Workbook ...
- Aspose.Cells.dll的用法
public void OutExcel() { #region WorkbookDesigner designer = new WorkbookDesigner(); Worksheet sheet ...
- 常用类-Excel-使用Aspose.Cells插件
using System; using System.Collections.Generic; using System.Linq; using System.Web; using System.Xm ...
- NPOI、MyXls、Aspose.Cells 导入导出Excel(转)
Excel导入及导出问题产生: 从接触.net到现在一直在维护一个DataTable导s出到Excel的类,时不时还会维护一个导入类.以下是时不时就会出现的问题: 导出问题: 如果是asp.net,你 ...
- 对Aspose.Cells Excel文件操作的扩展
工作中对Excel操作的需求很是常见,今天其他项目组的同事在进行Excel数据导入时,使用Aspose.Cells Excel 遇到了些问题. 刚好闲来不忙,回想自己用过的Excel文件操作,有NPO ...
- C#使用Aspose.Cells导出Excel简单实现
首先,需要添加引用Aspose.Cells.dll,官网下载地址:http://downloads.aspose.com/cells/net 将DataTable导出Xlsx格式的文件下载(网页输出) ...
- Aspose.Cells导出Excel(2)
DataTable dtTitle = ds.Tables[]; DataTable dtDetail = ds.Tables[]; int columns = dtTitle.Columns.Cou ...
- Aspose.Cells导出Excel(1)
利用Aspose.Cells导出excel 注意的问题 1.DataTable的处理 2.进行编码,便于中文名文件下载 3.别忘了Aspose.Cells.dll(可以自己在网上搜索) public ...
- 使用Aspose.Cells读取Excel
最新更新请访问: http://denghejun.github.io Aspose.Cells读取Excel非常方便,以下是一个简单的实现读取和导出Excel的操作类: 以下是Aspose.Ce ...
随机推荐
- string的相关问题
http://blog.csdn.net/seu_calvin/article/details/51404589 http://rednaxelafx.iteye.com/blog/774673 ht ...
- Java 反射机制系列
http://www.cnblogs.com/KingIceMou/category/1034898.html
- JSON.stringify和JSON.parse的使用
JSON.stringify 函数 (JavaScript)将 JavaScript 值转换为 JavaScript 对象表示法 (Json) 字符串.JSON.stringify(value [, ...
- jdbc连接1(可以注入)
package demo3class; import java.sql.Connection; import java.sql.DriverManager; import java.sql.Prepa ...
- 大白dmeo (转的)
<!doctype html><html> <head> <meta charset="utf-8"> <title>B ...
- [BZOJ2758] [SCOI2012]Blinker的噩梦 扫描线+set
题目大意:有n个圆或凸多边形,这些图形不会相交,每当走入或走出一个图形时需要异或上一个代价,有m组操作: 询问操作,每次询问从一个点走到另一个点时,需要的代价(初始代价为0) 修改操作,每次修改一个图 ...
- 数据?算法-> which is important?
谷歌的强不是强在 PageRank 算法,而在于它是第一个在排名时把链接——而不只是文字和标题——考虑进去的.又以自己教的数据挖掘课为例.他让学生以 Netflix 用户对一万八千多部电影的打分为基础 ...
- nginx+jwplayer配置flv/MP4点播系统, 视频拖动支持
一 配置nginx 1. 下载 nginx 最新版 http://nginx.org/ 2. 安装依赖库, 以ubuntu为例 apt-get install libpcre3 libpcre3-de ...
- libevent安装总结
1.先用:ls -al /usr/lib | grep libevent 查看是否已安装:如果已安装且版本低于1.3,则先通过:rpm -e libevent —nodeps进行卸载. 2.下载lib ...
- tcpdump非常实用的抓包实例
详细的文档见tcpdump高级过滤技巧 基本语法 ========过滤主机--------- 抓取所有经过 eth1,目的或源地址是 192.168.1.1 的网络数据# tcpdump -i eth ...
