Centos6.6下安装nginx1.6.3
安装环境:
[root@nginx ~]# cat /etc/redhat-release

CentOS release 6.6 (Final)

[root@nginx ~]# uname -r

2.6.32-504.el6.x86_64
Nginx安装
1:安装必须的包
[root@nginx ~]# yum install -y pcre pcre-devel openssl-devel
pcre全称(Perl Compatible Regular Expressions),中文perl兼容正则表达式!(nginx的rewite模块需要它)
2:添加虚拟用户
[root@nginx tools]# useradd -s /sbin/nologin -M nginx

[root@nginx tools]# id nginx

uid=501(nginx) gid=501(nginx) groups=501(nginx)
3:新建一目录,用于安装nginx
[root@nginx nginx-1.6.3]# mkdir /application
4:下载nginx
wget -q http://nginx.org/download/nginx-1.6.3.tar.gz
百度下载:http://pan.baidu.com/s/1jIE37Oa
微云下载:https://share.weiyun.com/8b3117629c6381199df93809ce26d81e
5:编译安装nginx
wget -q http://nginx.org/download/nginx-1.6.3.tar.gz

tar zxf nginx-1.6.3.tar.gz

./configure --prefix=/application/nginx-1.6.3 --user=nginx --group=nginx --with-http_ssl_module --with-http_stub_status_module

make        #只要结尾没有报错就OK

make install
6:创建软链接
[root@nginx application]# ln -s nginx-1.6.3 nginx

[root@nginx application]# ll

total 4

lrwxrwxrwx 1 root root   11 Feb 14 21:31 nginx -> nginx-1.6.3

drwxr-xr-x 6 root root 4096 Feb 14 21:30 nginx-1.6.3
7:启动nginx
[root@nginx application]# /application/nginx/sbin/nginx
查看是否启动成功:
[root@nginx application]# ps -ef|grep nginx

root      5205     1  0 21:32 ?        00:00:00 nginx: master process /application/nginx/sbin/nginx

nginx     5206  5205  0 21:32 ?        00:00:00 nginx: worker process

root      5208   967  0 21:32 pts/0    00:00:00 grep nginx
查看nginx端口号:
[root@nginx application]# ss -lnput|grep nginx

tcp    LISTEN     0      511                    *:80                    *:*      users:(("nginx",5205,6),("nginx",5206,6))
停掉nginx:
[root@nginx application]# /application/nginx/sbin/nginx -s stop
重启nginx:
[root@nginx application]# /application/nginx/sbin/nginx -s reload
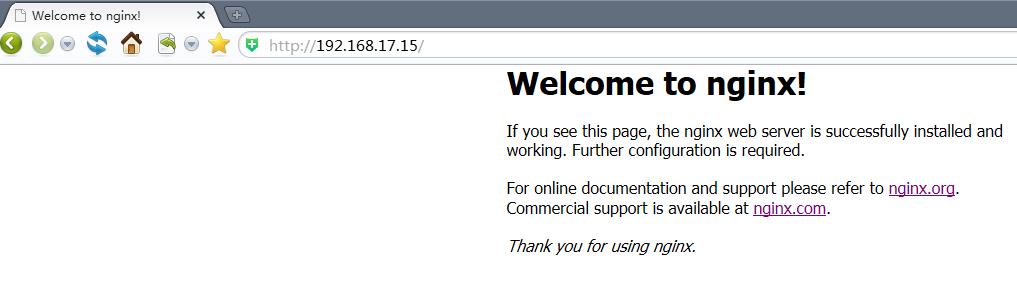
以上就是nginx1.6.3的安装!此时在windonws浏览器下输入IP地址,即可看到如下页面:
Linux本机测试:
[root@nginx application]# curl 192.168.17.15

<!DOCTYPE html>

<html>

<head>

<title>Welcome to nginx!</title>

<style>

    body {

        width: 35em;

        margin: 0 auto;

        font-family: Tahoma, Verdana, Arial, sans-serif;

    }

</style>

</head>

<body>

<h1>Welcome to nginx!</h1>

<p>If you see this page, the nginx web server is successfully installed and

working. Further configuration is required.</p>

<p>For online documentation and support please refer to

<a href="http://nginx.org/">nginx.org</a>.<br/>

Commercial support is available at

<a href="http://nginx.com/">nginx.com</a>.</p>

<p><em>Thank you for using nginx.</em></p>

</body>

</html>
nginx常用模块介绍
nginx技术内幕课程视频:http://edu.51cto.com/lesson/id-56899.html
nginx核心模块:http://nginx.org/en/docs
Nginx配置文件(nginx.conf)配置详解
[root@ClientA nginx]# cat conf/nginx.conf

#user  nobody;								#Nginx用户及组:用户 组。window下不指定

worker_processes  1;							#工作进程:数目。根据硬件调整,通常等于CPU数量或者2倍于CPU。

#error_log  logs/error.log;

#error_log  logs/error.log  notice;

#error_log  logs/error.log  info;

#pid        logs/nginx.pid;					#pid(进程标识符):存放路径。

events {

    worker_connections  1024;

}

#每个工作进程的最大连接数量。根据硬件调整,和前面工作进程配合起来用,尽量大,但是别把cpu跑到100%就行。每个进程允许的最多连接数,理论上每台nginx服务器的最大连接数为:worker_processes*worker_connections

http {

    include       mime.types;			#设定mime类型,类型由mime.type文件定义

    default_type  application/octet-stream;

    #log_format  main  '$remote_addr - $remote_user [$time_local] "$request" '

    #                  '$status $body_bytes_sent "$http_referer" '

    #                  '"$http_user_agent" "$http_x_forwarded_for"';

    #access_log  logs/access.log  main;

    sendfile        on;			#开启高效传输模式

    #tcp_nopush     on;

    #keepalive_timeout  0;

    keepalive_timeout  65;

    #gzip  on;

    server {

        listen       80;

        server_name  localhost;

        #charset koi8-r;

        #access_log  logs/host.access.log  main;

        location / {

            root   html;

            index  index.html index.htm;

        }

        #error_page  404              /404.html;

        # redirect server error pages to the static page /50x.html

        #

        error_page   500 502 503 504  /50x.html;

        location = /50x.html {

            root   html;

        }

        # proxy the PHP scripts to Apache listening on 127.0.0.1:80

        #

        #location ~ \.php$ {

        #    proxy_pass   http://127.0.0.1;

        #}

        # pass the PHP scripts to FastCGI server listening on 127.0.0.1:9000

        #

        #location ~ \.php$ {

        #    root           html;

        #    fastcgi_pass   127.0.0.1:9000;

        #    fastcgi_index  index.php;

        #    fastcgi_param  SCRIPT_FILENAME  /scripts$fastcgi_script_name;

        #    include        fastcgi_params;

        #}

        # deny access to .htaccess files, if Apache's document root

        # concurs with nginx's one

        #

        #location ~ /\.ht {

        #    deny  all;

        #}

    }

    # another virtual host using mix of IP-, name-, and port-based configuration

    #

    #server {

    #    listen       8000;

    #    listen       somename:8080;

    #    server_name  somename  alias  another.alias;

    #    location / {

    #        root   html;

    #        index  index.html index.htm;

    #    }

    #}

    # HTTPS server

    #

    #server {

    #    listen       443 ssl;

    #    server_name  localhost;

    #    ssl_certificate      cert.pem;

    #    ssl_certificate_key  cert.key;

    #    ssl_session_cache    shared:SSL:1m;

    #    ssl_session_timeout  5m;

    #    ssl_ciphers  HIGH:!aNULL:!MD5;

    #    ssl_prefer_server_ciphers  on;

    #    location / {

    #        root   html;

    #        index  index.html index.htm;

    #    }

    #}

}
基于域名的虚拟主机配置步骤
为了让配置文件规范化,我们使用一个网站一个配置文件,操作步骤如下:
1:编辑nginx.conf配置文件
[root@nginx application]# vim /application/nginx/conf/nginx.conf

worker_processes  1;

events {

    worker_connections  1024;

}

http {

    include       mime.types;

    default_type  application/octet-stream;

    sendfile        on;

    keepalive_timeout  65;

    # nginx vhosts config

    include extra/www.conf;

    #include extra/bbs.conf;

    #include extra/blog.conf;      ##如果有多个网站在这里添加配置文件路径

}

##编辑后的文件,删除了注释,添加include几行
2:在/application/nginx/conf/extra目录下创建对应的网站配置文件
[root@nginx conf]# mkdir extra

[root@nginx conf]# cd extra

[root@nginx extra]# cat www.conf

server {

    listen  80;

    server_name www.ginvip.com alias ginvip.com;

    location / {

        root    html/ginvip;

        index   index.html index.htm;

    }

}
上面的alias ginvip.com就是别名配置!类似于IIS里的301重定向
3:创建对应的网站目录(路径就是上面的配置文件中:html/ginvip)
[root@nginx nginx]# mkdir html/ginvip
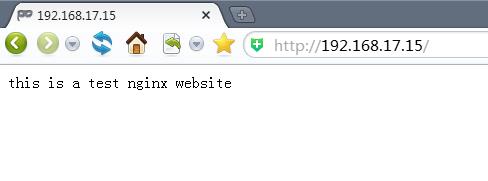
4:创建测试文件
[root@nginx nginx]# cd html/ginvip

[root@nginx ginvip]# ll

total 0

[root@nginx ginvip]# echo "this is a test nginx website" >index.html

[root@nginx ginvip]# ll

total 4

-rw-r--r-- 1 root root 29 Feb 14 22:07 index.html
5:检查语法,重启nginx
[root@nginx ginvip]# /application/nginx/sbin/nginx -t

nginx: the configuration file /application/nginx-1.6.3/conf/nginx.conf syntax is ok

nginx: configuration file /application/nginx-1.6.3/conf/nginx.conf test is successful

[root@nginx ginvip]# /application/nginx/sbin/nginx -s reload
6:添加IP,域名到本地的hosts文件
Linux平台添加:
[root@nginx ginvip]# vim /etc/hosts

192.168.17.15   www.ginvip.com ginvip.com
windows平台添加:(路径:C:\Windows\System32\drivers\etc\hosts)
7:测试
Linux平台测试:
[root@nginx ginvip]# curl www.ginvip.com

this is a test nginx website
测试别名:
[root@nginx ginvip]# curl ginvip.com

this is a test nginx website
windows平台测试:
基于端口的虚拟主机配置
基于端口的虚拟主机在生产环境中不多见,仅偶尔会用到,一般是为公司内部人员提供访问的,如OA系统,网站程序的后台,CMS发布后台,Mysql的web客户端phpmyadmin等。
配置文件中的配置与基于域名的配置大致一样,只是修改上面配置文件中的80端口为你想要访问的端口!测试访问的时候,域名后面加上 :端口号
基于IP的虚拟主机实战
只需要在配置文件中的80端口前加上IP地址即可!
Nginx状态信息功能实战
1:在extra目录增加一个status.conf配置文件,内容如下:
[root@nginx nginx]# vim conf/extra/status.conf

## website status

server {

    listen  80;

    server_name status.ginvip.com;

    location / {

        stub_status on;  #开启http_stub_status_module模块

        access_log  off;

    }

}
2:在主配置文件包含status.conf配置文件
[root@nginx nginx]# cat conf/nginx.conf

worker_processes  1;

events {

    worker_connections  1024;

}

http {

    include       mime.types;

    default_type  application/octet-stream;

    sendfile        on;

    keepalive_timeout  65;

    # nginx vhosts config

    include extra/www.conf;

    include extra/status.conf;

}
3:检查语法,重启nginx
[root@nginx nginx]# sbin/nginx -t

nginx: the configuration file /application/nginx-1.6.3/conf/nginx.conf syntax is ok

nginx: configuration file /application/nginx-1.6.3/conf/nginx.conf test is successful

[root@nginx nginx]# sbin/nginx -s reload
4:添加域名到/etc/hosts文件
5:测试status.ginvip.com
[root@nginx nginx]# curl status.ginvip.com

Active connections: 1      #活跃的连接数量

server accepts handled requests

 4      4        4       4

Reading: 0 Writing: 1 Waiting: 0
第一个server表示Nginx启动到现在共处理了4个连接
第三个accepts表示Nginx启动到现在共成功创建了4次握手:请求丢失数=(握手数-连接数),可以看出,本次状态显示没有丢失请求
第三个handled requests,表示总共处理了4次请求
Reading: 0 Writing: 1 Waiting: 0
Reading:Nginx读取到客户端的header信息数
Writing:Nginx返回给客户端的header信息数
Waiting:Nginx已经处理完正在等候下一次请求指令的驻留连接。开启keep-alive的情况下,这个值等于active-(reading+writing)
为Nginx增加错误日志(error_log)配置
error_log的语法格式及参数语法说明如下:
error_log		file				level;

#关键字		    日志文件	            错误日志级别
生产场景一般是warn|error|crit这三个级别之一,注意不要配置info等较低级别,会带来更多的磁盘I/O消耗
error_log的默认值为:
#default: error_log logs/error.log error;
可以放置的标签段为:
#context: main, http, server, location
官方参考资料:http://nginx.org/docs/ngx_core_module.html#error_log
在主配置文件nginx.conf中添加日志项:
[root@nginx nginx]# cat conf/nginx.conf

worker_processes  1;

error_log   logs/error.log  error;

events {

    worker_connections  1024;

}

http {

    include       mime.types;

    default_type  application/octet-stream;

    sendfile        on;

    keepalive_timeout  65;

    # nginx vhosts config

    include extra/www.conf;

    include extra/status.conf;

}
Nginx访问日志介绍
Nginx软件会把每个用户访问网站的日志信息记录到指定的日志文件里,供网站提供都分析用户浏览器行为等,此功能由ngx_http_log_module模块负责。
对应官方地址:http://nginx.org/en/docs/http/ngx_http_log_module.html
Nginx的访问日志主要由下面的两个参数控制:
|
参数 |
说明 |
|
log_format |
用来定义记录日志的格式(可以定义多种日志格式,取不同名字即可) |
|
access_log |
用来指定日志文件的路径及使用的何种日志格式记录日志 |
Nginx日志格式中默认的参数配置格如下:
[root@ClientA nginx]# cat conf/nginx.conf.default

    #log_format  main  '$remote_addr - $remote_user [$time_local] "$request" '

    #                  '$status $body_bytes_sent "$http_referer" '

    #                  '"$http_user_agent" "$http_x_forwarded_for"';
将上面三行代码去掉#号,复制到主配置文件nginx.conf
[root@nginx nginx]# cat conf/nginx.conf

worker_processes  1;

error_log   logs/error.log  error;

events {

    worker_connections  1024;

}

http {

    include       mime.types;

    default_type  application/octet-stream;

    sendfile        on;

    keepalive_timeout  65;

    log_format  main  '$remote_addr - $remote_user [$time_local] "$request" '

                      '$status $body_bytes_sent "$http_referer" '

                      '"$http_user_agent" "$http_x_forwarded_for"';

    # nginx vhosts config

    include extra/www.conf;

    include extra/status.conf;

}
Nginx日志变量说明如下:
|
Nginx日志变量 |
说明 |
|
$remote_addr |
记录访问网站的客户端地址 |
|
$http_x_forwarded_for |
当前端有代理服务器时,设置WEB节点记录客户端地址的配置,此参数生效的前提是代理服务器上也要进行相关的x_forwarded_for设置 |
|
$remote_user |
远程客户端用户名称 |
|
$time_local |
记录访问时间与时区 |
|
$request |
用户的http请求起始行信息 |
|
$status |
http状态码,记录请求返回的状态,如:200 , 404 , 301等 |
|
$body_bytes_sents |
服务器发送给客户端的响应body字节数 |
|
$http_referer |
记录此次请求是从哪个链接访问过来的,可以根据referer进行防盗链设置 |
|
$http_user_agent |
记录客户端访问信息,如:浏览器,手机客户端 |
没有特殊要求,默认的配置即可,更多可以设置的记录日志信息变量见:http://nginx.org/en/docs/http/ngx_http_log_module.html
记录日志的access_log参数说明
access_log off; #这里的off,表示不记录访问日志
默认配置:access_log logs/access.log combined;
放置位置:http , server , location , if in location , limit_except
访问日志最好在单独的配置文件中配置:
[root@nginx nginx]# cat conf/extra/www.conf

server {

    listen  80;

    server_name www.ginvip.com alias ginvip.com;

    location / {

        root    html/ginvip;

        index   index.html index.htm;

    }

    access_log  logs/access_www.log main;

}
如果不指定日志格式就会用默认的combined格式记录日志
也可以对日志进行压缩,可以在记录日志参数中加上buffer和flush选项,这样做会在高并发场景下提升网站访问....:
access_log logs/access_www.log main gzip buffer=32k flush=5s;
更多内容参考:http://nginx.org/en/docs/http/ngx_http_log_module.html
Nginx访问日志轮询切割
默认情况nginx会把所有的访问日志生成到一个指定的访问日志文件access.log里,如果自己配置了日志,如上面我就对网站做了配置,写到了logs/access_www.conf文件里,时间长了会导致日志容量过大,不利于分析日志和处理,因此,有必要对Nginx按天或按指定时间进行切割成不同的文件保留,这里使用按天切割的方法:
[root@nginx scripts]# cat cut_nginx_log.sh

#!/bin/sh

Dateformat=`date +%Y%m%d -d -1day`

Basedir='/application/nginx'

Nginxlogdir="$Basedir/logs"

Logname="access_www"

[ -d $Nginxlogdir ] && cd $Nginxlogdir || exit 1

[ -f ${Logname}.log ] || exit 1

/bin/mv ${Logname}.log ${Dateformat}_${Logname}.log

$Basedir/sbin/nginx -s reload
将此脚本加入到定时任务中即可!
Nginx常用日志收集及分析工具
见:http://oldboy.blog.51cto.com/2561410/775056
Centos6.6下安装nginx1.6.3的更多相关文章
- CentOS6.8下安装Nginx-1.9.15
1. 简介 Nginx是一个高性能的HTTP和反向代理服务器,也是一个IMAP/POP3/SMTP代理服务器. Nginx是一款轻量级的Web服务器/反向代理服务器以及电子邮件代理服务器,并在一个BS ...
- CentOS6.4下安装Nginx1.12.2
1.安装GCC安装 nginx 需要先将官网下载的源码进行编译,编译依赖 gcc 环境,如果没有 gcc 环境,则需要安装 yum install gcc-c++ 2.安装PCRE-devel PCR ...
- CentOS6.5下安装JDK1.7+MYSQL5.5+TOMCAT7+nginx1.7.5环境安装文档
----------------CentOS6.5下安装JDK1.7+MYSQL5.5+TOMCAT7+nginx1.7.5环境安装文档----------------------- [JDK1.7安 ...
- 【转载】CentOS6.5_X64下安装配置MongoDB数据库
[转载]CentOS6.5_X64下安装配置MongoDB数据库 2014-05-16 10:07:09| 分类: 默认分类|举报|字号 订阅 下载LOFTER客户端 本文转载自zhm&l ...
- CentOS6.5下安装apache2.2和PHP 5.5.28
CentOS6.5下安装apache2.2 1. 准备程序 :httpd-2.2.27.tar.gz 下载地址:http://httpd.apache.org/download.cgi#apache2 ...
- CentOS6.5下安装配置MySQL
CentOS6.5下安装配置MySQL,配置方法如下: 安装mysql数据库:# yum install -y mysql-server mysql mysql-deve 查看mysql-server ...
- Linux下安装Nginx1.9.3-0303(本人亲手实践)
Linux下安装Nginx1.9.3 Linux操作系统 Oel 5.8 64bit 最新版Nginx: 1.9.3 最近同事让我帮忙搞 ngix,两天时间 安装.配置搞定了.继续 Nginx 1.9 ...
- CentOS6.5下安装Apache2.4+PHP7
CentOS6.5下安装Apache2.4+PHP7 http://blog.csdn.net/along602/article/details/42695779 http://www.th7.cn/ ...
- 在CentOS6.8下安装Docker
在CentOS6.8下安装Docker 一.查看系统版本 [root@localhost opt]# uname -a Linux localhost.localdomain -.el6.x86_64 ...
随机推荐
- java工程文件路径的问题
String classpath = this.getClass().getResource("/").getPath().replaceFirst("/WEB-INF/ ...
- 三维空间中xoy平面上特定抛物线的正等测投影解析解的一种求法
背景 背景:为锻炼代同学,老师给了她一个反向工程微信"跳一跳"小游戏的任务,希望做一个一样的出来.跳一跳中,有方块,有小人,小人站在方块上. 这个游戏的玩法是,用手指按住手机屏幕, ...
- 软件工程第十周psp
1.PSP表格 2.进度条 3.饼状图 4.折线图
- Last Daily Scrum (2015/11/9)
今晚我们终于完成了新版本的爬虫工作,可以替换掉之前部署在服务器上的那个爬虫了.由于周末大家各种原因导致了我们迭代一的截止日没有完成所有任务,所以今天晚上大家加班加点终于把这一迭代的爬虫项目完成了. 成 ...
- python learning1.py
# 廖雪峰的官方网站 python教材 1~4章 # 格式控制符语法 print('Hello, %s' % 'world') print('hello, %s, you have %d dollar ...
- vue 实战语法错误导致的问题记录
1. 在组件中引入mapActions import mapActions from 'vuex' 而不是 getActions 2.引入 mutations-type.js import ...
- Scrum Meeting Beta - 10
Scrum Meeting Beta - 10 NewTeam 2017/12/11 地点:新主楼F座二楼 任务反馈 团队成员 完成任务 计划任务 安万贺 完成了作业详情的本地存储Issue #165 ...
- PAT 甲级 1155 Heap Paths
https://pintia.cn/problem-sets/994805342720868352/problems/1071785408849047552 In computer science, ...
- HDU 2086 A1 = ?
http://acm.hdu.edu.cn/showproblem.php?pid=2086 Problem Description 有如下方程:Ai = (Ai-1 + Ai+1)/2 - Ci ( ...
- autoit获取ie浏览器简单操作网页(GUI小工具)
需要稍稍熟悉一下autoti提供的语言, 我简单做了一个带GUI的小工具,实现根据IE标题点击页面内的LinkText 注意:使用时IE窗口是显示状态才可以获取到(可以在脚本中加入搜索IE句柄,将ie ...