初试mininet(可选PyCharm)
0x00 Mininet
尝试理解一下mininet,话说mininet是基于python编写的,代码结构清晰,简直清醒脱俗((≧▽≦)/啦啦啦),附上链接mininet,mark一下。
0x01 Important classes, methods, functions
简单记录一下比较重要的类和方法
Important classes, methods, functions and variables in the above code include:

Topo: the base class for Mininet topologies

build(): The method to override in your topology class. Constructor parameters (n) will be passed through to it automatically by Topo.__init__().

addSwitch(): adds a switch to a topology and returns the switch name

addHost(): adds a host to a topology and returns the host name

addLink(): adds a bidirectional link to a topology (and returns a link key, but this is not important). Links in Mininet are bidirectional unless noted otherwise.

Mininet: main class to create and manage a network

start(): starts your network

pingAll(): tests connectivity by trying to have all nodes ping each other

stop(): stops your network

net.hosts: all the hosts in a network

dumpNodeConnections(): dumps connections to/from a set of nodes.

setLogLevel( 'info' | 'debug' | 'output' ): set Mininet's default output level; 'info' is recommended as it provides useful information.
0x02 Sample
自己写了一个简单的,h1~h5链接到s1, h6~h10链接到s2,然后s1和s2互联
一开始想着SingleSwitchTopo的方法来写LinearTopo,结果一直报错,╮(╯_╰)╭,明明人家代码都写好了
SingleSwitchTopo是Single switch connected to k hosts,而Linear topology of k switches, with n hosts per switch
#!/usr/bin/python

from mininet.topo import Topo

from mininet.net import Mininet

from mininet.util import irange,dumpNodeConnections

from mininet.log import setLogLevel

class LinearTopo(Topo):

    ""

    """Linear topology of k switches, with n hosts per switch."""

    ""

    def __init__(self, k=2, n=5,**opts):

        """k:number of switches (and hosts)"""

        """hconf: host configuration options"""

        """lconf: ling configuration options"""

        super(LinearTopo, self).__init__(**opts)

        self.n = n

        self.k = k

        """creates 2 switchs"""

        switch1 = self.addSwitch('s1')

        switch2 = self.addSwitch('s2')

        """creates h1~h5 and addLink switch1"""

        for i in irange(1,n):

            host = self.addHost('h%s' %i)

            self.addLink(host,switch1)

        """creates h6~h10 and addLink switch2"""

        for i in irange(n+1,n+5):

            host =self.addHost('h%s' %i)

            self.addLink(host,switch2)

        """addLink switch1 and switch2"""

        self.addLink(switch1,switch2)

def simpleTest():

    "Create and test a simple network"

    topo = LinearTopo(k=2,n=5)

    net = Mininet(topo)

    #start the network

    net.start()

    print "Dumping host connections"

    dumpNodeConnections(net.hosts)

    #test the connections of the network

    print "Testing network connectivity"

    net.pingAll()

    #Test the bandwidth of the h* and h*

    print "Testing bandwidth between h1 and h2"

    h1, h2 = net.get('h1', 'h2')

    net.iperf((h1,h2))

    print "Testing bandwidth between h10 and h1"

    h10, h1 = net.get('h10', 'h1')

    net.iperf((h10,h1))

    #stop the network

    net.stop()

if __name__== '__main__':

    # Tell mininet to print useful information

    setLogLevel('info')

    simpleTest()
0x04 run in shell
命令行直接运行
#将代码保存到一个文件中

sudo vi test.py

#运行

sudo python test.py
0x05 Output
*** Creating network

*** Adding controller

*** Adding hosts:

h1 h2 h3 h4 h5 h6 h7 h8 h9 h10

*** Adding switches:

s1 s2

*** Adding links:

(h1, s1) (h2, s1) (h3, s1) (h4, s1) (h5, s1) (h6, s2) (h7, s2) (h8, s2) (h9, s2) (h10, s2) (s1, s2)

*** Configuring hosts

h1 h2 h3 h4 h5 h6 h7 h8 h9 h10

*** Starting controller

c0

*** Starting 2 switches

s1 s2 ...

Dumping host connections

h1 h1-eth0:s1-eth1

h2 h2-eth0:s1-eth2

h3 h3-eth0:s1-eth3

h4 h4-eth0:s1-eth4

h5 h5-eth0:s1-eth5

h6 h6-eth0:s2-eth1

h7 h7-eth0:s2-eth2

h8 h8-eth0:s2-eth3

h9 h9-eth0:s2-eth4

h10 h10-eth0:s2-eth5

Testing network connectivity

*** Ping: testing ping reachability

h1 -> h2 h3 h4 h5 h6 h7 h8 h9 h10

h2 -> h1 h3 h4 h5 h6 h7 h8 h9 h10

h3 -> h1 h2 h4 h5 h6 h7 h8 h9 h10

h4 -> h1 h2 h3 h5 h6 h7 h8 h9 h10

h5 -> h1 h2 h3 h4 h6 h7 h8 h9 h10

h6 -> h1 h2 h3 h4 h5 h7 h8 h9 h10

h7 -> h1 h2 h3 h4 h5 h6 h8 h9 h10

h8 -> h1 h2 h3 h4 h5 h6 h7 h9 h10

h9 -> h1 h2 h3 h4 h5 h6 h7 h8 h10

h10 -> h1 h2 h3 h4 h5 h6 h7 h8 h9

*** Results: 0% dropped (90/90 received)

Testing bandwidth between h1 and h2

*** Iperf: testing TCP bandwidth between h1 and h2

*** Results: ['35.8 Gbits/sec', '35.8 Gbits/sec']

Testing bandwidth between h10 and h1

*** Iperf: testing TCP bandwidth between h10 and h1

*** Results: ['36.4 Gbits/sec', '36.4 Gbits/sec']

*** Stopping 1 controllers

c0

*** Stopping 11 links

...........

*** Stopping 2 switches

s1 s2

*** Stopping 10 hosts

h1 h2 h3 h4 h5 h6 h7 h8 h9 h10

*** Done
0x06 Problems
遇到的问题:
一.Mininet只能使用python2使用python3不行,即使用外部库也不行,
二.PyCharm配置root运行文件
一开始我没有使用shell来运行,而是使用了PyCharm来跑,然后出现了一个问题,就是Mininet must run as a root,即必须以管理员身份进行,所以需要在PyCharm上设置管理员运行,具体做法:
- 1.在/usr/bin/目录下新建文件 python_sudo.sh :
sudo gedit /usr/bin/python_sudo.sh
在文件中写入下列代码:
#! /bin/bash

sudo python $*
- 2.给sh文件赋予权限:
cd /usr/bin/

sudo chmod a+x python_sudo.sh
- 3.编辑visudo(其他工具有点问题):
sudo visudo
- 4.在最后一行输入,然后保存:
%sudo ALL=NOPASSWD: /usr/bin/python
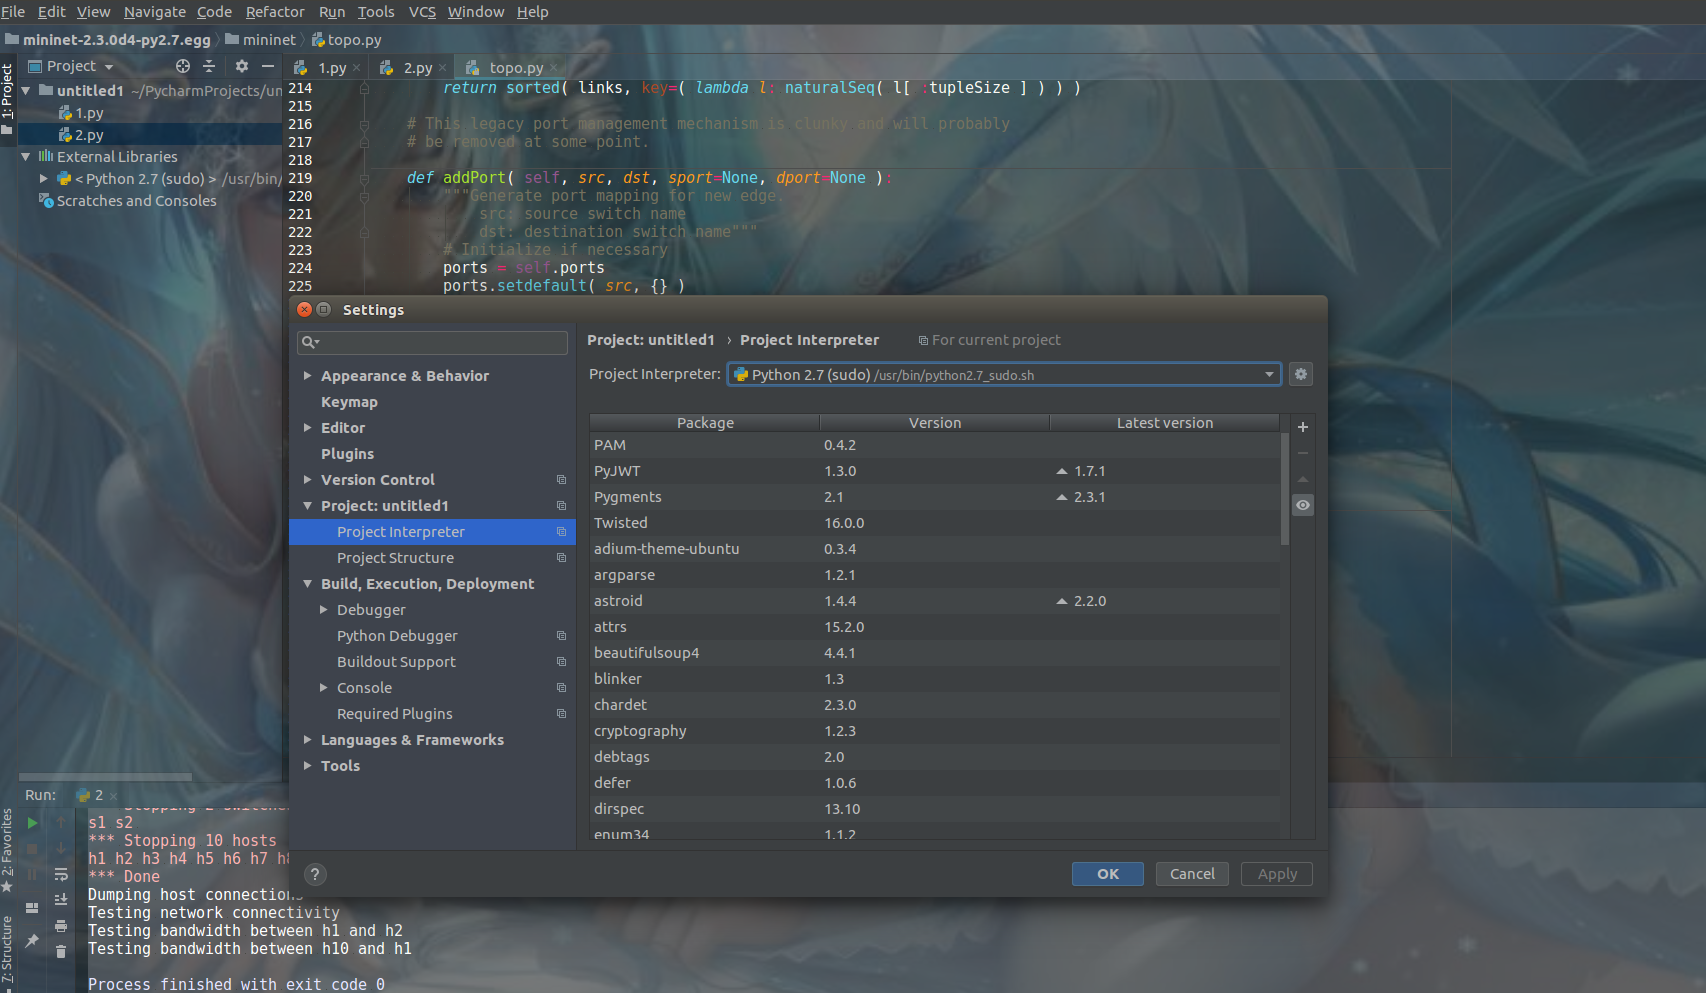
- 5.将pycharm 中的
File→Settings→Project Interpreter
置换为自己写的python_sudo.sh,在下图选中框右边有个小齿轮,点那个进行Add就OK了
- 6.同理可以对python3等进行设定,只要在将python改成对应版本就可以(前提是在这个目录下已安装)
0x07 Paint
一个能用画图工具
sudo apt-get install kolourpaint4
然后搜paint就OK了
初试mininet(可选PyCharm)的更多相关文章
- Pycharm 使用
Pycharm基本使用http://edu.51cto.com/index.php?do=lession&id=118722 Pycharm的基本使用 在Pycharm下为你的Python ...
- 配置Windows 2008 R2 64位 Odoo 8.0 源码PyCharm开发调试环境
安装过程中,需要互联网连接下载python依赖库: 1.安装: Windows Server 2008 R2 x64标准版 2.安装: Python 2.7.10 amd64 到C:\Python27 ...
- [Python] Magic editor in Pycharm
From: http://blog.csdn.net/u013088062/article/details/50249751 From:http://blog.csdn.net/u013088062/ ...
- [Python] Interpreter setting in Pycharm
From: http://blog.csdn.net/u013088062/article/details/50135135 From: http://blog.csdn.net/u013088062 ...
- 基于OpenDaylight和Mininet的试验床平台搭建
##########################################平台架构######################################### 一.虚拟机安装和镜像加载 ...
- Mininet VM设置笔记
Mininet VM是为了加快Mininet安装,而且可以很容易在linux平台上运行. VM运行在Windows,Mac,Linux,通过VMware.VirtualBox,QEMU和KVM. 下载 ...
- (原+转)pycharm中传入命令行参数
转载请注明出处: http://www.cnblogs.com/darkknightzh/p/5670821.html 参考网址: http://zhidao.baidu.com/question/5 ...
- PyCharm基本使用
调节PyCharm的背景颜色 File>Settings>Appearance&Behavior>Appearance 在PyCharm中切换Python解释器版本 File ...
- pycharm 安装与基本设置
一.下载及安装 打开官网下载:https://www.jetbrains.com/pycharm/download/#section=windows 下载完毕之后可直接双击可执行文件,然后点击&quo ...
随机推荐
- arcgis for js/flex/sl 该选哪一个?
arcgis server开发webgis 在客户端有3种选择:js.flex.sl 他们除了开发arcgis外,本身还有一些常用的领域 js:在传统网站中很常用 flex:游戏.视频播放.动画特效 ...
- mongodb shell警告
# mongoMongoDB shell version: 3.0.2connecting to: testServer has startup warnings: 2015-05-09T12:34: ...
- js不管条件是否成立都要进行变量提升
### 不管条件是否成立都要进行变量提升 > 不管条件是否成立,判断体中出现的var/function都会进行变量提升:但是在最新浏览器版本当中,function声明的变量只能提前声明,不能定义 ...
- 使用iCarousel的旋转木马效果请求图片
使用iCarousel的旋转木马效果请求图片 https://github.com/nicklockwood/iCarousel 先看看效果: 源码如下: // // RootViewControll ...
- map() Filter() lambda函数说明
map()函数接收两个参数,一个是函数,一个是序列,map将传入的函数依次作用到序列的每个元素,并把结果作为新的list返回 #通过map()函数将list中的数字转换为字符 map(str,rang ...
- golang 获取变量类型的字符串格式 列举变量类型
fmt.Println(reflect.TypeOf(var)) switch xxx.(type){ case int:.... case float32:... case float64:... ...
- Exchange Server 2016 安卓手机打不开超过10M的附件问题处理
华为手机配置Exchange Server 2016 时,打不开超过10M的附件,如PPT或者是DOC之类的附件,而iphone手机确可以,因为iphone手机使用了IMAP协议,安卓手机如果使用I ...
- 乘风破浪:LeetCode真题_016_3Sum Closest
乘风破浪:LeetCode真题_016_3Sum Closest 一.前言 这一次,问题又升级了,寻找的是三个数之和最靠近的某个数,这是非常让人难以思考的,需要把三个数相加之后和最后给的目标 ...
- Jmeter和LoadRunner的区别
1.Jmeter的架构跟LoadRunner原理一样,都是通过中间代理,监控&收集并发客户端发现的指令,把他们生成脚本,再发送到应用服务器,再监控服务器反馈的结果的一个过程. 2.分布式中间代 ...
- C/S结构软件测试要点汇总
C/S结构测试要点 1.安装/卸载: 1.安装包:完整性,安装包大小是否达到要求,显示基本信息是否正确,步骤是否明确,内容是否合理. 2.首次安装: 1)是否与其他已安装的软件冲突. 2)各种杀毒 ...