iphone dev 入门实例4:CoreData入门
The iPhone Core Data Example Application
The application developed in this chapter will take the form of the same contact database application used in previous chapters, the objective being to allow the user to enter name, address and phone number information into a database and then search for specific contacts based on the contact’s name.
Creating a Core Data based iPhone Application
As is often the case, we can rely on Xcode to do much of the preparatory work for us when developing an iPhone application that will use Core Data. Currently, however, only the Master-Detail Application, Utility Application and Empty Application project templates offer the option to automatically include support for Core Data.
To create the example application project, launch Xcode and select the option to create a new project. In the new project window, select the Empty Application option. In the next screen make sure that the Devices menu is set to iPhone and that the check boxes next to Use Core Data and Use Automatic Reference Counting are selected. In the Product Name and Class Prefix fields enter CoreData and click Next to select a location to store the project files. Xcode will create the new project and display the main project window. In addition to the usual files that are present when creating a new project, this time an additional file named CoreData.xcdatamodeld is also created. This is the file where the entity descriptions for our data model are going to be stored.
Creating the Entity Description
The entity description defines the model for our data, much in the way a schema defines the model of a database table. To create the entity for the Core Data application, select the CoreData.xcdatamodeld file to load the entity editor:

Figure 42-1
To create a new entity, click on the Add Entity button located in the bottom panel. In the text field that appears beneath the Entities heading name the entity Contacts. With the entity created, the next step is to add some attributes that represent the data that is to be stored. To do so, click on the Add Attribute button. In the Attribute pane, name the attribute name and set the Type to String. Repeat these steps to add two other String attributes named address and phone respectively:

Figure 42-2
The entity is now defined and it is time to start writing code.
Adding a View Controller
In order to automatically add Core Data support to our application we had to choose the Empty Application project template option when we started Xcode. As such, we now need to create our own view controller.
Within the Xcode project navigator panel, Ctrl-click on the CoreData folder entry. From the popup menu, select New File.... In the new file panel, select the iOS Cocoa Touch Class category followed by the Objective-C class icon and click Next. On the following options screen, make sure the Subclass of menu is set to UIViewController and name the class CoreDataViewController. Select the With XIB for user interface check box and make sure the Targeted for iPad option is off. Click Next and on the final panel click on Create.
Now that we have added the view controller class to the application we need to modify our app delegate to make this the root view controller. In the Xcode project navigator, select the CoreDataAppDelegate.h file and modify it to add a reference to our new view controller:
#import <UIKit/UIKit.h>

#import "CoreDataViewController.h"

@class CoreDataViewController;

@interface CoreDataAppDelegate : UIResponder <UIApplicationDelegate>

@property (strong, nonatomic) CoreDataViewController *viewController;

@property (strong, nonatomic) UIWindow *window;

@property (readonly, strong, nonatomic) NSManagedObjectContext *managedObjectContext;

@property (readonly, strong, nonatomic) NSManagedObjectModel *managedObjectModel;

@property (readonly, strong, nonatomic) NSPersistentStoreCoordinator *persistentStoreCoordinator;

- (void)saveContext;

- (NSURL *)applicationDocumentsDirectory;

@end
With an instance of the view controller declared in the interface file we now need to modify the didFinishLaunchingWithOptions method located in the CoreDataAppDelegate.m implementation file to initialize and allocate the CoreDataViewController instance and assign it as the application’s root view controller so that it is visible to the user on application launch:
- (BOOL)application:(UIApplication *)application didFinishLaunchingWithOptions:(NSDictionary *)launchOptions

{

    self.window = [[UIWindow alloc] initWithFrame:[[UIScreen mainScreen] bounds]];

    // Override point for customization after application launch.

    _viewController = [[CoreDataViewController alloc]

      initWithNibName:@"CoreDataViewController" bundle:nil];

    self.window.backgroundColor = [UIColor whiteColor];

    [self.window setRootViewController:_viewController];

    [self.window makeKeyAndVisible];

    return YES;

}

.

.

.

@end
Designing the User Interface
With the application delegate configured, now is a good time to design the user interface and establish the outlet and action connections. Select the CoreDataViewController.xib file to begin the design work. The user interface and corresponding connections used in this tutorial are the same as those in previous data persistence chapters. The completed view should, once again, appear as outlined in Figure 42-3:
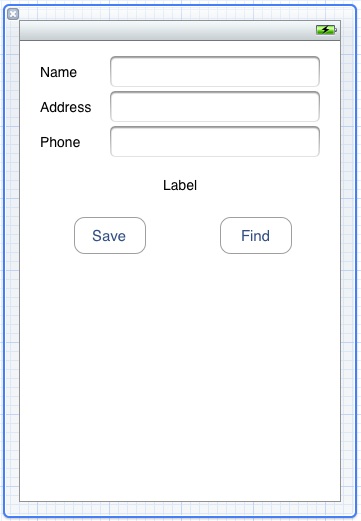
Figure 42-3
Before proceeding, stretch the status label (located above the two buttons) so that it covers most of the width of the view. Finally, edit the label and remove the word “Label” so that it is blank.
Select the top most text field object in the view canvas, display the Assistant Editor panel and verify that the editor is displaying the contents of the DatabaseViewController.h file. Ctrl-click on the text field object again and drag to a position just below the @interface line in the Assistant Editor. Release the line and in the resulting connection dialog establish an outlet connection named name.
Repeat the above steps to establish outlet connections for the remaining text fields and the label object to properties named address and phone respectively and status.
Ctrl-click on the Save button object and drag the line to the area immediately beneath the newly created outlet in the Assistant Editor panel. Release the line and, within the resulting connection dialog, establish an Action method on the Touch Up Inside event configured to call a method named saveData. Repeat this step to create an action connection from the Find button to a method named findContact.
With the connections established, select the CoreDataViewController.h file and verify the settings are correct before modifying the file to import the CoreDataAppDelegate.h file which will be required by code added to the view controller later in the chapter:
#import <UIKit/UIKit.h>

#import "coreDataAppDelegate.h"

@interface CoreDataViewController : UIViewController

@property (strong, nonatomic) IBOutlet UITextField *name;

@property (strong, nonatomic) IBOutlet UITextField *address;

@property (strong, nonatomic) IBOutlet UITextField *phone;

@property (strong, nonatomic) IBOutlet UILabel *status;

- (IBAction)saveData:(id)sender;

- (IBAction)findContact:(id)sender;

@end
Saving Data to the Persistent Store using Core Data
When the user touches the Save button the saveData method is called. It is within this method, therefore, that we must implement the code to obtain the managed object context and create and store managed objects containing the data entered by the user. Select the CoreDataViewController.m file, scroll down to the template saveData method and implement the code as follows:
- (IBAction)saveData:(id)sender {

    CoreDataAppDelegate *appDelegate =

    [[UIApplication sharedApplication] delegate];

   NSManagedObjectContext *context =

    [appDelegate managedObjectContext];

   NSManagedObject *newContact;

   newContact = [NSEntityDescription

       insertNewObjectForEntityForName:@"Contacts"

       inManagedObjectContext:context];

   [newContact setValue: _name.text forKey:@"name"];

   [newContact setValue: _address.text forKey:@"address"];

   [newContact setValue: _phone.text forKey:@"phone"];

   _name.text = @"";

   _address.text = @"";

   _phone.text = @"";

   NSError *error;

   [context save:&error];

   _status.text = @"Contact saved";

}
The above code identifies the application delegate instance and uses that object to identify the managed object context. This context is then used to create a new managed object using the Contacts entity description. The setValue method of the managed object is then called to set the name, address and phone attribute values of the managed object (which in turn are read from the text field user interface components). Finally, the context is instructed to save the changes to the persistent store with a call to the context’s save method.
Retrieving Data from the Persistent Store using Core Data
In order to allow the user to search for a contact it is now necessary to implement the findContact action method. As with the save method, this method will need to identify the application delegate and managed object context. It will then need to obtain the entity description for the Contacts entity and then create a predicate to ensure that only objects with the name specified by the user are retrieved from the store. Matching objects are placed in an array from which the attributes for the first match are retrieved using the valueForKey method and displayed to the user. A full count of the matches is displayed in the status field.
The code to perform these tasks is as follows:
- (IBAction)findContact:(id)sender {

    CoreDataAppDelegate *appDelegate =

       [[UIApplication sharedApplication] delegate];

    NSManagedObjectContext *context =

       [appDelegate managedObjectContext];

    NSEntityDescription *entityDesc =

       [NSEntityDescription entityForName:@"Contacts"

       inManagedObjectContext:context];

    NSFetchRequest *request = [[NSFetchRequest alloc] init];

    [request setEntity:entityDesc];

    NSPredicate *pred =

       [NSPredicate predicateWithFormat:@"(name = %@)",

        _name.text];

    [request setPredicate:pred];

    NSManagedObject *matches = nil;

    NSError *error;

    NSArray *objects = [context executeFetchRequest:request

        error:&error];

    if ([objects count] == 0) {

       _status.text = @"No matches";

    } else {

       matches = objects[0];

       _address.text = [matches valueForKey:@"address"];

       _phone.text = [matches valueForKey:@"phone"];

       _status.text = [NSString stringWithFormat:

           @"%d matches found", [objects count]];

    }

}
Building and Running the Example Application
The final step is to build and run the application. Click on the Run button located in the toolbar of the main Xcode project window. If errors are reported check the syntax of the code you have written, using the error message provided by Xcode as guidance. Once the application compiles it will launch and load into the iOS Simulator. Enter some test contacts (some with the same name). Having entered some test data, enter the name of the contact for which you created duplicate records and click the Find button. As shown in Figure 42-4, the address and phone number of the first matching record should appear together with an indication in the status field of the total number of matching objects that were retrieved:
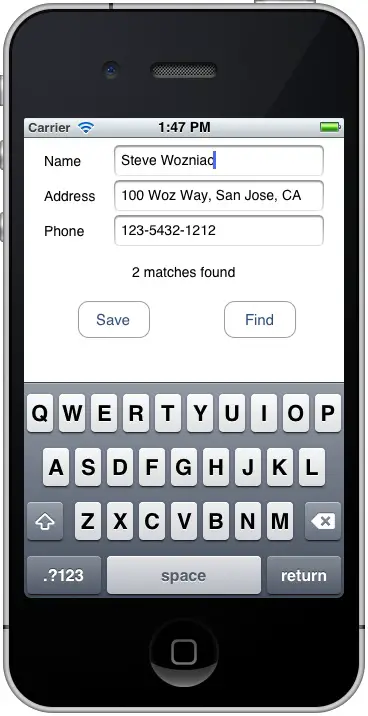
Figure 42-4
Summary
The Core Data framework provides an abstract, object oriented interface to database storage within iOS applications. As demonstrated in the example application created in this chapter, Core Data does not require any knowledge of the underlying database system and, combined with the visual entity creation features of Xcode, allows database storage to be implemented with relative ease.
iphone dev 入门实例4:CoreData入门的更多相关文章
- iphone Dev 开发实例10:How To Add a Slide-out Sidebar Menu in Your Apps
Creating the Xcode Project With a basic idea about what we’ll build, let’s move on. You can create t ...
- iphone Dev 开发实例9:Create Grid Layout Using UICollectionView in iOS 6
In this tutorial, we will build a simple app to display a collection of recipe photos in grid layout ...
- iphone Dev 开发实例8: Parsing an RSS Feed Using NSXMLParser
From : http://useyourloaf.com/blog/2010/10/16/parsing-an-rss-feed-using-nsxmlparser.html Structure o ...
- Vue.js2.0从入门到放弃---入门实例
最近,vue.js越来越火.在这样的大浪潮下,我也开始进入vue的学习行列中,在网上也搜了很多教程,按着教程来做,也总会出现这样那样的问题(坑啊,由于网上那些教程都是Vue.js 1.x版本的,现在用 ...
- 转-Vue.js2.0从入门到放弃---入门实例(一)
http://blog.csdn.net/u013182762/article/details/53021374 标签: Vue.jsVue.js 2.0Vue.js入门实例Vue.js 2.0教程 ...
- docker入门实例(转载)
1.Docker 是什么?Docker 是一个开源的应用容器引擎,让开发者可以打包他们的应用以及依赖包到一个可移植的镜像中,然后发布到任何流行的 Linux 或 Windows 机器上( 摘自百度 ) ...
- React 入门实例教程(转载)
本人转载自: React 入门实例教程
- struts入门实例
入门实例 1 .下载struts-2.3.16.3-all .不摆了.看哈就会下载了. 2 . 解压 后 找到 apps 文件夹. 3. 打开后将 struts2-blank.war ...
- wxPython中文教程入门实例
这篇文章主要为大家分享下python编程中有关wxPython的中文教程,分享一些wxPython入门实例,有需要的朋友参考下 wxPython中文教程入门实例 wx.Window 是一个基类 ...
随机推荐
- (单选后,显示相对应的div)点击免费没有变化,点击收费出现输入框
<li> <label class="feiyonglabel">活动费用</label> <div class="textbo ...
- WebApp远程调试工具
针对存在内嵌在客户端的webview项目中,在开发过程中我们希望能像PC上一下直接进行调试,提高我们平时的开发效率,这时候我们可以使用webApp远程调试工具-weinre. 安装: 本工具需要nod ...
- AndrdoidStudio 2个jar包引起的异常Duplicate files copied in APK META-INF/LICENSE.txt
在build.gradle中与compileSdkVersion **.buildToolsVersion “**.**.*"或defaultConfig 同级添加如下代码 packagin ...
- js部分---函数与递归;
function (){}//匿名函数 1.function hanshu () { alert("这是我第一个函数"); } hanshu();//调用函数 2.//有参数的函数 ...
- CDH hadoop的安装
1 先拷贝tar包到目录底下(tar 包解压 tar zxvf) 2 : 1.使用课程提供的hadoop-2.5.0-cdh5.3.6.tar.gz,上传到虚拟机的/usr/local目录下.(htt ...
- Vue.js相关知识1
<!DOCTYPE html><html lang="en"><head> <meta charset="UTF-8" ...
- php会话(session)生命周期概念介绍及设置更改和回收
http://www.169it.com/article/8429580816135935852.html https://my.oschina.net/jiec/blog/227252 sessi ...
- Python中urlretrieve函数
API定义: urllib.request.urlretrieve(url,filename=None,reporthook=None, data=None) 利用urlretrieve() 将数据下 ...
- jquery layer弹窗弹层插件 小巧强大
/* 先去官网下载最新的js http://sentsin.com/jquery/layer/ ①引用jquery ②引用layer.min.js */ 触发弹层的事件可自由绑定,如: $('#id ...
- SqlBulkCopy 批量插入数据库
/// <summary> /// 批量插入 注:DT的tableName为要更新的数据库表名,DT的列名和数据库一致 /// </summary> /// <param ...