Elasticsearch学习(1) Spring boot整合Elasticsearch
本文的Spring Boot版本为1.5.9,Elasticsearch版本为2.4.4,话不多说,直接上代码。
一、启动Elasticsearch
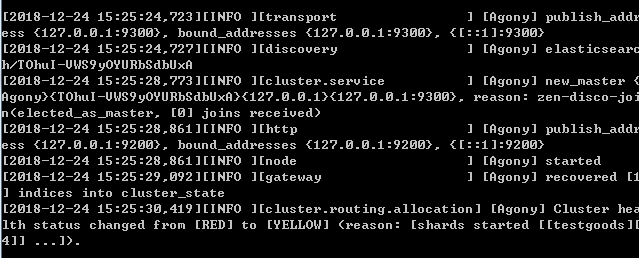
在官网上下载Elasticsearch后,打开bin目录下的elasticsearch.bat,出现下面的图,就证明成功启动了。
二、新建项目,添加依赖
在创建spring boot项目中,可以在nosql中选择添加Elasticsearch的依赖,完整的依赖如下:
<?xml version="1.0" encoding="UTF-8"?>

<project xmlns="http://maven.apache.org/POM/4.0.0" xmlns:xsi="http://www.w3.org/2001/XMLSchema-instance"

    xsi:schemaLocation="http://maven.apache.org/POM/4.0.0 http://maven.apache.org/xsd/maven-4.0.0.xsd">

    <modelVersion>4.0.0</modelVersion>

    <groupId>cmo.jf.cloud</groupId>

    <artifactId>resourceCente</artifactId>

    <version>1.0.0</version>

    <packaging>war</packaging>

    <name>Elasticsearch</name>

    <description>搜索引擎</description>

    <parent>

        <groupId>org.springframework.boot</groupId>

        <artifactId>spring-boot-starter-parent</artifactId>

        <version>1.5.9.RELEASE</version>

        <relativePath/> <!-- lookup parent from repository -->

    </parent>

    <properties>

        <project.build.sourceEncoding>UTF-8</project.build.sourceEncoding>

        <project.reporting.outputEncoding>UTF-8</project.reporting.outputEncoding>

        <java.version>1.8</java.version>

    </properties>

    <dependencies>

        <dependency>

            <groupId>org.springframework.boot</groupId>

            <artifactId>spring-boot-starter-data-elasticsearch</artifactId>

        </dependency>

        <dependency>

            <groupId>org.springframework.boot</groupId>

            <artifactId>spring-boot-starter-web</artifactId>

        </dependency>

        <dependency>

            <groupId>org.springframework.boot</groupId>

            <artifactId>spring-boot-starter-tomcat</artifactId>

            <scope>provided</scope>

        </dependency>

        <dependency>

            <groupId>org.springframework.boot</groupId>

            <artifactId>spring-boot-starter-test</artifactId>

            <scope>test</scope>

        </dependency>

    </dependencies>

    <build>

        <plugins>

            <plugin>

                <groupId>org.springframework.boot</groupId>

                <artifactId>spring-boot-maven-plugin</artifactId>

            </plugin>

        </plugins>

    </build>

</project>
需要注意的是:
1.spring boot2.X版本必须使用Elasticsearch 5.X版本
2.Elasticsearch 2.X的版本必须使用spring boot1.5版本
3.目前spring-boot-starter-data-elasticsearch还不支持Elasticsearch 6.X版本
如果出现版本不兼容,这会出现下面的错误:
NoNodeAvailableException[None of the configured nodes are available: [{#transport#-1}{729dgKKVSF-ti27v2_w68g}{127.0.0.1}{127.0.0.7:9300}]]
三、Elasticsearch的配置文件
和操作数据库一样,我们需要配置好配置文件,才能访问Elasticsearch,配置文件如下:
##端口号

server.port=8888

##es地址

spring.data.elasticsearch.cluster-nodes =127.0.0.1:9300
四、Elasticsearch的实体类
在Elasticsearch中,我们需要创建一个实体类作为索引,简单的理解就是在Elasticsearch中创建数据库和表。
利用@Document注解可以创建数据库和表。其中Document中的参数意义为:
indexName:索引名称 可以理解为数据库名 必须为小写不然会报org.elasticsearch.indices.InvalidIndexNameException异常
type:类型 可以理解为表名
代码如下:
import java.io.Serializable;

import org.springframework.data.elasticsearch.annotations.Document;

//indexName索引名称 可以理解为数据库名 必须为小写 不然会报org.elasticsearch.indices.InvalidIndexNameException异常

//type类型 可以理解为表名

@Document(indexName = "class",type = "user")

public class User implements Serializable {

        //定义成员属性

          private Integer id;

          private String name;

        private  Integer age;

        private String sex;

        public Integer getId() {

            return id;

        }

        public void setId(Integer id) {

            this.id = id;

        }

        public String getName() {

            return name;

        }

        public void setName(String name) {

            this.name = name;

        }

        public Integer getAge() {

            return age;

        }

        public void setAge(Integer age) {

            this.age = age;

        }

        public String getSex() {

            return sex;

        }

        public void setSex(String sex) {

            this.sex = sex;

        }

        public User(Integer id, String name, Integer age, String sex) {

            super();

            this.id = id;

            this.name = name;

            this.age = age;

            this.sex = sex;

        }

        public User() {

            super();

        }

}
五、创建一个数据访问层
同样,和其他的数据库访问操作一样,我们需要创建一个dao层来操作Elasticsearch,这个dao层类似于mongodb的操作,只需要继承ElasticsearchRepository接口就能实现。
import org.springframework.context.annotation.Configuration;

import org.springframework.data.elasticsearch.repository.ElasticsearchRepository;

import cmo.jf.cloud.bean.User;

@Configuration

public interface  UserMapper extends  ElasticsearchRepository<User,Long>{

}
六、创建controller层测试
import org.springframework.beans.factory.annotation.Autowired;

import org.springframework.web.bind.annotation.GetMapping;

import org.springframework.web.bind.annotation.RestController;

import cmo.jf.cloud.bean.User;

import cmo.jf.cloud.dao.UserMapper;

@RestController

public class UserController {

    @Autowired

    UserMapper userMapper;

     // 访问接口地址:localhost:8888/save

    //存储数据

    @GetMapping("save")

    public String save(){

        User user = new User(1,"张三",15,"男");

        userMapper.save(user);

        return "success";

    }

     //访问接口地址:localhost:8888/delete?id=1

    //根据ID删除数据

    @GetMapping("delete")

    public String delete(long id){

        userMapper.delete(id);

        return "success";

    }

    //访问接口地址:localhost:8888/getOne?id=1

    //根据ID查询数据

    @GetMapping("getOne")

    public User getOne(long id){

        User user = userMapper.findOne(id);

        return user;

    }

}
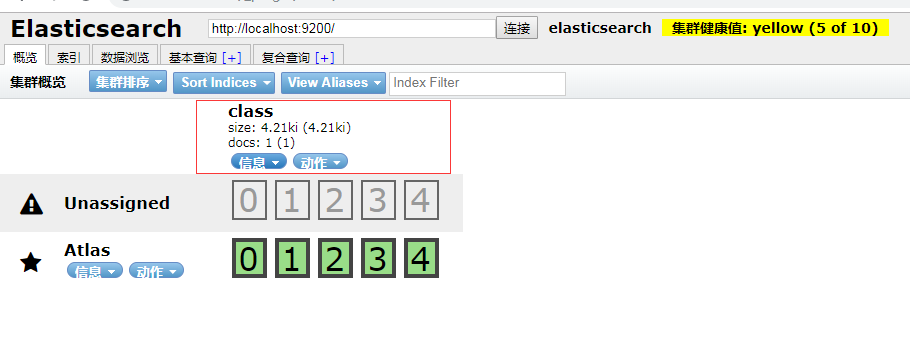
在添加几条数据后我们访问head插件---ES管理界面可以看到我们添加的数据库在页面上
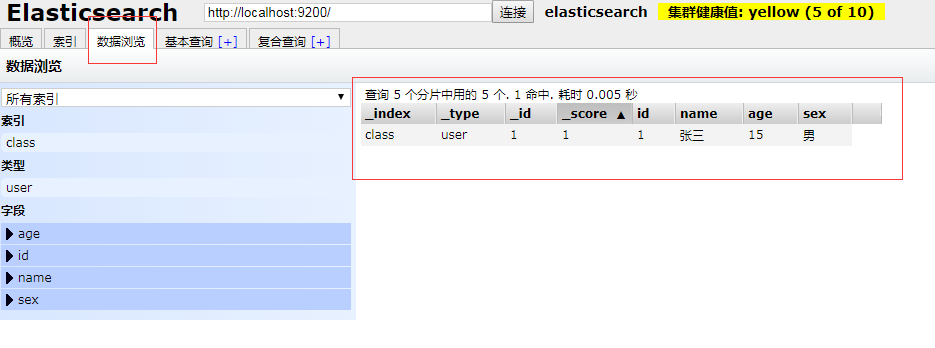
在数据浏览界面中可以看到我们添加的数据
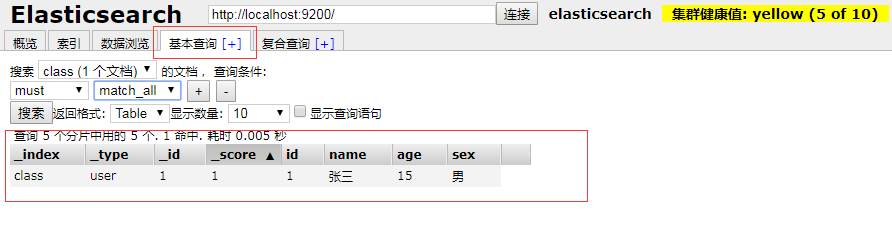
在基本查询中可以根据表名和条件,查询我们刚才插入的数据
七、项目中出现的错误
直接上错误代码:
Description:

Cannot determine embedded database driver class for database type NONE

Action:

If you want an embedded database please put a supported one on the classpath.

If you have database settings to be loaded from a particular profile you may need to active it (no profiles are currently active).
这个错误是由于打开了spring boot的自动配置数据,但是没有配置数据源,所以报错,解决的方案是直接关闭数据源自动配置,
只需要在启动类上加入:@SpringBootApplication(exclude = {DataSourceAutoConfiguration.class})即可
import org.springframework.boot.SpringApplication;

import org.springframework.boot.autoconfigure.SpringBootApplication;

import org.springframework.boot.autoconfigure.jdbc.DataSourceAutoConfiguration;

@SpringBootApplication(exclude = {DataSourceAutoConfiguration.class})

public class ElasticsearchApplication {

    public static void main(String[] args) {

        SpringApplication.run(ElasticsearchApplication.class, args);

    }

}
八、小结
这就是spring boot1.5整合ElasticSearch 2.X的操作,本文作为初级学习起来还是有帮助,但是ElasticSearch 中的一些高级操作如:同步数据库,分词器,高亮等都将在后面的文章中进行书写。ElasticSearch 6.X、ElasticSearch 5.X的API方式也和ElasticSearch 2.X不同,我也会放在后面进行讲解。
Elasticsearch学习(1) Spring boot整合Elasticsearch的更多相关文章
- Elasticsearch学习(3) spring boot整合Elasticsearch的原生方式
前面我们已经介绍了spring boot整合Elasticsearch的jpa方式,这种方式虽然简便,但是依旧无法解决我们较为复杂的业务,所以原生的实现方式学习能够解决这些问题,而原生的学习方式也是E ...
- Elasticsearch学习(4) spring boot整合Elasticsearch的聚合操作
之前已将spring boot原生方式介绍了,接下将结介绍的是Elasticsearch聚合操作.聚合操作一般来说是解决一下复杂的业务,比如mysql中的求和和分组,由于博主踩的坑比较多,所以博客可能 ...
- Spring Boot整合Elasticsearch
Spring Boot整合Elasticsearch Elasticsearch是一个全文搜索引擎,专门用于处理大型数据集.根据描述,自然而然使用它来存储和搜索应用程序日志.与Logstash和K ...
- 【spring boot】【elasticsearch】spring boot整合elasticsearch,启动报错Caused by: java.lang.IllegalStateException: availableProcessors is already set to [8], rejecting [8
spring boot整合elasticsearch, 启动报错: Caused by: java.lang.IllegalStateException: availableProcessors ], ...
- Spring Boot 项目学习 (四) Spring Boot整合Swagger2自动生成API文档
0 引言 在做服务端开发的时候,难免会涉及到API 接口文档的编写,可以经历过手写API 文档的过程,就会发现,一个自动生成API文档可以提高多少的效率. 以下列举几个手写API 文档的痛点: 文档需 ...
- Spring Boot 整合 Elasticsearch,实现 function score query 权重分查询
摘要: 原创出处 www.bysocket.com 「泥瓦匠BYSocket 」欢迎转载,保留摘要,谢谢! 『 预见未来最好的方式就是亲手创造未来 – <史蒂夫·乔布斯传> 』 运行环境: ...
- spring boot 整合 elasticsearch 5.x
spring boot与elasticsearch集成有两种方式.一种是直接使用elasticsearch.一种是使用data中间件. 本文只指针使用maven集成elasticsearch 5.x, ...
- Spring Boot 整合 elasticsearch
一.简介 我们的应用经常需要添加检索功能,开源的 ElasticSearch 是目前全文搜索引擎的 首选.他可以快速的存储.搜索和分析海量数据.Spring Boot通过整合Spring Data E ...
- Spring Boot整合ElasticSearch和Mysql 附案例源码
导读 前二天,写了一篇ElasticSearch7.8.1从入门到精通的(点我直达),但是还没有整合到SpringBoot中,下面演示将ElasticSearch和mysql整合到Spring Boo ...
随机推荐
- 01 lucene基础 北风网项目培训 Lucene实践课程 索引
在创建索引的过程中IndexWriter会创建多个对应的Segment,这个Segment就是对应一个实体的索引段.随着索引的创建,Segment会慢慢的变大.为了提高索引的效率,IndexWrite ...
- 【LA2238 训练指南】固定分区内存管理 【二分图最佳完美匹配,费用流】
题意 早期的多程序操作系统常把所有的可用内存划分为一些大小固定的区域,不同的区域一般大小不同,而所有区域的大小之和为可用内存的大小.给定一些程序,操作系统需要给每个程序分配一个区域,使得他们可以同时执 ...
- 如何清除保存的FTP用户名和密码
很多人习惯登陆FTP时选择保存密码,这样下次只需打开地址就可以进入FTP的页面了.这样确实方便,但如果遇到更换别的FTP用户名登陆,该怎么办?相信不少人还真答不出.重装浏览器,或者重装系统?呵呵, ...
- 浅谈svn的hook机制
一.什么是钩子 所谓svn的hook机制,就是用户在管理数据仓库的时候,当特定的事件发生时,相应的hook会被调用,hook 其实就相当于特定事件的处理函数. 当前 Subversion 提供了5种可 ...
- Python3 模块与包
一.模块介绍 什么是模块? 常见的场景:一个模块就是一个包含了一组功能的Python文件,比如spam.py,模块名为spam,可以通过import spam使用. 在Python中,模块的使用方式都 ...
- linux环境下搭建osm_web服务器二(Mapnik及apache2mod_tile配置):
Mapnik及apache2mod_tile配置 上一篇,我们配置好了PostgreSQL服务器,导入了测试数据.今天,我们来配置 mapnik2 + apache2 + mod_tile 的WMS服 ...
- springMVC框架集成tiles模板
将tiles模板集成到springMVC框架下,大概流程如下: 1.在配置文件中加入tiles支持 我的servlet配置文件名为spring-mvc.xml.具体配置如下: <?xml ver ...
- Unable to locate JAR/zip in file system as specified by the driver definition: ojdbc14.jar
eclipse的配置错误,把当前包删除,重新导入一个包.然后设置与需要的数据库对应,就可以了
- javascript总结系列49:javaScript教程:原型链不可变
<!DOCTYPE html> <html lang="zh-CN"> <head> <meta charset="UTF-8& ...
- lshw查看系统硬件信息
lshw(Hardware Lister)是另外一个可以查看硬件信息的工具,不仅如此,它还可以用来做一些硬件的benchmark. lshw is a small tool to extract de ...