学习ASP.NET Core Blazor编程系列二十三——登录(3)
虽然在上一篇文章(学习ASP.NET Core Blazor编程系列二十三——登录(2))中我们制作出了登录页面,但那个登录页面,不符合我们平时使用的样式,需要进行修改,同时也没有实现登录验证。这一文章学习如何对Login.razor使用特有的布局组件,实现正常的登录样式,学习使用AuthenticationStateProvider类来进行登录验证。
五、LoginLayout组件
登录页面的布局与之前的内容页面中的布局是不一样的。例如之前的图书编辑页面是有侧边导航栏的,但登录页面显然是不需要的。因此,我们需要单独写一个LoginLayout组件,和默认布局MainLayout分开,只用于Login页面:
1. 在Visual Studio 2022的解决方案资源管理器中,鼠标左键选中“Pages”文件夹,右键单击,在弹出菜单中选择“添加—>Razor组件…”,并将组件命名为“LoginLayout.razor”。
2.在Visual Studio 2022的文本编辑器中打开LoginLayout.razor,我们来创建登录页面的布局。代码中的“/imgs/logo.png”所指定的logo图片,请自行准备。具体代码如下:
@inherits LayoutComponentBase

<div class="container">

    <div class="card">

    <div class="card-header" style="height:10%">

       <div style="margin:10px;">

            <div class="row">

                <div class="col-8">

                    <img src="/imgs/logo.png" style="align-self:center" />

                </div>

                <div class="col-8 text-center">

                    <span style="color:black; font-size:24px">欢迎使用 @ProductionName 后台管理系统</span>

                </div>

            </div>

        </div>

    </div>

    <div class="card-body" Style="background-color:white; min-height:500px">

        <div class="row">

            <div class="col-3"></div>

            <div class="col-6">

                <div style="margin:100px 0">

                    @Body

                </div>

            </div>

        </div>

    </div>

    <div class="card-footer">

        <small class="text-muted">Copyright @Year 图书租赁系统  Powered by .NET 6.0 </small>

    </div>

</div>

</div>

@code {

    private const string ProductionName = "图书租赁";

    private  int Year = DateTime.Now.Year;

}
六. 修改Login.razor
1.在Visual Studio 2022的文本编辑器中打开Login.razor,我们修改一下登录页面。具体代码如下:
@page "/Login"

@using BlazorAppDemo.Models

@using BlazorAppDemo.Utils

@layout LoginLayout

@inject NavigationManager NavigationManager

<div class="card align-items-center">

    <div class="card-body my-2">

        <h3>Login</h3>

        <hr />

        <EditForm  Model="loginModel" OnValidSubmit="SubmitHandler" OnInvalidSubmit="InvalidHandler">

            <DataAnnotationsValidator />

            <div class="form-group">

                <label for="userName">  @HtmlHelper.GetDisplayName(loginModel ,m=> m.UserName)</label>

                <InputText @bind-Value="loginModel.UserName" class="form-control" id="userName" />

                <ValidationMessage For="()=>loginModel.UserName" />

            </div>

            <div class="form-group">

                <label for="pwd"> @HtmlHelper.GetDisplayName(loginModel ,m=> m.Password)</label>

                <InputPassword @bind-Value="loginModel.Password" class="form-control" id="pwd" />

                <ValidationMessage For="()=>loginModel.Password" />

            </div>

            <span class="form-control-plaintext"></span>

            <div class="form-group row">

                <div class="col-sm-10">

            <button class="btn btn-primary">登录</button>

                </div>

            </div>

        </EditForm>

    </div>

</div>

@code {

    private UserInfo loginModel = new UserInfo();

    private void SubmitHandler()

    {

        Console.WriteLine($"用户名:{loginModel.UserName} ,密码:{loginModel.Password}");

        NavigationManager.NavigateTo("/Index");

    }

    private void InvalidHandler()

    {

        Console.WriteLine($"用户名: {loginModel.UserName} ,密码:{loginModel.Password}");

    }

}
七、修改路由与启动页面
如何让Blazor知道当用登录用户是被授权访问的?答案是Blazor提供的AuthenticationStateProvider。如果razor组件使用CascadingAuthenticationState,Blazor在渲染前会检查AuthorizeRouteView中的/AuthorizeView/Authorized, NotAuthorized, Authorizing标签,并根据获取的信息在客户端进行渲染成是授权的UI,还是未授权的UI。
1.在Visual Studio 2022的文本编辑器中打开app.razor,我们来添加CascadingAuthenticationState组件。具体代码如下:
@using Microsoft.AspNetCore.Components.Authorization

 <CascadingAuthenticationState>

<Router AppAssembly="@typeof(App).Assembly">

    <Found Context="routeData">

            <AuthorizeRouteView RouteData="@routeData" DefaultLayout="@typeof(MainLayout)" />

        <FocusOnNavigate RouteData="@routeData" Selector="h1" />

    </Found>

    <NotFound>

        <PageTitle>Not found</PageTitle>

        <LayoutView Layout="@typeof(MainLayout)">

            <h1>页面走失!请确认输入的URL是否正确!</h1>

            <p role="alert">Sorry, there's nothing at this address.</p>

        </LayoutView>

    </NotFound>

</Router>

</CascadingAuthenticationState>
2. 在Visual Studio 2022的文本编辑器中打开MainLayou.razor,我们来添加AuthorizeView组件。具体代码如下:
@inherits LayoutComponentBase

<PageTitle>BlazorAppDemo</PageTitle>

<div class="page">

    <div class="sidebar">

        <NavMenu />

    </div>

    <main>

        <AuthorizeView>

            <Authorized>

              <div class="top-row px-4">

            <a href="https://docs.microsoft.com/aspnet/" target="_blank">About</a>

        </div>

        <article class="content px-4">

                    @Body

        </article>

            </Authorized>

            <NotAuthorized>

                <div style="margin: 120px 0; width:100%; text-align: center; color: red;">

                    <span style="font-size:20px">检测到登录超时,请重新<a href="/login" style="text-decoration:underline">登录</a>!</span>

                </div>

            </NotAuthorized>

        </AuthorizeView>

    </main>

</div>
3. 在Visual Studio 2022的菜单栏上,找到“调试-->开始调试”或是按F5键,Visual Studio 2022会生成BlazorAppDemo应用程序,并在浏览器中打开Home页面,这时我们看到的不在是之前的页面,而是一个没有登录的提示信息。如下图。

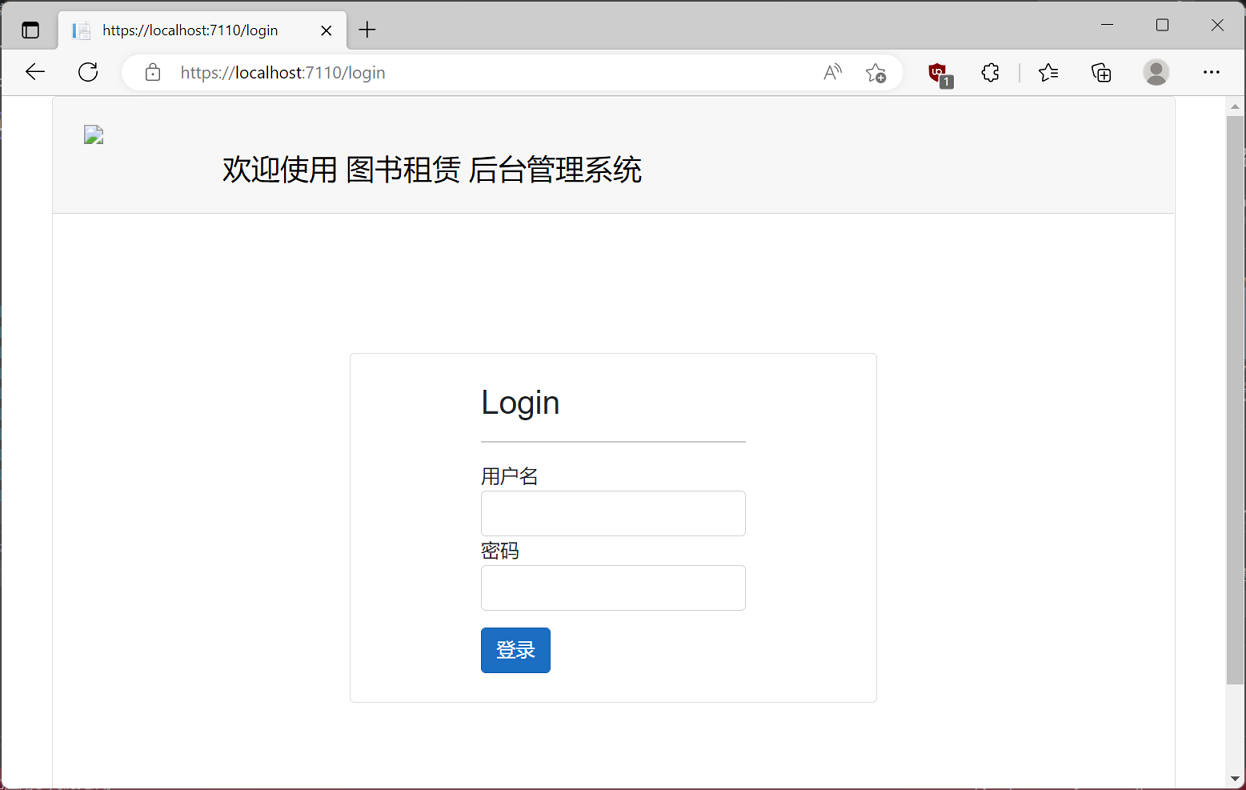
4.使用鼠标左键点击“登录”超连接,页面进入到登录页面。如下图。
学习ASP.NET Core Blazor编程系列二十三——登录(3)的更多相关文章
- 学习ASP.NET Core Blazor编程系列二——第一个Blazor应用程序(中)
学习ASP.NET Core Blazor编程系列一--综述 学习ASP.NET Core Blazor编程系列二--第一个Blazor应用程序(上) 四.创建一个Blazor应用程序 1. 第一种创 ...
- 学习ASP.NET Core Blazor编程系列二——第一个Blazor应用程序(下)
学习ASP.NET Core Blazor编程系列一--综述 学习ASP.NET Core Blazor编程系列二--第一个Blazor应用程序(上) 学习ASP.NET Core Blazor编程系 ...
- 学习ASP.NET Core Blazor编程系列二——第一个Blazor应用程序(完)
学习ASP.NET Core Blazor编程系列一--综述 学习ASP.NET Core Blazor编程系列二--第一个Blazor应用程序(上) 学习ASP.NET Core Blazor编程系 ...
- 学习ASP.NET Core Blazor编程系列二——第一个Blazor应用程序(上)
学习ASP.NET Core Blazor编程系列一--综述 一.概述 Blazor 是一个生成交互式客户端 Web UI 的框架: 使用 C# 代替 JavaScript 来创建信息丰富的交互式 U ...
- 022年9月12日 学习ASP.NET Core Blazor编程系列三——实体
学习ASP.NET Core Blazor编程系列一--综述 学习ASP.NET Core Blazor编程系列二--第一个Blazor应用程序(上) 学习ASP.NET Core Blazor编程系 ...
- 学习ASP.NET Core Blazor编程系列四——迁移
学习ASP.NET Core Blazor编程系列一--综述 学习ASP.NET Core Blazor编程系列二--第一个Blazor应用程序(上) 学习ASP.NET Core Blazor编程系 ...
- 学习ASP.NET Core Blazor编程系列五——列表页面
学习ASP.NET Core Blazor编程系列一--综述 学习ASP.NET Core Blazor编程系列二--第一个Blazor应用程序(上) 学习ASP.NET Core Blazor编程系 ...
- 学习ASP.NET Core Blazor编程系列六——初始化数据
学习ASP.NET Core Blazor编程系列一--综述 学习ASP.NET Core Blazor编程系列二--第一个Blazor应用程序(上) 学习ASP.NET Core Blazor编程系 ...
- 学习ASP.NET Core Blazor编程系列六——新增图书(上)
学习ASP.NET Core Blazor编程系列一--综述 学习ASP.NET Core Blazor编程系列二--第一个Blazor应用程序(上) 学习ASP.NET Core Blazor编程系 ...
- 学习ASP.NET Core Blazor编程系列八——数据校验
学习ASP.NET Core Blazor编程系列一--综述 学习ASP.NET Core Blazor编程系列二--第一个Blazor应用程序(上) 学习ASP.NET Core Blazor编程系 ...
随机推荐
- Spring Boot 应用的热部署配置
前言 所谓热部署,简单来说,就是代码修改后不需重启项目就可自动加载出新的内容. 注意:热部署在 debug 调试模式下才生效! IDEA 配置 在 IDE(IDEA)中开启相关项目自动构建选项 开启编 ...
- C#中winform DataGridView常用修改点
1.修改列名 一般情况下,从数据库里面读取的列名是英文或者拼音,但是,有时候显示需要中文,这样就需要修改列名了. dgv.Columns[0].HeaderCell.Value="编号&qu ...
- jmeter接口性能测试【CSV文件读取+接口关联+设置集合点】
一.前言 周计划上安排了个接口性能测试的任务,便开始了职业生涯的第一个接口性能测试... 接口进行压测之前,首先需要调通脚本.有两种方式,一种是通过抓包工具(如fiddler)抓取业务接口:另一种是通 ...
- git pull与git pull --rebase
aliases: [] tags: [git] link: date: 2022-08-30 目录 git pull --rebase 等效命令 总结 参考文章 git pull --rebase 在 ...
- JUnit 5 单元测试教程
点赞再看,动力无限. 微信搜「程序猿阿朗 」. 本文 Github.com/niumoo/JavaNotes 和 未读代码博客 已经收录,有很多知识点和系列文章. 在软件开发过程中,我们通常都需要测试 ...
- Day17:稀疏数组的超细详解
稀疏数组的超细详解 一个含有大量重复元素的二维数组,我们可以提取其有效元素,压缩空间,整合为一个稀疏数组. 例如一个五子棋棋盘,我们将棋盘看作为一个二维数组,没有棋子的位置为0:黑棋为1:白棋为2: ...
- kubernetes笔记-1-基础环境部署
一.环境信息: 操作系统:ubuntu 18.04 server amd64 docker:docker 19.03.ce kubernetes:v1.19 IP地址 主机名 角色 172.29. ...
- 第2-4-4章 规则引擎Drools规则属性-业务规则管理系统-组件化-中台
目录 5. 规则属性 5.1 enabled属性 5.2 dialect属性 5.3 salience属性 5.4 no-loop属性 5.5 activation-group属性 5.6 agend ...
- 【Java】【数据库】B树
B-树的形式 (B-树就是B树, 而且'-'是一个连接符号,不是减号.) B树的结构如下 不同于B+树(关于B+树,我的这篇博客里有写:B+树)的一些特点: 数据 \(K_i\) 左边的树不会将 \( ...
- Django三大主流Web框架(django版本安装-项目创建-应用创建-django三板斧)
目录 一:python三大主流web框架 1.python三大主流Web框架 2:三大主流web框架特点 二:正常运行Django项目所需要知道的注意事项 1.计算机的名称不能有中文,不然bug在哪你 ...