【转】Android AlertDialog自定义布局
原文网址:https://blog.csdn.net/u010694658/article/details/53022294
由于开发中经常使用弹框,然而系统自带的弹框太局限,也不太美观,经常不能满足开发需求,所以就只能自定义布局。其实自定义布局很简单,没不要写出来,但是如果不写一遍的,后面遇到的话就感觉又会忘记,所以在次记一小笔,仅记一个最简单的例子,可以举一反三。
直接上代码
public class MainActivity extends Activity implements OnClickListener {
private TextView text1, text2;
private Context mContext;
@Override
protected void onCreate(Bundle savedInstanceState) {
super.onCreate(savedInstanceState);
requestWindowFeature(Window.FEATURE_NO_TITLE);
setContentView(R.layout.activity_main);
mContext = this;
initView();
}
private void initView() {
text1 = (TextView) findViewById(R.id.text1);
text2 = (TextView) findViewById(R.id.text2);
text1.setOnClickListener(this);
text2.setOnClickListener(this);
}
@Override
public void onClick(View v) {
switch (v.getId()) {
case R.id.text1:
dialogShow1();
break;
case R.id.text2:
dialogShow2();
break;
default:
break;
}
}
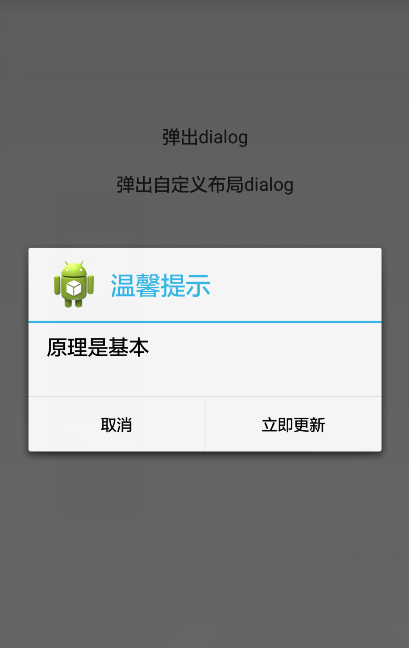
private void dialogShow1() {
AlertDialog.Builder builder = new Builder(mContext);
builder.setTitle("温馨提示");
builder.setIcon(R.drawable.ic_launcher);
builder.setMessage("原理是基本");
builder.setNegativeButton("取消", new DialogInterface.OnClickListener() {
@Override
public void onClick(DialogInterface arg0, int arg1) {
Toast.makeText(mContext, "no", 1).show();
}
});
builder.setPositiveButton("立即更新",
new DialogInterface.OnClickListener() {
@Override
public void onClick(DialogInterface arg0, int arg1) {
Toast.makeText(mContext, "ok", 1).show();
}
});
Dialog dialog = builder.create();
dialog.show();
}
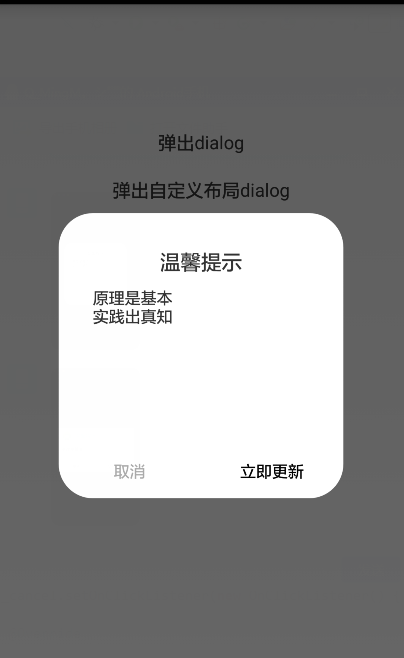
/**
* 自定义布局
* setView()只会覆盖AlertDialog的Title与Button之间的那部分,而setContentView()则会覆盖全部,
* setContentView()必须放在show()的后面
*/
private void dialogShow2() {
AlertDialog.Builder builder = new Builder(mContext);
LayoutInflater inflater = LayoutInflater.from(mContext);
View v = inflater.inflate(R.layout.update_manage_dialog, null);
TextView content = (TextView) v.findViewById(R.id.dialog_content);
Button btn_sure = (Button) v.findViewById(R.id.dialog_btn_sure);
Button btn_cancel = (Button) v.findViewById(R.id.dialog_btn_cancel);
//builer.setView(v);//这里如果使用builer.setView(v),自定义布局只会覆盖title和button之间的那部分
final Dialog dialog = builder.create();
dialog.show();
dialog.getWindow().setContentView(v);//自定义布局应该在这里添加,要在dialog.show()的后面
//dialog.getWindow().setGravity(Gravity.CENTER);//可以设置显示的位置
btn_sure.setOnClickListener(new OnClickListener() {
@Override
public void onClick(View v) {
dialog.dismiss();
Toast.makeText(mContext, "ok", 1).show();
}
});
btn_cancel.setOnClickListener(new OnClickListener() {
@Override
public void onClick(View arg0) {
dialog.dismiss();
Toast.makeText(mContext, "no", 1).show();
}
});
}
}activity_main的布局
<LinearLayout xmlns:android="http://schemas.android.com/apk/res/android"

    xmlns:tools="http://schemas.android.com/tools"

    android:layout_width="match_parent"

    android:layout_height="match_parent"

    android:layout_marginTop="100dp"

    android:orientation="vertical" >

    <TextView

        android:id="@+id/text1"

        android:layout_width="match_parent"

        android:layout_height="wrap_content"

        android:layout_margin="10dp"

        android:gravity="center"

        android:text="弹出dialog"

        android:textSize="@dimen/activity_horizontal_margin" />

    <TextView

        android:id="@+id/text2"

        android:layout_width="match_parent"

        android:layout_height="wrap_content"

        android:layout_margin="10dp"

        android:gravity="center"

        android:text="弹出自定义布局dialog"

        android:textSize="@dimen/activity_horizontal_margin" />

</LinearLayout>
update_manage_dialog布局
<RelativeLayout xmlns:android="http://schemas.android.com/apk/res/android"

    xmlns:tools="http://schemas.android.com/tools"

    android:layout_width="match_parent"

    android:layout_height="match_parent"

    android:background="#00FFFFFF" >

    <RelativeLayout

        android:layout_width="250dp"

        android:layout_height="250dp"

        android:layout_centerInParent="true"

        android:background="@drawable/update_bg" >

        <TextView

            android:id="@+id/dialog_title"

            android:layout_width="match_parent"

            android:layout_height="wrap_content"

            android:layout_marginTop="30dp"

            android:gravity="center"

            android:text="温馨提示"

            android:textSize="18sp" />

        <TextView

            android:id="@+id/dialog_content"

            android:layout_width="match_parent"

            android:layout_height="wrap_content"

            android:layout_below="@+id/dialog_title"

            android:layout_marginTop="10dp"

            android:layout_marginLeft="30dp"

            android:layout_marginRight="30dp"

            android:text="原理是基本\n实践出真知"

            android:textSize="14sp" />

        <LinearLayout

            android:layout_width="match_parent"

            android:layout_height="wrap_content"

            android:layout_alignParentBottom="true"

            android:orientation="horizontal" >

            <Button

                android:id="@+id/dialog_btn_cancel"

                android:layout_width="0dp"

                android:layout_height="wrap_content"

                android:layout_weight="1"

                android:background="@null"

                android:text="取消"

                android:textColor="#AAAAAA"

                android:textSize="14sp" />

            <Button

                android:id="@+id/dialog_btn_sure"

                android:layout_width="0dp"

                android:layout_height="wrap_content"

                android:layout_weight="1"

                android:background="@null"

                android:text="立即更新"

                android:textSize="14sp" />

        </LinearLayout>

    </RelativeLayout>

</RelativeLayout>
update_bg放在drawable里面,代码如下
<?xml version="1.0" encoding="utf-8"?>

<shape xmlns:android="http://schemas.android.com/apk/res/android" >

    <!-- android:radius 弧形的半径 -->

    <corners android:radius="30dp" />

    <!-- 填充的颜色 -->

    <solid android:color="@android:color/white" />

</shape>
【转】Android AlertDialog自定义布局的更多相关文章
- Android 创建自定义布局
我们所有的控件都是继承至View类的,而所有的布局都是继承至ViewGroup的,所以我们也可以继承某个view类来实现我们自己的布局或者控件. 引入布局 我们新建一个title.xml的layout ...
- 获取 AlertDialog自定义的布局 的控件
AlertDialog自定义的布局 效果图: 创建dialog方法的代码如下: 1 LayoutInflater inflater = getLayoutInflater(); 2 View layo ...
- Android之自定义AlertDialog和PopupWindow实现(仿微信Dialog)
我们知道,在很多时候,我们都不用Android内置的一些控件,而是自己自定义一些自己想要的控件,这样显得界面更美观. 今天主要是讲自定义AlertDialog和popupWindow的使用,在很多需求 ...
- Android之自定义AlertDialog无法监听控件
参考:http://www.cnblogs.com/511mr/archive/2011/10/21/2220253.html 要做一个自定义的弹出框,以前都是用一个Activity来实现,总觉得不是 ...
- Android:创建可穿戴应用 - 自定义布局
创建自定义布局(Creating Custom Layouts) 本文将介绍如何创建自定义通知以及使用可穿戴UI库来创建自定义布局你同时还需要了解可穿戴设计准则(Wear Design Princip ...
- 【Android基础】listview控件的使用(4)-----自定义布局的listview的使用
前面我介绍了listview控件的不同用法,但是这些用法在实际的开发项目中是不足以满足需求的,因为前面的几种用法只能简单的显示文本信息,而且布局都比较单一,很难做出复杂的结果,在实际的开发项目中,90 ...
- Android开发学习之路--UI之自定义布局和控件
新的一年已经开始了,今天已经是初二了,两天没有学习了,还是要来继续学习下.一般手机的title都是actionbar,就像iphone一样可以后退,可以编辑.这里自定义布局就来实现下这个功能,首先准备 ...
- Android创建自定义的布局和控件
Android的自带布局有framelayout.linerlayout.relativelayout,外加两个百分比布局,但是这些无法灵活的满足我们的需要,所以我们要自己自定义并引入自己的布局.首先 ...
- android 开发 使用自定义布局实现标题栏复用(标题栏内容自定义:使用代码实现和xml布局自定义属性2种办法实现)
在个人学习的情况下可能很少使用自定义布局去实现大量复用的情况下,但是在一个开发工作的环境下就会使用到大量复用的自定义控件. 实现思维: 1.写一个xml的布局,用于标题栏的样式,并且添加在标题栏中你想 ...
随机推荐
- Codeforces Round #212 (Div. 2) C. Insertion Sort
C. Insertion Sort Petya is a beginner programmer. He has already mastered the basics of the C++ lang ...
- Android SurfaceView内容获取
Android SurfaceView内容获取 这几天在做一个Android的小项目,项目中需要使用到SurfaceView来显示相机捕获的内容,同时还有一个SurfaceView用于绘制一些辅助线, ...
- 使用lets encrypt获取免费ssl证书
lets encrypt也是一个CA,并且在众多大厂的加持下有可能成为最棒的免费颁发证书的CA,尤其是chrome的加入. 目前https已经成为了一种趋势,无奈证书授权费用相当昂贵,将一大批企业挡在 ...
- POJ 1321 棋盘问题 (dfs)
在一个给定形状的棋盘(形状可能是不规则的)上面摆放棋子,棋子没有区别.要求摆放时任意的两个棋子不能放在棋盘中的同一行或者同一列,请编程求解对于给定形状和大小的棋盘,摆放k个棋子的所有可行的摆放方案C. ...
- 【Python】一些零散的练习
#练习:subprocess模块来产生子进程 import subprocess obj = subprocess.Popen(["python"], stdin=subproce ...
- ___security_cookie机制
.text:00411500 ; int __cdecl wmainCRTStartup().text:00411500 _wmainCRTStartup proc near ...
- js获取当天零点的时间戳
var now_date = new Date();//获取Date对象now_date.setHours(0);//设置小时now_date.setMinutes(0);//设置分钟now_date ...
- [LeetCode&Python] Problem 628. Maximum Product of Three Numbers
Given an integer array, find three numbers whose product is maximum and output the maximum product. ...
- hdoj-1022(栈的模拟)
#include <iostream> #include <cstring> #include <algorithm> #include <stack> ...
- Layer 弹出页面 在点击保存关闭弹出层
<script src="http://apps.bdimg.com/libs/jquery/2.0.0/jquery.min.js"></script> ...