vue路由总结
vue-router, vue自带的路由,下面是一些简单的操作说明:
一、安装
1、cnpm install vue-router --save 命令进行安装
2、在main.js或者使用vue-router的地方,通过import 来导入import vRouter from 'vue-router'
3、Vue.use(vRouter )
4、开始配置路由
 import Vue from 'vue'

 import App from './App'

 import VRouter from 'vue-router'

 import Apple from './components/apple'

 import Banana from './components/banana'

 import Redapple from './components/redapple'

 //使用vue.use来注册使用VRouter插件

 Vue.use(VRouter);

 //这样VRouter作为一个类来使用,我们自己实例化这样的一个类

 let router = new VRouter({

     mode: 'history',

    routes: [

      {

         path: '/apple/:color',//为页面设置路由参数

         component: Apple,

         //路由嵌套

         children: [

             {

               path: 'redapple',

               component: Redapple               注意:在路径上加上‘/’表示从根目录开始跳转

                                                      不加‘/’表示从当前页面进行跳转

             },
               {
                 path:'/redapple',
                 component: Redapple
               }

         ]

      },

      {

         path: '/banana',

         component: Banana

      }

    ]

 });

 /* eslint-disable no-new */

 new Vue({

   el: '#app',

   router,//将这样的router放到根目录里面

   //  es6 通过render方法来使用外部引入的App组件

   render: h => h(App)

 })
二、常用的路由方式
1、常规的路由
 1 var routes = [

 2     {

 3         path:"/one",

 4

 5         component: a

 6     },

 7     {

 8         path:"/two",

 9         component: b

10     },

11 ]
2、嵌套路由
    routes: [

 13      {

 14         path: '/apple',

 15         component: Apple,

 16         //路由嵌套

 17         children: [

 18             {

 19               path: 'redapple',

 20               component: Redapple               注意:在路径上加上‘/’表示从根目录开始跳转

 21                                                      不加‘/’表示从当前页面进行跳转

 23             },

                {

                  path:'/redapple',

                  component: Redapple

                }

 24         ]
3、动态路由,一般适用于详情页
 {

     path:"/two:id",

     component: b

 }
4、路由跳转的方式与传参,适合写入一些方法中:
a、 router.push(location)
  //  字符串

    router.push('home')

  //  对象

     router.push({path: 'home'})

  //  命名的路由

     router.push({ name: 'user',  params: { userId: 123 }})

  // 带查询参数,变成 /register?plan=private

     router.push ({ path: 'register', query: { plan: 'private' }})
b、标签跳转,其中传参的方式和上面的一样
 <router-link :to="{ name: 'one'}">User</router-link>

 <router-link :to="{ name: 'two'}">User</router-link>
5、路由的重定向
重定向(Redirect)就是通过各种方法将各种网络请求重新定个方向转到其它位置,用于网站调整或网页被移到一个新地址,它也是通过routes配置来完成,下面例子是从/a 重定向到 /b, 如果a 找不到,直接跳到b:
 var router = new VueRouter({

   routes: [

     { path: '/a', redirect: '/b' }

   ]

 })
6、路由的别名
/a 的别名是 /b,意味着,当用户访问 /b 时,URL 会保持为 /b,但是路由匹配则为 /a,就像用户访问 /a 一样。简单的说就是给 /a 起了一个外号叫做 /b ,但是本质上还是 /a。适合页面的推广:
 var router = new VueRouter({

   routes: [

     { path: '/a', component: A, alias: '/b' }

   ]

 })
7、路由中props传递
     {

       path: '/personal/:id',

       name: 'personal',

       component: personal,

       props: true     // 这一步非常重要

     }
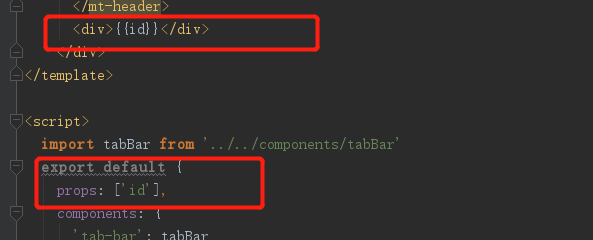
页面中会直接被渲染出来
三、常用的路由方法
1、返回上一页, 一个全局的goBack 事件
 Router.prototype.goBack = function() {

   window.history.go(-1)

 }
 // 在浏览器记录中前进一步,等同于 history.forward()

    router.go(1)

 // 后退一步记录,等同于 history.back()

     router.go(-1)

  // 前进 3步记录
     router.go(3)

  // 如果history 记录不够用, 那就默默地的失败呗
     router.go(-100)
     router.go(100)
2、router.replace()
类型: boolean
默认值: false
设置 replace 属性的话,当点击时,会调用 router.replace() 而不是 router.push(),于是导航后不会留下 history 记录。即使点击返回按钮也不会回到这个页面。
/加上replace: true后,它不会向 history 添加新记录,而是跟它的方法名一样 —— 替换掉当前的 history 记录。
   this.$router.push({path: '/home', replace: true})

     //如果是声明式就是像下面这样写:

    <router-link :to="..." replace></router-link>

     // 编程式:

     router.replace(...)
3、需要先跳转到登录的页面


将登录收的token存在localstory中。
4、路由过渡效果(App.vue)
 <template>

   <div id="app" class="app">

     <transition :name='transitionName'>

      <router-view class="child-view"></router-view>

     </transition>

   </div>

 </template>

 <script>

 export default {

   name: 'app',

   data () {

     return {

       data: 'abcd',

       info: 'nono',

       transitionName: 'slide-left'

     }

   },

 19   watch: {

 20    '$route' (to, from) {

 21      const toDepth = to.path.split('/').length

 22      const fromDepth = from.path.split('/').length

 23      this.transitionName = toDepth < fromDepth ? 'slide-right' : 'slide-left'

 24     }

 25   },
      // 判断左右滑动

   beforeCreate () {

     console.log('创建前……')

     console.log(this.data)

     console.log(this.$el)

   },

 //  created () {

 //    console.log('已创建……')

 //    console.log(this.info)

 //    console.log(this.data)

 //  },

 //  beforeMount () {

 //    console.log('mounted之前……')

 //    console.log(this.info)

 //    console.log(this.$el)

 //  },

 //  mounted () {

 //    console.log('mounted……')

 //    console.log(this.info)

 //    console.log(this.$el)

 //  },

 //  beforeUpdate () {

 //    console.log('更新前========')

 //  },

 //  updated () {

 //    console.log('更新完成')

 //  },

 //  beforeDestroy () {

 //    console.log('销毁前……')

 //    console.log(this.info)

 //    console.log(this.$el)

 //  },

   destroyed () {

     console.log('已销毁……')

     console.log(this.info)

     console.log(this.$el)

   },

   beforeRouteUpdate (to, from, next) {

     let isBack = this.$router.isBack

     if (isBack) {

       this.transitionName = 'slide-right'

     } else {

       this.transitionName = 'slide-left'

     }

     this.$router.isBack = false

   }

 }

 </script>

 <style>

   @import "./common/css/reset.css";

 .app {

   font-family: 'Avenir', Helvetica, Arial, sans-serif;

   -webkit-font-smoothing: antialiased;

   -moz-osx-font-smoothing: grayscale;

   text-align: center;

   color: #000;

   font-size:.14rem;

   height:2rem;

 }

   .child-view {

     position: absolute;

     width:100%;

     transition: all .8s cubic-bezier(.55,0,.1,1);

   }

   .slide-left-enter, .slide-right-leave-active {

     opacity: 0;

     -webkit-transform: translate(50px, 0);

     transform: translate(50px, 0);

   }

   .slide-left-leave-active, .slide-right-enter {

     opacity: 0;

     -webkit-transform: translate(-50px, 0);

     transform: translate(-50px, 0);

   }

 </style>
5、 路由的封装
 import Vue from 'vue'

 import Router from 'vue-router'

 import {storage} from '../assets/js/utils/storage'

 import routeConfig from './route.config.json';

 var registerRoute = (routeConfig) => {

   let route = [];

   routeConfig.map(pages => {

     route.push({

       path: pages.path,

       name: pages.name !== undefined ? pages.name : null,

       redirect: pages.redirect !== undefined ? pages.redirect : null,

       component: require(`@/pages${pages.component}`).default,

       meta: pages.meta !== undefined ? pages.meta : null,

       children: pages.children !== undefined ? registerRoute(pages.children) : null

     })

   });

   return route;

 };

 var route = registerRoute(routeConfig);

 Vue.use(Router)

 Router.prototype.goBack = function() {

   this.isBack = true

   window.history.go(-1)

 }

 const routeInstance = new Router({

   routes: route

 })

 routeInstance.beforeEach((to, from, next) => {

   if (to.path !== '/') {

     let familyId = storage.cookie.get('familyId');

     if ((familyId !== null)) {

       next()

     } else {

       routeInstance.replace({path: '/'})

     }

   }

   next()

 })

 export default routeInstance
vue路由总结的更多相关文章
- Vue路由vue-router
前面的话 在Web开发中,路由是指根据URL分配到对应的处理程序.对于大多数单页面应用,都推荐使用官方支持的vue-router.Vue-router通过管理URL,实现URL和组件的对应,以及通过U ...
- 攻克vue路由
先下手 路由是个好功能,但是每次都感觉没法开始下手,愣愣的看半天官方文档,所以做个快速开始教程. 首先先搭好HTML文件结构: <!--link和view在一个父元素下--> <di ...
- Vue路由学习心得
GoodBoy and GoodGirl~进来了就看完点个赞再离开,写了这么多也不容易的~ 一.介绍 1.概念:路由其实就是指向的意思,当我们点击home按钮时,页面中就要显示home的内容,点击l ...
- VUE路由新页面打开的方法总结
平常做单页面的场景比较多,所以大部分的业务是在同一个页面进行跳转.要通过VUE路由使用新页面打开且传递参数,可以采用以下两个方法: 1.router-link的target <router-li ...
- vue路由参数变化刷新数据
当路由到某个组件时,由于组件会复用,所以生命周期函数不会再次执行, 如果这个组件是模板组件,靠传入不同数据来显示的.那么,可能会发生参数变化了但页面数据却不变化. 问题 假如有个组件 info.vue ...
- 10.3 Vue 路由系统
Vue 路由系统 简单示例 main.js import Vue from 'vue' import App from './App.vue' //https://router.vuejs.or ...
- vue路由原理剖析
单页面应用(SPA)的核心之一是: 更新视图而不重新请求页面, 实现这一点主要是两种方式: 1.Hash: 通过改变hash值 2.History: 利用history对象新特性(详情可出门左拐见: ...
- 3种vue路由传参的基本模式
路由是连接各个页面的桥梁,而参数在其中扮演者异常重要的角色,在一定意义上,决定着两座桥梁是否能够连接成功. 在vue路由中,支持3中传参方式. 场景,点击父组件的li元素跳转到子组件中,并携带参数,便 ...
- 14.vue路由&脚手架
一.vue路由:https://router.vuejs.org/zh/ 1.定义 let router = new VueRouter({ mode:"history/hash" ...
- react router @4 和 vue路由 详解(八)vue路由守卫
完整版:https://www.cnblogs.com/yangyangxxb/p/10066650.html 13.vue路由守卫 a.beforeEach 全局守卫 (每个路由调用前都会触发,根据 ...
随机推荐
- (49)C# npoi-word
//新建段落 XWPFParagraph p1 = doc.CreateParagraph(); //对齐方式 p1.SetAlignment(ParagraphAlignment.LEFT); p1 ...
- (39)C#Ping类
一.Ping类 引用命名空间 using System.Net.NetworkInformation 控制台版 using System; using System.Collections.Gener ...
- 板子-GOD BLESS ALL OF YOU
字符串: KMP #include<cstdio> #include<cstring> ; ]; ]; int l1,l2; void get_next() { next[]= ...
- Windows系统Python包的安装
本文针对于Python初学者,Python老鸟请绕道. 最近同时尝试在Windows10.MacOS.Ubuntu三个系统上安装Python相关的包,整体比较,Ubuntu最简单,Windows10最 ...
- 漫谈深度学习时代点击率预估技术进展 &&深度学习在推荐系统上的发展
转载:https://www.infoq.cn/article/XA055tpFrprUy*0UBdCb https://www.zhihu.com/question/20830906/answer/ ...
- POJ3114 有些图缩点/改图/最短路
没想到手感还在~ 不须要又一次建图.仅仅要依据条件改改权值就可以. 还跑k次SPFA~ #include<cstdio> #include<iostream> #include ...
- AngularJS的ng-repeat显示属性名和属性值
代码下载:https://files.cnblogs.com/files/xiandedanteng/AngularJSAuthorRepeat.rar 代码: <!DOCTYPE HTML P ...
- c++ 操作Mysql ado
#pragma once #ifndef DB_MYSQL_H #define DB_MYSQL_H #include "stdafx.h" #include <wins ...
- python(38)- 网络编程socket
一 客户端/服务器架构 即C/S架构,包括 1.硬件C/S架构(打印机) 2.软件C/S架构(web服务) 美好的愿望: 最常用的软件服务器是 Web 服务器.一台机器里放一些网页或 Web 应用程序 ...
- Linq实现SQL in
比如 Id in (1,2,3) int[] a={1,2,3}; list.Where(x=>a.Contains(x.Id))