SpringBoot之MultipartFile文件上传(6)
1、静态文件
<!DOCTYPE html>
<html>
<head>
<meta charset="UTF-8">
<title>文件上传</title>
</head>
<body>
<form enctype="multipart/form-data" method="post" action="/v1/upload">
文件:<input type="file" name="fileName"/></br></br>
备注:<input type="text" name="remark"/>
<input type="submit" value="上传"/>
</form>
</body>
</html>
2、return result
package cn.xiaobing.demo.pojo;

public class Result {

    private int code;

    private Object data;

    private String msg;

    public int getCode() {

        return code;

    }

    public void setCode(int code) {

        this.code = code;

    }

    public Object getData() {

        return data;

    }

    public void setData(Object data) {

        this.data = data;

    }

    public String getMsg() {

        return msg;

    }

    public void setMsg(String msg) {

        this.msg = msg;

    }

    public Result(int code, Object data, String msg) {

        super();

        this.code = code;

        this.data = data;

        this.msg = msg;

    }

    public Result() {

        super();

    }

    @Override

    public String toString() {

        return "Result [code=" + code + ", data=" + data + ", msg=" + msg + "]";

    }

}
3、FileController
package cn.xiaobing.demo.controller;

import java.io.File;

import java.util.HashMap;

import java.util.Map;

import java.util.UUID;

import javax.servlet.http.HttpServletRequest;

import org.springframework.beans.factory.annotation.Value;

import org.springframework.context.annotation.PropertySource;

import org.springframework.stereotype.Controller;

import org.springframework.web.bind.annotation.RequestMapping;

import org.springframework.web.bind.annotation.RequestParam;

import org.springframework.web.bind.annotation.ResponseBody;

import org.springframework.web.multipart.MultipartFile;

import cn.xiaobing.demo.pojo.Result;

@Controller

@PropertySource(value = { "application.properties" })//指定配置文件

public class FileController {

    @Value("${web.upload.filepath}")//获取配置文件中的配置参数

    private String filePath;

//  private static final String filePath = "C:/oneself/eclipse-workspace/springboot-v0/src/main/resources/static/images";

    @RequestMapping(value="/v1/upload")

    @ResponseBody

    public Object upload(@RequestParam("fileName") MultipartFile file,HttpServletRequest request) {

        String remark = request.getParameter("remark");//备注信息

        String filename = file.getOriginalFilename();//获取文件名称

        String suffixname = filename.substring(filename.lastIndexOf("."));//后缀

        filename = UUID.randomUUID() + suffixname;//文件上传后重命名数据库存储

        File dest = new File(filePath,filename);

        Map<String, String> data = new HashMap<String, String>();

        data.put("filename", filename);

        data.put("备注 ", remark);

        try {

            //MultipartFile对象的transferTo方法用于文件的保存(效率和操作比原来用的FileOutputStream方便和高效)

            file.transferTo(dest);//拷贝文件到指定路径储存

            return new Result(0, data, "上传成功");

        } catch (Exception e) {

            e.printStackTrace();

            return new Result(-1, data, "上传失败");

        }

    }

}

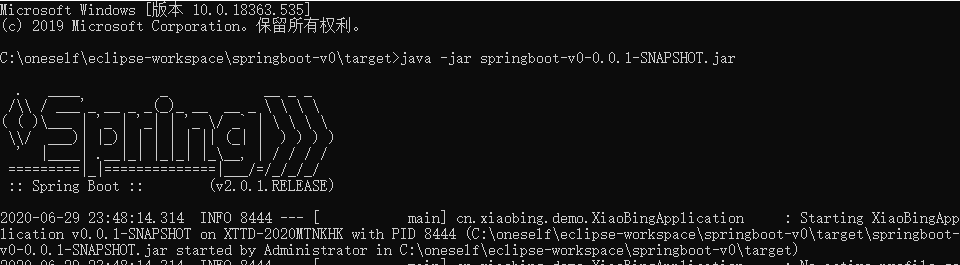
4、启动项目
  .   ____          _            __ _ _

 /\\ / ___'_ __ _ _(_)_ __  __ _ \ \ \ \

( ( )\___ | '_ | '_| | '_ \/ _` | \ \ \ \

 \\/  ___)| |_)| | | | | || (_| |  ) ) ) )

  '  |____| .__|_| |_|_| |_\__, | / / / /

 =========|_|==============|___/=/_/_/_/

 :: Spring Boot ::        (v2.0.1.RELEASE)
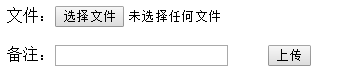
5、访问upload.html上传文件
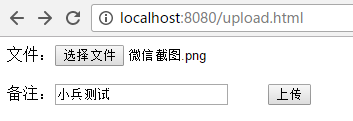
6、点击上传,上传文件成功

7、点击上传,上传失败

8、设置上传文件大小限制,编码如下,在启动类中添加@Bean方法
package cn.xiaobing.demo;

import javax.servlet.MultipartConfigElement;

import org.springframework.boot.SpringApplication;

import org.springframework.boot.autoconfigure.SpringBootApplication;

import org.springframework.boot.web.servlet.MultipartConfigFactory;

import org.springframework.context.annotation.Bean;

@SpringBootApplication

public class XiaoBingApplication {

    public static void main(String[] args) {

        SpringApplication.run(XiaoBingApplication.class,args);

    }

    @Bean

    public MultipartConfigElement multipartConfigElement() {

        MultipartConfigFactory factory = new MultipartConfigFactory();

        factory.setMaxFileSize("10240KB");//设置上传单个文件最大10M

        factory.setMaxRequestSize("102400KB");//设置上传文件总数据最大100M

        return factory.createMultipartConfig();

    }

}
9、maven打包执行
(1) pom.xml引入依赖
<build>

    <plugins>

        <plugin>

            <groupId>org.springframework.boot</groupId>

            <artifactId>spring-boot-maven-plugin</artifactId>

        </plugin>

    </plugins>

</build>
(2)打jar包-项目右键-Run As-Maven Install
[INFO] ------------------------------------------------------------------------

[INFO] BUILD SUCCESS

[INFO] ------------------------------------------------------------------------

[INFO] Total time: 45.874 s

[INFO] Finished at: 2020-06-29T23:44:45+08:00

[INFO] ------------------------------------------------------------------------
(3)启动项目
(4) Test

10、不足之处,后续优化。。。
SpringBoot之MultipartFile文件上传(6)的更多相关文章
- SpringBoot项目实现文件上传和邮件发送
前言 本篇文章主要介绍的是SpringBoot项目实现文件上传和邮件发送的功能. SpringBoot 文件上传 说明:如果想直接获取工程那么可以直接跳到底部,通过链接下载工程代码. 开发准备 环境要 ...
- Springboot如何启用文件上传功能
网上的文章在写 "springboot文件上传" 时,都让你加上模版引擎,我只想说,我用不上,加模版引擎,你是觉得我脑子坏了,还是觉得我拿不动刀了. springboot如何启用文 ...
- SpringBoot+BootStrap多文件上传到本地
1.application.yml文件配置 # 文件大小 MB必须大写 # maxFileSize 是单个文件大小 # maxRequestSize是设置总上传的数据大小 spring: servle ...
- SpringBoot之KindEditor文件上传
后端核心代码如下: package com.blog.springboot.controller; import java.io.BufferedOutputStream; import java.i ...
- springboot+vue实现文件上传
https://blog.csdn.net/mqingo/article/details/84869841 技术: 后端:springboot 前端框架:vue 数据库:mysql pom.xml: ...
- SpringBoot: 6.文件上传(转)
1.编写页面uploadFile.html <!DOCTYPE html> <html lang="en"> <head> <meta c ...
- Springboot(九).多文件上传下载文件(并将url存入数据库表中)
一. 文件上传 这里我们使用request.getSession().getServletContext().getRealPath("/static")的方式来设置文件的存储 ...
- springboot升级导致文件上传自动配置/tmp目录问题解决
1,..\web\src\main\resources\spring\web-men-applicationContext.xml 保留原有的bean配置 <bean id="mult ...
- SpringMVC实现 MultipartFile 文件上传
1. Maven 工程引入所需要的依赖包 2. 页面需要开放多媒体标签 3. 配置文件上传试图解析器 4. 接收图片信息,通过 IO 流写入磁盘(调用解析其中的方法即可) 如下: 1.1 引入所依赖的 ...
随机推荐
- vue中data为什么不写成data:{}这样而是写成data(){return {}}类型。
data:{}:这样会直接挂载在vue实例中,变成全局变量,容易造成污染,再次今日该组件页面,会保留上次的变量值,不会被初始化 data(){return {}} :return包裹后数据中变量只在当 ...
- Selenium多浏览器并行测试
如果需要同时在IE.firefox.chrome进行测试,可以使用grid. Selenium Grid是一个智能代理服务器,允许Selenium测试将命令路由到远程Web浏览器实例.其目的是提供一种 ...
- CF444C-DZY Loves Colors【线段树,set】
正题 题目链接:https://www.luogu.com.cn/problem/CF444C 题目大意 \(n\)个物品第\(i\)个颜色为\(i\),权值为\(0\).要求支持\(m\)次操作 给 ...
- 最详细的搭建web自动化测试网站,别再说你没有实战项目(文未有福利)
一步步教你搭建开源网站 环境准备: Tomcat shopping商城文件 jdk环境 Mysql环境 解压shopping.rar拷贝至tomcat/webapps 在navicat导入数据库db_ ...
- 启用 Spring-Cloud-OpenFeign 配置可刷新,项目无法启动,我 TM 人傻了(上)
本篇文章涉及底层设计以及原理,以及问题定位,比较深入,篇幅较长,所以拆分成上下两篇: 上:问题简单描述以及 Spring Cloud RefreshScope 的原理 下:当前 spring-clou ...
- 【Azure Developer】Azure Automation 自动化账号生成的时候怎么生成连接 与证书 (Connection & Certificate)
Azure Automation :The Azure Automation service provides a highly reliable and scalable workflow exec ...
- disruptor笔记之八:知识点补充(终篇)
欢迎访问我的GitHub https://github.com/zq2599/blog_demos 内容:所有原创文章分类汇总及配套源码,涉及Java.Docker.Kubernetes.DevOPS ...
- mysql从零开始之MySQL 创建数据库
MySQL 创建数据库 我们可以在登陆 MySQL 服务后,使用 create 命令创建数据库,语法如下: CREATE DATABASE 数据库名; 以下命令简单的演示了创建数据库的过程,数据名为 ...
- 使用CEF(二)— 基于VS2019编写一个简单CEF样例
使用CEF(二)- 基于VS2019编写一个简单CEF样例 在这一节中,本人将会在Windows下使用VS2019创建一个空白的C++Windows Desktop Application项目,逐步进 ...
- 题解 Crash 的文明世界
题目传送门 题目大意 给出一个\(n\)个点的树,和常数\(k\),对于\(\forall i\in[1,n]\),求出: \[\sum_{j=1}^{n} \text{dist}(i,j)^k \] ...