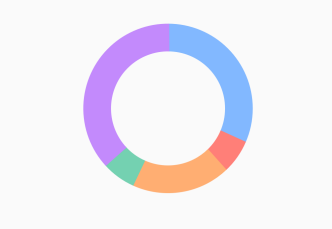
Android中自定义环形图
如图:

自定义view
package com.riverlet.ringview;

import android.animation.ObjectAnimator;

import android.content.Context;

import android.graphics.Canvas;

import android.graphics.Paint;

import android.graphics.RectF;

import android.util.AttributeSet;

import android.util.Log;

import android.view.View;

import android.view.animation.AccelerateInterpolator;

public class AnnularChartView extends View {

    /**

     * 默认颜色

     */

    private static final int[] DEFAULT_COLOR = new int[]{0xff82B8FF, 0xffFF7F78, 0xffFFAE72, 0xff74D1B1, 0xffC38AFC};

    /**

     * 圆环半径,以内环算

     */

    private int innerRadius;

    /**

     * 圆环厚度

     */

    private int ringWidth;

    /**

     * 画笔数组

     */

    private Paint[] paints;

    /**

     * 画笔数组对应的颜色

     */

    private int[] colors = DEFAULT_COLOR;

    /**

     * 圆环圆心x坐标

     */

    private int centerX;

    /**

     * 圆环圆心y坐标

     */

    private int centerY;

    /**

     * 圆环范围

     */

    private RectF oval;

    /**

     * 每个数据对应的角度

     */

    private int[] angles;

    /**

     * 数据

     */

    private float[] datas;

    /**

     * 动画用的进度

     */

    private float progress;

    /**

     * 动画

     */

    private ObjectAnimator animator;

    public AnnularChartView(Context context) {

        this(context, null);

    }

    public AnnularChartView(Context context, AttributeSet attrs) {

        this(context, attrs, 0);

    }

    public AnnularChartView(Context context, AttributeSet attrs, int defStyleAttr) {

        super(context, attrs, defStyleAttr);

        //动画

        initAnimator();

    }

    @Override

    protected void onMeasure(int widthMeasureSpec, int heightMeasureSpec) {

        super.onMeasure(widthMeasureSpec, heightMeasureSpec);

        //矩形

        initRectF(getMeasuredWidth(), getMeasuredHeight());

    }

    /**

     * 计算圆环的范围

     *

     * @param w

     * @param h

     */

    private void initRectF(int w, int h) {

        if (w == 0 && h == 0) {

            return;

        }

        centerX = (int) ((float) w / 2);

        centerY = (int) ((float) h / 2);

        innerRadius = (int) ((float) w / 2 / 89 * 64);

        ringWidth = (int) ((float) w / 2 / 89 * 25);

        oval = new RectF(centerX - innerRadius, centerY - innerRadius, centerX + innerRadius, centerY + innerRadius);

    }

    /**

     * 初始化paint

     */

    private void initPaints() {

        if (datas == null) {

            angles = null;

        } else {

            float total = 0;

            for (float data : datas) {

                total += data;

            }

            if (total <= 0) {

                angles = null;

            } else {

                angles = new int[datas.length];

                int sumAngles = 0;

                for (int i = 0; i < datas.length; i++) {

                    float angle;

                    if (i == datas.length - 1) {

                        angles[i] = 360 - sumAngles;

                        Log.v("setData", angles[i] + "");

                    } else {

                        angle = datas[i] / total * 360;

                        if (angle < 1) {

                            angles[i] = 1;

                        } else {

                            angles[i] = Math.round(angle);

                        }

                        sumAngles += angles[i];

                        Log.v("setData", angles[i] + "");

                    }

                }

            }

        }

        if (angles != null) {

            //用于定义的圆弧的形状和大小的界限

            paints = new Paint[angles.length];

            for (int i = 0; i < angles.length; i++) {

                Paint paint = new Paint();

                paint.setColor(colors[i % colors.length]);

                paint.setStyle(Paint.Style.STROKE);

                paint.setStrokeWidth(25);

                paint.setAntiAlias(true);

                paints[i] = paint;

            }

        }

        animStart();

    }

    private void initAnimator() {

        progress = 0;

        animator = ObjectAnimator.ofFloat(this, "progress", 0f, 1.0f);

        animator.setDuration(800);

        animator.setInterpolator(new AccelerateInterpolator());

        animator.start();

    }

    @Override

    protected void onDraw(Canvas canvas) {

        super.onDraw(canvas);

        if (oval == null) {

            initRectF(getWidth(), getHeight());

        }

        int lastAngle = 0;

        int nums = angles == null ? 0 : angles.length;

        if (nums > 0) {

            for (int i = 0; i < nums; i++) {

                if (i > 0) {

                    lastAngle = (int) (lastAngle + angles[i - 1] * progress);

                }

                paints[i].setStrokeWidth(ringWidth);

                if (angles[i] > 0) {

                    canvas.drawArc(oval, 270 + lastAngle, (angles[i] + 1) * progress, false, paints[i]);

                }

            }

        } else {

            Paint paint = new Paint();

            paint.setColor(0xffa0a0a0);

            paint.setStyle(Paint.Style.STROKE);

            paint.setStrokeWidth(ringWidth);

            paint.setAntiAlias(true);

            canvas.drawArc(oval, 270, 360 * progress + 1, false, paint);

        }

    }

    public float getProgress() {

        return progress;

    }

    public void setProgress(float progress) {

        this.progress = progress;

        invalidate();

    }

    /**

     * 开始动画

     */

    public void animStart() {

        if (animator.isStarted()) {

            animator.cancel();

        }

        animator.start();

    }

    public void setData(float[] datas) {

        this.datas = datas;

        initPaints();

    }

    public int[] getColors() {

        return colors;

    }

    public void setColors(int[] colors) {

        this.colors = colors;

    }

    public void setAnimator(ObjectAnimator animator) {

        this.animator = animator;

    }

}
布局
<?xml version="1.0" encoding="utf-8"?>

<android.support.constraint.ConstraintLayout xmlns:android="http://schemas.android.com/apk/res/android"

    xmlns:app="http://schemas.android.com/apk/res-auto"

    xmlns:tools="http://schemas.android.com/tools"

    android:layout_width="match_parent"

    android:layout_height="match_parent"

    tools:context="com.riverlet.ringview.MainActivity">

    <com.riverlet.ringview.AnnularChartView

        android:id="@+id/annularChartView"

        android:layout_width="200dp"

        android:layout_height="200dp"

        android:layout_marginTop="30dp"

        android:text="Hello World!"

        app:layout_constraintLeft_toLeftOf="parent"

        app:layout_constraintRight_toRightOf="parent"

        app:layout_constraintTop_toTopOf="parent" />

    <TextView

        android:id="@+id/text_1"

        android:layout_width="wrap_content"

        android:layout_height="wrap_content"

        android:layout_marginTop="50dp"

        android:background="@drawable/bg"

        android:padding="5dp"

        android:text="100 : 100 : 100 : 100 : 100"

        android:textColor="#ffffff"

        android:textSize="25sp"

        app:layout_constraintLeft_toLeftOf="parent"

        app:layout_constraintRight_toRightOf="parent"

        app:layout_constraintTop_toBottomOf="@+id/annularChartView" />

    <TextView

        android:id="@+id/text_2"

        android:layout_width="wrap_content"

        android:layout_height="wrap_content"

        android:layout_marginTop="20dp"

        android:background="@drawable/bg"

        android:padding="5dp"

        android:text="100 : 200 : 300 : 400 : 500"

        android:textColor="#ffffff"

        android:textSize="25sp"

        app:layout_constraintLeft_toLeftOf="parent"

        app:layout_constraintRight_toRightOf="parent"

        app:layout_constraintTop_toBottomOf="@+id/text_1" />

    <TextView

        android:id="@+id/text_3"

        android:layout_width="wrap_content"

        android:layout_height="wrap_content"

        android:layout_marginTop="20dp"

        android:background="@drawable/bg"

        android:padding="5dp"

        android:text="500 : 100 : 300 : 100 : 600"

        android:textColor="#ffffff"

        android:textSize="25sp"

        app:layout_constraintLeft_toLeftOf="parent"

        app:layout_constraintRight_toRightOf="parent"

        app:layout_constraintTop_toBottomOf="@+id/text_2" />

</android.support.constraint.ConstraintLayout>
MainActivity中
package com.riverlet.ringview;

import android.os.Bundle;

import android.support.v7.app.AppCompatActivity;

import android.view.View;

public class MainActivity extends AppCompatActivity implements View.OnClickListener {

    AnnularChartView annularChartView;

    @Override

    protected void onCreate(Bundle savedInstanceState) {

        super.onCreate(savedInstanceState);

        setContentView(R.layout.activity_main);

        annularChartView = findViewById(R.id.annularChartView);

        findViewById(R.id.text_1).setOnClickListener(this);

        findViewById(R.id.text_2).setOnClickListener(this);

        findViewById(R.id.text_3).setOnClickListener(this);

    }

    @Override

    public void onClick(View v) {

        switch (v.getId()) {

            case R.id.text_1:

                annularChartView.setData(new float[]{100f, 100f, 100f, 100f, 100f});

                break;

            case R.id.text_2:

                annularChartView.setData(new float[]{100f, 200f, 300f, 400f, 500f});

                break;

            case R.id.text_3:

                annularChartView.setData(new float[]{500f, 100f, 300f, 100f, 600f});

                break;

        }

    }

}
完成
参考于://https://www.jianshu.com/p/03f6751e4c99
Android中自定义环形图的更多相关文章
- Android中自定义环形图2
如图: 自定义属性,在values文件夹下创建 attrs.xml <?xml version="1.0" encoding="utf-8"?> & ...
- [转]Android中自定义checkbox样式
android中自定义checkbox的图片和大小 其实很简单,分三步: 1.在drawable中创建文件checkbox_selector.xml: <?xml version=" ...
- 转--Android中自定义字体的实现方法
1.Android系统默认支持三种字体,分别为:“sans”, “serif”, “monospace 2.在Android中可以引入其他字体 . 复制代码 代码如下: <?xml versio ...
- Android中自定义ActionBar的背景色等样式style
Android中想要去自定义ActionBar的背景色等样式. [折腾过程] 1.自己找代码,发现对应的配置的地方了: AndroidManifest.xml ? 1 2 <applicatio ...
- Android中自定义veiw使用Java中的回调方法
//------------------MainActivity----中---------------------------------- import android.os.Bundle;imp ...
- android开发:Android 中自定义View的应用
大家好我们今天的教程是在Android 教程中自定义View 的学习,对于初学着来说,他们习惯了Android 传统的页面布局方式,如下代码: <?xml version="1.0&q ...
- Android中自定义组合控件
Android中自定义控件的情况非常多,一般自定义控件可以分为两种:继承控件及组合控件.前者是通过继承View或其子类,重写方法实现自定义的显示及事件处理方式:后者是通过组合已有的控件,来实现结构的简 ...
- Android中自定义ListView实现上拉加载更多和下拉刷新
ListView是Android中一个功能强大而且很常用的控件,在很多App中都有ListView的下拉刷新数据和上拉加载更多这个功能.这里我就简单记录一下实现过程. 实现这个功能的方法不止一个,Gi ...
- Android中自定义View和自定义动画
Android FrameWork 层给我们提供了很多界面组件,但是在实际的商业开发中这些组件往往并不能完全满足我们的需求,这时候我们就需要自定义我们自己的视图和动画. 我们要重写系统的View就必须 ...
随机推荐
- java的excel表格的导出与下载
今天做一个java对excel表格的导出和下载的时候,从网络上搜寻了下载的模板,代码如下: 控制层: @RequestMapping(value = "excelOut_identifier ...
- Linux 安装Docker compose 快速方法
https://blog.csdn.net/ysk_xh_521/article/details/80443509 安装pipyum -y install epel-releaseyum -y ins ...
- django -- ORM实现出版社增删改查
前戏 我们来完成一个图书管理系统的增删改查 表结构设计 1. 出版社 id name 2. 作者 id name 3. 书 id title 出版社_id 4. 作者_书_关系表 id 书 ...
- sparksql基础知识一
目标 掌握sparksql底层原理 掌握sparksql中DataFrame和DataSet的数据结构和使用方式 掌握通过sparksql开发应用程序 要点 1.sparksql概述 1.1 spar ...
- VueCli3新特性
升级VueCli3的理由: 1.构建速度大大加快,之前看到一个升级的例子是2的3倍速度,具体可以在自己迁移一个项 目测试下,这里的优化有默认开启了多核构建.缓存 并行和缓存 2.webpack被内置到 ...
- udev工作流程简图
- Linux学习之编译运行.c(C语言)文件
在Linux命令行界面下,创建文件hello.c,进入vim编辑器,编辑一个简单的C语言文件 分解C语言文件执行过程,要经过预编译.编译.汇编.连接四个步骤后才能执行, 预编译:gcc -E hell ...
- 【Gamma阶段】第八次Scrum Meeting
冰多多团队-Gamma阶段第八次Scrum会议 工作情况 团队成员 已完成任务 待完成任务 卓培锦 编辑器风格切换(添加夜间模式) UI界面手势切换 牛雅哲 添加pytorch训练dict和ssh工具 ...
- Keras 中的 verbose 参数
在 fit( ) 和 evaluate( ) 中 都有 verbose 这个参数,但都是表示日志显示的参数. 具体如下: fit( ) 中 的 verbose 参数: verbose:日志显示ver ...
- xshell 快速复制粘贴的方法
xshell快速复制粘贴的方法<img src="http://newmiracle.cn/wp-content/uploads/2017/01/QQ截图20170113163139- ...
