
Android 使用 TableLayout 布局拉伸宽度
转自:http://www.cnblogs.com/ghj1976/archive/2011/04/21/2023850.html
布局文件
<?xml version="1.0" encoding="utf-8"?>

<LinearLayout xmlns:android="http://schemas.android.com/apk/res/android"

	android:orientation="vertical" android:layout_width="fill_parent"

	android:layout_height="fill_parent">

	<TableLayout android:layout_width="match_parent"

		android:layout_height="match_parent">

		<TableRow>

			<EditText android:id="@+id/et_led" android:layout_width="fill_parent"

				android:digits="1234567890.+-*/=%\n\t()" android:text=""

				android:layout_span="4" />

		</TableRow>

		<TableRow>

			<Button android:text="(" android:id="@+id/btn_LeftParenthesis"></Button>

			<Button android:text=")" android:id="@+id/btn_RightParenthesis"></Button>

			<Button android:text="*" android:id="@+id/btn_x"></Button>

			<Button android:text="back" android:id="@+id/btn_back"></Button>

		</TableRow>

		<TableRow>

			<Button android:text="7" android:id="@+id/btn_7"></Button>

			<Button android:text="8" android:id="@+id/btn_8"></Button>

			<Button android:text="9" android:id="@+id/btn_9"></Button>

			<Button android:text="%" android:id="@+id/btn_mod"></Button>

		</TableRow>

		<TableRow>

			<Button android:text="4" android:id="@+id/btn_4"></Button>

			<Button android:text="5" android:id="@+id/btn_5"></Button>

			<Button android:text="6" android:id="@+id/btn_6"></Button>

			<Button android:text="/" android:id="@+id/btn_div"></Button>

		</TableRow>

		<TableRow>

			<Button android:text="1" android:id="@+id/btn_1"></Button>

			<Button android:text="2" android:id="@+id/btn_2"></Button>

			<Button android:text="3" android:id="@+id/btn_3"></Button>

			<Button android:text="-" android:id="@+id/btn_sub"></Button>

		</TableRow>

		<TableRow>

			<Button android:text="0" android:id="@+id/btn_0"></Button>

			<Button android:text="." android:id="@+id/btn_dot"></Button>

			<Button android:text="+" android:id="@+id/btn_plus"></Button>

			<Button android:text="=" android:id="@+id/btn_equal"></Button>

		</TableRow>

	</TableLayout>

</LinearLayout>
布局效果:

显然这不能满足我们的期望,下面我们演示 使用 android:stretchColumns 来自动拉伸
我们这里简单的给 TableLayout 增加一个属性 android:stretchColumns="*" 表示所有列都要自动拉伸,以便适应屏幕宽度。
布局效果
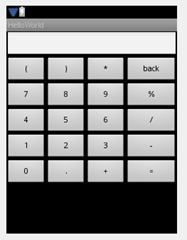
它的值即可以是数字,也可以是*,注意数字是从0开始的,即:android:stretchColumns="1" 是设置 TableLayout所有行的第二列为扩展列。
上面我们会看到 第四列的按钮比其他列的按钮要宽,如果我们想都一样宽如何办呢?
一个简单办法:
在自动拉伸的基础上,把每一列的宽度都设置成一样,比如下面的代码:
<?xml version="1.0" encoding="utf-8"?>

<LinearLayout xmlns:android="http://schemas.android.com/apk/res/android"

	android:orientation="vertical" android:layout_width="fill_parent"

	android:layout_height="fill_parent">

	<TableLayout android:layout_width="match_parent"

		android:layout_height="match_parent" 		android:stretchColumns="*">

		<TableRow>

			<EditText android:id="@+id/et_led" android:layout_width="fill_parent"

				android:digits="1234567890.+-*/=%\n\t()" android:text=""

				android:layout_span="4" />

		</TableRow>

		<TableRow>

			<Button android:text="(" android:id="@+id/btn_LeftParenthesis"

				android:layout_width="1dip"></Button>

			<Button android:text=")" android:id="@+id/btn_RightParenthesis"

				android:layout_width="1dip"></Button>

			<Button android:text="*" android:id="@+id/btn_x"

				android:layout_width="1dip"></Button>

			<Button android:text="back" android:id="@+id/btn_back"

				android:layout_width="1dip"></Button>

		</TableRow>

		<TableRow>

			<Button android:text="7" android:id="@+id/btn_7"></Button>

			<Button android:text="8" android:id="@+id/btn_8"></Button>

			<Button android:text="9" android:id="@+id/btn_9"></Button>

			<Button android:text="%" android:id="@+id/btn_mod"></Button>

		</TableRow>

		<TableRow>

			<Button android:text="4" android:id="@+id/btn_4"></Button>

			<Button android:text="5" android:id="@+id/btn_5"></Button>

			<Button android:text="6" android:id="@+id/btn_6"></Button>

			<Button android:text="/" android:id="@+id/btn_div"></Button>

		</TableRow>

		<TableRow>

			<Button android:text="1" android:id="@+id/btn_1"></Button>

			<Button android:text="2" android:id="@+id/btn_2"></Button>

			<Button android:text="3" android:id="@+id/btn_3"></Button>

			<Button android:text="-" android:id="@+id/btn_sub"></Button>

		</TableRow>

		<TableRow>

			<Button android:text="0" android:id="@+id/btn_0"></Button>

			<Button android:text="." android:id="@+id/btn_dot"></Button>

			<Button android:text="+" android:id="@+id/btn_plus"></Button>

			<Button android:text="=" android:id="@+id/btn_equal"></Button>

		</TableRow>

	</TableLayout>

</LinearLayout>
这时候的效果就成了:
注意比起最初的就多了2个设置
android:layout_width="1dip" 和 android:stretchColumns="*"

Android 使用 TableLayout 布局拉伸宽度的更多相关文章
- Android 之 TableLayout 布局详解
TableLayout简介 •简介 Tablelayout 类以行和列的形式对控件进行管理,每一行为一个 TableRow 对象,或一个 View 控件. 当为 TableRow 对象时,可在 Tab ...
- Android精通:TableLayout布局,GridLayout网格布局,FrameLayout帧布局,AbsoluteLayout绝对布局,RelativeLayout相对布局
在Android中提供了几个常用布局: LinearLayout线性布局 RelativeLayout相对布局 FrameLayout帧布局 AbsoluteLayout绝对布局 TableLayou ...
- Android之TableLayout表格布局
1.相关属性 1.1.常用属性 android:collapseColumns 设置需要被隐藏的列的序列号 android:shrinkColumns 设置允许被收缩的列的序列号 android:st ...
- android:TableLayout表格布局详解
1.TableLayout简介2.TableLayout行列数的确定3.TableLayout可设置的属性详解4.一个包含4个TableLayout布局的实例及效果图一.Tablelayout简介 ...
- 14.Android之Layout布局学习
Android布局主要有5种,接下来学习总结下. 1) 最常见的线性布局 LinearLayout 线性布局是Android布局中最简单的布局,也是最常用,最实用的布局. android:orient ...
- [置顶] Android系统五大布局详解Layout
我们知道Android系统应用程序一般是由多个Activity组成,而这些Activity以视图的形式展现在我们面前,视图都是由一个一个的组件构成的.组件就是我们常见的Button.TextEdit等 ...
- 【Android 复习】:Android五种布局的使用方法
---恢复内容开始--- 在Android布局中,有五种常用的布局,下面我们就来学习一下这几种布局的使用方式 1) 线性布局:LinearLayout 2) 帧布局: FrameLayout 3) ...
- Android系统五大布局详解Layout
我们知道Android系统应用程序一般是由多个Activity组成,而这些Activity以视图的形式展现在我们面前, 视图都是由一个一个的组件构成的.组件就是我们常见的Button.TextEdit ...
- Android视图篇之一:Android常见基本布局
Android中,布局都是直接或间接的继承自ViewGroup类,其中,ViewGroup的直接子类目前有: AbsoluteLayout, AdapterView<T extends Adap ...
随机推荐
- JDK - Tomcat - JSP - Servlet 配置运行全攻略(转)
http://www.cnblogs.com/myqiao/archive/2005/08/29/225497.html 花了将近两个月的时间,从 JDK 开始一步一步摸索,历经千辛万苦,终于让第一个 ...
- BITED-Windows8应用开发学习札记之四:如何在Win8 应用中实现语义缩放
语意缩放的意义在于:创新的语意缩放外观,让你的应用随时展现信息可视化的力量.如图表般的Tile,随着数据的不同而变化,让你的页面更富节奏.而所谓的语意缩放就是通过上下文的跳转,帮助我们实现一种更快更便 ...
- Classic Source Code Collected
收藏一些经典的源码,持续更新!!! 1.深度学习框架(Deep Learning Framework). A:Caffe (Convolutional Architecture for Fast Fe ...
- -ms-viewport的问题
Windows 8 中的 Internet Explorer 10 和 Windows Phone 8 Internet Explorer 10 doesn't differentiate devic ...
- 串口发送浮点型数据及int(2个字节)long int(4个字节)的方法
方法一: 直接把float数据拆分为4个unsigned char(由于数字没法拆分,所以只能用指针的),发过去,在合并为float. 其中有两点要注意. (1)大端存储,小端存储:如果搞错读取数据就 ...
- 一种将Region转为Polyline的方法
在AutoCAD.NET二次开发中,如果要将面域转为Polyline主要有以下几种方式: 1.使用Explode将面域炸成Line和Arc,然后再串起来,此方法可用于AutoCAD2007开始的所有版 ...
- 如何检查oracle的归档空间是否满了?
如何检查oracle的归档空间是否满了? 关于如何检查归档空间是否慢了,大多数人会去先检查放归档的目录的磁盘空间是否满了,通过该归档目录空余情况来判断归档空间是否满了,但我觉得这个方法不一定代表实际情 ...
- 接口是干爹, 继承是亲爹 ---JAVA
接口(interface)是干爹, 因为你可以有很多很多的干爹爹... 继承(extends)是亲爹, 因为你只能有一个父类, 只有一个亲生的父亲. 单继承,多接口?./>./..
- POJ 3616 Milking Time (排序+dp)
题目链接:http://poj.org/problem?id=3616 有头牛产奶n小时(n<=1000000),但必须在m个时间段内取奶,给定每个时间段的起始时间和结束时间以及取奶质量 且两次 ...
- Java中的BASE64
located in rt.jar... public class sun.misc.BASE64Encoder extends sun.misc.CharacterEncoder{ //.. } p ...