
Android 之 TableLayout 布局详解
TableLayout简介
•简介
Tablelayout 类以行和列的形式对控件进行管理,每一行为一个 TableRow 对象,或一个 View 控件。
当为 TableRow 对象时,可在 TableRow 下添加子控件,默认情况下,每个子控件占据一列。
当为View时,该 View 将独占一行。
•TableLayout行列数的确定
如果我们直接往TableLayout中添加组件的话,那么这个组件将占满一行;
如果我们想一行上有多个组件的话,就要添加一个 TableRow 的容器,把组件都丢到里面;
TableRow 中的组件个数就决定了该行有多少列,而列的宽度由含有最多子控件的 TableRow 决定;
TableRow 的 layout_width 属性,默认是 martch_parent 的,我们自己设置成其他的值也不会生效;
但是 layout_height 默认是 wrap_content 的,我们可以自己设置大小;
整个表格布局的宽度取决于父容器的宽度(占满父容器本身)
有多少行就要自己数啦,一个 TableRow 占一行,一个单独的 View 也占一行;
多少列则是看 TableRow 中的组件个数,组件最多的就是 TableLayout 的列数;
比如第一TableRow含2个子控件,第二个TableRow含3个,第三个TableRow含4个,那么该TableLayout的列数为4;
<?xml version="1.0" encoding="utf-8"?>

<LinearLayout xmlns:android="http://schemas.android.com/apk/res/android"

    android:layout_width="match_parent"

    android:layout_height="match_parent"

    android:orientation="vertical"

    android:padding="10dp"

    android:background="@color/teal_700">

    <TextView

        android:layout_width="match_parent"

        android:layout_height="wrap_content"

        android:gravity="center"

        android:text="测试行数,列数"

        android:textSize="26sp"/>

    <TableLayout

        android:layout_width="match_parent"

        android:layout_height="wrap_content">

        <TableRow

            android:layout_height="match_parent">

            <Button

                android:text="(1,1)"/>

            <Button

                android:text="(1,2)"/>

        </TableRow>

        <TableRow

            android:layout_height="match_parent">

            <Button

                android:text="(2,1)"/>

            <Button

                android:text="(2,2)"/>

            <Button

                android:text="(2,3)"/>

        </TableRow>

        <TableRow

            android:layout_height="match_parent">

            <Button

                android:text="(3,1)"/>

            <Button

                android:text="(3,2)"/>

            <Button

                android:text="(3,3)"/>

            <Button

                android:text="(3,4)"/>

        </TableRow>

        <TextView

            android:layout_marginLeft="5dp"

            android:text="我单独占一行"

            android:textSize="20sp"/>

    </TableLayout>

</LinearLayout>
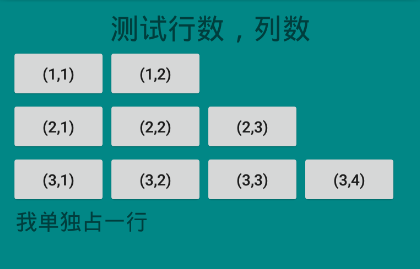
运行效果:
行数 = 三个<TableRow> + 一个<TextView> = 4行
列数 = max{2,3,4} = 4列;
TableLayout属性详解
•简介
- android:stretchColumns : 设置运行被拉伸的列的列序号
- android:shrinkColumns : 设置允许被收缩的列的列序号
- android:collapseColumns : 设置需要被隐藏的列的序号
以上这三个属性的列号都是从 0 开始算的,比如 stretchColunmns = "2",对应的是第 3 列;
可以设置多个,用逗号隔开比如 stretchColunmns = "0,2";
如果是所有列都生效,则用"*"号即可;
•stretchColumns
android:stretchColumns : 设置可伸展的列,该列可以向行方向伸展,最多可占据一整行。
先写出一个基础布局,在此基础上测试 strechColumns:
<?xml version="1.0" encoding="utf-8"?>

<LinearLayout xmlns:android="http://schemas.android.com/apk/res/android"

    android:layout_width="match_parent"

    android:layout_height="match_parent"

    android:orientation="vertical"

    android:padding="10dp"

    android:background="@color/teal_700">

    <TextView

        android:layout_width="match_parent"

        android:layout_height="wrap_content"

        android:gravity="center"

        android:text="测试 stretchColumns 属性"

        android:textSize="26sp"/>

    <TableLayout

        android:layout_width="match_parent"

        android:layout_height="wrap_content">

        <TableRow

            android:layout_height="match_parent">

            <Button

                android:layout_width="wrap_content"

                android:text="(1,1)"/>

            <Button

                android:layout_width="wrap_content"

                android:text="(1,2)"/>

        </TableRow>

    </TableLayout>

</LinearLayout>
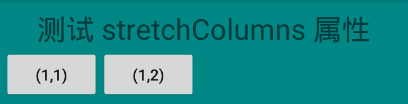
运行效果:
如图可知,这两个 Button 并没有占满整行,如何通过设置将这两个控件均匀占满整行呢?
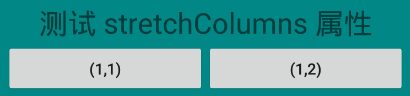
添加语句 android:stretchColumns="0,1" :
<?xml version="1.0" encoding="utf-8"?>

<LinearLayout xmlns:android="http://schemas.android.com/apk/res/android"

    android:layout_width="match_parent"

    android:layout_height="match_parent"

    android:orientation="vertical"

    android:padding="10dp"

    android:background="@color/teal_700">

    <TextView

        android:layout_width="match_parent"

        android:layout_height="wrap_content"

        android:gravity="center"

        android:text="测试 stretchColumns 属性"

        android:textSize="26sp"/>

    <TableLayout

        android:layout_width="match_parent"

        android:layout_height="wrap_content"

        android:stretchColumns="0,1">

        <TableRow

            android:layout_height="match_parent">

            <Button

                android:layout_width="wrap_content"

                android:text="(1,1)"/>

            <Button

                android:layout_width="wrap_content"

                android:text="(1,2)"/>

        </TableRow>

    </TableLayout>

</LinearLayout>
运行效果:
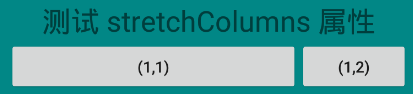
当然,你也可以单独拉伸 (1,1);
修改语句: android:stretchColumns="0" ;
运行效果:
•shrinkColumns
同样先写出一个基础布局,在此基础上测试 shrinkColumns:
<?xml version="1.0" encoding="utf-8"?>

<LinearLayout xmlns:android="http://schemas.android.com/apk/res/android"

    android:layout_width="match_parent"

    android:layout_height="match_parent"

    android:orientation="vertical"

    android:padding="10dp"

    android:background="@color/teal_700">

    <TextView

        android:layout_width="match_parent"

        android:layout_height="wrap_content"

        android:gravity="center"

        android:text="测试 shrinkColumns 属性"

        android:textSize="26sp"/>

    <TableLayout

        android:layout_width="match_parent"

        android:layout_height="wrap_content"

        android:stretchColumns="0"

        android:shrinkColumns="2">

        <TableRow

            android:layout_height="match_parent">

            <Button

                android:id="@+id/btn_0"

                android:layout_width="wrap_content"

                android:text="(1,1)"/>

            <Button

                android:id="@+id/btn_1"

                android:layout_width="wrap_content"

                android:text="(1,2)"/>

            <Button

                android:id="@+id/btn_2"

                android:layout_width="wrap_content"

                android:text="(1,3)"/>

            <Button

                android:id="@+id/btn_3"

                android:layout_width="wrap_content"

                android:text="(1,4)"/>

        </TableRow>

    </TableLayout>

</LinearLayout>
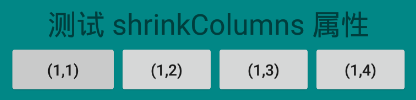
可以看到,通过 android:stretchColumns="0" 将 btn_0 设置成 stretchColumns;
通过 android:shrinkColumns="2" 将 btn_2 设置成 shrinkColumns;
运行效果:
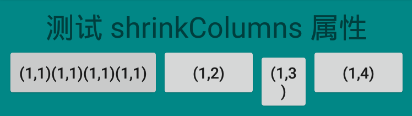
现在,我将 btn_0 设置的 Text 改为 (1,1)(1,1)(1,1)(1,1):
<?xml version="1.0" encoding="utf-8"?>

<LinearLayout xmlns:android="http://schemas.android.com/apk/res/android"

    android:layout_width="match_parent"

    android:layout_height="match_parent"

    android:orientation="vertical"

    android:padding="10dp"

    android:background="@color/teal_700">

    <TextView

        android:layout_width="match_parent"

        android:layout_height="wrap_content"

        android:gravity="center"

        android:text="测试 shrinkColumns 属性"

        android:textSize="26sp"/>

    <TableLayout

        android:layout_width="match_parent"

        android:layout_height="wrap_content"

        android:stretchColumns="0"

        android:shrinkColumns="2">

        <TableRow

            android:layout_height="match_parent">

            <Button

                android:id="@+id/btn_0"

                android:layout_width="wrap_content"

                android:text="(1,1)(1,1)(1,1)(1,1)"/>

            <Button

                android:id="@+id/btn_1"

                android:layout_width="wrap_content"

                android:text="(1,2)"/>

            <Button

                android:id="@+id/btn_2"

                android:layout_width="wrap_content"

                android:text="(1,3)"/>

            <Button

                android:id="@+id/btn_3"

                android:layout_width="wrap_content"

                android:text="(1,4)"/>

        </TableRow>

    </TableLayout>

</LinearLayout>
运行效果:
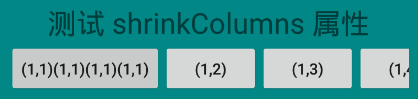
如果将 android:shrinkColumns="2" 这个语句去掉呢?
运行效果:
对比一下,是不是很容易得知 shrinkColunms 的作用?
如果不给 btn_2 设置这个属性,那么在 btn_0 拉伸的时候,将优先占用 btn_3 的空间;
如果给 btn_2 设置这个属性,那么优先占用 btn_2 的空间。
•collapseColumns
同样,还是先写出一个基础布局:
<?xml version="1.0" encoding="utf-8"?>

<LinearLayout xmlns:android="http://schemas.android.com/apk/res/android"

    android:layout_width="match_parent"

    android:layout_height="match_parent"

    android:orientation="vertical"

    android:padding="10dp"

    android:background="@color/teal_700">

    <TextView

        android:layout_width="match_parent"

        android:layout_height="wrap_content"

        android:gravity="center"

        android:text="测试 collapseColumns 属性"

        android:textSize="26sp"/>

    <TableLayout

        android:layout_width="match_parent"

        android:layout_height="wrap_content"

        android:stretchColumns="*">

        <TableRow

            android:layout_height="match_parent">

            <Button

                android:id="@+id/btn_0"

                android:layout_width="wrap_content"

                android:text="(1,1)"/>

            <Button

                android:id="@+id/btn_1"

                android:layout_width="wrap_content"

                android:text="(1,2)"/>

            <Button

                android:id="@+id/btn_2"

                android:layout_width="wrap_content"

                android:text="(1,3)"/>

            <Button

                android:id="@+id/btn_3"

                android:layout_width="wrap_content"

                android:text="(1,4)"/>

        </TableRow>

    </TableLayout>

</LinearLayout>
运行效果:
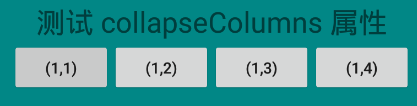
在上述代码中添加语句: android:collapseColumns="1,3" ,也即是隐藏 btn_1,btn_3:
<?xml version="1.0" encoding="utf-8"?>

<LinearLayout xmlns:android="http://schemas.android.com/apk/res/android"

    android:layout_width="match_parent"

    android:layout_height="match_parent"

    android:orientation="vertical"

    android:padding="10dp"

    android:background="@color/teal_700">

    <TextView

        android:layout_width="match_parent"

        android:layout_height="wrap_content"

        android:gravity="center"

        android:text="测试 collapseColumns 属性"

        android:textSize="26sp"/>

    <TableLayout

        android:layout_width="match_parent"

        android:layout_height="wrap_content"

        android:stretchColumns="*"

        android:collapseColumns="1,3">

        <TableRow

            android:layout_height="match_parent">

            <Button

                android:id="@+id/btn_1"

                android:layout_width="wrap_content"

                android:text="(1,1)"/>

            <Button

                android:id="@+id/btn_2"

                android:layout_width="wrap_content"

                android:text="(1,2)"/>

            <Button

                android:id="@+id/btn_3"

                android:layout_width="wrap_content"

                android:text="(1,3)"/>

            <Button

                android:id="@+id/btn_4"

                android:layout_width="wrap_content"

                android:text="(1,4)"/>

        </TableRow>

    </TableLayout>

</LinearLayout>
运行效果:
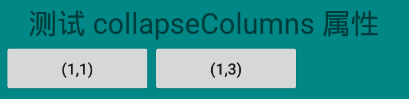
由图可知,虽然设置了 android:stretchColumns="*" 属性,但是btn_0,btn_2 并没有占据整个空间;
这就充分说明了 android:collapseColumns="1,3" 仅仅是让 btn_1,btn_3 隐藏了,并没有销毁;
单元格属性
•简介
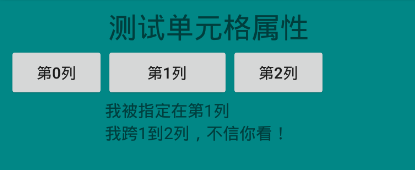
- android:layout_column : 指定该单元格在第几列显示
- android:layout_span : 指定该单元格占据的列数(未指定时,为1)
•布局代码
<LinearLayout xmlns:android="http://schemas.android.com/apk/res/android"

    android:layout_width="match_parent"

    android:layout_height="match_parent"

    android:orientation="vertical"

    android:padding="10dp"

    android:background="@color/teal_700">

    <TextView

        android:layout_width="match_parent"

        android:layout_height="wrap_content"

        android:gravity="center"

        android:text="测试单元格属性"

        android:textSize="26sp"/>

    <TableLayout

        android:layout_width="match_parent"

        android:layout_height="wrap_content">

        <TableRow>

            <Button android:text="第0列"/>

            <Button android:text="第1列"/>

            <Button android:text="第2列"/>

        </TableRow>

        <TableRow>

            <TextView

                android:layout_column="1"

                android:text="我被指定在第1列"

                android:textSize="15sp"

                />

        </TableRow>

        <TableRow>

            <TextView

                android:layout_column="1"

                android:layout_span="2"

                android:text="我跨1到2列,不信你看!"

                android:textSize="15sp"

                />

        </TableRow>

    </TableLayout>

</LinearLayout>
•运行效果
Android 之 TableLayout 布局详解的更多相关文章
- [置顶] Android系统五大布局详解Layout
我们知道Android系统应用程序一般是由多个Activity组成,而这些Activity以视图的形式展现在我们面前,视图都是由一个一个的组件构成的.组件就是我们常见的Button.TextEdit等 ...
- Android系统五大布局详解Layout
我们知道Android系统应用程序一般是由多个Activity组成,而这些Activity以视图的形式展现在我们面前, 视图都是由一个一个的组件构成的.组件就是我们常见的Button.TextEdit ...
- Android LinearLayout线性布局详解
为了更好地管理Android应用的用户界面里的各组件,Android提供了布局管理器.通过使用布局管理器,Android应用图形用户界面具有良好的平台无关性.推荐使用布局管理器来管理组件的分布.大小, ...
- Android学习之基础知识六—Android四种布局详解
一.Android基本布局 布局是一种可以放置多个控件的容器,它可以按照一定规律调整内部控件的位置,而且布局内部除了可以放置控件外,还可以放置布局,实现多层布局嵌套.布局和控件.布局和布局之间的关系如 ...
- android:TableLayout表格布局详解
http://blog.csdn.net/justoneroad/article/details/6835915 这篇博文包括的内容:1.TableLayout简介2.TableLayout行列数的确 ...
- Android开发重点难点1:RelativeLayout(相对布局)详解
前言 啦啦啦~博主又推出了一个新的系列啦~ 之前的Android开发系列主要以完成实验的过程为主,经常会综合许多知识来写,所以难免会有知识点的交杂,给人一种混乱的感觉. 所以博主推出“重点难点”系列, ...
- Android布局详解之一:FrameLayout
原创文章,如有转载,请注明出处:http://blog.csdn.net/yihui823/article/details/6702273 FrameLayout是最简单的布局了.所有放在布局里的 ...
- Android 布局详解
Android 布局详解 1.重用布局 当一个布局文件被多处使用时,最好<include>标签来重用布局. 例如:workspace_screen.xml的布局文件,在另一个布局文件中被重 ...
- Android 布局学习之——Layout(布局)详解二(常见布局和布局参数)
[Android布局学习系列] 1.Android 布局学习之——Layout(布局)详解一 2.Android 布局学习之——Layout(布局)详解二(常见布局和布局参数) 3.And ...
随机推荐
- Learning Web Performance with MDN
Learning Web Performance with MDN Web 性能是客观的衡量标准,是加载时间和运行时的感知用户体验. https://developer.mozilla.org/en- ...
- Web 全栈开发 Redis 面试题
Web 全栈开发 Redis 面试题 Redis 大 key 问题 https://www.cnblogs.com/xgqfrms/p/13601959.html Redis 数据结构 Redis 初 ...
- HTML5 stream video player
HTML5 stream video player Aliplayer https://player.alicdn.com/aliplayer/index.html https://help.aliy ...
- zsh all in one
zsh all in one zsh https://ohmyz.sh/ # install $ sh -c "$(curl -fsSL https://raw.github.com/ohm ...
- 为什么ElasticSearch比MySQL更适合全文索引
熟悉 MySQL 的同学一定都知道,MySQL 对于复杂条件查询的支持并不好.MySQL 最多使用一个条件涉及的索引来过滤,然后剩余的条件只能在遍历行过程中进行内存过滤,对这个过程不了解的同学可以先行 ...
- tep环境变量、fixtures、用例三者之间的关系
tep是一款测试工具,在pytest测试框架基础上集成了第三方包,提供项目脚手架,帮助以写Python代码方式,快速实现自动化项目落地. 在tep项目中,自动化测试用例都是放到tests目录下的,每个 ...
- Java常用类:Arrays类
一.简介 全类名:java.util.Arrays 描述: 此类包含用来操作数组(比如排序和搜索)的各种方法. 此类还包含一个允许将数组作为列表来查看的静态工厂. 注意: 除非特别注明,否则如果指定数 ...
- 行业动态 | 通过使用Apache Cassandra实现实时供应链管理
借助基于Apache Cassandra的DataStax Enterprise,C&S Wholesale确实得到了他们所需要的东西--一个持续在线的仓库运作整体视图. 视图中包含了原本 ...
- 第七届蓝桥杯JavaB组——第7题剪邮票
题目: 剪邮票 如[图1.jpg], 有12张连在一起的12生肖的邮票. 现在你要从中剪下5张来,要求必须是连着的. (仅仅连接一个角不算相连) 比如,[图2.jpg],[图3.jpg]中,粉红色所示 ...
- Python插入排序
升序 import random l = [] for i in range(8): l.append(random.randint(0,9)) print(l) for cur in range(1 ...