
MyBatis+PageHelper实现分页
转载请注明出处:http://www.cnblogs.com/Joanna-Yan/p/7256105.html
前面讲到Spring+SpringMVC+MyBatis深入学习及搭建(十七)——SpringMVC拦截器
本文通过MyBatis+PageHelper实现列表分页,先上效果图:
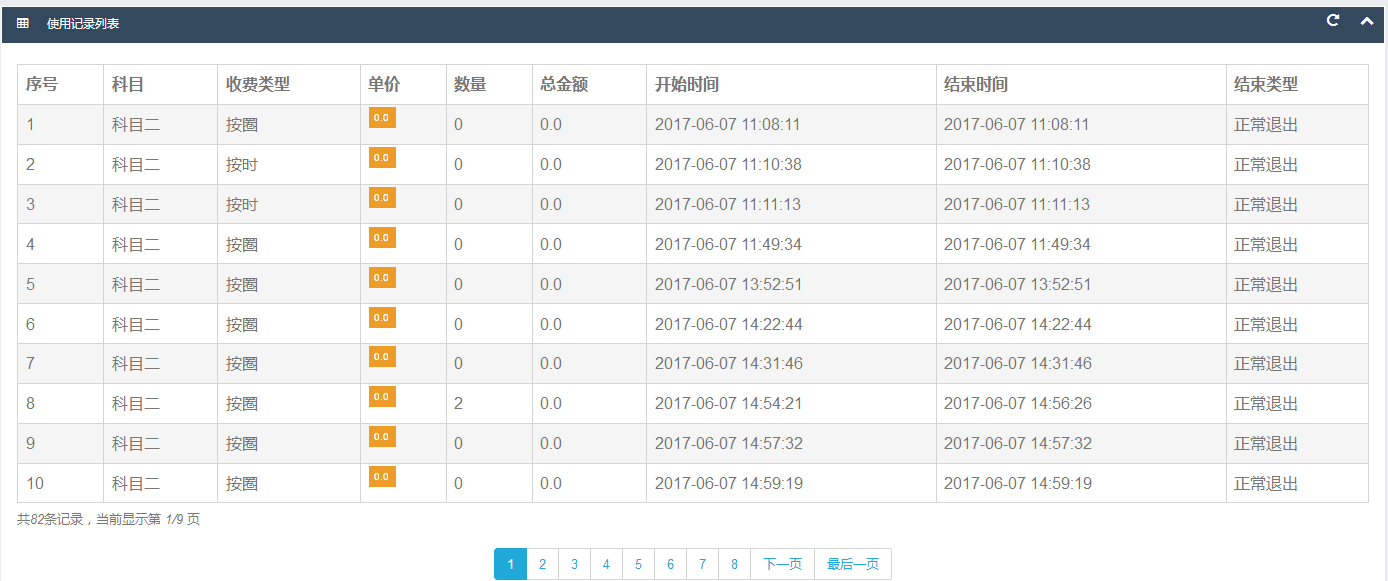
注意:MyBaits最低版本不能低于3.3。
PageHelper插件及依赖jar包:jsqlparser-0.9.5.jar pagehelper-4.2.1.jar
sqlMapConfig.xml中,配置PageHelper插件:
<?xml version="1.0" encoding="UTF-8"?>

<!DOCTYPE configuration

PUBLIC "-//mybatis.org//DTD Config 3.0//EN"

"http://mybatis.org/dtd/mybatis-3-config.dtd">

 <configuration>

     <!-- 全局setting配置,根据需要添加 -->

     <settings>

         <setting name="logImpl" value="LOG4J" />

     </settings>

    <!-- 配置别名 -->

    <typeAliases>

        <package name="pojo对象所在包名"/>

    </typeAliases>

    <!-- 插件 -->

    <plugins>

        <plugin interceptor="com.github.pagehelper.PageHelper">

            <!-- 4.0.0以后版本可以不设置该参数  -->

            <property name="diaect" value="mysql"/>

            <!--

                该参数默认为false

                设置为true时,会将RowBounds第一个参数offset当成pageNum页码使用

                和startPage中的pageNum效果一样

             -->

            <property name="offsetAsPageNum" value="true"/>

            <!--

                该参数默认为false

                设置为true时,使用RowBounds分页会进行count查询

              -->

            <property name="rowBoundsWithCount" value="true"/>

            <!--

                设置为true时,如果pageSize=0或者RowBounds.limit=0就会查询出全部的结果

                (相当于没有执行分页查询,只是返回结果仍然是Page类型)

             -->

            <property name="pageSizeZero" value="true"/>

            <!--

                3.3.0版本可用-分页参数合理化,默认false禁用

                启用合理化时,如果pageNum<1会查询第一页,如果pageNum>pages会查询最后一页

                禁用合理化时,如果pageNum<1或pages会返回空数据

             -->

            <property name="reasonable" value="true"/>

            <!--

                3.5.0版本可用-为了支持startPage(Object params)方法

                增加了一个'params'参数来配置参数映射,用于从Map或ServletRequest中取值

                可以配置pageNum,pageSize,count,pageSizeZero,reasonable,orderBy,不配置映射的用默认值

                 不理解该含义的前提下,不要随便复制该配置

             -->

            <property name="params" value="pageNum=start;pageSize=limit;"/>

            <!-- 支持通过Mapper接口参数来传递分页参数  -->

            <property name="supportMethodsArguments" value="true"/>

            <!-- always重视返回PageInfo类型,check检查返回类型是否为PageInfo,none返回Page -->

            <property name="returnPageInfo" value="check"/>

        </plugin>

    </plugins>

 </configuration>
后台代码:
    //查询单个item

    @RequestMapping(value={"/query"})

    public String query(HttpSession session,Model model,@RequestParam(required=true)Integer id,@RequestParam(required=true)Integer pageNum) throws Exception{

        MaindeviceCustom maindeviceCustom=maindeviceService.findById(id);

        model.addAttribute("maindevice", maindeviceCustom);

        int roleId=(int) session.getAttribute("roleId");

        RoleFunction rfListAble=roleFunctionService.find(roleId, 27);

        RoleFunction rfUpdateAble=roleFunctionService.find(roleId, 32);

        if(rfListAble!=null){

            model.addAttribute("listAble", 1);

           int pageSize=10;

        Page<?> page=PageHelper.startPage(pageNum, pageSize);

        List<DeviceUserecordCustom> deviceUserecordCustomList=deviceUserecordService.itemRecords(id);

        PageInfo<?> pagehelper=page.toPageInfo();

        model.addAttribute("deviceUserecordCustomList", deviceUserecordCustomList);

        model.addAttribute("pagehelper", pagehelper);

        }else{

            model.addAttribute("listAble", 0);

        }

        if(rfUpdateAble!=null){

            model.addAttribute("updateAble", 1);

        }else{

            model.addAttribute("updateAble", 0);

        }

        return "devices/query_device";

    }
前端代码:
<div class="row" id="deviceRecordList">
<div class="col-lg-12" style="height: 15px;top:700px" id="paging">
<div class="panel">
<div class="panel-heading bk-bg-primary">
<h6><i class="fa fa-table red"></i><span class="break"></span>使用记录列表</h6>
<div class="panel-actions">
<a href="table.html#" class="btn-setting"><i class="fa fa-rotate-right"></i></a>
<a href="table.html#" class="btn-minimize"><i class="fa fa-chevron-up"></i></a>
</div>
</div>
<div class="panel-body" style="height: 900px;">
<div class="table-responsive">
<table class="table table-striped table-bordered bootstrap-datatable datatable">
<thead>
<tr>
<th>序号</th>
<th>科目</th>
<th>收费类型</th>
<th>单价</th>
<th>数量</th>
<th>总金额</th>
<th>开始时间</th>
<th>结束时间</th>
<th>结束类型</th>
</tr>
</thead>
<tbody> <c:forEach items="${deviceUserecordCustomList }" var="deviceUserecordCustom" varStatus="status">
<tr>
<td>${status.index+1 }</td>
<td>${deviceUserecordCustom.courseName }</td>
<td>${deviceUserecordCustom.paymenttypeName }</td>
<td>
<span class="label label-warning">${deviceUserecordCustom.price }</span>
</td>
<td>${deviceUserecordCustom.usedamount }</td>
<td>${deviceUserecordCustom.monetary }</td>
<td>${deviceUserecordCustom.begintimeStr }</td>
<td>${deviceUserecordCustom.endtimeStr }</td>
<td>${deviceUserecordCustom.endtypeName }</td>
</tr>
</c:forEach> </tbody>
</table>
<!-- 分页 -->
<div class="message">
共<i class="blue">${pagehelper.total}</i>条记录,当前显示第 <i
class="blue">${pagehelper.pageNum}/${pagehelper.pages}</i> 页
</div>
<div style="text-align:center;">
<ul class="pagination">
<c:if test="${!pagehelper.isFirstPage}">
<li><a href="javascript:queryDeviceRecords(${pagehelper.firstPage});">首页</a></li>
<li><a href="javascript:queryDeviceRecords(${pagehelper.prePage});">上一页</a></li>
</c:if>
<c:forEach items="${pagehelper.navigatepageNums}" var="navigatepageNum"> <c:if test="${navigatepageNum==pagehelper.pageNum}">
<li class="active"><a href="javascript:queryAllDevices(${navigatepageNum});">${navigatepageNum}</a></li>
</c:if>
<c:if test="${navigatepageNum!=pagehelper.pageNum}">
<li><a href="javascript:queryDeviceRecords(${navigatepageNum});">${navigatepageNum}</a></li>
</c:if>
</c:forEach>
<c:if test="${!pagehelper.isLastPage}">
<li><a href="javascript:queryDeviceRecords(${pagehelper.nextPage});">下一页</a></li>
<li><a href="javascript:queryDeviceRecords(${pagehelper.lastPage});">最后一页</a></li>
</c:if>
</ul>
</div>
</div>
</div>
</div>
</div>
</div>
其中id="paging",为需要局部重新加载的代码块。
    <script type="text/javascript">

        function queryDeviceRecords(pageNum) {

            var id=$("#deviceId").val();

            $("#paging").load("<%=basePath %>/maindevice/query.html?id="+id+"&pageNum=" + pageNum);

        }

    </script>
如果此文对您有帮助,微信打赏我一下吧~

MyBatis+PageHelper实现分页的更多相关文章
- SpringBoot+Mybatis+PageHelper实现分页
SpringBoot+Mybatis+PageHelper实现分页 mybatis自己没有分页功能,我们可以通过PageHelper工具来实现分页,非常简单方便 第一步:添加依赖 <depend ...
- Python分页转Mybatis pagehelper格式分页
最近工作里遇到一个需求要把之前用Java写的一个http接口替换成用Python写的,出参是带了mybatis pageHelper中PageInfo信息的一个JSON串,而Python这边分页不会涉 ...
- SpringBoot+Mybatis+PageHelper简化分页实现
前言 经过一段时间的测试和修改PageHelper插件逐渐走到了让我觉得靠谱的时候,它功能的就是简化分页的实现,让分页不需要麻烦的多写很多重复的代码. 已经加入我的github模版中:https:// ...
- spring-boot + mybatis +pagehelper 使用分页
转自:https://segmentfault.com/a/1190000015668715?utm_medium=referral&utm_source=tuicool 最近自己搭建一个sp ...
- SpringBoot 整合Mybatis + PageHelper 实现分页
前言: 现在公司大多数都实现了前后端分离,前端使用Vue.React.AngularJS 等框架,不用完全依赖后端.但是如果对于比较小型的项目,没必要前后端分离,而SpringBoot也基本抛弃了Js ...
- Mybatis下collections使用pageHelper进行分页
pageHelper在对mybatis一对多分页时造成查询总页数结果不对的情况. 可以做出如下修改: service层: public CommonResult worksList(String us ...
- SpringBoot集成Mybatis并具有分页功能PageHelper
SpringBoot集成Mybatis并具有分页功能PageHelper 环境:IDEA编译工具 第一步:生成测试的数据库表和数据 SET FOREIGN_KEY_CHECKS=0; ...
- mybatis pagehelper 分页 失效
pagehelper 不分页几种情况的解决方法 - web洋仔 - CSDN博客https://blog.csdn.net/csdn___lyy/article/details/77160488 分页 ...
- 后端分页神器,mybatis pagehelper 在SSM与springboot项目中的使用
mybatis pagehelper想必大家都耳熟能详了,是java后端用于做分页查询时一款非常好用的分页插件,同时也被人们称为mybatis三剑客之一,下面 就给大家讲讲如何在SSM项目和sprin ...
随机推荐
- Ubuntu下录音机程序的使用
在Ubuntu中使用系统自带的录音机程序可以录制电脑的音频输出(比如,电脑正在播放视频的声音),或录制外部环境音频输入(比如,自己说话的声音) 1.录制电脑音频输出 在“硬件”选项中,将”选中设备的设 ...
- Builder模式详解及其在Android开发中的应用
一.引言 在Android开发中,采用Builder模式的代码随处可见,比如说Android系统对话框AlertDialog的使用或者是Android中的通知栏(Notification)的使用,又比 ...
- 通过位异或来交换a,b的值和通过中间变量交换a,b的值
//通过位异或来交换a,b的值 #include <stdio.h> int main(int argc, const char * argv[]) { int a=20,b=10; ...
- 【开源】做了一个WinForm窗体的投影组件,能够为窗口添加影子效果
最近手头上的项目终于忙得差不多了,想起好久没有更新了的NanUI,再看着每天QQ群未读消息闪烁的标志,突然才发现似乎愧对了群里各位喜爱NanUI的朋友们.于是乎,就想趁这几天有时间,好好的修复一下Na ...
- bootstrap-table前台和后台分页对json格式的要求
Bootstrap是一款前端非常流行的框架,其中的表格更为大家经常使用.大家都知道表格的分页分为前台和后台分页,也就是表格配置中sidePagination属性,当sidePagination: &q ...
- jQuery.merge( first, second )返回: Array
jQuery.merge( first, second )返回: Array描述: 合并两个数组内容到第一个数组.first类型: Array第一个用于合并的数组,其中将会包含合并后的第二个数组的内容 ...
- Android-->创建自定义控件
1.仿 iPhone 的风格,在界面的顶部放置一个标题栏. <?xml version="1.0" encoding="utf-8"?> <R ...
- C#深入学习 ----多线程学习(一)第一天学习
学习最好的方法就是总结,并写下来,能让别人看懂,自己肯定是掌握了的. 针对软件开发,一直停留在能做的层次,今天得到大牛指点,觉得有必要对这门技术深入学习. 翻阅园内各大神的文章,收益匪浅,在这里做下总 ...
- Spring+Mybatis配置
Spring+Mybatis配置 之前做项目的时候用到了spring+mybatis框架,一直想抽空整理一下 Mybatis: mybatis是支持普通 SQL查询,存储过程和高级映射的优秀持久层框架 ...
- 平板点餐软件编程体会---记我的Android编程之路
前言 想开发一个平板点餐系统,研究下陈江根大侠分享的一个很高水准的实例,只是个单机版无实用意义. (如需运行源码请回复联系邮箱) 实现 Mysql 数据库+Tomcat WEb服务器,使用Servle ...