使用json-Server与postman快速模拟服务环境搭建
在前后端分离的这种工作模式下,分工明确,各司其职。前端负责展示数据,后端提供数据。然而,在这种过程中对于接口的规范 需要提前制定好。例如根据规范提前模拟数据,这个时候就比较麻烦的。JsonServer这个比较NB了,它可以快速搭建服务端环境,创建json文件,便于调用。然后可以通过下载postman与json-server结合,可以实现数据的增删改查功能。下面是使用过程:
在浏览器中打开 http://jsonplaceholder.typicode.com/ 可以看到里面的一些数据
1.首先安装Node.js (https://nodejs.org/en/)
$ npm install -g json-server (全局安装json-server)
Downloading json-server to C:\Users\Administrator\AppData\Roaming\npm\node_modules\json-server_tmp

Copying C:\Users\Administrator\AppData\Roaming\npm\node_modules\json-server_tmp\_json-server@0.12.1@json-server to C:\Users\Administrator\AppData\Roaming\npm\node_modules\json-server

Installing json-server's dependencies to C:\Users\Administrator\AppData\Roaming\npm\node_modules\json-server/node_modules

[1/22] connect-pause@^0.1.0 installed at node_modules\_connect-pause@0.1.0@connect-pause

[2/22] errorhandler@^1.2.0 installed at node_modules\_errorhandler@1.5.0@errorhandler

[3/22] lodash-id@^0.14.0 installed at node_modules\_lodash-id@0.14.0@lodash-id

[4/22] cors@^2.8.4 installed at node_modules\_cors@2.8.4@cors

[5/22] json-parse-helpfulerror@^1.0.3 installed at node_modules\_json-parse-helpfulerror@1.0.3@json-parse-helpfulerror

[6/22] express-urlrewrite@^1.2.0 installed at node_modules\_express-urlrewrite@1.2.0@express-urlrewrite

[7/22] object-assign@^4.0.1 existed at node_modules\_object-assign@4.1.1@object-assign

[8/22] compression@^1.7.1 installed at node_modules\_compression@1.7.2@compression

[9/22] nanoid@^1.0.1 installed at node_modules\_nanoid@1.0.2@nanoid

[10/22] method-override@^2.3.10 installed at node_modules\_method-override@2.3.10@method-override

[11/22] chalk@^2.3.0 installed at node_modules\_chalk@2.4.0@chalk

[12/22] body-parser@^1.18.2 installed at node_modules\_body-parser@1.18.2@body-parser

[13/22] pluralize@^7.0.0 installed at node_modules\_pluralize@7.0.0@pluralize

[14/22] please-upgrade-node@^3.0.1 installed at node_modules\_please-upgrade-node@3.0.1@please-upgrade-node

[15/22] morgan@^1.9.0 installed at node_modules\_morgan@1.9.0@morgan

[16/22] server-destroy@^1.0.1 installed at node_modules\_server-destroy@1.0.1@server-destroy

[17/22] express@^4.16.2 installed at node_modules\_express@4.16.3@express

[18/22] lodash@^4.11.2 installed at node_modules\_lodash@4.17.5@lodash

[19/22] lowdb@^0.15.0 installed at node_modules\_lowdb@0.15.5@lowdb

[20/22] yargs@^10.0.3 installed at node_modules\_yargs@10.1.2@yargs

[21/22] request@^2.83.0 installed at node_modules\_request@2.85.0@request

[22/22] update-notifier@^2.3.0 installed at node_modules\_update-notifier@2.5.0@update-notifier

Recently updated (since 2018-04-16): 3 packages (detail see file C:\Users\Administrator\AppData\Roaming\npm\node_modules\json-server\node_modules\.recently_updates.txt)

  Today:

    → yargs@10.1.2 › cliui@^4.0.0(4.1.0) (10:28:35)

  2018-04-17

    → chalk@^2.3.0(2.4.0) (12:28:37)

    → chalk@2.4.0 › supports-color@^5.3.0(5.4.0) (11:57:41)

All packages installed (228 packages installed from npm registry, used 9s, speed 492.45kB/s, json 216(2.05MB), tarball 2.37MB)

[json-server@0.12.1] link C:\Users\Administrator\AppData\Roaming\npm\json-server@ -> C:\Users\Administrator\AppData\Roaming\npm\node_modules\json-server\bin\index.js
出现这样的情况,说明执行完成
2.进入你创建的目录里。cd json-server(json-server是我创建的文件名称)
npm init 初始化
This utility will walk you through creating a package.json file.

It only covers the most common items, and tries to guess sensible defaults.

See `npm help json` for definitive documentation on these fields

and exactly what they do.

Use `npm install <pkg>` afterwards to install a package and

save it as a dependency in the package.json file.

Press ^C at any time to quit.

package name: (1)

version: (1.0.0)

description:

entry point: (index.js)

test command:

git repository:

keywords:

author:

license: (ISC)

About to write to G:\1\package.json:

{

  "name": "1",

  "version": "1.0.0",

  "description": "",

  "main": "index.js",

  "scripts": {

    "test": "echo \"Error: no test specified\" && exit 1"

  },

  "author": "",

  "license": "ISC"

}

Is this OK? (yes)
3.安装json-server依赖
npm install json-server --save
这时候在你项目中会生成node_modules所需要的依赖
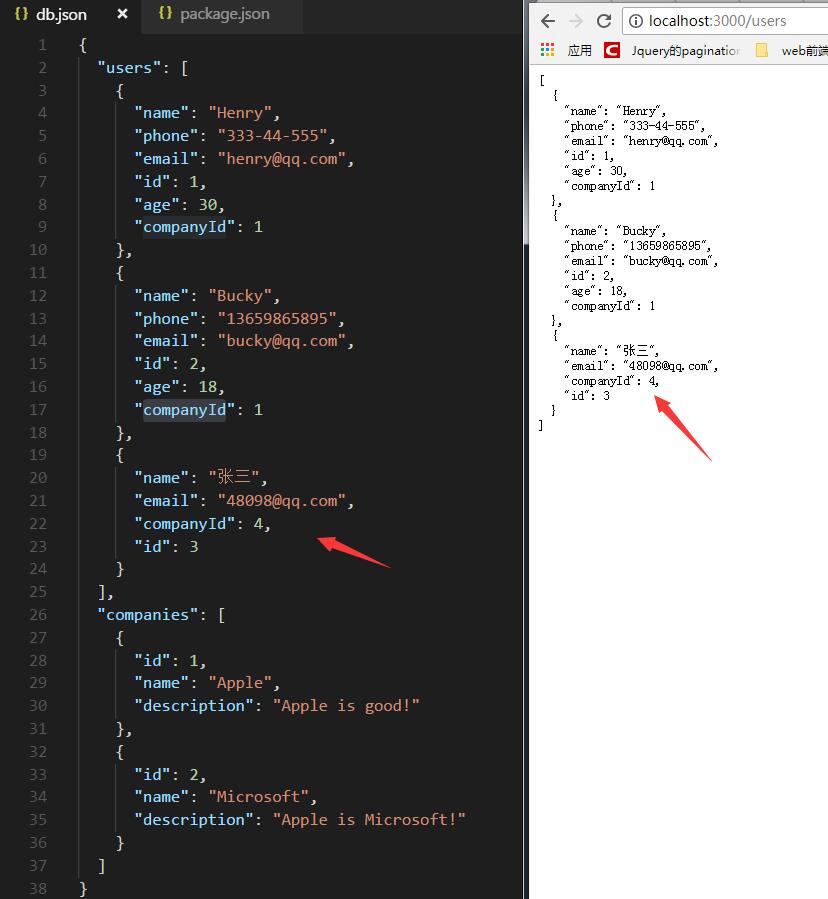
4.在你的文件中创建一个db.json,用于写一些模拟数据
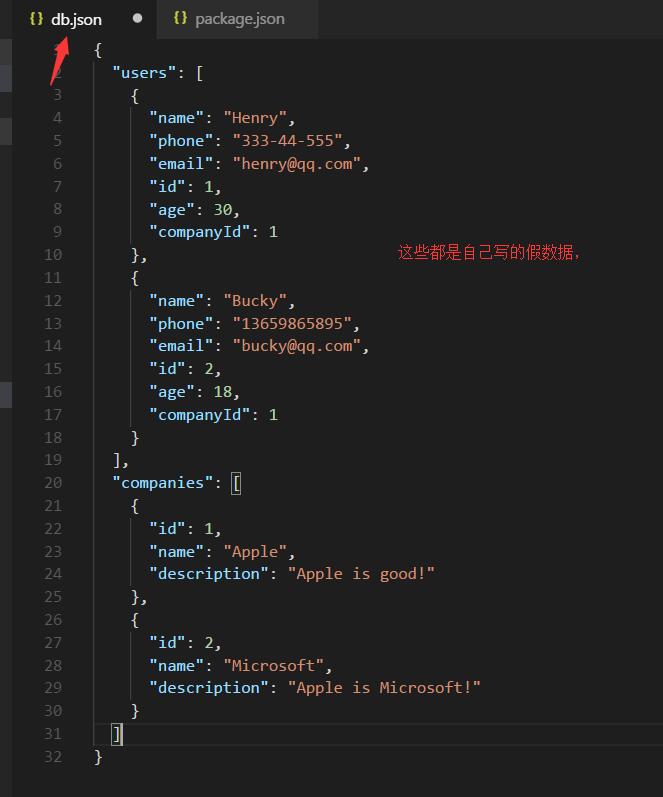
5.在我们的package.json这个文件里,配置一下运行环境
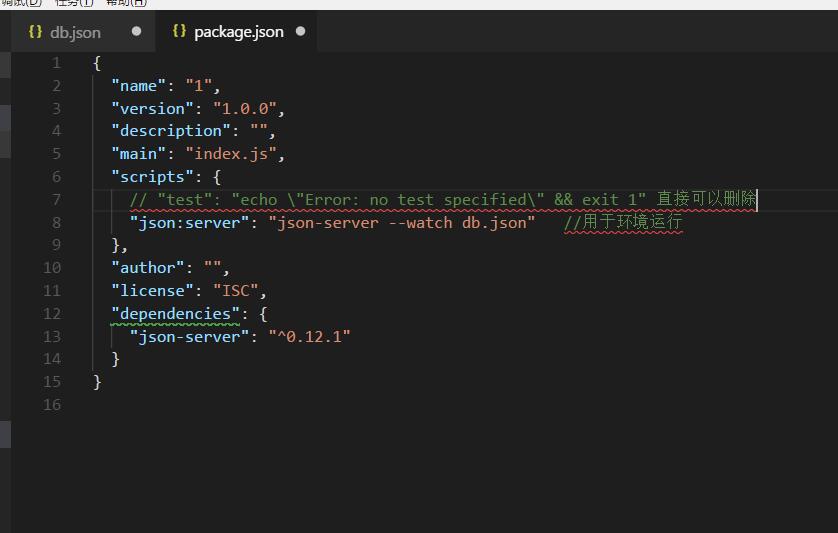
6.运行命令
npm run json:server (就是你在package.json配置的命令)
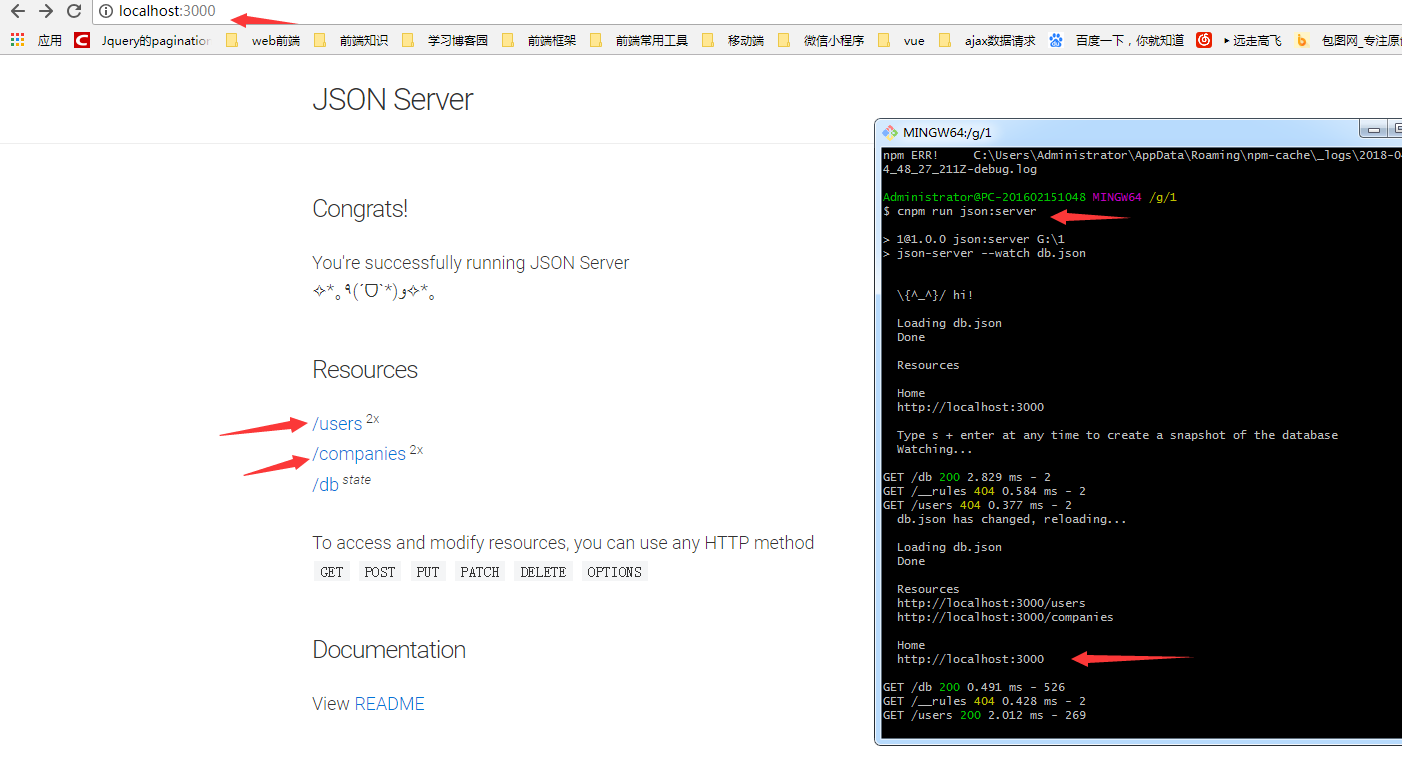
在命令版输入 npm run json:server
在浏览器打开http://localhost:3000/会出现下面内容
在浏览器中可以看到,users中有两个对象,就是我们在db。josn创建的两个数据
7.现在我们都可以实现数据的添加删除修改,查询功能了。
8.postman测试接口工具,这个工具专门提供接口测试,
在浏览器中https://www.getpostman.com/自己下载,自己注册登录,此处就不详细介绍了。打开就是下面的界面
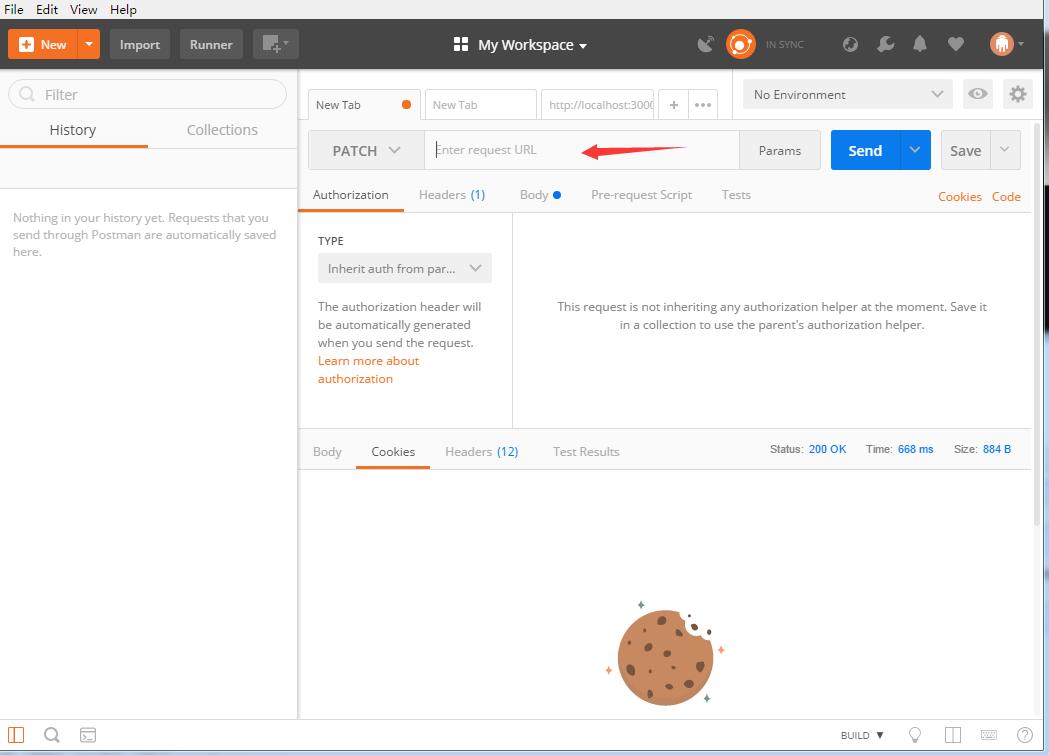
8.我们在输入框输入我们的运行的地址http://localhost:3000/users,输入好地址的时候,点击send运行,一定要选择json格式
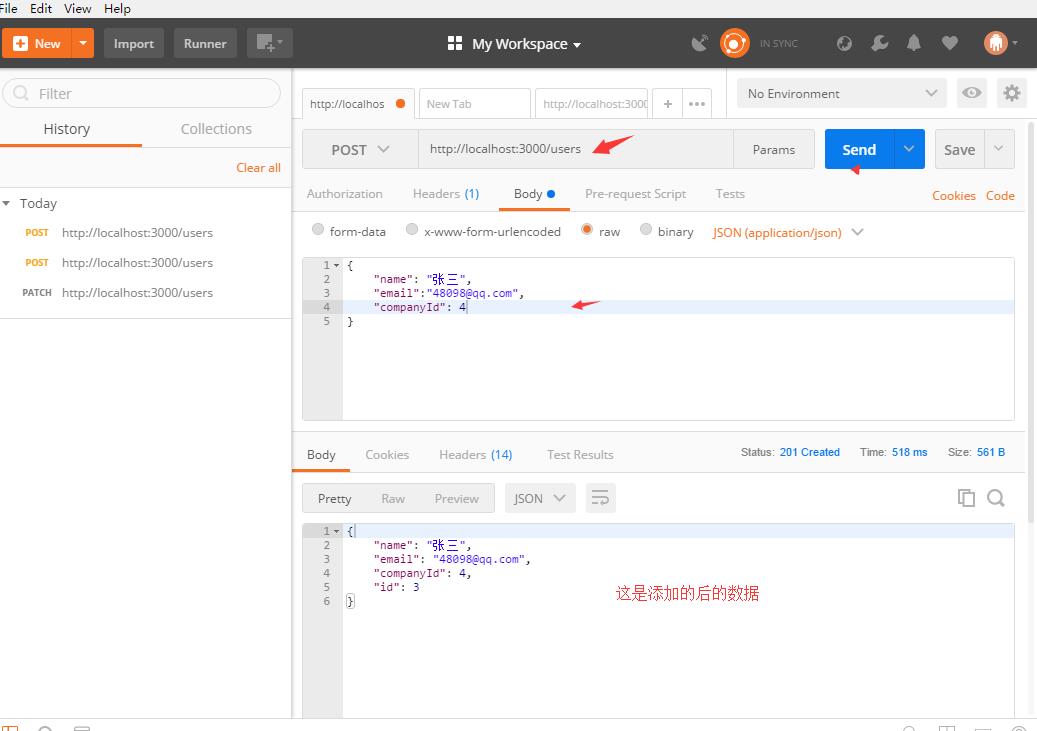
我们可以在浏览器或者在db.json这个文件看到我们已经添加了一个新的数据
如果想实现其他自己可以尝试,
这时候我们只需要调用这些端口就已经可以实现数据的增删改查了。
使用json-Server与postman快速模拟服务环境搭建的更多相关文章
- 【个人笔记】003-PHP基础-01-PHP快速入门-03-PHP环境搭建
003-PHP基础-01-PHP快速入门 03-PHP环境搭建 1.客户端(浏览器) IE FireFox CHROME Opera Safari 2.服务器 是运行网站的基本 是放置程序代码的地方 ...
- SpringCloudAlibaba 微服务讲解(二)微服务环境搭建
微服务环境搭建 我们这次是使用的电商项目的商品.订单.用户为案例进行讲解 2.1 案例准备 2.1.1 技术选型 maven :3.3.9 数据库:mysql 持久层:SpringData JPA S ...
- Redis 快速集群环境搭建
环境 Linux :centos 7 redis:redis-5.0.9 Redis 集群环境搭建步骤 早期 redis 版本集群环境搭建需要安装 ruby 运行环境,搭建步骤比较繁琐: redis ...
- Elasticsearch快速入门和环境搭建
内容概述 什么是Elasticsearch,为什么要使用它? 基础概念简介 节点(node) 索引(index) 类型映射(mapping) 文档(doc) 本地环境搭建,创建第一个index 常用R ...
- JAVA WEB快速入门之环境搭建
前言 我是一直致力于:.NET技术栈.WEB前端.架构设计相关的开发与管理工作,但因国内大环境影响及公司技术方向发生转变(由.NET全部转为JAVA),需要熟练掌握JAVA WEB相关的知识,故我也得 ...
- 【CentOS7】服务环境搭建
用了两天时间,完成了服务环境的搭建.记录下了搭建的过程,搭建细节并没有记录. 1.OpenSSH. (1)yum search ssh (2)yum install openssh-server (3 ...
- JsonServer服务环境搭建
在前后端分离的这种工作模式下,分工明确,各司其职.前端负责展示数据,后端提供数据.然而,在这种过程中对于接口的规范 需要提前制定好.例如根据规范提前模拟数据,这个时候就比较麻烦的.JsonServer ...
- SQL Server 2016 非域Aways On环境搭建
一.优点 aways on的优点,a. 构建主从数据库,分摊单点数据库压力.b.可以减少数据同步时间,提升用户体验.c.可以实现高可用,自动平滑切换. 二.缺点 及时同步最多只能提交3台,及时同步会导 ...
- Windows server 2003+IIS6+PHP5.4.45环境搭建教程
今天试了一下升级到PHP 5.4.45,但是却发现了不少问题.在以前PHP 5.2.X中,只需要使用php5isapi.dll的方式就可以,但在PHP 5.3以后却不再支持ISAPI模式了,也没有此文 ...
随机推荐
- bzoj千题计划245:bzoj1095: [ZJOI2007]Hide 捉迷藏
http://www.lydsy.com/JudgeOnline/problem.php?id=1095 查询最远点对,带修改 显然可以用动态点分治 对于每个点,维护两个堆 堆q1[x] 维护 点分树 ...
- 动手写IL到Lua的翻译器——准备
文章里的代码粘过来的时候格式有点问题,原因是一开始文章是在订阅号上写的(gamedev101,文末有二维码),不知道为啥贴过来就没了格式,还要手动删行号,就没搞了. 介绍下问题背景: 小说君正在参与的 ...
- R语言基础2
----------------------------------R语言学习与科研应用,科研作图,数据统计挖掘分析,群:719954246-------------------------- 通常, ...
- 更优雅的方式: JavaScript 中顺序执行异步函数
火于异步 1995年,当时最流行的浏览器--网景中开始运行 JavaScript (最初称为 LiveScript). 1996年,微软发布了 JScript 兼容 JavaScript.随着网景.微 ...
- Spring mvc中junit测试遇到com.mysql.jdbc.exceptions.jdbc4.MySQLSyntaxErrorException错误怎么解决
今天遇到图片中的错误,纠结了一下,弄清楚了怎么从控制台中读取错误信息,并修改错误. com.mysql.jdbc.exceptions.jdbc4.MySQLSyntaxErrorException: ...
- Thinkphp框架部署步骤
Thinkphp框架部署步骤 thinkphp框架部署起来简单,但是由于步骤较多也容易遗忘: 这是安装了集成环境后的一个www根目录结构: 然后需要在这个目录下面创建一个文件夹做项目:thinkphp ...
- Appium+python测试app实例
Appium和selenium差不到,只是一个用于测web,一个用于测APP.下面记录一下我搭的测试框架,同样是基于PO模式,用的unittest. 最后测试报告如下: 1.1 代码结构 这 ...
- angular路由守卫
路由守卫是指当用户满足了某些要求之后才可以离开或者进入某个页面或者场景的时候使用.比如说只有当用户填写了用户名和密码之后才可以进入首页,比如说用户离开某个页面时明月保存信息提示用户是否保存信息后再离 ...
- virtualbox中linux系统与windows实现共享文件夹
最近有一次,需要在linux获取在我windows系统里的安装包,但是呢不论如何也拿不过去. virtualbox虽然提供了双向拖放,但是实在是太不健壮了,感觉基本就没好使过. 于是我想到了用共享文件 ...
- 文本处理三剑客之sed
sed 1.简介 sed是一种流编辑器,它一次处理一行内容.处理时,把当前处理的行存储在临时缓冲区中,称为"模式空间"(patternspace),接着用sed命令处理缓冲区中的内 ...