ScrollView的顶部下拉和底部上拉回弹效果
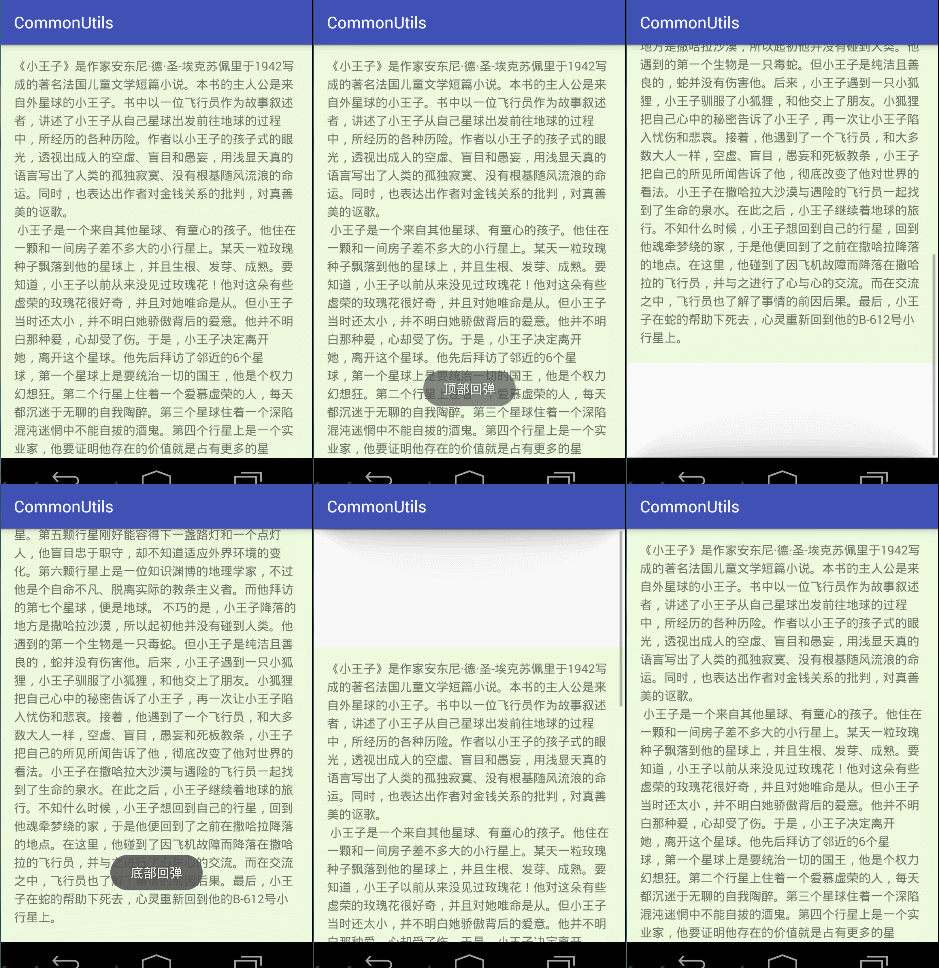
要实现ScrollView的回弹效果,需要对其进行触摸事件处理。先来看一下简单的效果:

根据Android的View事件分发处理机制,下面对dispatchTouchEvent进行详细分析:
在加载布局完成之后,获取ScrollView的第一个子元素,保存它的参数,left top right bottom参数,根据顶部下拉操作和底部上拉操作进行子View的布局参数根据滑动距离改变,ACTION_UP的时候判断是否存在回弹,如果需要则进行动画回弹到原来的位置,可以添加一个回弹结束监听,比如监听回弹处理跳转到其他的页面的操作等。
具体的实现如下,添加了是否禁用顶部和底部回弹的参数设置,以及回弹效果结束监听。
/**

 * A Simple Rebound ScrollView

 * @author Denluoyia

 */

public class ReboundScrollView extends ScrollView{

    private boolean mEnableTopRebound = true;

    private boolean mEnableBottomRebound = true;

    private OnReboundEndListener mOnReboundEndListener;

    private View mContentView;

    private Rect mRect = new Rect();

    public ReboundScrollView(Context context) {

        super(context);

    }

    public ReboundScrollView(Context context, AttributeSet attrs) {

        super(context, attrs);

    }

    public ReboundScrollView(Context context, AttributeSet attrs, int defStyleAttr) {

        super(context, attrs, defStyleAttr);

    }

    /** after inflating view, we can get the width and height of view */

    @Override

    protected void onFinishInflate() {

        super.onFinishInflate();

        mContentView = getChildAt(0);

    }

    @Override

    protected void onLayout(boolean changed, int l, int t, int r, int b) {

        super.onLayout(changed, l, t, r, b);

        if (mContentView == null) return;

        // to remember the location of mContentView

        mRect.set(mContentView.getLeft(), mContentView.getTop(), mContentView.getRight(), mContentView.getBottom());

    }

    public ReboundScrollView setOnReboundEndListener(OnReboundEndListener onReboundEndListener){

        this.mOnReboundEndListener = onReboundEndListener;

        return this;

    }

    public ReboundScrollView setEnableTopRebound(boolean enableTopRebound){

        this.mEnableTopRebound = enableTopRebound;

        return this;

    }

    public ReboundScrollView setEnableBottomRebound(boolean mEnableBottomRebound){

        this.mEnableBottomRebound = mEnableBottomRebound;

        return this;

    }

    private int lastY;

    private boolean rebound = false;

    private int reboundDirection = 0; //<0 表示下部回弹  >0 表示上部回弹 0表示不回弹

    @Override

    public boolean dispatchTouchEvent(MotionEvent ev) {

        if (mContentView == null){

            return super.dispatchTouchEvent(ev);

        }

        switch (ev.getAction()){

            case MotionEvent.ACTION_DOWN:

                lastY = (int) ev.getY();

                break;

            case MotionEvent.ACTION_MOVE:

                if (!isScrollToTop() && !isScrollToBottom()){

                    lastY = (int) ev.getY();

                    break;

                }

                //处于顶部或者底部

                int deltaY = (int) (ev.getY() - lastY);

                //deltaY > 0 下拉  deltaY < 0 上拉

                //disable top or bottom rebound

                if ((!mEnableTopRebound && deltaY > 0) || (!mEnableBottomRebound && deltaY < 0)){

                    break;

                }

                int offset = (int) (deltaY * 0.48);

                mContentView.layout(mRect.left, mRect.top + offset, mRect.right, mRect.bottom + offset);

                rebound = true;

                break;

            case MotionEvent.ACTION_UP:

                if (!rebound) break;

                reboundDirection = mContentView.getTop() - mRect.top;

                TranslateAnimation animation = new TranslateAnimation(0, 0, mContentView.getTop(), mRect.top);

                animation.setDuration(300);

                animation.setAnimationListener(new Animation.AnimationListener() {

                    @Override

                    public void onAnimationStart(Animation animation) {

                    }

                    @Override

                    public void onAnimationEnd(Animation animation) {

                        if (mOnReboundEndListener != null){

                           if (reboundDirection > 0){

                               mOnReboundEndListener.onReboundTopComplete();

                           }

                           if (reboundDirection < 0){

                               mOnReboundEndListener.onReboundBottomComplete();

                           }

                           reboundDirection = 0;

                        }

                    }

                    @Override

                    public void onAnimationRepeat(Animation animation) {

                    }

                });

                mContentView.startAnimation(animation);

                mContentView.layout(mRect.left, mRect.top, mRect.right, mRect.bottom);

                rebound = false;

                break;

        }

        return super.dispatchTouchEvent(ev);

    }

    @Override

    public void setFillViewport(boolean fillViewport) {

        super.setFillViewport(true); //默认是填充ScrollView 或者再XML布局文件中设置fillViewport属性

    }

    /**

     * 判断当前ScrollView是否处于顶部

     */

    private boolean isScrollToTop(){

        return getScrollY() == 0;

    }

    /**

     * 判断当前ScrollView是否已滑到底部

     */

    private boolean isScrollToBottom(){

        return mContentView.getHeight() <= getHeight() + getScrollY();

    }

    /**

     * listener for top and bottom rebound

     * do your implement in the following methods

     */

    public interface OnReboundEndListener{

        void onReboundTopComplete();

        void onReboundBottomComplete();

    }

}
使用:
直接在XML布局文件中把ScrollView替换成ReboundScrollView就可以了。还可以拓展把回弹顶部和底部添加其他的动画效果(之后再拓展试下)。
<?xml version="1.0" encoding="utf-8"?>

<LinearLayout xmlns:android="http://schemas.android.com/apk/res/android"

    xmlns:tools="http://schemas.android.com/tools"

    android:layout_width="match_parent"

    android:layout_height="match_parent"

    android:orientation="vertical"

    tools:context=".TestActivity">

    <com.denluoyia.dtils.widget.ReboundScrollView

        android:id="@+id/reboundScrollView"

        android:layout_width="match_parent"

        android:layout_height="match_parent">

        <LinearLayout

            android:layout_width="match_parent"

            android:layout_height="match_parent"

            android:background="#eefade"

            android:padding="16dp">

            <TextView

                android:layout_width="match_parent"

                android:layout_height="match_parent"

                android:textSize="15sp"

                android:lineSpacingExtra="5dp"

                android:text="@string/content"/>

        </LinearLayout>

    </com.denluoyia.dtils.widget.ReboundScrollView>

</LinearLayout>
如果需要禁用回弹,可以直接设置enableTopRebound和enableBottomRebound参数,同样设置回弹结束(或开始)监听。
public class TestActivity extends AppCompatActivity {

    private ReboundScrollView reboundScrollView;

    @Override

    protected void onCreate(Bundle savedInstanceState) {

        super.onCreate(savedInstanceState);

        setContentView(R.layout.activity_test);

        reboundScrollView = findViewById(R.id.reboundScrollView);

        //reboundScrollView.setEnableTopRebound(false);

        //reboundScrollView.setEnableBottomRebound(false);

        reboundScrollView.setOnReboundEndListener(new ReboundScrollView.OnReboundEndListener() {

            @Override

            public void onReboundTopComplete() {

                Toast.makeText(TestActivity.this, "顶部回弹", Toast.LENGTH_SHORT).show();

            }

            @Override

            public void onReboundBottomComplete() {

                Toast.makeText(TestActivity.this, "底部回弹", Toast.LENGTH_SHORT).show();

            }

        });

    }

}
ScrollView的顶部下拉和底部上拉回弹效果的更多相关文章
- 微信小程序开发之 下拉刷新,上拉加载更多
本文记载了如何在微信小程序里面实现下拉刷新,上拉加载更多 先开看一下界面 大致如此的界面吧. 这个Demo使用了微信的几个Api和事件,我先列出来. 1.wx.request (获取远程服务器的数据, ...
- ListView下拉刷新及上拉更多两种状态
一.前言: 很多应用都会用到ListView,当然如果是iOS就会用UITableViewController,这两个控件在不同的OS上,功能是一样的,只是有些细微的不同(iOS的UITableVie ...
- Taro下拉刷新,上拉加载更多
1.引入插件 import Taro, { Component } from '@tarojs/taro' import { View, Text, ScrollView } from '@taroj ...
- react + iscroll5 实现完美 下拉刷新,上拉加载
经过几天的反复折腾,总算做出一个体验还不错的列表页了,主要支持了下拉刷新,上拉加载两个功能. 一开始直接采用了react-iscroll插件,它是基于iscroll插件开发的组件.但是开发过程中,发现 ...
- Android打造(ListView、GridView等)通用的下拉刷新、上拉自动加载的组件
原文 http://blog.csdn.net/bboyfeiyu/article/details/39253051 前言 下 拉刷新组件在开发中使用率是非常高的,基本上联网的APP都会采 ...
- DCloud-MUI:下拉刷新、上拉加载
ylbtech-DCloud-MUI:下拉刷新.上拉加载 1. 下拉刷新返回顶部 0. http://dev.dcloud.net.cn/mui/pulldown/ 1. 概述 为实现下拉刷新功能,大 ...
- 【Android - 自定义View】之自定义可下拉刷新或上拉加载的ListView
首先来介绍一下这个自定义View: (1)这个自定义View的名称叫做 RefreshableListView ,继承自ListView类: (2)在这个自定义View中,用户可以设置是否支持下拉刷新 ...
- vue移动端下拉刷新、上拉加载
由于自身的项目比较简单,只有几个H5页面,用来嵌入app中,所有没有引入移动端的UI框架,但是介于能让用户在浏览H5页面时有下拉刷新和上拉加载,有更好的用户体验,自己写组件实现. 1.下拉刷新Drop ...
- iOS MJRefresh下拉刷新(上拉加载)使用详解
下拉刷新控件目前比较火的有好几种,本人用过MJRefresh 和 SVPullToRefresh,相对而言,前者比后者可定制化.拓展新都更高一点. 因此本文着重讲一下MJRefresh的简单用法. 导 ...
随机推荐
- Dynamics CRM 2013 Homepage Ribbon 按钮引用多个Javascript资源
在CRM的开发中ribbon的开发是比较重要的一环,很多客制化的功能都需要动用ribbon区,CRM2013中的名字已经改叫command bar了,但从老版本过来的人都还是习惯叫他ribbon. R ...
- Oracle dblink详解
database link概述 database link是定义一个数据库到另一个数据库的路径的对象,database link允许你查询远程表及执行远程程序.在任何分布式环境里,databas ...
- 【C++知识点】单例模式的简单实现
单例模式是最常见,也是使用最广泛的一种设计模式,其意图是保证一个类仅有一个实例,并提供一个访问它的全局访问点,该实例被所有程序模块共享. 单例模式的实现方法有很多种,本文只给出一个最简单的实现,如下: ...
- Android进阶(十三)网络爬虫&json应用
刚开始接触网络爬虫,怎一个"菜"字了得!经过几次的折磨,对其原理以及其中用到的json技术有了大致的了解,故作一总结,供有同样迷惑的朋友参考学习. 自己爬取的网站内容为12306的 ...
- 【unix网络编程第三版】阅读笔记(二):套接字编程简介
unp第二章主要将了TCP和UDP的简介,这些在<TCP/IP详解>和<计算机网络>等书中有很多细致的讲解,可以参考本人的这篇博客[计算机网络 第五版]阅读笔记之五:运输层,这 ...
- ROS_Kinetic_16 ubuntu中安装使用Matlab和ROS
ROS_Kinetic_16 ubuntu(16.04)中安装使用Matlab(2015b)和ROS(kinetic) 参考网址:http://cn.mathworks.com/hardware-su ...
- 图文浅析APK程序运行的过程
概述 APK程序运行过程有别于FrameWork底层启动过程,它们是倆码事,本文将以图文方式总结一下APK启动的过程,主要分为一下部分 [1]基本概念 [2]APK过程 1 .新的知识点 [1]什么是 ...
- mongoDB基本使用(二)
数据库基本操作 连接到mongoDB服务器 ./bin/mongo 127.0.0.1:12345 查看当前数据库 > show dbs admin (empty) local 0.078 ...
- Python学习 - 输入和输出
#输出 print('hello, python') print('The quick brown fox', 'jumps over', 'the lazy dog') #多个字符串,用逗号隔开,就 ...
- python模块:调用系统命令模块subprocess等
http://blog.csdn.net/pipisorry/article/details/46972171 Python经常被称作"胶水语言",因为它能够轻易地操作其他程序,轻 ...
