
zabbix批量监控urls的状态码
.添加url监控脚本

[root@node1 usr]# vim /usr/local/zabbix_agents_3.2.0/scripts/web_site_code_status.sh

#!/bin/bash

UrlFile="/usr/local/zabbix_agents_3.2.0/scripts/WEB.txt"

IFS=$'\n'

web_site_discovery () {

    WEB_SITE=($(cat $UrlFile|grep -v "^#"))

    printf '{\n'

    printf '\t"data":[\n'

    num=${#WEB_SITE[@]}

    for site in ${WEB_SITE[@]}

    do

        num=$(( $num -  ))

        url=$(echo $site|awk '{print $1}')

        ip=$(echo $site|awk '{print $2}')

        if [ $num -ne  ] ; then

            printf "\t\t{\"{#SITENAME}\":\""%s"\",\"{#PROXYIP}\":\""${ip}"\"},\n" ${url}

        else

            printf "\t\t{\"{#SITENAME}\":\""%s"\",\"{#PROXYIP}\":\""${ip}"\"}\n" ${url}

            printf '\t]\n'

            printf '}\n'

        fi

    done

}

web_site_code () {

    if [ "$2" == "" ]; then

        curl -s -k --connect-timeout  -m  -o /dev/null -w %{http_code} "https://$1"

    elif echo $ |grep ':' &>/dev/null ; then

        curl -s -k --connect-timeout  -m  -o /dev/null -w %{http_code} "https://$1" -x $

    else

        curl -s -k --connect-timeout  -m  -o /dev/null -w %{http_code} "https://$1" -x $:

    fi

}

case "$1" in

    web_site_discovery)

        web_site_discovery

        ;;

    web_site_code)

        web_site_code $ $

        ;;

    *)

        echo "Usage:$0 {web_site_discovery|web_site_code [URL]}"

        ;;

esac

[root@node1 usr]# chmod +x /usr/local/zabbix_agents_3.2.0/scripts/web_site_code_status.sh

.在zabbix客户端加配置文件:

zabbix-agent中打开配置

Include=/usr/local/zabbix_agents_3.2.0/conf/zabbix_agentd/*.conf

vim /usr/local/zabbix_agents_3.2.0/conf/zabbix_agentd/web_site_discovery.conf

UserParameter=web.site.discovery,/usr/local/zabbix_agents_3.2.0/scripts/web_site_code_status.sh web_site_discovery

UserParameter=web.site.code[*],/usr/local/zabbix_agents_3.2.0/scripts/web_site_code_status.sh web_site_code $1 $2

[root@node1 usr]# cat /usr/local/zabbix_agents_3.2.0/scripts/WEB.txt

http://www.baidu.com

http://www.sina.com.cn

http://www.163.com 10.10.10.10

http://www.sohu.com 115.23.16.97:80

http://www.111.com

# 客户端测试

[root@account_web03:~]# /usr/local/zabbix_agents_3.2.0/scripts/web_site_code_status.sh web_site_discovery

{

    "data":[

        {"{#SITENAME}":"www.wondershare.com","{#PROXYIP}":""},

        {"{#SITENAME}":"www.wondershare.net","{#PROXYIP}":""},

        {"{#SITENAME}":"www.wondershare.jp","{#PROXYIP}":""},

        {"{#SITENAME}":"www.wondershare.de","{#PROXYIP}":""},

# 服务端测试

[root@node5 ~]# zabbix_get -s 10.11.0.210 -k 'web.site.discovery'

{

    "data":[

        {"{#SITENAME}":"http://www.baidu.com","{#PROXYIP}":""},

        {"{#SITENAME}":"http://www.sina.com.cn","{#PROXYIP}":""},

        {"{#SITENAME}":"http://www.163.com","{#PROXYIP}":"10.10.10.10"},

        {"{#SITENAME}":"http://www.sohu.com","{#PROXYIP}":"115.23.16.97:80"},

        {"{#SITENAME}":"http://www.111.com","{#PROXYIP}":""}

    ]

}

被监控端 zabbix_Agentd.conf 的配置调整:

ServerActive=*.*.*.*    #zabbix_server的ip

Hostname=agent_host_name    #重要:主机名

RefreshActiveChecks=1800    #被监控端到服务器获取监控项的周期

BufferSize=200        #被监控端存储监控信息的空间大小

Timeout=10            #超时时间

比较重要的参数是ServerActive和Hostname,ServerActive是指定Agentd收集的数据往哪里发送,Hostname是必须要和Server端添加主机时的主机名一样,这样Server端接收到数据才能找到对应关系。

3.服务端配置,导入自动发现的模板
4.也可以自定义item,具体如下:
触发器另外的写法,5次触发:
{urls_monitor_rsync:web.site.code[{#SITENAME},].count(#5,200,"eq")}=0 and {urls_monitor_rsync:web.site.code[{#SITENAME},].count(#5,301,"eq")}=0
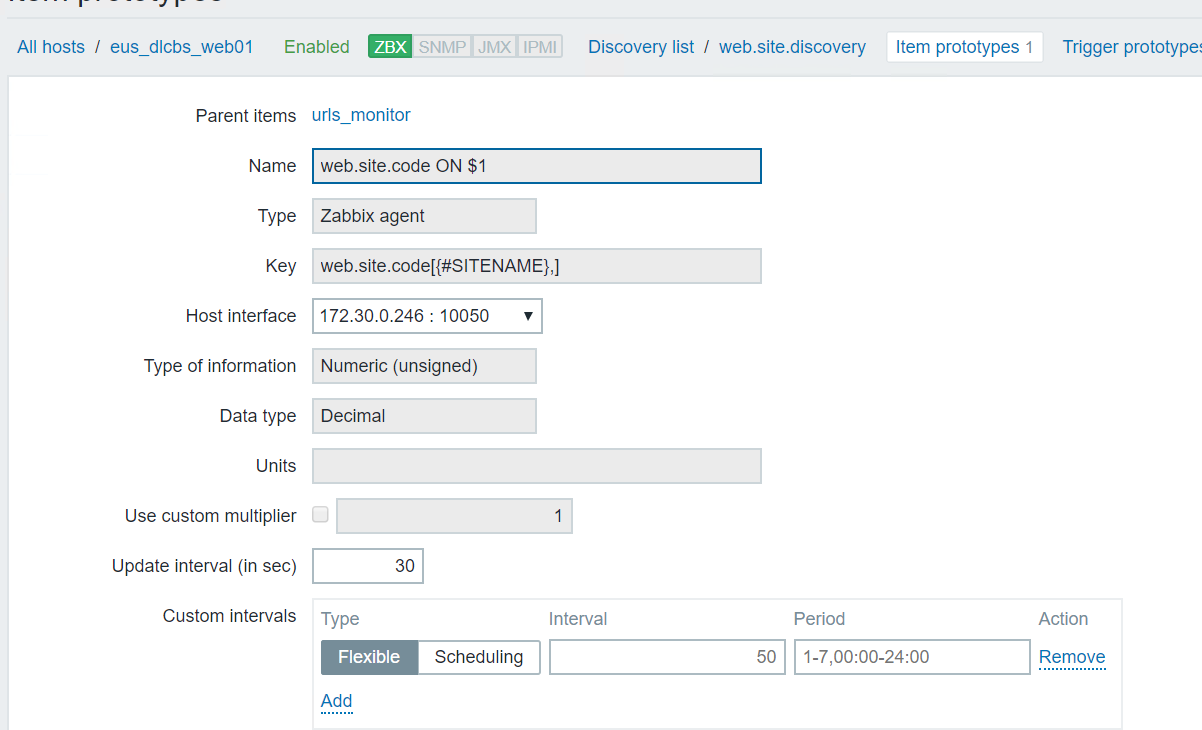
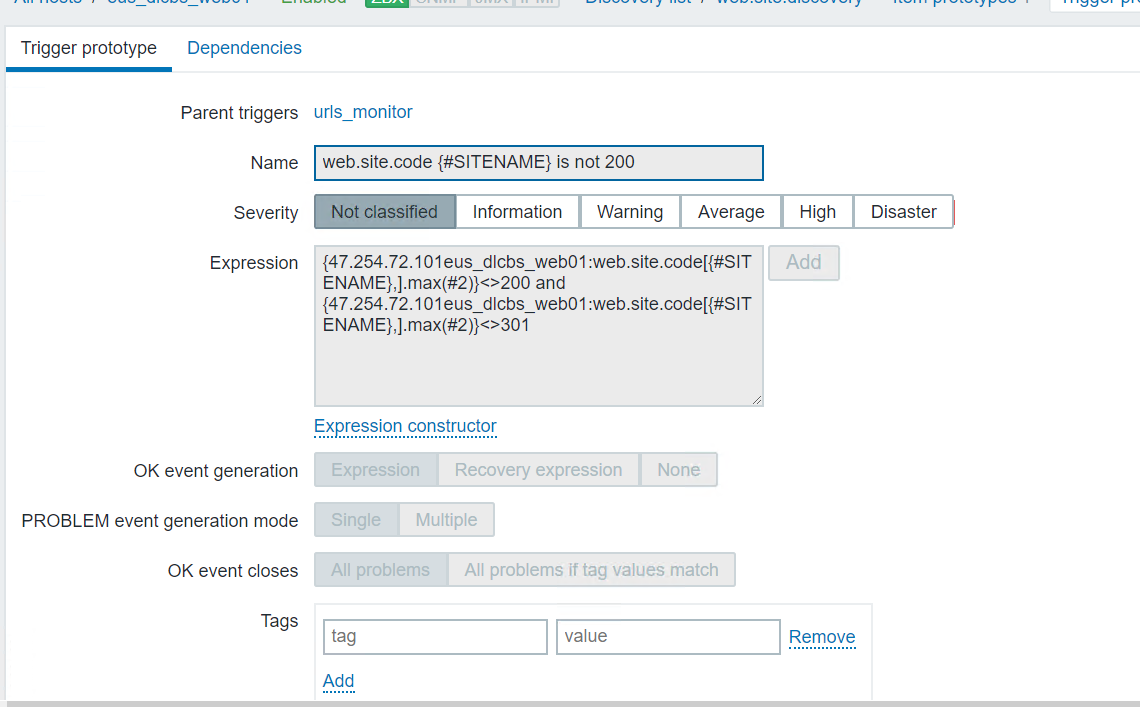
自动发现模板
<?xml version="1.0" encoding="UTF-8"?>
<zabbix_export>
<version>3.4</version>
<date>--14T01::17Z</date>
<groups>
<group>
<name>Templates</name>
</group>
</groups>
<templates>
<template>
<template>Template Web Monitor_active</template>
<name>Template Web Monitor_active</name>
<description/>
<groups>
<group>
<name>Templates</name>
</group>
</groups>
<applications>
<application>
<name>web_monitor</name>
</application>
</applications>
<items/>
<discovery_rules>
<discovery_rule>
<name>web.site.discovery</name>
<type></type>
<snmp_community/>
<snmp_oid/>
<key>web.site.discovery</key>
<delay></delay>
<status></status>
<allowed_hosts/>
<snmpv3_contextname/>
<snmpv3_securityname/>
<snmpv3_securitylevel></snmpv3_securitylevel>
<snmpv3_authprotocol></snmpv3_authprotocol>
<snmpv3_authpassphrase/>
<snmpv3_privprotocol></snmpv3_privprotocol>
<snmpv3_privpassphrase/>
<params/>
<ipmi_sensor/>
<authtype></authtype>
<username/>
<password/>
<publickey/>
<privatekey/>
<port/>
<filter>
<evaltype></evaltype>
<formula/>
<conditions/>
</filter>
<lifetime>30d</lifetime>
<description/>
<item_prototypes>
<item_prototype>
<name>monitor_site $ $ response code</name>
<type></type>
<snmp_community/>
<snmp_oid/>
<key>web.site.code[{#SITENAME},{#PROXYIP}]</key>
<delay></delay>
<history>7d</history>
<trends>365d</trends>
<status></status>
<value_type></value_type>
<allowed_hosts/>
<units/>
<snmpv3_contextname/>
<snmpv3_securityname/>
<snmpv3_securitylevel></snmpv3_securitylevel>
<snmpv3_authprotocol></snmpv3_authprotocol>
<snmpv3_authpassphrase/>
<snmpv3_privprotocol></snmpv3_privprotocol>
<snmpv3_privpassphrase/>
<params/>
<ipmi_sensor/>
<authtype></authtype>
<username/>
<password/>
<publickey/>
<privatekey/>
<port/>
<description/>
<inventory_link></inventory_link>
<applications>
<application>
<name>web_monitor</name>
</application>
</applications>
<valuemap/>
<logtimefmt/>
<preprocessing/>
<jmx_endpoint/>
<application_prototypes/>
<master_item_prototype/>
</item_prototype>
</item_prototypes>
<trigger_prototypes>
<trigger_prototype>
<expression>{Template Web Monitor_active:web.site.code[{#SITENAME},{#PROXYIP}].last()}<> and {Template Web Monitor_active:web.site.code[{#SITENAME},{#PROXYIP}].last()}<></expression>
<recovery_mode></recovery_mode>
<recovery_expression/>
<name>web_monitor {#SITENAME} {#PROXYIP}</name>
<correlation_mode></correlation_mode>
<correlation_tag/>
<url/>
<status></status>
<priority></priority>
<description/>
<type></type>
<manual_close></manual_close>
<dependencies/>
<tags/>
</trigger_prototype>
</trigger_prototypes>
<graph_prototypes/>
<host_prototypes/>
<jmx_endpoint/>
</discovery_rule>
</discovery_rules>
<httptests/>
<macros/>
<templates/>
<screens/>
</template>
</templates>
</zabbix_export>
zabbix批量监控urls的状态码的更多相关文章
- 云监控自定义HTTP状态码说明
您在使用站点监控时,返回的6XX状态码均为云监控自定义HTTP状态码,具体含义如下表所示: 状态码 含义 备注 610 HTTP连接超时 监测点探测您的网站时出现连接超 ...
- zabbix监控nginx日志状态码
监控需求 监控Nginx常见的状态码并对其进行监控,对常见的错误状态码创建相对应的触发器以下按照分钟对数据进行抓取 Zabbix_Agentd创建监控脚本 1)创建脚本之前核对Nginx日志格式我这里 ...
- zabbix批量监控域名下nginx的访问50x状态码数量
背景: 购物车相关的站点某些页面经常出现502,如果超过一些阈值则需要报警给管理员知道 .自动发现脚本的编写 # vim /usr/local/zabbix_agents_3.2.0/scripts/ ...
- zabbix3.2自动发现批量监控redis端口状态
使用nmap提示被防火墙阻挡,实际没有启用防火墙 [root@eus_chinasoft_haproxy:/usr/local/aegis]# nmap 172.20.103.202 -p 7000 ...
- zabbix监控nginx连接状态(转)
zabbix监控nginx zabbix可以监控nginx的状态,关于一个服务的状态可以查看服务本身的状态(版本号.是否开启),还应该关注服务能力(例如以nginx的负载效果:连接数.请求数和句柄数) ...
- zabbix自动发现 url 以及对http返回状态码监控实现 告警
2019-06-04 18:39:12 目的:批量监控业务URL的返回状态码,通过zabbix监控判断业务好坏. 1.zabbix安装 请查看此永久链接:https://www.cnblogs.com ...
- shell批量监控网站状态码
shell批量监控网站状态码脚本,使用curl很慢.等我学完其他方式,在来更新. #!/bin/bash #GuoYabin yuming=`/bin/cat yuming.txt` for i in ...
- ZABBIX监控mysql主从状态
模板如下 <zabbix_export> <version>3.4</version> <date>2018-11-30T08:28:28Z</d ...
- Zabbix监控Low level discovery实时监控网站URL状态
今天我们来聊一聊Low level discovery这个功能,我们为什么要用到loe level discovery这个功能呢? 很多时候,在使用zabbix监控一些东西,需要对类似于Itens进行 ...
随机推荐
- spring-data-redis集成ehcache实现缓存
1.结构 2.pom.xml <?xml version="1.0" encoding="UTF-8"?><project xmlns=&qu ...
- 阅读:ECMAScript 6 入门(4)
参考 ECMAScript 6 入门 ES6新特性概览 ES6 全套教程 ECMAScript6 (原著:阮一峰) JavaScript 教程 重新介绍 JavaScript(JS 教程) 数组的扩展 ...
- Jmeter测试报告生成
Jmeter测试报告生成 本文使用的 Jmeter 版本为 apache-jmeter-3.2 1. 命令行模式将 jtl 文件转成测试图表 注意: 这种方式只适用于jmeter3.0以后的版本 1. ...
- Java基础高级部分(一)
1. 集合部分 1.1 HashMap排序 package cn.Douzi.hashMap01; import java.util.ArrayList; import java.util.Colle ...
- java 写一个 map reduce 矩阵相乘的案例
1.写一个工具类用来生成 map reduce 实验 所需 input 文件 下面两个是原始文件 matrix1.txt 1 2 -2 0 3 3 4 -3 -2 0 2 3 5 3 -1 2 -4 ...
- 外部程序调用Django模块的解决办法
Question django.core.exceptions.ImproperlyConfigured: Requested setting CACHES, but settings are not ...
- U盘中毒后变为快捷方式的解决方法
今天神奇地发现,如果U盘中毒后,变为快捷方式,那么你可以有三种解决方法: (1)在网上下一个脚本程序,将文件恢复: (2)使用U盘查杀的工具,一般的工具应该有U盘文件恢复这一项,比如金山的杀毒软件: ...
- Noisy Channel模型纠正单词拼写错误
本文介绍 Stanford<From Languages to Information>课程中讲到的 单词拼写错误 纠正.背后的数学原理主要是贝叶斯公式.单词拼写错误纠正主要涉及到两个模型 ...
- [译]Walkthrough: Using MSBuild
原文 MSBuild是微软VS的Build平台. 你可以在Visual Studio或Windows命令行中运行MSBuild.在这我们使用VS创建一个MSBuild项目.你可以在VS中编辑项目文件, ...
- Filter 快速开始 异步Servlet 异步请求 AsyncContext 异步线程 异步派发 过滤器拦截
[web.xml] <filter> <filter-name>normalFilter</filter-name> <filter-class>net ...