
4、Qt Project之串口数据传输
串口数据传输:
Step1:串口数据的发送和接收过程,我们需要单独的添加串口的相关模块进去,模块名称叫做serialport,我们需要建立的工程是QMainWindow的基类程序,不是QWidget程序
我们添加的位置是在xxx.pro文件当中,改文件如前所述,是包含当前工程所需要的核心模块的文件:
QT += core gui serialport
这里添加了core、gui、serialprot三个核心需要使用到的模块。
Step2:完成整个串口通讯程序的UI界面的设计工作:
<?xml version="1.0" encoding="UTF-8"?>

<ui version="4.0">

 <class>MainWindow</class>

 <widget class="QMainWindow" name="MainWindow">

  <property name="geometry">

   <rect>

    <x>0</x>

    <y>0</y>

    <width>473</width>

    <height>382</height>

   </rect>

  </property>

  <property name="windowTitle">

   <string>MainWindow</string>

  </property>

  <widget class="QWidget" name="centralWidget">

   <widget class="QLabel" name="label_6">

    <property name="geometry">

     <rect>

      <x>0</x>

      <y>0</y>

      <width>321</width>

      <height>51</height>

     </rect>

    </property>

    <property name="font">

     <font>

      <pointsize>28</pointsize>

      <italic>true</italic>

      <underline>false</underline>

      <strikeout>false</strikeout>

     </font>

    </property>

    <property name="cursor">

     <cursorShape>BlankCursor</cursorShape>

    </property>

    <property name="text">

     <string>Qt interface Demo!</string>

    </property>

    <property name="alignment">

     <set>Qt::AlignCenter</set>

    </property>

   </widget>

   <widget class="QLabel" name="label_5">

    <property name="geometry">

     <rect>

      <x>0</x>

      <y>50</y>

      <width>171</width>

      <height>51</height>

     </rect>

    </property>

    <property name="font">

     <font>

      <pointsize>16</pointsize>

      <italic>true</italic>

      <underline>false</underline>

      <strikeout>false</strikeout>

     </font>

    </property>

    <property name="cursor">

     <cursorShape>BlankCursor</cursorShape>

    </property>

    <property name="text">

     <string>SerialPort Control</string>

    </property>

    <property name="alignment">

     <set>Qt::AlignCenter</set>

    </property>

   </widget>

   <widget class="QLabel" name="label_4">

    <property name="geometry">

     <rect>

      <x>10</x>

      <y>100</y>

      <width>171</width>

      <height>21</height>

     </rect>

    </property>

    <property name="font">

     <font>

      <pointsize>10</pointsize>

      <italic>true</italic>

      <underline>false</underline>

      <strikeout>false</strikeout>

     </font>

    </property>

    <property name="cursor">

     <cursorShape>BlankCursor</cursorShape>

    </property>

    <property name="text">

     <string>Designed by : mm1994uestc</string>

    </property>

    <property name="alignment">

     <set>Qt::AlignCenter</set>

    </property>

   </widget>

   <widget class="QLabel" name="label">

    <property name="geometry">

     <rect>

      <x>10</x>

      <y>210</y>

      <width>91</width>

      <height>17</height>

     </rect>

    </property>

    <property name="text">

     <string>Send Content</string>

    </property>

   </widget>

   <widget class="QLabel" name="label_2">

    <property name="geometry">

     <rect>

      <x>0</x>

      <y>250</y>

      <width>111</width>

      <height>17</height>

     </rect>

    </property>

    <property name="text">

     <string>Recieve Content</string>

    </property>

   </widget>

   <widget class="QTextEdit" name="Send_Text">

    <property name="geometry">

     <rect>

      <x>120</x>

      <y>200</y>

      <width>231</width>

      <height>31</height>

     </rect>

    </property>

   </widget>

   <widget class="QTextEdit" name="Recieve_Text">

    <property name="geometry">

     <rect>

      <x>120</x>

      <y>240</y>

      <width>231</width>

      <height>81</height>

     </rect>

    </property>

   </widget>

   <widget class="QPushButton" name="Send">

    <property name="geometry">

     <rect>

      <x>360</x>

      <y>200</y>

      <width>98</width>

      <height>27</height>

     </rect>

    </property>

    <property name="text">

     <string>SEND</string>

    </property>

   </widget>

   <widget class="QPushButton" name="Clear">

    <property name="geometry">

     <rect>

      <x>360</x>

      <y>260</y>

      <width>98</width>

      <height>27</height>

     </rect>

    </property>

    <property name="text">

     <string>CLEAR</string>

    </property>

   </widget>

   <widget class="QComboBox" name="BaudRate">

    <property name="geometry">

     <rect>

      <x>280</x>

      <y>80</y>

      <width>78</width>

      <height>27</height>

     </rect>

    </property>

    <item>

     <property name="text">

      <string>115200</string>

     </property>

    </item>

    <item>

     <property name="text">

      <string>57600</string>

     </prop

19:41:19 收到数据:erty>

    </item>

    <item>

     <property name="text">

      <string>38400</string>

     </property>

    </item>

    <item>

     <property name="text">

      <string>19200</string>

     </property>

    </item>

    <item>

     <property name="text">

      <string>9600</string>

     </property>

    </item>

    <item>

     <property name="text">

      <string>4800</string>

     </property>

    </item>

    <item>

     <property name="text">

      <string>2400</string>

     </property>

    </item>

    <item>

     <property name="text">

      <string>1200</string>

     </property>

    </item>

   </widget>

   <widget class="QLabel" name="label_3">

    <property name="geometry">

     <rect>

      <x>290</x>

      <y>60</y>

      <width>61</width>

      <height>17</height>

     </rect>

    </property>

    <property name="text">

     <string>Baud Set</string>

    </property>

   </widget>

   <widget class="QLabel" name="label_7">

    <property name="geometry">

     <rect>

      <x>200</x>

      <y>60</y>

      <width>65</width>

      <height>17</height>

     </rect>

    </property>

    <property name="text">

     <string>Port Set</string>

    </property>

   </widget>

   <widget class="QComboBox" name="Port_Set">

    <property name="geometry">

     <rect>

      <x>190</x>

      <y>80</y>

      <width>78</width>

      <height>27</height>

     </rect>

    </property>

   </widget>

   <widget class="QComboBox" name="DataBit">

    <property name="geometry">

     <rect>

      <x>380</x>

      <y>80</y>

      <width>78</width>

      <height>27</height>

     </rect>

    </property>

    <item>

     <property name="text">

      <string>8</string>

     </property>

    </item>

    <item>

     <property name="text">

      <string>7</string>

     </property>

    </item>

    <item>

     <property name="text">

      <string>6</string>

     </property>

    </item>

    <item>

     <property name="text">

      <string>5</string>

     </property>

    </item>

   </widget>

   <widget class="QLabel" name="label_8">

    <property name="geometry">

     <rect>

      <x>390</x>

      <y>60</y>

      <width>61</width>

      <height>17</height>

     </rect>

    </property>

    <property name="text">

     <string>Data Bit</string>

    </property>

   </widget>

   <widget class="QComboBox" name="CheckBit">

    <property name="geometry">

     <rect>

      <x>190</x>

      <y>150</y>

      <width>78</width>

      <height>27</height>

     </rect>

    </property>

    <item>

     <property name="text">

      <string>None</string>

     </property>

    </item>

    <item>

     <property name="text">

      <string>Even</string>

     </property>

    </item>

    <item>

     <property name="text">

      <string>Odd</string>

     </property>

    </item>

    <item>

     <property name="text">

      <string>Mark</string>

     </property>

    </item>

    <item>

     <property name="text">

      <string>Space</string>

     </property>

    </item>

   </widget>

   <widget class="QLabel" name="label_9">

    <property name="geometry">

     <rect>

      <x>190</x>

      <y>130</y>

      <width>81</width>

      <height>20</height>

     </rect>

    </property>

    <property name="text">

     <string>Data Parity</string>

    </property>

   </widget>

   <widget class="QComboBox" name="StopBit">

    <property name="geometry">

     <rect>

      <x>280</x>

      <y>150</y>

      <width>78</width>

      <height>27</height>

     </rect>

    </property>

    <item>

     <property name="text">

      <string>1</string>

     </property>

    </item>

    <item>

     <property name="text">

      <string>1.5</string>

     </property>

    </item>

    <item>

     <property name="text">

      <string>2</string>

     </property>

    </item>

   </widget>

   <widget class="QLabel" name="label_10">

    <property name="geometry">

     <rect>

      <x>290</x>

      <y>130</y>

      <width>61</width>

      <height>17</height>

     </rect>

    </property>

    <property name="text">

     <string>Stop Bit</string>

    </property>

   </widget>

   <widget class="QComboBox" name="Stream">

    <property name="geometry">

     <rect>

      <x>380</x>

      <y>150</y>

      <width>78</width>

      <height>27</height>

     </rect>

    </property>

    <item>

     <property name="text">

      <string>NoFlowCtl</string>

     </property>

    </item>

    <item>

     <property name="text">

      <string>SoftWareCtl</string>

     </property>

    </item>

    <item>

     <property name="text">

      <string>HardWareCtl</string>

     </property>

    </item>

   </widget>

   <widget class="QLabel" name="label_11">

    <property name="geometry">

     <rect>

      <x>370</x>

      <y>130</y>

      <width>121</width>

      <height>17</height>

     </rect>

    </property>

    <property name="text">

     <string>Stream Control</string>

    </property>

   </widget>

   <widget class="QPushButton" name="Start_Stop_Button">

    <property name="geometry">

     <rect>

      <x>20</x>

      <y>130</y>

      <width>71</width>

      <height>71</height>

     </rect>

    </property>

    <property name="text">

     <string>Start/Stop</string>

    </property>

   </widget>

  </widget>

  <widget class="QMenuBar" name="menuBar">

   <property name="geometry">

    <rect>

     <x>0</x>

     <y>0</y>

     <width>473</width>

     <height>25</height>

    </rect>

   </property>

  </widget>

  <widget class="QToolBar" name="mainToolBar">

   <attribute name="toolBarArea">

    <enum>TopToolBarArea</enum>

   </attribute>

   <attribute name="toolBarBreak">

    <bool>false</bool>

   </attribute>

  </widget>

  <widget class="QStatusBar" name="statusBar"/>

 </widget>

 <layoutdefault spacing="6" margin="11"/>

 <resources/>

 <connections/>

</ui>
整个界面的大致情况如下所示:
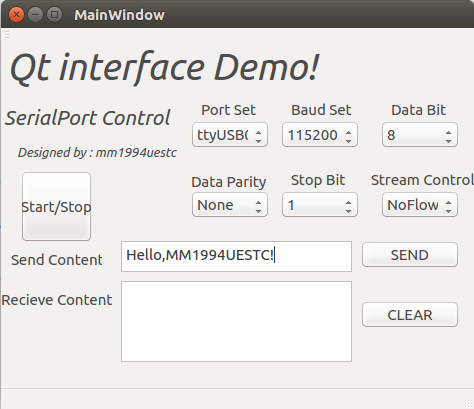 这里,我们已经看到了程序读取到的串口好:ttyUSB0这个串口
Step3:根据上面完成的界面,我们需要在mainwindow.cpp文件中实现每一个按键的触发信号和槽函数的实现,并使用connect函数见他们连接起来
void MainWindow::Read_Data()
void MainWindow::Read_Data()

{

    QByteArray buf;

    buf = PortParam.readAll();

    if(!buf.isEmpty())

    {

        QString str = this->ui->Recieve_Text->toPlainText();

        str += tr(buf);

        this->ui->Recieve_Text->clear();

        this->ui->Recieve_Text->append(str);

    }

    buf.clear();

}
void MainWindow::on_Start_Stop_Button_clicked(bool checked) //on_Port_Set_currentIndexChanged
void MainWindow::on_Start_Stop_Button_clicked(bool checked) //on_Port_Set_currentIndexChanged

{

    if(Start_Stop)

    {

        foreach (const QSerialPortInfo &info, QSerialPortInfo::availablePorts()) {

            qDebug() << "Name :" << info.portName();

            qDebug() << "Discription :" << info.description();

            qDebug() << "Manufacturer :" << info.manufacturer();

        }

        QString Port_Select = this->ui->Port_Set->currentText();

        int Port_BaudRate = this->ui->BaudRate->currentIndex();

        int Data_Bit = this->ui->DataBit->currentIndex();

        int Check_Bit = this->ui->CheckBit->currentIndex();

        int Stop_Bit = this->ui->StopBit->currentIndex();

        int Stream_Contrl = this->ui->Stream->currentIndex();

        QSerialPort::BaudRate baudrate;

        switch (Port_BaudRate) {

        case 0: baudrate = QSerialPort::Baud115200; break;

        case 1: baudrate = QSerialPort::Baud57600; break;

        case 2: baudrate = QSerialPort::Baud38400; break;

        case 3: baudrate = QSerialPort::Baud19200; break;

        case 4: baudrate = QSerialPort::Baud9600; break;

        case 5: baudrate = QSerialPort::Baud4800; break;

        case 6: baudrate = QSerialPort::Baud2400; break;

        case 7: baudrate = QSerialPort::Baud1200; break;

        default: break;

        }

        QSerialPort::DataBits databit;

        switch(Data_Bit){

        case 0: databit = QSerialPort::Data5; break;

        case 1: databit = QSerialPort::Data6; break;

        case 2: databit = QSerialPort::Data7; break;

        case 3: databit = QSerialPort::Data8; break;

        default: break;

        }

        QSerialPort::FlowControl flowcontrol;

        switch(Stream_Contrl){

        case 0: flowcontrol = QSerialPort::NoFlowControl; break;

        case 1: flowcontrol = QSerialPort::SoftwareControl; break;

        case 2: flowcontrol = QSerialPort::HardwareControl; break;

        default : break;

        }

        QSerialPort::StopBits stopbit;

        switch(Stop_Bit){

        case 0: stopbit = QSerialPort::OneStop; break;

        case 1: stopbit = QSerialPort::TwoStop; break;

        case 2: stopbit = QSerialPort::OneAndHalfStop; break;

        default: break;

        }

        QSerialPort::Parity checkbit;

        switch(Check_Bit){

        case 0: checkbit = QSerialPort::NoParity; break;

        case 1: checkbit = QSerialPort::EvenParity; break;

        case 2: checkbit = QSerialPort::OddParity; break;

        case 3: checkbit = QSerialPort::MarkParity; break;

        case 4: checkbit = QSerialPort::SpaceParity; break;

        default: break;

        }

        qDebug() << "BaudRate:" << Port_BaudRate;

        qDebug() << "Data Bit:" << Data_Bit;

        qDebug() << "Stop Bit:" << Stop_Bit;

        qDebug() << "FlowControl:" << Stream_Contrl;

        qDebug() << "Data Parity:" << Check_Bit;

        foreach (const QSerialPortInfo &info, QSerialPortInfo::availablePorts()) {

            if(info.portName() == Port_Select)

            {

                PortParam.setPort(info); //Set Serial Port

                PortParam.setPortName(Port_Select);

                if(PortParam.open(QIODevice::ReadWrite))

                {

                    PortParam.setBaudRate(baudrate); //Set Serial Port BaudRate

                    PortParam.setDataBits(databit); // Set Port Data Bit

                    PortParam.setFlowControl(flowcontrol);

                    PortParam.setStopBits(stopbit);

                    PortParam.setParity(checkbit);

                    QObject::connect(&PortParam,&QSerialPort::readyRead,this,&MainWindow::Read_Data);

                    PortParam.clearError();

                    PortParam.clear();

                    qDebug() << "Port Opened!";

                }else

                {

                    qDebug() << "No port Opened!";

                }

            }

        }

    }else

    {

        PortParam.close();

        qDebug() << "Port Closed!";

    }

    Start_Stop = !Start_Stop;

}
void MainWindow::on_Send_clicked(bool checked)
void MainWindow::on_Send_clicked(bool checked)

{

    QString T;

    QByteArray Temp;

    char *Data;

    int len,i;

    len = this->ui->Send_Text->toPlainText().size();

    T = this->ui->Send_Text->toPlainText();

    Temp = T.toLatin1();

    Data = Temp.data();

    qDebug() << len;

    qDebug() << T;

    for(i=0;i<len;i++)

    {

        qDebug() << Data[i];

    }

    qDebug() << Data[0] << Data[1] << Data[2];

    PortParam.write(Data);

}
void MainWindow::on_Clear_clicked(bool checked)
void MainWindow::on_Clear_clicked(bool checked)

{

    this->ui->Recieve_Text->clear();

}
Step4:下面使用connect函数将他们和信号连接起来:
connect(this->ui->Start_Stop_Button,SIGNAL(clicked(bool)),this,SLOT(on_Start_Stop_Button_clicked(bool checked)));

connect(this->ui->Send,SIGNAL(clicked(bool)),this,SLOT(on_Send_clicked(bool checked)));

connect(this->ui->Clear,SIGNAL(clicked(bool)),this,SLOT(on_Clear_clicked(bool)));
注1:以上步骤基本完成了Qt的Serialport的相关设计,但是我们发现在打开串口的过程当中总是存在这串口打不开的情况,这里我们在电脑的USB口上插入的是PL2303的串口芯片检查并解决如下:

从上图可以看出,我们的确找到了需要的ttyUSB0设备,但是/dev/ttyUSB0的文件对象的权限是普通用户不可以执行不可读写的状态,我们需要对它进行修改,修改之后就能顺利的使用我们的串口芯片了。

注2:关于如何在Ubuntu下如何安装Serialport模块,可以参看我的这篇博客:http://www.cnblogs.com/uestc-mm/p/8920525.html
4、Qt Project之串口数据传输的更多相关文章
- 在CentOS下面编译WizNote Qt Project
编译环境 CentOS 64位 Desktop 版本:6.5 编译前的准备: CentOS的用户默认没有root权限,如果当前用户没有权限root,则可以在终端里面执行下面的命令: su root s ...
- Qt Project的持续集成方案
作者:齐亮链接:http://www.zhihu.com/question/24314354/answer/27547787来源:知乎著作权归作者所有,转载请联系作者获得授权. PETER HARTM ...
- Qt WebKit and HTML5 geolocation | Qt Project forums | Qt Project
Qt WebKit and HTML5 geolocation | Qt Project forums | Qt Project Qt WebKit and HTML5 geolocation I ...
- DOM Traversal Example | Documentation | Qt Project
DOM Traversal Example | Documentation | Qt Project DOM Traversal Example
- 关于VS2017+Qt5.6.3(msvc2015_64)联合编程Qt project settings界面没有ok,cancel选项的问题
如题,我在项目开发的过程中,需要添加数据库模块SQL,然后发现VS上QT project settings选项中不能修改添加的模块,也就是对应QT creator中的在.pro文件中添加一句:QT + ...
- qt project settings被禁用解决方案
转载请注明出处:http://www.cnblogs.com/dachen408/p/7422707.html qt project settings被禁用点击不了: 解决方案:需要点击该项目(或者项 ...
- 使用QT来制作串口终端
为什么要使用QT,因为它是跨平台的. 我现在使用的环境是Win7 64bit,使用VS的编译器来编译QT工程. 安装这套环境简单说一下:先到QT官网下载qt-windows-opensource-5. ...
- Qt 自动搜索串口号列表
@功能: SerialPortList 类实现当前可用的串口进行实时扫描,当发现有新的串口 或是现有串口消失时,SerialPortList类将发出一个QStringList类型的 信号onNewSe ...
- Qt中的串口编程之三
QtSerialPort 今天我们来介绍一下QtSerialPort模块的源代码,学习一下该可移植的串口编程库是怎么实现的. 首先,我们下载好了源代码之后,使用QtCreator打开整个工程,可以看到 ...
随机推荐
- Codeforces 833D Red-Black Cobweb [点分治]
洛谷 Codeforces 思路 看到树上路径的统计,容易想到点分治. 虽然只有一个限制,但这个限制比较麻烦,我们把它拆成两个. 设黑边有\(a\)条,白边有\(b\)条,那么有 \[ 2a\geq ...
- HTML_1
HTML 指的是超文本标记语言: HyperText Markup LanguageHTML 不是一种编程语言,而是一种标记语言标记语言是一套标记标签 (markup tag)HTML 使用标记标签来 ...
- 一篇文章让你了解Android各个版本的历程
2008年--至今 Android 1.5(Cupcake纸杯蛋糕): 智能虚拟键盘:使用widgets实现桌面个性化:在线文件夹(Live Folder)快速浏览在线数据:视频录制和分享:图片上传: ...
- swift 学习- 18 -- 自动引用计数
// Swift 使用 自动引用计数 (ARC) 机制来跟踪和管理你的应用程序的内存, 通常情况下, Swift 内存管理机制会一直起作用, 你无须自己来考虑内存的管理, ARC 会在类的实例不再被使 ...
- 如何在cmd中安装python第三方模块
打开 cmd终端 1 输入pip install 模块名. 2 等待安装完成即可.
- SQLmap注入启发式检测算法
1.经过setTargetEnv()就进入了checkWaf()的环节 def checkWaf(): """ Reference: http://sec ...
- OrCAD Capture CIS 16.6 修改原理图的页面大小
OrCAD Capture CIS 16.6 打开需要修改的原理图. 菜单:Options > Schematic Page Properties... 看图操作...
- C++ GetSystemDirectory()
关于GetSystemDirectory function,参考:https://msdn.microsoft.com/en-us/library/windows/desktop/ms724373(v ...
- iOS 测试之非代码获取 iPhone 型号及其他信息
首先 安装libimobiledevice和ideviceinstaller $ brew uninstall ideviceinstaller $ brew uninstall libimobile ...
- appium+python测试app使用相对坐标定位元素
我们获取到的是绝对坐标,如果换一个屏幕分辨率不同的手机那这个坐标自然会发生变化,要实现不同手机均能实现点击同一控件自然要用到相对坐标了,具体方法如下: 1.获取当前空间的绝对坐标(x1,y1),开启指 ...