mysql 开发进阶篇系列 29 数据库二进制包安装
概述
对于二进制安装,优点是可以安装到任何路径下,灵活性好,一台服务器可以安装多个mysql。缺点是已经绎过编译,性能不如源码编译得好,不能灵活定制编译参数。如果用户即不想安装最简单却不够灵活的RPM包,又不想安装复杂费时的源码包,那么已编译好的二进制包将是最好的选择。
一.步骤1: 解压glib包
-- 在 /usr/local 下创建一个mysql文件夹,用来存放
[root@hsr local]# mkdir mysql
[root@hsr local]# ls
bin etc games include lib lib64 libexec mysql sbin share src
-- 在原有/usr/tool目录将gz压缩包解压
[root@hsr tool]# tar -zxvf mysql-5.7.-linux-glibc2.-x86_64.tar.gz
mysql-5.7.-linux-glibc2.-x86_64/bin/myisam_ftdump
mysql-5.7.-linux-glibc2.-x86_64/bin/myisamchk
mysql-5.7.-linux-glibc2.-x86_64/bin/myisamlog
mysql-5.7.-linux-glibc2.-x86_64/bin/myisampack
mysql-5.7.-linux-glibc2.-x86_64/bin/mysql
mysql-5.7.-linux-glibc2.-x86_64/bin/mysql_client_test_embedded
mysql-5.7.-linux-glibc2.-x86_64/bin/mysql_config_editor
.....
--将解压的文件复制到/usr/local/mysql目录下
[root@hsr tool]# sudo cp -r mysql-5.7.-linux-glibc2.-x86_64 /usr/local/mysql
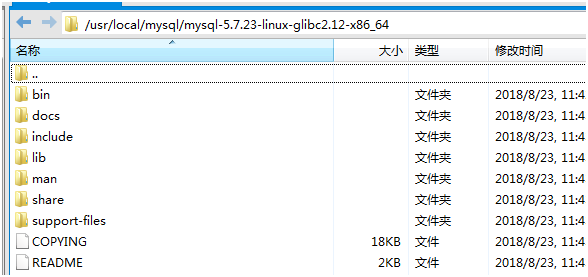
--在mysql-->mysql-5.7.23-linux-glibc2.12-x86_64路径下 解压的文件共9个 目录如下:
[root@hsr mysql]# ls mysql-5.7.-linux-glibc2.-x86_64 bin COPYING docs include lib man README share support-files
注意:mysql-5.7.23-linux-glibc2.12-x86_64目录层次要去掉,变为/usr/local/mysql 下的9个目录,在文章后面会去掉这层。
二. 步骤2:
2.1 添加mysql用户 useradd -r -g 用户名 用户组
[root@hsr mysql]# groupadd mysql

[root@hsr mysql]# useradd -r -g mysql mysql
2.2 切换到 /usr/local/mysql 目录下,改变目录拥有者为mysql
[root@hsr mysql]# chown -R mysql.mysql /usr/local/mysql
2.3 新环境安装libaio包 mysql 依赖于libaio
[root@hsr mysqld]# yum search libaio
三 步骤3:
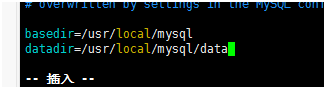
安装mysql,使用 --initialize,basedir 基础目录,datadir 为数据目录。
[root@hsr ~]# cd /usr/local/mysql/mysql-5.7.-linux-glibc2.-x86_64/bin

[root@hsr bin]# ./mysqld  --initialize --user=mysql --basedir=/usr/local/mysql --datadir=/usr/local/mysql/data

--23T06::.157088Z  [Warning] TIMESTAMP with implicit DEFAULT value is deprecated. Please use --explicit_defaults_for_timestamp server option (see documentation for more details).

--23T06::.157246Z  [ERROR] Can't find error-message file '/usr/local/mysql/share/errmsg.sys'. Check error-message file location and 'lc-messages-dir' configuration directive.

--23T06::.287087Z  [Warning] InnoDB: New log files created, LSN=

--23T06::.059913Z  [Warning] InnoDB: Creating foreign key constraint system tables.

--23T06::.138616Z  [Warning] No existing UUID has been found, so we assume that this is the first time that this server has been started. Generating a new UUID: a7e28575-a6a1-11e8-af13-000c29affb65.

--23T06::.154064Z  [Warning] Gtid table is not ready to be used. Table 'mysql.gtid_executed' cannot be opened.

--23T06::.155635Z  [Note] A temporary password is generated for root@localhost: ro0ssOGT?ocf
四步骤4:
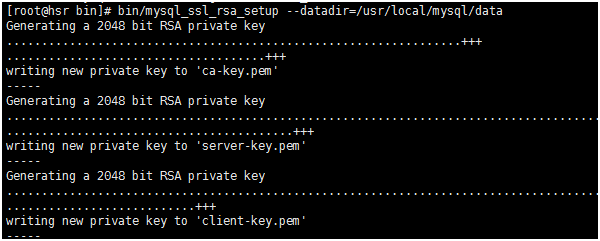
4.1 创建RSA private key。
[root@hsr bin]# bin/mysql_ssl_rsa_setup --datadir=/usr/local/mysql/data
4.2 修改当前目录拥有者为 root 用户,修改data 目录拥有者为 mysql
[root@hsr bin]# chown -R root:root /usr/local/mysql

[root@hsr bin]# chown -R mysql:mysql /usr/local/mysql/data
五.步骤5 配置mysql(mysql.server)和my.cnf文件
--检查 etc/my.cnf文件是否存在 (二进制安装,默认配置文件在/etc/my.cnf)

    [root@hsr etc]# find -name  my.cnf

    ./my.cnf

 --将support-files 目录下的mysql.server文件复制到etc/init.d下

    [root@hsr ~]# cd /usr/local/mysql/mysql-5.7.-linux-glibc2.-x86_64/support-files

    [root@hsr support-files]# cp mysql.server /etc/init.d/mysql

 -- 配置/etc/init.d/mysql服务文件 添加basedir和datadir

    [root@hsr support-files]# vim /etc/init.d/mysql
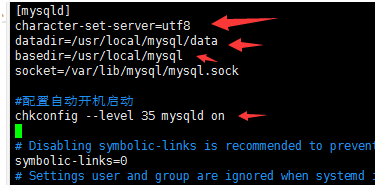
修改my.cnf 配置以下四个参数(注意:chkconfig -- level 35 mysqld on 不要加上,后面报错,又得去掉)
六.步骤6 启动mysql
[root@hsr bin]# service mysql start

/etc/init.d/mysql: line : my_print_defaults: command not found

    Starting MySQL ERROR! Couldn't find MySQL server (/usr/local/mysql/bin/mysqld_safe)

--提示未找到路径,需要把"mysql-5.7.23-linux-glibc2.12-x86_64" 文件夹去掉,使用mv 将里面的文件移到/usr/locl/mysql下,共9个文件

[root@hsr bin]# mv /usr/local/mysql/mysql-5.7.-linux-glibc2.-x86_64/README /usr/local/mysql

[root@hsr bin]# mv /usr/local/mysql/mysql-5.7.-linux-glibc2.-x86_64/COPYING /usr/local/mysql

[root@hsr bin]# mv /usr/local/mysql/mysql-5.7.-linux-glibc2.-x86_64/support-files /usr/local/mysql

[root@hsr bin]# mv /usr/local/mysql/mysql-5.7.-linux-glibc2.-x86_64/share /usr/local/mysql

[root@hsr bin]# mv /usr/local/mysql/mysql-5.7.-linux-glibc2.-x86_64/man /usr/local/mysql

[root@hsr bin]# mv /usr/local/mysql/mysql-5.7.-linux-glibc2.-x86_64/lib /usr/local/mysql

[root@hsr bin]# mv /usr/local/mysql/mysql-5.7.-linux-glibc2.-x86_64/include /usr/local/mysql

[root@hsr bin]# mv /usr/local/mysql/mysql-5.7.-linux-glibc2.-x86_64/docs /usr/local/mysql

[root@hsr bin]# mv /usr/local/mysql/mysql-5.7.-linux-glibc2.-x86_64/bin /usr/local/mysql
-- 再启动

[root@hsr bin]# service mysql start

Starting MySQL.--24T01::.545225Z mysqld_safe error: log-error set to '/var/log/mariadb/mariadb.log', however file don't exists. Create writable for user 'mysql'.

 ERROR! The server quit without updating PID file (/usr/local/mysql/data/hsr.pid).

-- 提示/var/log/mariadb/mariadb.log 不存在, 打开my.cnf 能看到定义的默认路径

[mysqld_safe]

log-error=/var/log/mariadb/mariadb.log

pid-file=/var/run/mariadb/mariadb.pid

--创建目录 给权限

[root@hsr bin]# mkdir /var/log/mariadb

[root@hsr bin]# touch /var/log/mariadb/mariadb.log

[root@hsr bin]# chown -R mysql:mysql  /var/log/mariadb/
-- 再启动

[root@hsr bin]# service mysql start

Starting MySQL.... ERROR! The server quit without updating PID file (/usr/local/mysql/data/hsr.pid).

-- 错误信息是hsr.pid进程出问题,先查看下日志

[root@hsr ~]# cat /var/log/mariadb/mariadb.log

在my.cnf中注释上面参数(#chkconfig --level 35 mysqld on),再启动

上图意思是不能创建mysql.sock.lock 文件,一般是权限不足,如下设置好权限,启动成功

七 登录mysql
[root@hsr ~]# mysql -u root -p

bash: mysql: 未找到命令
未找到命令,是由于系统默认会查找/usr/bin下的命令,如果这个命令不在这个目录下,就会找不到命令,需要映射一个链接到/usr/bin目录下,相当于建立一个链接文件。
[root@hsr ~]#  ln -s /usr/local/mysql/bin/mysql /usr/bin

[root@hsr ~]# mysql -u -root -p

ERROR  (HY000): Can't connect to local MySQL server through socket '/tmp/mysql.sock' (2)

--错误信息是不能连接到本地的socket ,系统默认找到了/tmp目录下,需要设置链接文件

[root@hsr tmp]# ln -s /var/lib/mysql/mysql.sock /tmp/mysql.sock
[root@hsr ~]# mysql -u -root -p

Enter password:
八. 设置密码
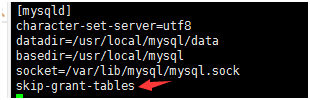
8.1 打开my.cnf文件,添加skip-grant-tables,来重置密码,如下所示
8.2 启动服务,再次登录,在输入密码处按回车键进入。
[root@hsr ~]# vim /etc/my.cnf

[root@hsr ~]# service mysql restart

Shutting down MySQL.. SUCCESS!

Starting MySQL. SUCCESS!

[root@hsr ~]# mysql -u root -p

Enter password:

Welcome to the MySQL monitor.  Commands end with ; or \g.

Your MySQL connection id is

Server version: 5.7.
8.3 进入mysql后,修改密码
mysql> use mysql;

Reading table information for completion of table and column names

You can turn off this feature to get a quicker startup with -A

Database changed

mysql> update user set authentication_string=password('') where user='root';

Query OK,  row affected,  warning (0.00 sec)

Rows matched:   Changed:   Warnings:
退出mysql>quit; 编辑 my.cnf 注释掉#skip-grant-tables
8.4 重启mysql服务,输入修改后的密码(123456)进入
[root@hsr ~]# service mysql restart

Shutting down MySQL.. SUCCESS!

Starting MySQL. SUCCESS!

[root@hsr ~]# mysql -u root -p

Enter password:

Welcome to the MySQL monitor.  Commands end with ; or \g.

Your MySQL connection id is

Server version: 5.7.
九 远程登录
-- 登录到mysql后设置权限

mysql> GRANT ALL PRIVILEGES ON *.* TO 'root'@'%' IDENTIFIED BY '' WITH GRANT OPTION;

ERROR  (HY000): You must reset your password using ALTER USER statement before executing this statement.

--  再设置密码

mysql> SET PASSWORD = PASSWORD('');

Query OK,  rows affected,  warning (0.00 sec)

-- 设置权限

mysql> ALTER USER 'root'@'localhost' PASSWORD EXPIRE NEVER;

Query OK,  rows affected (0.00 sec)

-- 刷新权限

mysql>  flush privileges;

Query OK,  rows affected (0.01 sec)

-- 设置远程登录权限

mysql> GRANT ALL PRIVILEGES ON *.* TO 'root'@'%' IDENTIFIED BY '' WITH GRANT OPTION;

Query OK,  rows affected,  warning (0.00 sec)
-- 在my.cnf中 添加端口,重启服务
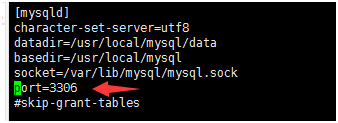
-- 测试端口是否打开

[root@hsr ~]#  firewall-cmd    --query-port=/tcp

no

-- 防火墙设置

[root@hsr ~]# firewall-cmd --zone=public --add-port=/tcp --permanent

success

-- 重新加载

[root@hsr ~]# firewall-cmd --reload

success

-- 再次测试端口

[root@hsr ~]# firewall-cmd    --query-port=/tcp

yes
-- 在windows端拼通成功

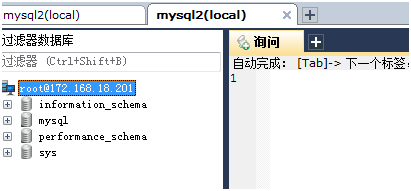
--- 最后使用SQLyog连接成功

mysql 开发进阶篇系列 29 数据库二进制包安装的更多相关文章
- mysql 开发进阶篇系列 30 数据库二进制包(安装指定路径,目录介绍)
一. 指定路径 在上一篇里,二进制包解压后,全部放入在/usr/local/mysql目录下,在安装时指定了基础目录和数据目录, --basedir=/usr/local/mysql --datadi ...
- mysql 开发进阶篇系列 28 数据库二进制包安装(centos系统准备)
1. centos 7安装工作 对于mysql二进制安装,我这里在使用一台新的centos系统.准备好VMware,Xftp-6.0, Xshell-6.0.在VMware中网络使用桥接模式,分配20 ...
- mysql 开发进阶篇系列 25 数据库RPM安装目录介绍
一.概述 mysql可以在多个平台上运行,在windows平台上安装有noinstall包和图形化包二种方式.在linux/unix平台上有RPM包安装,二进制包(Binary Package)安装, ...
- mysql 开发进阶篇系列 45 物理备份与恢复(xtrabackup 安装,用户权限,配置)
一. 安装说明 安装XtraBackup 2.4 版本有三种方式: (1) 存储库安装Percona XtraBackup(推荐) (2 )下载的rpm或apt包安装Percona XtraBacku ...
- mysql 开发进阶篇系列 27 数据库字符集设置
在安装完数据库后,使用汉字插入到表中,会报错,需要修改字符集类型,如下图所示: -- 插入汉字时报错 INSERT INTO User2 VALUES('张三') -- 查看字符集 SHOW VARI ...
- mysql 开发进阶篇系列 26 数据库RPM安装演示
一.概述 上一章讲到了RPM安装后的文件目录,这章还是介绍下安装步骤.也便以后做参考吧. 1. 移出centos 7系统自带的mysql库 yum remove mysql-libs 2. 将下载的m ...
- mysql 开发进阶篇系列 55 权限与安全(安全事项 )
一. 操作系统层面安全 对于数据库来说,安全很重要,本章将从操作系统和数据库两个层面对mysql的安全问题进行了解. 1. 严格控制操作系统账号和权限 在数据库服务器上要严格控制操作系统的账号和权限, ...
- mysql 开发进阶篇系列 46 物理备份与恢复( xtrabackup的 选项说明,增加备份用户,完全备份案例)
一. xtrabackup 选项说明 在操作xtrabackup备份与恢复之前,先看下该工具的选项,下面记录了xtrabackup二进制文件的部分命令行选项,后期把常用的选项在补上.点击查看xtrab ...
- mysql 开发进阶篇系列 47 物理备份与恢复(xtrabackup 的完全备份恢复,恢复后重启失败总结)
一. 完全备份恢复说明 xtrabackup二进制文件有一个xtrabackup --copy-back选项,它将备份复制到服务器的datadir目录下.下面是通过 --target-dir 指定完全 ...
随机推荐
- Vimtutor中文版
================================================================================ 欢 迎 阅 ...
- JavaSE基础知识(4)—数组的应用
一.数组的特点.好处及使用步骤 1.数组的好处 特点:相当于用于保存一组元素的容器好处: 1.提高代码的简洁性和扩展性,且同时开辟多个空间,提高了效率 2.分类存储,且空间是连续的,容易查找 2.数组 ...
- 每10秒执行定时任务-crontab
* * * * * /data/crontab.sh * * * * * sleep 10; /data/crontab.sh * * * * * sleep 20; /data/crontab.sh ...
- Spring源码-循环依赖源码解读
Spring源码-循环依赖源码解读 笔者最近无论是看书还是从网上找资料,都没发现对Spring源码是怎么解决循环依赖这一问题的详解,大家都是解释了Spring解决循环依赖的想法(有的解释也不准确,在& ...
- UNION 和 UNION ALL 操作符
SQL UNION 操作符 1.UNION 操作符用于合并两个或多个 SELECT 语句的结果集. 请注意:UNION 内部的 SELECT 语句必须拥有相同数量的列.列也必须拥有相似的数据类型.同时 ...
- Apache ab性能测试结果分析
Apache ab性能测试结果分析 测试场景:模拟10个用户,对某页发起总共100次请求. 测试命令: ab -n 100 -c 10 地址 测试报告: Server Software: 被测服务器软 ...
- javascript字符串方法总结
一.单引号字符串内部可以使用双引号,双引号字符串内部也可以使用单引号 "hello 'world'" 'welcome "to" js' 二.多行和转义 如果要 ...
- Git+Github入门
1.安装Git git 返回上一级文件命令 cd ..(cd 和..之间有空格) 2.安装完成后需进一步设置,在命令行输入 3.选择一个合适的地方创建一个空目录 pwd命令用于显示当前目录 4.通过g ...
- OpenCV2.4.10 + VS2010开发环境配置
原文转载自:qinyang8513 一.开发环境 1.操作系统:Windows 7(64位) 2.编程环境:Microsoft Visual Studio 2010 3.OpenCV版本:2.4.10 ...
- httphandler httpmodule一些个人理解
asp.net 对于http请求需要走一个管道就行一层一层的过滤:比如身份验证,根据请求的资源不同分发给具体哪个dll来处理 这些管道中就是httpmodule.所以我们自己写的httpmodule实 ...