15、SpringBoot------整合swagger2
开发工具:STS
前言:
对外提供一个Api,无论是对开发、测试、维护,都有很大的帮助。
下面我们来实现swagger2。
参考实例:https://blog.csdn.net/weixin_39477597/article/details/79639239
实例:
1.添加依赖:
         <dependency>

             <groupId>io.springfox</groupId>

             <artifactId>springfox-swagger2</artifactId>

             <version>2.7.0</version>

         </dependency>

         <dependency>

             <groupId>io.springfox</groupId>

             <artifactId>springfox-swagger-ui</artifactId>

             <version>2.7.0</version>

         </dependency>
2.配置:
package com.xm.shiro.config; import org.springframework.context.annotation.Bean;
import org.springframework.context.annotation.Configuration; import springfox.documentation.builders.ApiInfoBuilder;
import springfox.documentation.builders.PathSelectors;
import springfox.documentation.builders.RequestHandlerSelectors;
import springfox.documentation.service.ApiInfo;
import springfox.documentation.service.Contact;
import springfox.documentation.spi.DocumentationType;
import springfox.documentation.spring.web.plugins.Docket;
import springfox.documentation.swagger2.annotations.EnableSwagger2; @Configuration
@EnableSwagger2
public class SwaggerConfig { @Bean
public Docket docket(){
return new Docket(DocumentationType.SWAGGER_2).apiInfo(apiInfo()).select()
// 当前包路径
.apis(RequestHandlerSelectors.basePackage("com.xm.shiro.controller"))
.paths(PathSelectors.any()).build(); }
//构建api文档的详细信息函数
private ApiInfo apiInfo(){
return new ApiInfoBuilder()
//页面标题
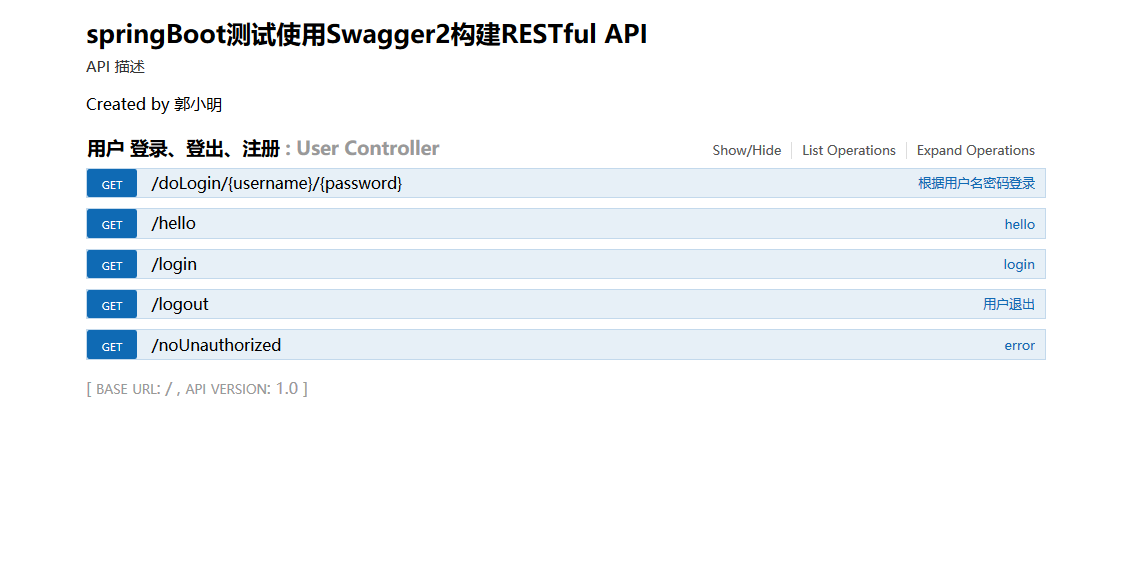
.title("springBoot测试使用Swagger2构建RESTful API")
//创建人
.contact("郭小明")
//版本号
.version("1.0")
//描述
.description("API 描述")
.build();
} }
3.在controller中引用api:
注解说明:
notes="方法的备注说明“
defaultValue:参数的默认值
package com.xm.shiro.controller;

import org.apache.shiro.SecurityUtils;

import org.apache.shiro.authc.AuthenticationException;

import org.apache.shiro.authc.IncorrectCredentialsException;

import org.apache.shiro.authc.UsernamePasswordToken;

import org.apache.shiro.authz.annotation.RequiresPermissions;

import org.apache.shiro.authz.annotation.RequiresRoles;

import org.apache.shiro.subject.Subject;

import org.springframework.web.bind.annotation.GetMapping;

import org.springframework.web.bind.annotation.PathVariable;

import org.springframework.web.bind.annotation.RequestMapping;

import org.springframework.web.bind.annotation.RestController;

import io.swagger.annotations.Api;

import io.swagger.annotations.ApiOperation;

@Api(value="UserController",tags="用户 登录、登出、注册")

@RestController

public class UserController {

    @RequiresPermissions("hello")

    @GetMapping("/hello")

    public String hello() {

        return "Hello Shiro!";

    }

    @GetMapping("/login")

    public String login() {

        return "权限管理";

    }

    @ApiOperation(value="根据用户名密码登录",notes="用户登录")

    @GetMapping("/doLogin/{username}/{password}")

    public String doLogin(@PathVariable("username") String username,@PathVariable("password") String password) {

        UsernamePasswordToken token = new UsernamePasswordToken(username, password);

        Subject currentUser = SecurityUtils.getSubject();

        try {

            currentUser.login(token);

            //此步将 调用realm的认证方法

        } catch(IncorrectCredentialsException e){

            //这最好把 所有的 异常类型都背会

            return "密码错误";

        } catch (AuthenticationException e) {

            return "登录失败";

        }

        currentUser.hasRole("sun");

        currentUser.hasRole("sun");

        currentUser.hasRole("sun");

        currentUser.hasRole("sun");

        return token.getPrincipal()+":登录成功";

    }

    @ApiOperation(value="用户退出",notes="注销用户")

    @GetMapping("/logout")

    public String logout() {

        Subject currentUser = SecurityUtils.getSubject();

        currentUser.logout();

        return "退出登录";

    }

    @GetMapping("/noUnauthorized")

    public String error() {

        return  "无权限";

    }

}
4.登录http://localhost:8080/swagger-ui.html,查看api
15、SpringBoot------整合swagger2的更多相关文章
- SpringBoot(七):SpringBoot整合Swagger2
原文地址:https://blog.csdn.net/saytime/article/details/74937664 手写Api文档的几个痛点: 文档需要更新的时候,需要再次发送一份给前端,也就是文 ...
- SpringBoot整合Swagger2
相信各位在公司写API文档数量应该不少,当然如果你还处在自己一个人开发前后台的年代,当我没说,如今为了前后台更好的对接,还是为了以后交接方便,都有要求写API文档. 手写Api文档的几个痛点: 文档需 ...
- SpringBoot整合Swagger2(Demo示例)
写在前面 由于公司项目采用前后端分离,维护接口文档基本上是必不可少的工作.一个理想的状态是设计好后,接口文档发给前端和后端,大伙按照既定的规则各自开发,开发好了对接上了就可以上线了.当然这是一种非常理 ...
- springboot 整合Swagger2的使用
Swagger2相较于传统Api文档的优点 手写Api文档的几个痛点: 文档需要更新的时候,需要再次发送一份给前端,也就是文档更新交流不及时. 接口返回结果不明确 不能直接在线测试接口,通常需要使用工 ...
- SpringBoot整合Swagger2案例,以及报错:java.lang.NumberFormatException: For input string: ""原因和解决办法
原文链接:https://blog.csdn.net/weixin_43724369/article/details/89341949 SpringBoot整合Swagger2案例 先说SpringB ...
- SpringBoot整合Swagger2详细教程
1. 简介 随着前后端分离开发模式越来越流行,编写接口文档变成了开发人员非常头疼的事.而Swagger是一个规范且完整的web框架,用于生成.描述.调用可视化的RESTful风格的在线接口文档,并 ...
- SpringBoot整合Swagger2及使用
简介 swagger是一个流行的API开发框架,这个框架以"开放API声明"(OpenAPI Specification,OAS)为基础, 对整个API的开发周期都提供了相应的解决 ...
- SpringBoot整合Swagger2,再也不用维护接口文档了!
前后端分离后,维护接口文档基本上是必不可少的工作.一个理想的状态是设计好后,接口文档发给前端和后端,大伙按照既定的规则各自开发,开发好了对接上了就可以上线了.当然这是一种非常理想的状态,实际开发中却很 ...
- SpringBoot学习笔记(16)----SpringBoot整合Swagger2
Swagger 是一个规范和完整的框架,用于生成,描述,调用和可视化RESTful风格的web服务 http://swagger.io Springfox的前身是swagger-springmvc,是 ...
- Spring Boot2 系列教程(十七)SpringBoot 整合 Swagger2
前后端分离后,维护接口文档基本上是必不可少的工作. 一个理想的状态是设计好后,接口文档发给前端和后端,大伙按照既定的规则各自开发,开发好了对接上了就可以上线了.当然这是一种非常理想的状态,实际开发中却 ...
随机推荐
- vue2.X+elementUI表单自定义验证
<template> <div class="taxi-appointment-dairen"> <el-form :model="rule ...
- 单元测试-Junit-Mockit-PowerMock
0. Junit5 1. Junit4 //手动命令行测试 java -cp /usr1/junit:/usr1/cdncms/lib/* org.junit.runner.JUnitCore com ...
- springmvc+mybatis+sql server实现简单登录功能
一.源码: 1.Users.java package com.login.entity; import java.io.Serializable; public class Users impleme ...
- secureCRT配置——针对Home、End无法使用
- matlab 摘要
matlab中的向量与矩阵 如果定义一个A = [1, 2, 3]; 则A为一个行向量 但是A(:)返回的是一个列向量 关于函数的返回值 在function [a, b, c] = fit_quadr ...
- wpf 查找父元素、子元素方法
1 /// <summary> 2 /// 根据类型查找子元素 3 /// </summary> 4 /// <typeparam name="T"& ...
- SSRS 参数 单选 多选
前段时间 公司要求报表的选项可以多选. 知道需求后,研究了下实现. 首先我们创建一个报表,然后添加3个数据集,2个参数,如下图. DataSet1数据集:存放主数据. ddl_emplid数据集:存放 ...
- 服务器断电后 redis重启后启动不起来
服务器断电后 redis 重启后启动不起来 原因:db持久化失败 1. 先查询redis的进程 ps -ef|grep redis 2. 查询redis的缓存文件在哪 whereis dump.rdb ...
- 在Git上创建新分支(实用性高!!!)
在github上创建仓库: Create a new repository on the command line touch README.md git init git add README.md ...
- 将pugixml库编译成动态库的做法
作者:朱金灿 来源:http://blog.csdn.net/clever101 pugixml库默认是编译成静态库的.要把pugixml库编译成一个动态库,需要对代码做一些修改,具体是将 // If ...