django模块导入/函数/中间件/MVC和MTV/CSRF
一:模块导入
第一种:继承
这里的母版更像是一个架子,子板都是定义的内容(如果多个页面中 ,存在相同的页面;这样我们可以抽到母版中实现)
母版:layer.html
<!DOCTYPE html>

<html lang="en">

<head>

    <meta charset="UTF-8">

    <title>Title</title>

    {% block mycss %}

    {% endblock %}

</head>

<body>

{% block mycontent %}

{% endblock %}

</body>

<script src="/static/js/jquery-1.12.4.js"></script>

<script src="/static/bootstrap-3.3.7-dist/js/bootstrap.min.js"></script>

{% block myjs %}

{% endblock %}

</html>
子板:son.html
{% extends "layer.html" %}

{% block mycss %}

    写上子板的样式

{% endblock %}

{% block mycontent %}

    写上子板的内容

{% endblock %}

{% block myjs %}

	写上子板的js

{% endblock %}
第二种:导入模板
如果我们A.html文件中写好了一个组件,想要添加到B.html文件中。因此我们可以在B.html文件使用
{% include "a.html" %}语法,将A.html文件引入到B.html文件中B.html
<!DOCTYPE html>

<html lang="en">

<head>

    <meta charset="UTF-8">

    <title>Title</title>

</head>

<body>

    {% include "a.html" %}

</body>

</html>
A.html
<!DOCTYPE html>

<html lang="en">

<head>

    <meta charset="UTF-8">

    <title>Title</title>

</head>

<body>

<a href="https://www.baidu.com">其他</a>

</body>

</html>
二:函数
1. 使用django自带的函数
views.py
from django.shortcuts import render,HttpResponse

# Create your views here.

def test(request):

    name = "panlifu"

    return  render(request,'test.html',{"name":name})
test.html
<!DOCTYPE html>

<html lang="en">

<head>

    <meta charset="UTF-8">

    <title>Title</title>

</head>

<body>

    {{ name|upper }}

</body>

</html>
2. 自定义函数
自定义函数流程
在app中创建templatetags模块
创建任意.py文件,如:xx.py
在xx.py中编写函数
from django import template

register =template.Library()

# 编写一个函数 并在函数前加上装饰器  @register.filteer   或  @register.simple_tag

@register.simple_tag

def my_upper(arg1,arg2)

	return arg1+arg2

@register.filter

def my_upper(arg1,arg2)

	return arg1+arg2
- 在要引入此函数的html文件顶部加上{% load xx%} 导入xx模块
- 使用函数属于@register.filter的函数调用{{"value" | fun:参数}},可以在if else中做判断条件
- 使用函数属于@register.simple_tag的函数调用{%fun '参数1' '参数2' '参数3'%},不可以在if else中做判断条件
- 一定要在注册使用此函数的app
需要注意的事项:
filter函数单独使用时必须至少有一个传入模板的对象作为参数,比如
{{ st |fun1 }}
filter最多只要两个参数
{{ 参数1 |fun1:参数2 }}
,且冒号后面不能有空格
simple_tag函数的参数如函数名用空格分开,单个空格和多个空格都可以
 {% if  st|fun1  %}

 <p>happy</p>
{% endif %} 作为条件语句不用加两个花括号
三:中间件
1. 什么是中间件
官方的说法:中间件是一个用来处理Django的请求和响应的框架级别的钩子。它是一个轻量、低级别的插件系统,用于在全局范围内改变Django的输入和输出。每个中间件组件都负责做一些特定的功能。
但是由于其影响的是全局,所以需要谨慎使用,使用不当会影响性能。
说的直白一点中间件是帮助我们在视图函数执行之前和执行之后都可以做一些额外的操作,它本质上就是一个自定义类,类中定义了几个方法,Django框架会在请求的特定的时间去执行这些方法。
我们一直都在使用中间件,只是没有注意到而已,打开Django项目的Settings.py文件,看到下图的MIDDLEWARE配置项。
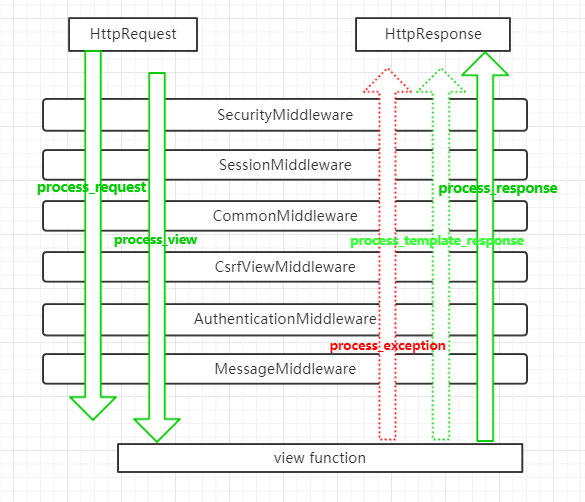
MIDDLEWARE = [

    'django.middleware.security.SecurityMiddleware',

    'django.contrib.sessions.middleware.SessionMiddleware',

    'django.middleware.common.CommonMiddleware',

    'django.middleware.csrf.CsrfViewMiddleware',

    'django.contrib.auth.middleware.AuthenticationMiddleware',

    'django.contrib.messages.middleware.MessageMiddleware',

    'django.middleware.clickjacking.XFrameOptionsMiddleware',

]
MIDDLEWARE配置项是一个列表,列表中是一个个字符串,这些字符串其实是一个个类,也就是一个个中间件。
我们之前已经接触过一个csrf相关的中间件了?我们一开始让大家把他注释掉,再提交post请求的时候,就不会被forbidden了,后来学会使用csrf_token之后就不再注释这个中间件了。
2. 自定义中间件
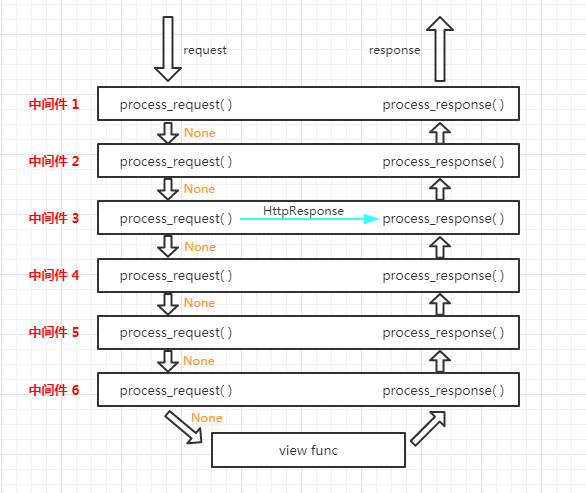
中间件可以定义五个方法,分别是:(主要的是process_request和process_response)
- process_request(self,request)
- process_view(self, request, view_func, view_args, view_kwargs)
- process_template_response(self,request,response)
- process_exception(self, request, exception)
- process_response(self, request, response)
以上方法的返回值可以是None或一个HttpResponse对象,如果是None,则继续按照django定义的规则向后继续执行,如果是HttpResponse对象,则直接将该对象返回给用户。
自定义一个中间件示例
from django.utils.deprecation import MiddlewareMixin

class MD1(MiddlewareMixin):

    def process_request(self, request):

        print("MD1里面的 process_request")

    def process_response(self, request, response):

        print("MD1里面的 process_response")

        return response
process_request
process_request有一个参数,就是request,这个request和视图函数中的request是一样的。
它的返回值可以是None也可以是HttpResponse对象。返回值是None的话,按正常流程继续走,交给下一个中间件处理,如果是HttpResponse对象,Django将不执行视图函数,而将相应对象返回给浏览器。
我们来看看多个中间件时,Django是如何执行其中的process_request方法的。
from django.utils.deprecation import MiddlewareMixin

class MD1(MiddlewareMixin):

    def process_request(self, request):

        print("MD1里面的 process_request")

class MD2(MiddlewareMixin):

    def process_request(self, request):

        print("MD2里面的 process_request")

        pass
在settings.py的MIDDLEWARE配置项中注册上述两个自定义中间件:
MIDDLEWARE = [

    'django.middleware.security.SecurityMiddleware',

    'django.contrib.sessions.middleware.SessionMiddleware',

    'django.middleware.common.CommonMiddleware',

    'django.middleware.csrf.CsrfViewMiddleware',

    'django.contrib.auth.middleware.AuthenticationMiddleware',

    'django.contrib.messages.middleware.MessageMiddleware',

    'django.middleware.clickjacking.XFrameOptionsMiddleware',

    'middlewares.MD1',  # 自定义中间件MD1

    'middlewares.MD2'  # 自定义中间件MD2

]
此时,我们访问一个视图,会发现终端中打印如下内容:
MD1里面的 process_request

MD2里面的 process_request

app01 中的 index视图
把MD1和MD2的位置调换一下,再访问一个视图,会发现终端中打印的内容如下:
MD2里面的 process_request

MD1里面的 process_request

app01 中的 index视图
看结果我们知道:视图函数还是最后执行的,MD2比MD1先执行自己的process_request方法。
在打印一下两个自定义中间件中process_request方法中的request参数,会发现它们是同一个对象。
由此总结一下:
- 中间件的process_request方法是在执行视图函数之前执行的。
- 当配置多个中间件时,会按照MIDDLEWARE中的注册顺序,也就是列表的索引值,从前到后依次执行的。
- 不同中间件之间传递的request都是同一个对象
多个中间件中的process_response方法是按照MIDDLEWARE中的注册顺序倒序执行的,也就是说第一个中间件的process_request方法首先执行,而它的process_response方法最后执行,最后一个中间件的process_request方法最后一个执行,它的process_response方法是最先执行。
process_response
它有两个参数,一个是request,一个是response,request就是上述例子中一样的对象,response是视图函数返回的HttpResponse对象。该方法的返回值也必须是HttpResponse对象。
给上述的M1和M2加上process_response方法:
from django.utils.deprecation import MiddlewareMixin

class MD1(MiddlewareMixin):

    def process_request(self, request):

        print("MD1里面的 process_request")

    def process_response(self, request, response):

        print("MD1里面的 process_response")

        return response

class MD2(MiddlewareMixin):

    def process_request(self, request):

        print("MD2里面的 process_request")

        pass

    def process_response(self, request, response):

        print("MD2里面的 process_response")

        return response
访问一个视图,看一下终端的输出:
MD2里面的 process_request

MD1里面的 process_request

app01 中的 index视图

MD1里面的 process_response

MD2里面的 process_response
看结果可知:
process_response方法是在视图函数之后执行的,并且顺序是MD1比MD2先执行。(此时settings.py中 MD2比MD1先注册)
多个中间件中的process_response方法是按照MIDDLEWARE中的注册顺序倒序执行的,也就是说第一个中间件的process_request方法首先执行,而它的process_response方法最后执行,最后一个中间件的process_request方法最后一个执行,它的process_response方法是最先执行。
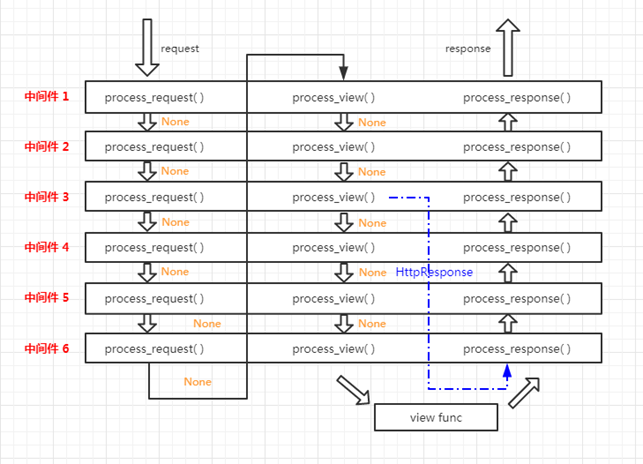
process_view
process_view(self, request, view_func, view_args, view_kwargs)
该方法有四个参数
request是HttpRequest对象。
view_func是Django即将使用的视图函数。 (它是实际的函数对象,而不是函数的名称作为字符串。)
view_args是将传递给视图的位置参数的列表.
view_kwargs是将传递给视图的关键字参数的字典。 view_args和view_kwargs都不包含第一个视图参数(request)。
Django会在调用视图函数之前调用process_view方法。
它应该返回None或一个HttpResponse对象。 如果返回None,Django将继续处理这个请求,执行任何其他中间件的process_view方法,然后在执行相应的视图。 如果它返回一个HttpResponse对象,Django不会调用适当的视图函数。 它将执行中间件的process_response方法并将应用到该HttpResponse并返回结果。
给MD1和MD2添加process_view方法:
from django.utils.deprecation import MiddlewareMixin

class MD1(MiddlewareMixin):

    def process_request(self, request):

        print("MD1里面的 process_request")

    def process_response(self, request, response):

        print("MD1里面的 process_response")

        return response

    def process_view(self, request, view_func, view_args, view_kwargs):

        print("-" * 80)

        print("MD1 中的process_view")

        print(view_func, view_func.__name__)

class MD2(MiddlewareMixin):

    def process_request(self, request):

        print("MD2里面的 process_request")

        pass

    def process_response(self, request, response):

        print("MD2里面的 process_response")

        return response

    def process_view(self, request, view_func, view_args, view_kwargs):

        print("-" * 80)

        print("MD2 中的process_view")

        print(view_func, view_func.__name__)
访问index视图函数,看一下输出结果:
MD2里面的 process_request

MD1里面的 process_request

--------------------------------------------------------------------------------

MD2 中的process_view

<function index at 0x000001DE68317488> index

--------------------------------------------------------------------------------

MD1 中的process_view

<function index at 0x000001DE68317488> index

app01 中的 index视图

MD1里面的 process_response

MD2里面的 process_response
process_view方法是在process_request之后,视图函数之前执行的,执行顺序按照MIDDLEWARE中的注册顺序从前到后顺序执行的
process_exception
process_exception(self, request, exception)
该方法两个参数:
一个HttpRequest对象
一个exception是视图函数异常产生的Exception对象。
这个方法只有在视图函数中出现异常了才执行,它返回的值可以是一个None也可以是一个HttpResponse对象。如果是HttpResponse对象,Django将调用模板和中间件中的process_response方法,并返回给浏览器,否则将默认处理异常。如果返回一个None,则交给下一个中间件的process_exception方法来处理异常。它的执行顺序也是按照中间件注册顺序的倒序执行。
给MD1和MD2添加上这个方法:
from django.utils.deprecation import MiddlewareMixin

class MD1(MiddlewareMixin):

    def process_request(self, request):

        print("MD1里面的 process_request")

    def process_response(self, request, response):

        print("MD1里面的 process_response")

        return response

    def process_view(self, request, view_func, view_args, view_kwargs):

        print("-" * 80)

        print("MD1 中的process_view")

        print(view_func, view_func.__name__)

    def process_exception(self, request, exception):

        print(exception)

        print("MD1 中的process_exception")

class MD2(MiddlewareMixin):

    def process_request(self, request):

        print("MD2里面的 process_request")

        pass

    def process_response(self, request, response):

        print("MD2里面的 process_response")

        return response

    def process_view(self, request, view_func, view_args, view_kwargs):

        print("-" * 80)

        print("MD2 中的process_view")

        print(view_func, view_func.__name__)

    def process_exception(self, request, exception):

        print(exception)

        print("MD2 中的process_exception")
如果视图函数中无异常,process_exception方法不执行。
想办法,在视图函数中抛出一个异常:
def index(request):

    print("app01 中的 index视图")

    raise ValueError("呵呵")

    return HttpResponse("O98K")
在MD1的process_exception中返回一个响应对象:
class MD1(MiddlewareMixin):

    def process_request(self, request):

        print("MD1里面的 process_request")

    def process_response(self, request, response):

        print("MD1里面的 process_response")

        return response

    def process_view(self, request, view_func, view_args, view_kwargs):

        print("-" * 80)

        print("MD1 中的process_view")

        print(view_func, view_func.__name__)

    def process_exception(self, request, exception):

        print(exception)

        print("MD1 中的process_exception")

        return HttpResponse(str(exception))  # 返回一个响应对象
看输出结果:
MD2里面的 process_request

MD1里面的 process_request

--------------------------------------------------------------------------------

MD2 中的process_view

<function index at 0x0000022C09727488> index

--------------------------------------------------------------------------------

MD1 中的process_view

<function index at 0x0000022C09727488> index

app01 中的 index视图

呵呵

MD1 中的process_exception

MD1里面的 process_response

MD2里面的 process_response
注意,这里并没有执行MD2的process_exception方法,因为MD1中的process_exception方法直接返回了一个响应对象。
process_template_response(用的比较少)
process_template_response(self, request, response)
它的参数,一个HttpRequest对象,response是TemplateResponse对象(由视图函数或者中间件产生)。
process_template_response是在视图函数执行完成后立即执行,但是它有一个前提条件,那就是视图函数返回的对象有一个render()方法(或者表明该对象是一个TemplateResponse对象或等价方法)。
class MD1(MiddlewareMixin):

    def process_request(self, request):

        print("MD1里面的 process_request")

    def process_response(self, request, response):

        print("MD1里面的 process_response")

        return response

    def process_view(self, request, view_func, view_args, view_kwargs):

        print("-" * 80)

        print("MD1 中的process_view")

        print(view_func, view_func.__name__)

    def process_exception(self, request, exception):

        print(exception)

        print("MD1 中的process_exception")

        return HttpResponse(str(exception))

    def process_template_response(self, request, response):

        print("MD1 中的process_template_response")

        return response

class MD2(MiddlewareMixin):

    def process_request(self, request):

        print("MD2里面的 process_request")

        pass

    def process_response(self, request, response):

        print("MD2里面的 process_response")

        return response

    def process_view(self, request, view_func, view_args, view_kwargs):

        print("-" * 80)

        print("MD2 中的process_view")

        print(view_func, view_func.__name__)

    def process_exception(self, request, exception):

        print(exception)

        print("MD2 中的process_exception")

    def process_template_response(self, request, response):

        print("MD2 中的process_template_response")

        return response
views.py中:
def index(request):

    print("app01 中的 index视图")

    def render():

        print("in index/render")

        return HttpResponse("O98K")

    rep = HttpResponse("OK")

    rep.render = render

    return rep
访问index视图,终端输出的结果:
MD2里面的 process_request

MD1里面的 process_request

--------------------------------------------------------------------------------

MD2 中的process_view

<function index at 0x000001C111B97488> index

--------------------------------------------------------------------------------

MD1 中的process_view

<function index at 0x000001C111B97488> index

app01 中的 index视图

MD1 中的process_template_response

MD2 中的process_template_response

in index/render

MD1里面的 process_response

MD2里面的 process_response
从结果看出:
视图函数执行完之后,立即执行了中间件的process_template_response方法,顺序是倒序,先执行MD1的,在执行MD2的,接着执行了视图函数返回的HttpResponse对象的render方法,返回了一个新的HttpResponse对象,接着执行中间件的process_response方法。
中间件的执行流程
上一部分,我们了解了中间件中的5个方法,它们的参数、返回值以及什么时候执行,现在总结一下中间件的执行流程。
请求到达中间件之后,先按照正序执行每个注册中间件的process_reques方法,process_request方法返回的值是None,就依次执行,如果返回的值是HttpResponse对象,不再执行后面的process_request方法,而是执行当前对应中间件的process_response方法,将HttpResponse对象返回给浏览器。也就是说:如果MIDDLEWARE中注册了6个中间件,执行过程中,第3个中间件返回了一个HttpResponse对象,那么第4,5,6中间件的process_request和process_response方法都不执行,顺序执行3,2,1中间件的process_response方法。
process_request方法都执行完后,匹配路由,找到要执行的视图函数,先不执行视图函数,先执行中间件中的process_view方法,process_view方法返回None,继续按顺序执行,所有process_view方法执行完后执行视图函数。加入中间件3 的process_view方法返回了HttpResponse对象,则4,5,6的process_view以及视图函数都不执行,直接从最后一个中间件,也就是中间件6的process_response方法开始倒序执行。
中间件版登录验证
中间件版的登录验证需要依靠session,所以数据库中要有django_session表。
urls.py
from django.conf.urls import url

from app01 import views

urlpatterns = [

    url(r'^index/$', views.index),

    url(r'^login/$', views.login, name='login'),

]
views.py
from django.shortcuts import render, HttpResponse, redirect

def index(request):

    return HttpResponse('this is index')

def home(request):

    return HttpResponse('this is home')

def login(request):

    if request.method == "POST":

        user = request.POST.get("user")

        pwd = request.POST.get("pwd")

        if user == "Q1mi" and pwd == "123456":

            # 设置session

            request.session["user"] = user

            # 获取跳到登陆页面之前的URL

            next_url = request.GET.get("next")

            # 如果有,就跳转回登陆之前的URL

            if next_url:

                return redirect(next_url)

            # 否则默认跳转到index页面

            else:

                return redirect("/index/")

    return render(request, "login.html")
login.html
<!DOCTYPE html>

<html lang="en">

<head>

    <meta charset="UTF-8">

    <meta http-equiv="x-ua-compatible" content="IE=edge">

    <meta name="viewport" content="width=device-width, initial-scale=1">

    <title>登录页面</title>

</head>

<body>

<form action="{% url 'login' %}">

    <p>

        <label for="user">用户名:</label>

        <input type="text" name="user" id="user">

    </p>

    <p>

        <label for="pwd">密 码:</label>

        <input type="text" name="pwd" id="pwd">

    </p>

    <input type="submit" value="登录">

</form>

</body>

</html>
middlewares.py
class AuthMD(MiddlewareMixin):

    white_list = ['/login/', ]  # 白名单

    balck_list = ['/black/', ]  # 黑名单

    def process_request(self, request):

        from django.shortcuts import redirect, HttpResponse

        next_url = request.path_info

        print(request.path_info, request.get_full_path())

        if next_url in self.white_list or request.session.get("user"):

            return

        elif next_url in self.balck_list:

            return HttpResponse('This is an illegal URL')

        else:

            return redirect("/login/?next={}".format(next_url))
在settings.py中注册
MIDDLEWARE = [

    'django.middleware.security.SecurityMiddleware',

    'django.contrib.sessions.middleware.SessionMiddleware',

    'django.middleware.common.CommonMiddleware',

    'django.middleware.csrf.CsrfViewMiddleware',

    'django.contrib.auth.middleware.AuthenticationMiddleware',

    'django.contrib.messages.middleware.MessageMiddleware',

    'middlewares.AuthMD',

]
AuthMD中间件注册后,所有的请求都要走AuthMD的process_request方法。
访问的URL在白名单内或者session中有user用户名,则不做阻拦走正常流程;
如果URL在黑名单中,则返回This is an illegal URL的字符串;
正常的URL但是需要登录后访问,让浏览器跳转到登录页面。
注:AuthMD中间件中需要session,所以AuthMD注册的位置要在session中间的下方。
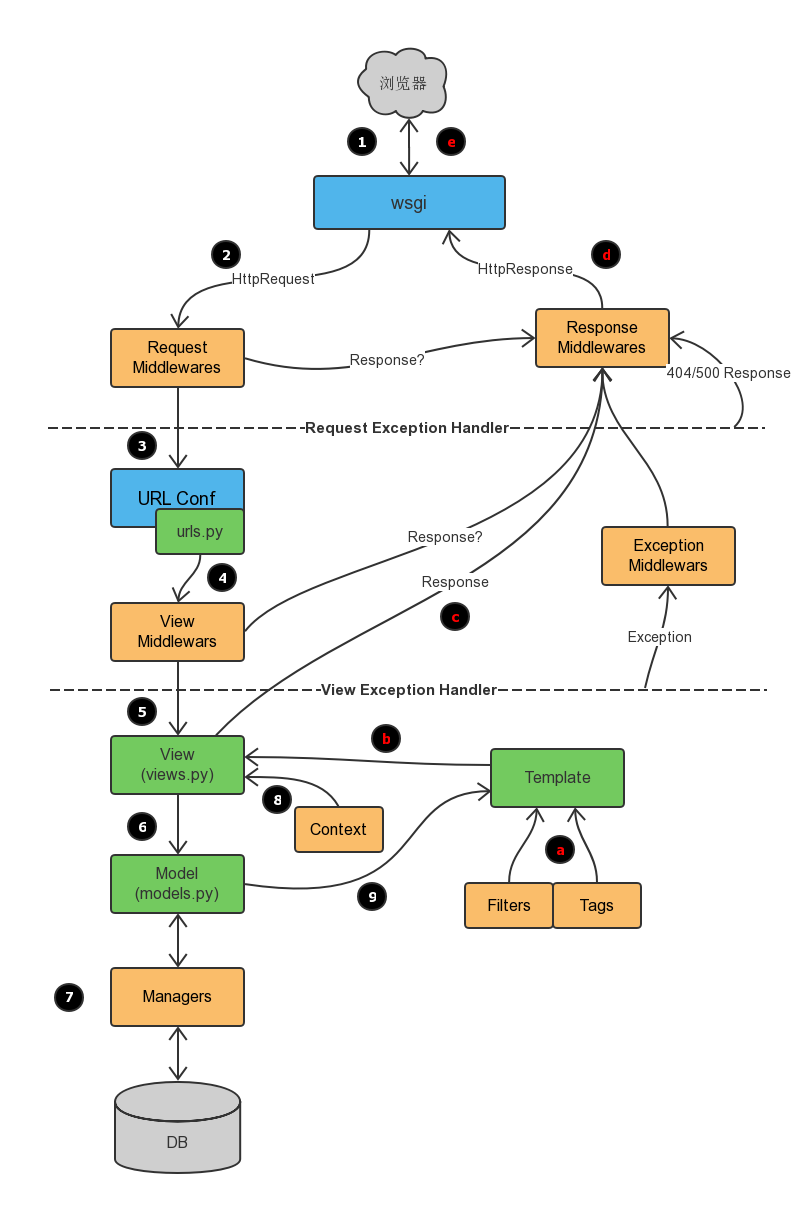
附:Django请求流程图
四:MVC和MTV
MVC模型
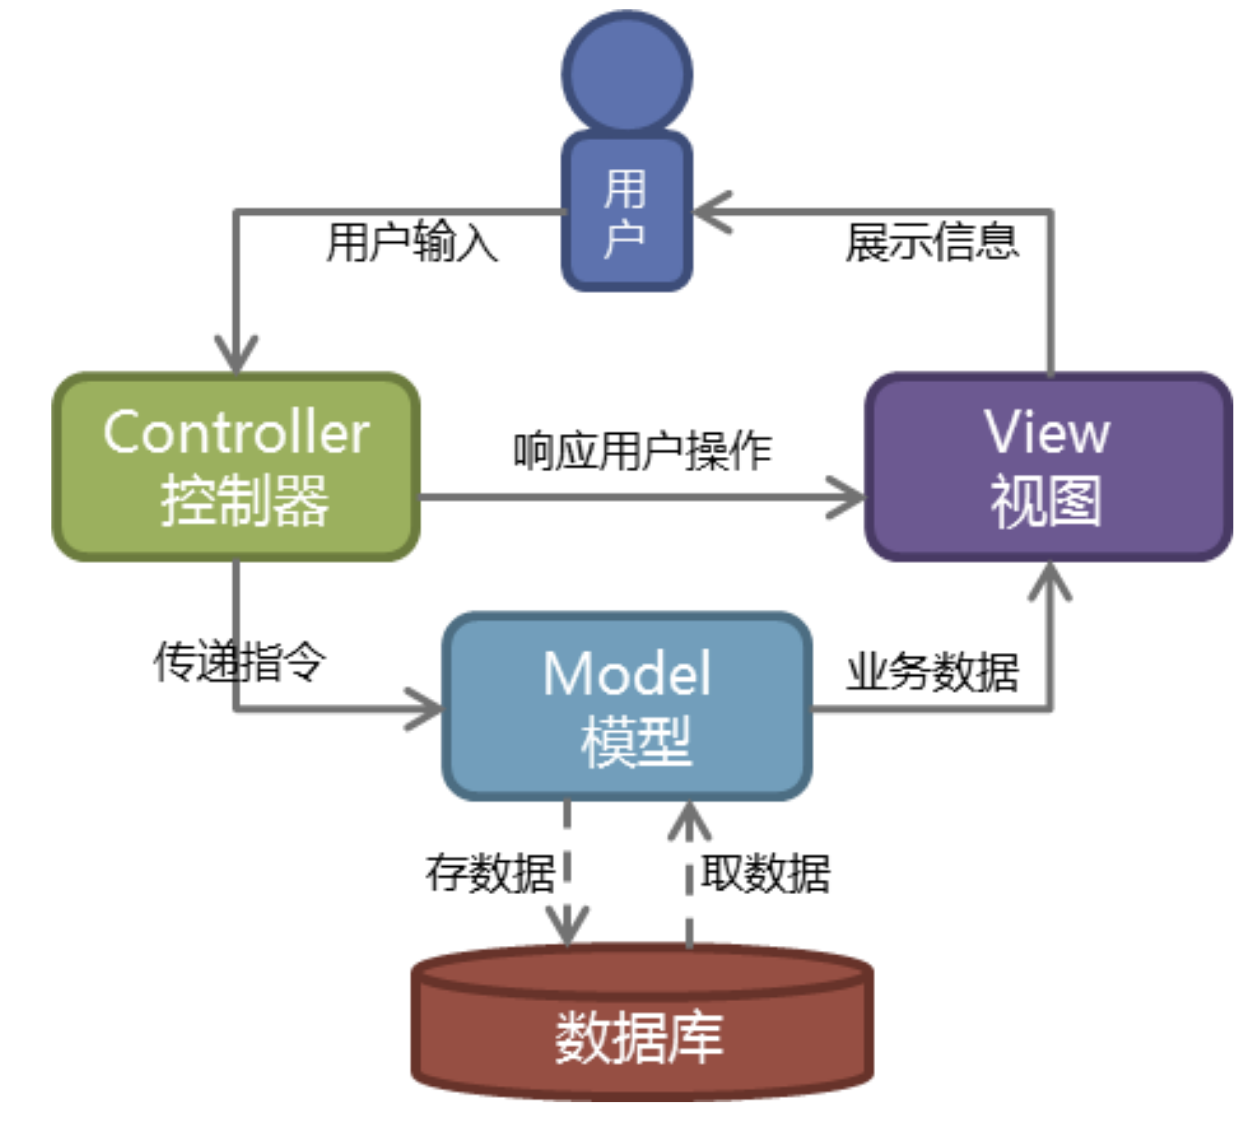
MVC模式(Model-View-Controller)是软件工程中的一种软件架构模式。

MVC把软件系统分为三个基本部分:模型(Model)、视图(View)和控制器(Controller)。
MVC的目的是实现一种动态的程序设计,便于后续对程序的修改和扩展简化,并且使程序某一部分的重复利用成为可能。
除此之外,此模式通过对复杂度的简化,使程序结构更加直观。
- 模型Model – 处理所有的数据库逻辑。模型提供了连接和操作数据库的抽象层。
- 控制器Controller - 管理所有的业务逻辑处理,包括负责响应用户请求、准备数据,以及决定如何展示数据等。
- 视图View – 负责渲染数据,通过HTML方式呈现给用户。
一个典型的Web MVC流程:
- Controller截获用户发出的请求;
- Controller调用Model完成状态的读写操作;
- Controller把数据传递给View;
- View渲染最终结果并呈献给用户。
MTV模型:
Django框架的设计模式借鉴了MVC框架的思想,也是分成三部分,来降低各个部分之间的耦合性。
MTV框架是Django的框架,三部分为:Model、Template(模板)和View
- M 代表模型(Model),数据存取层,该层处理与数据相关的所有事物:如何存取、包含哪些行为以及数据之间的关系等
- T 代表模板(Template),即表现层。该层处理与表现相关的决定:如何在页面和其他类型的文档中进行显示
- V 代表视图(View),即业务逻辑层。该层包含存取模型及调取恰当模型的相关逻辑,可看作模板与模型之间的桥梁
此外,Django还有一个urls分发器,
它的作用是将一个个URL的页面请求分发给不同的view处理,view再调用相应的Model和Template

Django的MTV和广义上的MVC的对应关系:模型(Model)----models.py视图(View)----templates控制器(Controller)-----View.py和urls.py

五:csrf
1. CSRF是什么
跨站请求伪造(CSRF)与跨站请求脚本正好相反。跨站请求脚本的问题在于,客户端信任服务器端发送的数据。跨站请求伪造的问题在于,服务器信任来自客户端的数据。
2. 无CSRF时存在的隐患
跨站请求伪造是指攻击者通过HTTP请求江数据传送到服务器,从而盗取回话的cookie。盗取回话cookie之后,攻击者不仅可以获取用户的信息,还可以修改该cookie关联的账户信息。
3. Form提交(CSRF)
那么在Django中CSRF验证大体是一个什么样的原理呢?下面通过一个小例子来简单说明一下:
我们把Django中CSRF中间件开启(在settings.py中)
'django.middleware.csrf.CsrfViewMiddleware'
在app01的views.py中写一个简单的后台
from django.shortcuts import render,redirect,HttpResponse

# Create your views here.

def login(request):

    if request.method == "GET":

        return render(request,'login.html')

    elif request.method == "POST":

        user = request.POST.get('user')

        pwd = request.POST.get('pwd')

        if user == 'root' and pwd == "123123":

            #生成随机字符串

            #写到用户浏览器cookie

            #保存在服务端session中

            #在随机字符串对应的字典中设置相关内容

            request.session['username'] = user

            request.session['islogin'] = True

            if request.POST.get('rmb',None) == '1':

                #认为设置超时时间

                request.session.set_expiry(10)

            return redirect('/index/')

        else:

            return render(request,'login.html')

def index(request):

    #获取当前随机字符串

    #根据随机字符串获取对应的信息

    if request.session.get('islogin', None):

        return render(request,'index.html',{'username':request.session['username']})

    else:

        return HttpResponse('please login ')

def logout(request):

    del request.session['username']

    request.session.clear()

    return redirect('/login/')
在templates中写一个简单的登陆创建两个文件(login.html,index.html)登陆成功跳转index.html
<!DOCTYPE html>

<html lang="en">

<head>

    <meta charset="UTF-8">

    <title>Title</title>

</head>

<body>

    <form action="/login/" method="post">

        <input type="text" name="user" />

        <input type="text" name="pwd" />

        <input type="checkbox" name="rmb" value="1" /> 10s免登录

        <input type="submit" value="提交" />

    </form>

</body>

</html>
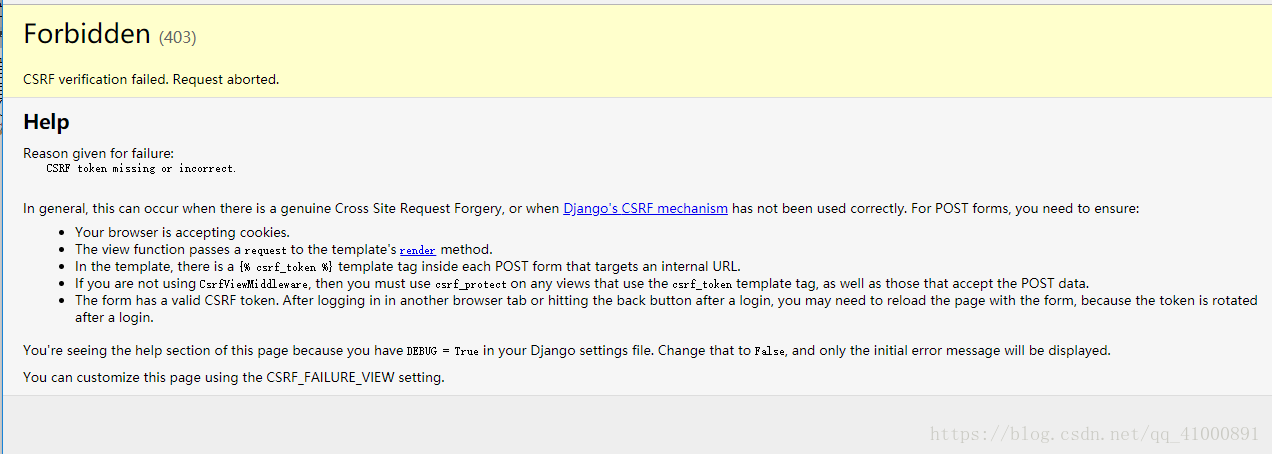
这是浏览器中的样式 :

那么如果这个时候,我们点击登陆提交,django会因为无法通过csrf验证返回一个403:
而csrf验证其实是对http请求中一段随机字符串的验证,那么这段随机字符串从何而来呢?这个时候我们尝试把login.html做一个修改添加一句 {% csrf_token %}:
<!DOCTYPE html>

<html lang="en">

<head>

    <meta charset="UTF-8">

    <title>Title</title>

</head>

<body>

    <form action="/login/" method="post">

        {% csrf_token %}

        <input type="text" name="user" />

        <input type="text" name="pwd" />

        <input type="checkbox" name="rmb" value="1" /> 10s免登录

        <input type="submit" value="提交" />

    </form>

</body>

</html>
这个时候我们再通过浏览器元素审查,就会发现一段新的代码:
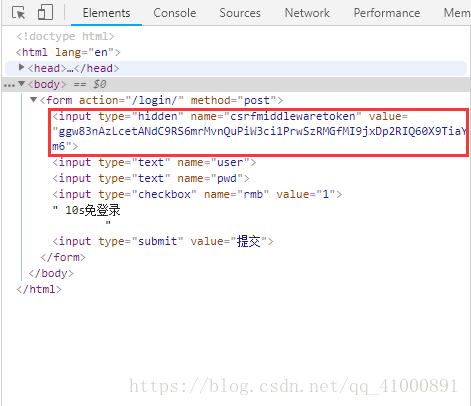
Django在html中创建一个基于input框value值的随机字符串 ,这个时候我们再次输入后台设置的账号密码,进行提交,会发现提交成功,进入了我们的index.html界面当中:

这就是csrf的基本原理,如果没有这样一段随机字符串做验证,我们只要在另一个站点,写一个表单,提交到这个地址下,是一样可以发送数据的,这样就造成了极大的安全隐患。而我们新添加的csrf_token就是在我们自己的站点中,设置的隐藏参数,用来进行csrf验证。
4. Ajax提交 (CSRF)
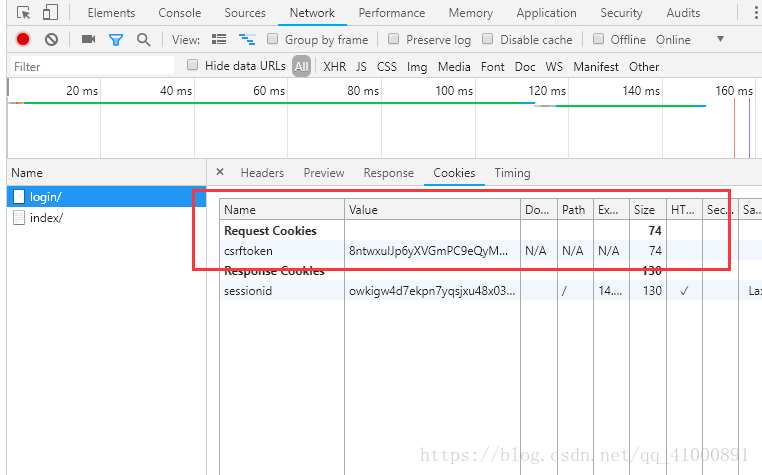
上面是一个基于form表单提交的小例子,csrf中间件要验证的随机字符串存放在了form表单当中,发送到了后台,那么如果我们使用的是ajax异步请求,是不是也要传送这样一个类似的字符串呢?答案是肯定的,但这个字符串又该来自哪里?其实它来自cookie,在上面的那个小例子当中,我们打开F12元素审查,会发现,在cookie中也存放这样一个csrftoken:
所以下面呢我们就再聊一下ajax请求中如何进行。
首先我们引入两个js文件放在工程项目的static当中,这两个文件是jquery的库文件,方便我们进行请求操作:
然后我们把之前的login.html做一个修改:

<!DOCTYPE html>

<html lang="en">

<head>

    <meta charset="UTF-8">

    <title>Title</title>

</head>

<body>

    <form action="/login/" method="post">

        {% csrf_token %}

        <input type="text" name="user" />

        <input type="text" name="pwd" />

        <input type="checkbox" name="rmb" value="1" /> 10s免登录

        <input type="submit" value="提交" />

        <input id="btn" type="button" value="按钮">

    </form>

    <script src="/static/jquery-1.12.4.js"></script>

    <script src="/static/jquery.cookie.js"></script>

    <script>

        $(function () {

            $('#btn').click(function () {

                $.ajax({

                    url:'/login/',

                    type:"POST",

                    data:{'username':'root','pwd':'123123'},

                    success:function (arg) {

                    }

                })

            })

        })

    </script>

</body>

</html>
这个时候我们打开界面,点击按钮,会发现http请求发送403错误,很明显我们直接发送请求是不合适的,并没有带随机字符串过去:

所以,我们应该先从cookie中获取到这个随机字符串,这个随机字符串的名字,我们可以通过之前的验证得出是“csrftoken”:
var csrftoken = $.cookie('csrftoken');
这样变量csrftoken取到的就是我们的随机字符串;但是如果后台想要去接收这个随机字符串,也应该需要一个key,那这个key是什么?我们可以通过查找配置文件,通过控制台输出的方式验证这个key:
from django.conf import settings

print(settings.CSRF_HEADER_NAME)
最后输出的是:
HTTP_X_CSRFTOKEN
但这里需要注意的是,HTTP_X_CSRFTOKEN并不是请求头中发送给django真正拿到的字段名,前端发过去真正的字段名是:
X-CSRFtoken
那为什么从Django的控制台输出会得到HTTP_X_CSRFTOKEN呢?其实我们前端的请求头X-CSRFtoken发送到后台之后,django会做一个名字处理,在原来的字段名前家一个HTTP_,并且将原来的小写字符变成大写的,“-”会处理成下划线“_”,所以会有这两个字段的不一样。但本质上他们指向的都是同一个字符串。知道这一点之后,那么我们前端就可以真正地发起含有CSRF请求头的数据请求了。
<!DOCTYPE html>

<html lang="en">

<head>

    <meta charset="UTF-8">

    <title>Title</title>

</head>

<body>

    <form action="/login/" method="post">

        {% csrf_token %}

        <input type="text" name="user" />

        <input type="text" name="pwd" />

        <input type="checkbox" name="rmb" value="1" /> 10s免登录

        <input type="submit" value="提交" />

        <input id="btn" type="button" value="按钮">

    </form>

    <script src="/static/jquery-1.12.4.js"></script>

    <script src="/static/jquery.cookie.js"></script>

    <script>

        var csrftoken = $.cookie('csrftoken');

        $(function () {

            $('#btn').click(function () {

                $.ajax({

                    url:'/login/',

                    type:"POST",

                    data:{'username':'root','pwd':'123123'},

                    header:{'X-CSRFtoken':csrftoken},

                    success:function (arg) {

                    }

                })

            })

        })

    </script>

</body>

</html>
在页面中点击按钮之后,会发现请求成功!
那么这个时候有人会问,难道所有的ajax请求,都需要这样获取一次写进去吗,会不会很麻烦。针对这一点,jquery的ajax请求中为我们封装了一个方法:ajaxSetup,它可以为我们所有的ajax请求做一个集体配置,所以我们可以进行如下改造,这样不管你的ajax请求有多少,都可以很方便地进行csrf验证了:
<!DOCTYPE html>

<html lang="en">

<head>

    <meta charset="UTF-8">

    <title>Title</title>

</head>

<body>

    <form action="/login/" method="POST">

        {% csrf_token %}

        <input type="text" name="user" />

        <input type="text" name="pwd" />

        <input type="checkbox" name="rmb" value="1" /> 10s免登录

        <input type="submit" value="提交" />

        <input id="btn" type="button" value="按钮">

    </form>

    <script src="/static/jquery-1.12.4.js"></script>

    <script src="/static/jquery.cookie.js"></script>

    <script>

        var csrftoken = $.cookie('csrftoken');

        function csrfSafeMethod(method) {

            // these HTTP methods do not require CSRF protection

            return (/^(GET|HEAD|OPTIONS|TRACE)$/.test(method));

        }

        $.ajaxSetup({

            beforeSend: function(xhr, settings) {

                if (!csrfSafeMethod(settings.type) && !this.crossDomain) {

                    xhr.setRequestHeader("X-CSRFToken", csrftoken);

                }

            }

        });

        $(function () {

            $('#btn').click(function () {

                $.ajax({

                    url:'/login/',

                    type:"POST",

                    data:{'username':'root','pwd':'123123'},

                    success:function (arg) {

                    }

                })

            })

        });

    </script>

</body>

</html>
5. 装饰器配置
在讲完基本的csrf验证操作之后,我们还有一个可说的地方。在平时的产品需求当中,并不一定所有的接口验证都需要进行csrf验证,而我们之前采用的是在settings.py中间件配置进行全局配置,那么如果遇到了不需要开启csrf的时候该怎么办呢?
from django.views.decorators.csrf import csrf_exempt,csrf_protect

@csrf_protect

def index(request):

    .....

@csrf_exempt

def login(request):
@csrf_protect 是 开启csrf验证的装饰器,@csrf_exempt是关闭csrf验证的装饰器。
6. 前后端分离项目手动将csrftoken写入cookie的方法
手动设置,在view 中添加(经常失效,建议采用2,3,4种方法,亲测有效)
request.META["CSRF_COOKIE_USED"] = True
手动调用 csrf 中的 get_token(request) 或 rotate_token(request) 方法。
from django.middleware.csrf import get_token ,rotate_token

def server(request):

    # get_token(request)       // 两者选一

    # rotate_token(request)   // 此方法每次设置新的cookies

    return render(request, ‘server.html‘)
在HTML模板中添加 {% csrf_token %}
在需要设置cookie的视图上加装饰器 ensure_csrf_cookie()
from django.views.decorators.csrf import ensure_csrf_cookie

@ensure_csrf_cookie

def server(request):

    return render(request,'server.html')
django模块导入/函数/中间件/MVC和MTV/CSRF的更多相关文章
- Django模块导入
Django模块导入篇 Django基础 urls.py 导入app中的视图函数 from app名字 import views app.view视图函数中导入models.py中的类 from ap ...
- Python19/1/11--标签与过滤器/Django模块导入继承/静态文件配置
1 模板语言之变量: -{{ }} 相当于执行了print -深度查询 . 如果是方法,不能加括号,不能传参数2 过滤器 {{ 变量|过滤器的名字:'参数' }} -add -default -s ...
- python 入门学习---模块导入三种方式及中文凝视
Python 有三种模块导入函数 1. 使用import 导入模块 import modname : 模块是指一个能够交互使用,或者从还有一Python 程序訪问的代码段.仅仅要导入了一个模块,就能够 ...
- python模块导入的问题
从模块导入函数时,通常可以使用 import somemodule 或者 from somemodule import somefunction 或者 from somemodule import s ...
- 模板、中间件以及MVC与MTV
模板 基本数据类型的渲染 {#基础数据类型的渲染#} {#1. 变量#} {{ name }} {#2. 列表#} {#通过点索引可以取值#} {{ list.0 }} {#for循环取值#} {% ...
- web 框架的本质及自定义web框架 模板渲染jinja2 mvc 和 mtv框架 Django框架的下载安装 基于Django实现的一个简单示例
Django基础一之web框架的本质 本节目录 一 web框架的本质及自定义web框架 二 模板渲染JinJa2 三 MVC和MTV框架 四 Django的下载安装 五 基于Django实现的一个简单 ...
- django基础一:web、wsgi、mvc、mtv
一.web框架 web框架,即framework,特指为解决一个开放性问题而设计的具有一定约束性的支撑结构,使用框架可以快速开发特定的系统.他山之石,可以攻玉.python的所有web框架,都是对so ...
- Django CBV装饰器 中间件 auth模块 CSRF跨站请求
CBV添加装饰器 给CBV添加装饰器有三种方法,三种方法都需要导入模块: from django.utils.decorators import method_decorator 第一种直接在方法上面 ...
- Django学习之六:Django 常用模块导入记忆
Django 常用模块导入记忆 django相关 1. urls相关操作 from django.urls import path, re_path, include from django.urls ...
随机推荐
- python tkinter模版
import tkinter import time import threading from tkinter import ttk event = threading.Event() once=0 ...
- B - 青蛙的约会
两只青蛙在网上相识了,它们聊得很开心,于是觉得很有必要见一面. 它们很高兴地发现它们住在同一条纬度线上,于是它们约定各自朝西跳,直到碰面为止. 可是它们出发之前忘记了一件很重要的事情,既没有问清楚对方 ...
- FireFox浏览器的about:config参数大全及其具体用途介绍
FireFox浏览器的about:config参数大全及其具体用途介绍,注意:这还远不是所有的about:config参数,由于设置参数太多,官方也只提供英文版本的说明,这里提供的FireFox ab ...
- 是未来还是“有毒”?紧抓球鞋风口的毒APP机遇与危机并存
编辑 | 于斌 出品 | 于见(mpyujian) 新一代的"潮流"之风正在席卷新生代消费市场,从去年开始,国内二手球鞋交易领域突然开始火爆,大有成为新一轮"风口&quo ...
- 基于Java在线学习系统设计与实现
Spring+SpringMVC+MyBatis+Bootstrap+Vue开发在线学习系统 本课题的主要内容是开发基于Java EE的在线学习平台,使用MVC经典开发模式. ...
- tomcat集群搭建集成nginx负载均衡
软件基础+版本: 1.3台centos7系统,其中都已经配置完成了jdk环境,jdk的版本为 [root@node03 bin]# java -version java version "1 ...
- 从心出发-刷leetcode写给5年后的自己
而立之年终未立,不惑而年犹存惑!这或许就是所谓的中年危机吧! 自认为是一个"勤奋"的人,又"未有寸功",天天碌碌,不知何为. "常立志"而未 ...
- JS高级---作用域,作用域链和预解析
作用域,作用域链和预解析 变量---->局部变量和全局变量, 作用域: 就是变量的使用范围 局部作用域和全局作用域 js中没有块级作用域---一对括号中定义的变量,这个变量可以在大括 ...
- Mysql数据多表查询及pymysql的使用
Exists关键字表示存在,在使用exists关键字时,内增查询语句不返回查询记录,而是返回一个真假值,True或者False,返回True外层语句才会进行查询:返回False时,外层查询语句不会进行 ...
- java.lang.NoClassDefFoundError: org/apache/commons/lang/exception/NestableRuntimeException
运行项目时出现java.lang.NoClassDefFoundError: org/apache/commons/lang/exception/NestableRuntimeException时,只 ...