基于深度学习的人脸识别系统(Caffe+OpenCV+Dlib)【二】人脸预处理
前言
基于深度学习的人脸识别系统,一共用到了5个开源库:OpenCV(计算机视觉库)、Caffe(深度学习库)、Dlib(机器学习库)、libfacedetection(人脸检测库)、cudnn(gpu加速库)。
用到了一个开源的深度学习模型:VGG model。
最终的效果是很赞的,识别一张人脸的速度是0.039秒,而且最重要的是:精度高啊!!!
CPU:intel i5-4590
GPU:GTX 980
系统:Win 10
OpenCV版本:3.1(这个无所谓)
Caffe版本:Microsoft caffe (微软编译的Caffe,安装方便,在这里安利一波)
Dlib版本:19.0(也无所谓
CUDA版本:7.5
cudnn版本:4
libfacedetection:6月份之后的(这个有所谓,6月后出了64位版本的)
这个系列纯C++构成,有问题的各位朋同学可以直接在博客下留言,我们互相交流学习。
====================================================================
本篇是该系列的第二篇博客,介绍我如何设计人脸检测与预处理的接口。
思路
人脸检测与预处理作为人脸识别的步骤之一,其质量能够直接影响识别的精度。而如何在保持精度的条件下最大化运行速度也是需要注意的地方。这里我们不使用OpenCV自带的分类器,而使用一个开源的windows平台下的人脸检测库。具体可以看我的这篇博客:
http://blog.csdn.net/mr_curry/article/details/51804072
那么首先,我们先需要检测出人脸。新建FaceDetect.h,FaceRotate.h,FaceProcessing.h,一个FaceDetect.cpp,FaceProcessing.cpp开始编写。(这里假定你已经添加好dlib的属性表了)
注:下面的人脸预处理函数,是IEEE数据库上的一篇论文所述的方法,2011年的
FaceDetect.h:(提供一个总的接口)
#include "facedetect-dll.h"

#include <opencv.hpp>

using namespace cv;

// define

Mat Facedetect(Mat frame);

//dlib的配置函数 后面几章会讲

void Dlib_Prodefine();FaceRotate.h:(用于关键点矫正)
#include <dlib/image_processing/frontal_face_detector.h>

#include <dlib/image_processing/render_face_detections.h>

#include <dlib/image_processing.h>

#include <dlib/gui_widgets.h>

#include <dlib/image_io.h>

#include<dlib/opencv/cv_image.h>

#include <dlib/opencv.h>

using namespace dlib;

frontal_face_detector detector = get_frontal_face_detector();

shape_predictor sp;//Already getFaceProcessing.h:(用于对人脸进行预处理)
#include <opencv2/opencv.hpp>

using namespace std;

using namespace cv;

Mat FaceProcessing(const Mat &img_, double gamma = 0.2, double sigma0 = 1, double sigma1 = -2, double mask = 0, double do_norm = 10);
FaceProcessing.cpp:
#include"FaceProcessing.h"

int gauss(float x[], float y[], int length, float sigma);

Mat gaussianfilter(Mat img, double sigma0, double sigma1, double shift1, double shift2);

Mat FaceProcessing(const Mat &img_, double gamma = 0.2, double sigma0 = 1, double sigma1 = -2, double mask = 0, double do_norm = 10);

//找出矩阵中的最大值或最小值,输入MAX,或MIN

double MatMaxMin(Mat im, String flag = "MAX")

{

    double value = im.ptr<float>(0)[0];

    if (flag == "MAX")

    {

        for (int i = 0; i<im.rows; i++)

            for (int j = 0; j<im.cols; j++)

                if (im.ptr<float>(i)[j]>value)

                    value = im.ptr<float>(i)[j];

        return value;

    }

    else if (flag == "MIN")

    {

        for (int i = 0; i<im.rows; i++)

            for (int j = 0; j<im.cols; j++)

                if (im.ptr<float>(i)[j]<value)

                    value = im.ptr<float>(i)[j];

        return value;

    }

    return -1;

}

//高斯滤波

Mat gaussianfilter(Mat img, double sigma0, double sigma1, double shift1 = 0, double shift2 = 0)

{

    int i, j;

    sigma0 = (float)sigma0;

    sigma1 = (float)sigma1;

    shift1 = (float)shift1;

    shift2 = (float)shift2;

    Mat img2 = img;

    Mat img3 = img;

    Mat  imgResult;

    //将数据存入横向高斯模板中

    int rowLength = (int)(floor(3.0*sigma0 + 0.5 - shift1) - ceil(-3.0*sigma0 - 0.5 - shift1) + 1);

    int rowBegin = (int)ceil(-3.0*sigma0 - 0.5 - shift1);

    float rowArray[30], Gx[30];

    for (i = 0; i < rowLength; i++)

    {

        rowArray[i] = rowBegin + i;

    }

    gauss(rowArray, Gx, rowLength, sigma0);

    Mat kx = Mat(1, rowLength, CV_32F); //转换成mat类型

    float *pData1 = kx.ptr<float>(0);

    for (i = 0; i < rowLength; i++)

    {

        pData1[i] = Gx[i];

    }

    //将数据存入纵向高斯模板中

    int colLength = (int)(floor(3.0*sigma1 + 0.5 - shift2) - ceil(-3.0*sigma1 - 0.5 - shift2) + 1);

    int colBegin = (int)ceil(-3.0*sigma1 - 0.5 - shift2);

    float colArray[30], Gy[30];

    for (i = 0; i<colLength; i++)

    {

        colArray[i] = colBegin + i;

    }

    gauss(colArray, Gy, colLength, sigma1);

    Mat ky = Mat(colLength, 1, CV_32F);

    float *pData2;

    for (i = 0; i < colLength; i++)

    {

        pData2 = ky.ptr<float>(i);

        pData2[0] = Gy[i];

    }

    filter2D(img, img2, img.depth(), kx, Point(-1, -1));

    filter2D(img2, imgResult, img2.depth(), ky, Point(-1, -1));

    return imgResult;

}

//行列卷积

int gauss(float x[], float y[], int length, float sigma)

{

    int i;

    float sum = 0.0;

    for (i = 0; i<length; i++)

    {

        x[i] = exp(-pow(x[i], 2) / (2 * pow(sigma, 2)));

        sum += x[i];

    }

    for (i = 0; i<length; i++)

    {

        y[i] = x[i] / sum;

    }

    return 1;

}

Mat FaceProcessing(const Mat &img_, double gamma , double sigma0 , double sigma1, double mask , double do_norm)

{

    Mat img;

    img_.convertTo(img, CV_32F);

    Mat imT1, imT2;

    int rows = img.rows;

    int cols = img.cols;

    Mat im = img;

    int b = floor(3 * abs(sigma1));//左右扩充边缘的距离

    Mat imtemp(Size(cols + 2 * b, rows + 2 * b), CV_32F, Scalar(0));//保存扩充的图形

    Mat imtemp2(Size(cols, rows), CV_32F, Scalar(0));

    float s = 0.0;

    //Gamma correct input image to increase local contrast in shadowed regions.

    if (gamma == 0)

    {

        double impixeltemp = 0;

        double Max = MatMaxMin(im, "MAX");//等价于max(1,max(max(im)))

        for (int i = 0; i<rows; i++)

            for (int j = 0; j<cols; j++)

            {

                impixeltemp = log(im.ptr<float>(i)[j] + Max / 256);

                im.ptr<float>(i)[j] = impixeltemp;

            }

    }

    else

    {

        for (int i = 0; i<rows; i++)

            for (int j = 0; j<cols; j++)

                im.ptr<float>(i)[j] = pow(im.ptr<float>(i)[j], gamma);

    }

    float *pData1;

    //run prefilter, if any

    if (sigma1)

    {

        double border = 1;

        if (border) //add extend-as-constant image border to reduce

            //boundary effects

        {

            for (int i = 0; i<rows + 2 * b - 1; i++)

            {

                pData1 = imtemp.ptr<float>(i);

                for (int j = 0; j<cols + 2 * b - 1; j++){

                    //中间

                    if (i >= b&&i<im.rows + b&&j >= b&&j<im.cols + b)

                        pData1[j] = im.ptr<float>(i - b)[j - b];

                    //左上

                    else if (i<b&&j<b)

                        pData1[j] = im.ptr<float>(0)[0];

                    //右上

                    else if (i<b&&j >= im.cols + b&&j<cols + 2 * b)

                        pData1[j] = im.ptr<float>(0)[cols - 1];

                    //左下

                    else if (i >= im.rows + b&&i<rows + 2 * b&&j<b)

                        pData1[j] = im.ptr<float>(rows - 1)[0];

                    //右下

                    else if (i >= im.rows + b&&j >= im.cols + b)

                        pData1[j] = im.ptr<float>(im.rows - 1)[im.cols - 1];

                    //上方

                    else if (i<b&&j >= b&&j<im.cols + b)

                        pData1[j] = im.ptr<float>(0)[j - b];

                    //下方

                    else if (i >= im.rows + b&&j >= b&&j<im.cols + b)

                        pData1[j] = im.ptr<float>(im.rows - 1)[j - b];

                    //左方

                    else if (j<b&&i >= b&&i<im.rows + b)

                        pData1[j] = im.ptr<float>(i - b)[0];

                    //右方

                    else if (j >= im.cols + b&&i >= b&&i<im.rows + b)

                        pData1[j] = im.ptr<float>(i - b)[im.cols - 1];/**/

                }

            }

        }

        else

        {

            if (sigma0>0)

            {

                imT1 = gaussianfilter(imtemp, sigma0, sigma0);

                imT2 = gaussianfilter(imtemp, -sigma1, -sigma1);

                imtemp = imT1 - imT2;

                //imtemp=gaussianfilter(imtemp,sigma0,sigma0)-gaussianfilter(imtemp,-sigma1,-sigma1);

            }

            else

                imtemp = imtemp - gaussianfilter(imtemp, -sigma1, -sigma1);

        }

        if (border)

        {

            //再取回中间部分

            for (int i = 0; i<rows; i++)

            {

                pData1 = im.ptr<float>(i);

                for (int j = 0; j<cols; j++)

                    pData1[j] = imtemp.ptr<float>(i + b)[j + b];

            }

        }

        //  test=im.ptr<float>(19)[19];

    }

    /*

    % Global contrast normalization. Normalizes the spread of output

    % values. The mean is near 0 so we don't bother to subtract

    % it. We use a trimmed robust scatter measure for resistance to

    % outliers such as specularities and image borders that have

    % different values from the main image.  Usually trim is about

    % 10.

    */

    if (do_norm)

    {

        double a = 0.1;

        double trim = abs(do_norm);

        //im = im./mean(mean(abs(im).^a))^(1/a);

        imtemp2 = abs(im);

        //cvPow(&im,&im,a)//为每个元素求pow

        for (int i = 0; i<rows; i++)

        {

            pData1 = imtemp2.ptr<float>(i);//imtemp2为零矩阵

            for (int j = 0; j<cols; j++)

                pData1[j] = pow(imtemp2.ptr<float>(i)[j], a);

        }

        //求平均值s

        s = 0.0;

        for (int i = 0; i<rows; i++)

        {

            pData1 = imtemp2.ptr<float>(i);

            for (int j = 0; j<cols; j++)

                s += imtemp2.ptr<float>(i)[j];

        }

        s /= (im.rows*im.cols);

        double temp = pow(s, 1 / a);

        for (int i = 0; i<rows; i++)

        {

            pData1 = im.ptr<float>(i);

            for (int j = 0; j<cols; j++)

                pData1[j] = pData1[j] / temp;//点除

        }

        //im = im./mean(mean(min(trim,abs(im)).^a))^(1/a);

        imtemp2 = abs(im);

        for (int i = 0; i<rows; i++)

        {

            pData1 = imtemp2.ptr<float>(i);

            for (int j = 0; j<cols; j++)

                if (pData1[j]>trim)

                    pData1[j] = trim;//min(trim,abs(im))

        }

        //cvPow(&im,&im,a);////为每个元素求pow

        for (int i = 0; i<rows; i++)

        {

            pData1 = imtemp2.ptr<float>(i);

            for (int j = 0; j<cols; j++)

                pData1[j] = pow(pData1[j], a);

        }

        //求平均值

        s = 0.0;

        for (int i = 0; i<rows; i++)

        {

            pData1 = imtemp2.ptr<float>(i);

            for (int j = 0; j<cols; j++)

                s += pData1[j];

        }

        s /= (im.rows*im.cols);

        temp = pow(s, 1 / a);//

        for (int i = 0; i<rows; i++)

        {

            pData1 = im.ptr<float>(i);

            for (int j = 0; j<cols; j++)

                pData1[j] = pData1[j] / temp;//点除

        }

        if (do_norm>0)

        {//im = trim*tanh(im/trim);

            for (int i = 0; i<rows; i++)

            {

                pData1 = im.ptr<float>(i);

                for (int j = 0; j<cols; j++)

                    pData1[j] = trim*tanh(pData1[j] / trim);

            }

        }

    }

    //归一化处理

    double Min;

    Min = MatMaxMin(im, "MIN");//找到矩阵的最小值

    for (int i = 0; i<rows; i++)

    {

        pData1 = im.ptr<float>(i);

        for (int j = 0; j<cols; j++)

            pData1[j] += Min;

    }

    //im.convertTo(im, CV_32F, 1.0/255.0);

    normalize(im, im, 0, 255, NORM_MINMAX);

    //normalize(im,im,0,255,NORM_MINMAX);

    /*  for(int i=0;i<rows;i++)

    {

    pData1=im.ptr<float>(i);

    for(int j=0;j<cols;j++)

    pData1[j]*=255;

    }*/

    im.convertTo(im, CV_8UC1);

    return im;

}
FaceDetect.cpp:
#include <FaceDetect.h>

#include <FaceRotate.h>

#include <FaceProcessing.h>

void Dlib_Prodefine()

{

    deserialize("shape_predictor_68_face_landmarks.dat") >> sp;//读入标记点文件

}

Mat Facedetect(Mat frame)//脸是否存在

{

    Mat gray,error;

    cvtColor(frame, gray, CV_BGR2GRAY);

    int * pResults = NULL;

    pResults = facedetect_frontal_tmp((unsigned char*)(gray.ptr(0)), gray.cols, gray.rows, gray.step, 1.2f, 5, 24);

    int peopleNUM = (pResults ? *pResults : 0);

    for (int i = 0; i < peopleNUM; i++)//代表有几张人脸(pResults ? *pResults : 0)

    {

        short * p = ((short*)(pResults + 1)) + 6 * i;

        Rect opencvRect(p[0], p[1], p[2], p[3]);

        //gray = gray(opencvRect);

        dlib::rectangle dlibRect((long)opencvRect.tl().x, (long)opencvRect.tl().y, (long)opencvRect.br().x - 1, (long)opencvRect.br().y - 1);

        dlib::full_object_detection shape = sp(dlib::cv_image<uchar>(gray), dlibRect);//标记点

        std::vector<full_object_detection> shapes;

        shapes.push_back(shape);//把点保存在了shape中

        dlib::array<array2d<rgb_pixel>>  face_chips;

        extract_image_chips(dlib::cv_image<uchar>(gray), get_face_chip_details(shapes), face_chips);

        Mat pic = toMat(face_chips[0]);

        cvtColor(pic, pic, CV_BGR2GRAY);

        resize(pic, pic, Size(224, 224));

        return FaceProcessing(pic);

    }

    return error;//如果没有检测出人脸 将返回一个空矩阵

}
在上述代码中,关于dlib的array2d< rgb_pixel >类型与Mat类型的转换可以在这里进行体现:
dlib::array<array2d<rgb_pixel>>  face_chips;

        extract_image_chips(dlib::cv_image<uchar>(gray), get_face_chip_details(shapes), face_chips);

        Mat pic = toMat(face_chips[0]);
其中face_chips[0]即为一个array2d< rgb_pixel >的类型,可以通过toMat函数进行转换。
将Mat类型转换为array2d< rgb_pixel >则可以用:
Mat gray;

dlib::cv_image<uchar>(gray);
在这个地方,我们特别需要注意,还要转换一次灰度:
cvtColor(pic, pic, CV_BGR2GRAY);

        resize(pic, pic, Size(224, 224));

        return FaceProcessing(pic);
为什么?因为在测试过程中我发现,dlib函数中的toMat函数返回的不是CV_BGR2GRAY(OpenCV中的灰度图像类型),如果这里你不加,那么这个预处理将会只卷积左半部分脸。
我们可以看看识别的效果。调用FaceDetect()函数接口:
Dlib_Prodefine();

    //Caffe_Prodefine();

    Mat lena = imread("lena.jpg");

    imshow("Face Detect", Facedetect(lena));

    waitKey(0);
当然,这个地方,在进行检测之前,我们最好还是先判断FaceDetect(lena)是否为空,再进行Imshow.
检测与处理图片效果显示:
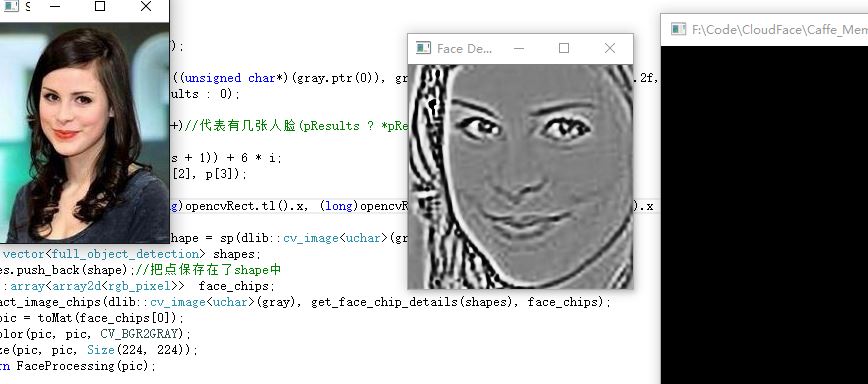
为什么要把图片最后转换为224*224的尺寸?因为:Vgg网络模型接收的就是224*224的尺寸,后面还会讲这个东西。
基于深度学习的人脸识别系统(Caffe+OpenCV+Dlib)【二】人脸预处理的更多相关文章
- 基于深度学习的中文语音识别系统框架(pluse)
目录 声学模型 GRU-CTC DFCNN DFSMN 语言模型 n-gram CBHG 数据集 本文搭建一个完整的中文语音识别系统,包括声学模型和语言模型,能够将输入的音频信号识别为汉字. 声学模型 ...
- 【OCR技术系列之四】基于深度学习的文字识别(3755个汉字)
上一篇提到文字数据集的合成,现在我们手头上已经得到了3755个汉字(一级字库)的印刷体图像数据集,我们可以利用它们进行接下来的3755个汉字的识别系统的搭建.用深度学习做文字识别,用的网络当然是CNN ...
- 【OCR技术系列之四】基于深度学习的文字识别
上一篇提到文字数据集的合成,现在我们手头上已经得到了3755个汉字(一级字库)的印刷体图像数据集,我们可以利用它们进行接下来的3755个汉字的识别系统的搭建.用深度学习做文字识别,用的网络当然是CNN ...
- 基于深度学习的回声消除系统与Pytorch实现
文章作者:凌逆战 文章代码(pytorch实现):https://github.com/LXP-Never/AEC_DeepModel 文章地址(转载请指明出处):https://www.cnblog ...
- VulDeePecker:基于深度学习的脆弱性检测系统
最近的两款软件,VUDDY和VulPecker,假阴性率高而假阳性率低,用于检测由代码克隆引发的漏洞.而如果用于非代码克隆引起的漏洞则会出现高误报率. 本文使用深度学习处理程序中的代码片段,不应由专家 ...
- 深度学习(PYTORCH)-2.python调用dlib提取人脸68个特征点
在看官方教程时,无意中发现别人写的一个脚本,非常简洁. 官方教程地址:http://pytorch.org/tutorials/beginner/data_loading_tutorial.html# ...
- 基于深度学习的人脸识别系统(Caffe+OpenCV+Dlib)【一】如何配置caffe属性表
前言 基于深度学习的人脸识别系统,一共用到了5个开源库:OpenCV(计算机视觉库).Caffe(深度学习库).Dlib(机器学习库).libfacedetection(人脸检测库).cudnn(gp ...
- 基于深度学习的人脸识别系统(Caffe+OpenCV+Dlib)【三】VGG网络进行特征提取
前言 基于深度学习的人脸识别系统,一共用到了5个开源库:OpenCV(计算机视觉库).Caffe(深度学习库).Dlib(机器学习库).libfacedetection(人脸检测库).cudnn(gp ...
- 基于深度学习的人脸识别系统系列(Caffe+OpenCV+Dlib)——【四】使用CUBLAS加速计算人脸向量的余弦距离
前言 基于深度学习的人脸识别系统,一共用到了5个开源库:OpenCV(计算机视觉库).Caffe(深度学习库).Dlib(机器学习库).libfacedetection(人脸检测库).cudnn(gp ...
随机推荐
- 【推荐】适合本科生的网络公开课(MOOC为主),不断更新……
题记:身在海大(湛江),是幸运还是不幸,每一个人有自己的定义.人生不能再来一次,唯有把握当下.提高自己,才可能在不能拼爹的年代靠自身实力前行.或许,我们做不了富二代.但我们每一个人.都有机会成为富二代 ...
- codeforce 571 B Minimization
题意:给出一个序列,经过合适的排序后.使得最小. 做法:将a升序排序后,dp[i][j]:选择i个数量为n/k的集合,选择j个数量为n/k+1的集合的最小值. 举个样例, a={1,2,3,4,5,6 ...
- Linq聚合函数使用
using System; using System.Collections.Generic; using System.Linq; using System.Text; using System.T ...
- C#变量引用与全局变量
using System; using System.Collections.Generic; using System.Linq; using System.Text; using System.T ...
- js插件---Amaze UI dialog如何使用
js插件---Amaze UI dialog如何使用 一.总结 一句话总结:别人给你列出来的参考手册照着用先 1.在哪里去找插件参考资料或者使用手册(一般位置找不到的时候)? github上面啊,非常 ...
- 8.AXIS1基础
转自:https://blog.csdn.net/chjttony/article/details/6209998 1.AXIS简介: Axis是Apache组织推出的SOAP引擎,Axis项目是Ap ...
- OpenCV —— 摄像机模型与标定
这种理论看的已经够多了,感觉应用价值不大(矫正畸变图像还凑合,用摄像机测距神马的...) 有始有终吧,简单把内容梳理一下 针孔 摄像机模型 —— 过于理想(不能为快速曝光收集足够的光线) 透镜可以聚 ...
- 搭建Disuz论坛社区
认证:http://.qcloud.com/event/try 网站的性能容量规划通用网站架构:CVM+CDB,可选CDN+Redis+COS http://www.8n8k.com/first-we ...
- Model、ModelMap、ModelAndView的作用及区别
Model.ModelMap.ModelAndView的作用及区别 对于MVC框架,控制器controller执行业务逻辑 用于产生模型数据Model 视图view用来渲染模型数据 Model和Mod ...
- last---显示用户最近登录信息
last命令用于显示用户最近登录信息.单独执行last命令,它会读取/var/log/wtmp的文件,并把该给文件的内容记录的登入系统的用户名单全部显示出来. 语法 last(选项)(参数) 选项 - ...