
【SVM】kaggle之澳大利亚天气预测
项目目标
由于大气运动极为复杂,影响天气的因素较多,而人们认识大气本身运动的能力极为有限,因此天气预报水平较低,预报员在预报实践中,每次预报的过程都极为复杂,需要综合分析,并预报各气象要素,比如温度、降水等。本项目需要训练一个二分类模型,来预测在给定天气因素下,城市是否下雨。
数据说明
本数据包含了来自澳大利亚多个气候站的日常共15W的数据,项目随机抽取了1W条数据作为样本。特征如下:
| 特征 | 含义 |
|---|---|
| Date | 观察日期 |
| Location | 获取该信息的气象站的名称 |
| MinTemp | 以摄氏度为单位的低温度 |
| MaxTemp | 以摄氏度为单位的高温度 |
| Rainfall | 当天记录的降雨量,单位为mm |
| Evaporation | 到早上9点之前的24小时的A级蒸发量(mm) |
| Sunshine | 白日受到日照的完整小时 |
| WindGustDir | 在到午夜12点前的24小时中的强风的风向 |
| WindGustSpeed | 在到午夜12点前的24小时中的强风速(km/h) |
| WindDir9am | 上午9点时的风向 |
| WindDir3pm | 下午3点时的风向 |
| WindSpeed9am | 上午9点之前每个十分钟的风速的平均值(km/h) |
| WindSpeed3pm | 下午3点之前每个十分钟的风速的平均值(km/h) |
| Humidity9am | 上午9点的湿度(百分比) |
| Humidity3am | 下午3点的湿度(百分比) |
| Pressure9am | 上午9点平均海平面上的大气压(hpa) |
| Pressure3pm | 下午3点平均海平面上的大气压(hpa) |
| Cloud9am | 上午9点的天空被云层遮蔽的程度,0表示完全晴朗的天空,而8表示它完全是阴天 |
| Cloud3pm | 下午3点的天空被云层遮蔽的程度 |
| Temp9am | 上午9点的摄氏度温度 |
| Temp3pm | 下午3点的摄氏度温度 |
项目过程
-处理缺失值,删除与预测无关的特征
-随机抽样
-对分类变量进行编码
-处理异常值
-数据归一化
-训练模型
-模型预测
项目代码(Jupyter)
import pandas as pd

import numpy as np
读取数据 探索数据
weather = pd.read_csv("weather.csv", index_col=0)

weather.head()

weather.info()

<class 'pandas.core.frame.DataFrame'>

Int64Index: 142193 entries, 0 to 142192

Data columns (total 20 columns):

 #   Column         Non-Null Count   Dtype

---  ------         --------------   -----

 0   MinTemp        141556 non-null  float64

 1   MaxTemp        141871 non-null  float64

 2   Rainfall       140787 non-null  float64

 3   Evaporation    81350 non-null   float64

 4   Sunshine       74377 non-null   float64

 5   WindGustDir    132863 non-null  object

 6   WindGustSpeed  132923 non-null  float64

 7   WindDir9am     132180 non-null  object

 8   WindDir3pm     138415 non-null  object

 9   WindSpeed9am   140845 non-null  float64

 10  WindSpeed3pm   139563 non-null  float64

 11  Humidity9am    140419 non-null  float64

 12  Humidity3pm    138583 non-null  float64

 13  Pressure9am    128179 non-null  float64

 14  Pressure3pm    128212 non-null  float64

 15  Cloud9am       88536 non-null   float64

 16  Cloud3pm       85099 non-null   float64

 17  Temp9am        141289 non-null  float64

 18  Temp3pm        139467 non-null  float64

 19  RainTomorrow   142193 non-null  object

dtypes: float64(16), object(4)

memory usage: 22.8+ MB
删除与预测无关的特征
weather.drop(["Date", "Location"],inplace=True, axis=1)
删除缺失值,重置索引
weather.dropna(inplace=True)

weather.index = range(len(weather))
1.WindGustDir WindDir9am WindDir3pm 属于定性数据中的无序数据——OneHotEncoder
2.Cloud9am Cloud3pm 属于定性数据中的有序数据——OrdinalEncoder
3.RainTomorrow 属于标签变量——LabelEncoder
为了简便起见,WindGustDir WindDir9am WindDir3pm 三个风向中只保留第一个最强风向
weather_sample.drop(["WindDir9am", "WindDir3pm"], inplace=True, axis=1)
编码分类变量
from sklearn.preprocessing import OneHotEncoder,OrdinalEncoder,LabelEncoder

print(np.unique(weather_sample["RainTomorrow"]))

print(np.unique(weather_sample["WindGustDir"]))

print(np.unique(weather_sample["Cloud9am"]))

print(np.unique(weather_sample["Cloud3pm"]))
['No' 'Yes']

['E' 'ENE' 'ESE' 'N' 'NE' 'NNE' 'NNW' 'NW' 'S' 'SE' 'SSE' 'SSW' 'SW' 'W'

 'WNW' 'WSW']

[0. 1. 2. 3. 4. 5. 6. 7. 8.]

[0. 1. 2. 3. 4. 5. 6. 7. 8.]
# 查看样本不均衡问题,较轻微

weather_sample["RainTomorrow"].value_counts()
No     7750

Yes    2250

Name: RainTomorrow, dtype: int64
# 编码标签

weather_sample["RainTomorrow"] = pd.DataFrame(LabelEncoder().fit_transform(weather_sample["RainTomorrow"]))
# 编码Cloud9am Cloud3pm

oe = OrdinalEncoder().fit(weather_sample["Cloud9am"].values.reshape(-1, 1))

weather_sample["Cloud9am"] = pd.DataFrame(oe.transform(weather_sample["Cloud9am"].values.reshape(-1, 1)))

weather_sample["Cloud3pm"] = pd.DataFrame(oe.transform(weather_sample["Cloud3pm"].values.reshape(-1, 1)))
# 编码WindGustDir

ohe = OneHotEncoder(sparse=False)

ohe.fit(weather_sample["WindGustDir"].values.reshape(-1, 1))

WindGustDir_df = pd.DataFrame(ohe.transform(weather_sample["WindGustDir"].values.reshape(-1, 1)), columns=ohe.get_feature_names())
WindGustDir_df.tail()

合并数据
weather_sample_new = pd.concat([weather_sample,WindGustDir_df],axis=1)

weather_sample_new.drop(["WindGustDir"], inplace=True, axis=1)

weather_sample_new
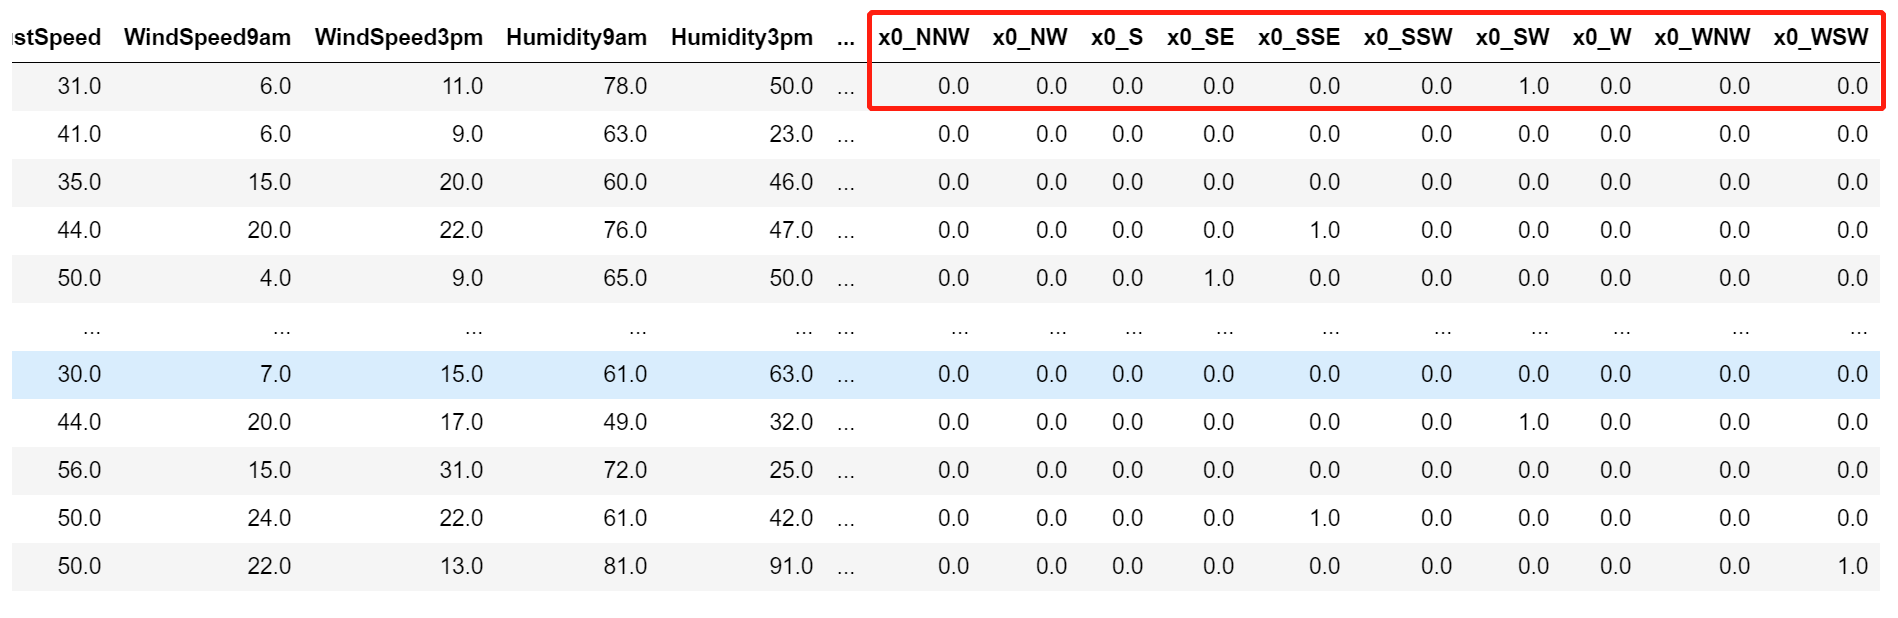
调整列顺序,将数值型变量与分类变量分开,便于数据归一化
Cloud9am = weather_sample_new.iloc[:,12]

Cloud3pm = weather_sample_new.iloc[:,13]

weather_sample_new.drop(["Cloud9am"], inplace=True, axis=1)

weather_sample_new.drop(["Cloud3pm"], inplace=True, axis=1)

weather_sample_new["Cloud9am"] = Cloud9am

weather_sample_new["Cloud3pm"] = Cloud3pm

RainTomorrow = weather_sample_new["RainTomorrow"]

weather_sample_new.drop(["RainTomorrow"], inplace=True, axis=1)

weather_sample_new["RainTomorrow"] = RainTomorrow

weather_sample_new.head()

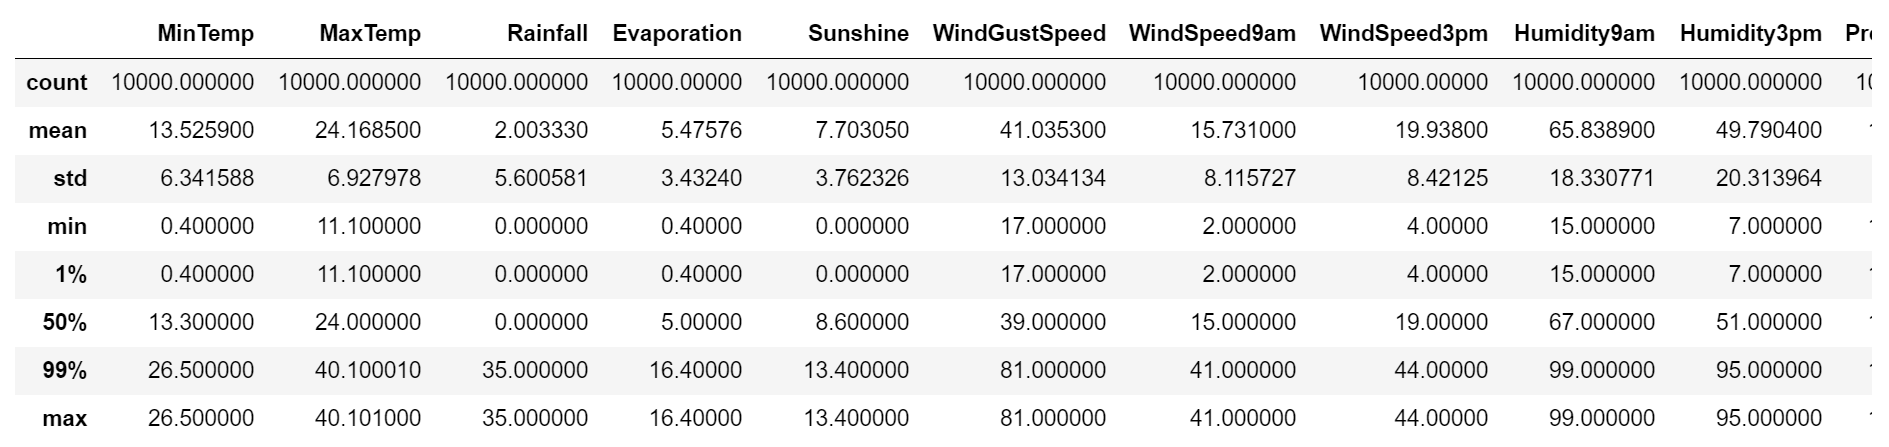
为了防止数据归一化受到异常值影响,在此之前先处理异常值
# 观察数据异常情况

weather_sample_new.describe([0.01,0.99])
因为数据归一化只针对数值型变量,所以将两者进行分离
# 对数值型变量和分类变量进行切片

weather_sample_mv = weather_sample_new.iloc[:,0:14]

weather_sample_cv = weather_sample_new.iloc[:,14:33]
盖帽法处理异常值
## 盖帽法处理数值型变量的异常值

def cap(df,quantile=[0.01,0.99]):

    for col in df:

        # 生成分位数

        Q01,Q99 = df[col].quantile(quantile).values.tolist()

        # 替换异常值为指定的分位数

        if Q01 > df[col].min():

            df.loc[df[col] < Q01, col] = Q01

        if Q99 < df[col].max():

            df.loc[df[col] > Q99, col] = Q99

cap(weather_sample_mv)

weather_sample_mv.describe([0.01,0.99])
数据归一化
from sklearn.preprocessing import StandardScaler

weather_sample_mv = pd.DataFrame(StandardScaler().fit_transform(weather_sample_mv))

weather_sample_mv

重新合并数据
weather_sample = pd.concat([weather_sample_mv, weather_sample_cv], axis=1)

weather_sample.head()

划分特征与标签
X = weather_sample.iloc[:,:-1]

y = weather_sample.iloc[:,-1]
print(X.shape)

print(y.shape)
(10000, 32)

(10000,)
创建模型与交叉验证
from sklearn.svm import SVC

from sklearn.model_selection import cross_val_score

from sklearn.metrics import roc_auc_score, recall_score
for kernel in ["linear","poly","rbf"]:

    accuracy = cross_val_score(SVC(kernel=kernel), X, y, cv=5, scoring="accuracy").mean()

    print("{}:{}".format(kernel,accuracy))
linear:0.8564

poly:0.8532

rbf:0.8531000000000001
weather_sample.head()
【SVM】kaggle之澳大利亚天气预测的更多相关文章
- 【原创】基于SVM作短期时间序列的预测
[面试思路拓展] 对时间序列进行预测的方法有很多, 但如果只有几周的数据,而没有很多线性的趋势.各种实际的背景该如何去预测时间序列? 或许可以尝试下利用SVM去预测时间序列,那么如何提取预测的特征呢? ...
- kaggle之数字序列预测
数字序列预测 Github地址 Kaggle地址 # -*- coding: UTF-8 -*- %matplotlib inline import pandas as pd import strin ...
- 数据挖掘竞赛kaggle初战——泰坦尼克号生还预测
1.题目 这道题目的地址在https://www.kaggle.com/c/titanic,题目要求大致是给出一部分泰坦尼克号乘船人员的信息与最后生还情况,利用这些数据,使用机器学习的算法,来分析预测 ...
- Kaggle入门——泰坦尼克号生还者预测
前言 这个是Kaggle比赛中泰坦尼克号生存率的分析.强烈建议在做这个比赛的时候,再看一遍电源<泰坦尼克号>,可能会给你一些启发,比如妇女儿童先上船等.所以是否获救其实并非随机,而是基于一 ...
- 【项目实战】Kaggle泰坦尼克号的幸存者预测
前言 这是学习视频中留下来的一个作业,我决定根据大佬的步骤来一步一步完成整个项目,项目的下载地址如下:https://www.kaggle.com/c/titanic/data 大佬的传送门:http ...
- pytorch kaggle 泰坦尼克生存预测
也不知道对不对,就凭着自己的思路写了一个 数据集:https://www.kaggle.com/c/titanic/data import torch import torch.nn as nn im ...
- 模式识别之bayes---bayes 简单天气预测实现实例
Bayes Classifier 分类 在模式识别的实际应用中,贝叶斯方法绝非就是post正比于prior*likelihood这个公式这么简单,一般而言我们都会用正态分布拟合likelihood来实 ...
- Kaggle之泰坦尼克号幸存预测估计
上次已经讲了怎么下载数据,这次就不说废话了,直接开始.首先导入相应的模块,然后检视一下数据情况.对数据有一个大致的了解之后,开始进行下一步操作. 一.分析数据 1.Survived 的情况 train ...
- 天气预测(CNN)
import torch import torch.nn as nn import torch.utils.data as Data import numpy as np import pymysql ...
随机推荐
- 《aspose》 word表格循环导出图片
废话不多说,直接上代码,网上代码都不能用,迫不得已,最后查询了官网的源码.上菜! 模板文件可以自己去github去下载. package com.aspose.words.examples.mail_ ...
- 2. Linux常用系统工作命令
1.echo:在终端输出字符串或变量提取后的值.echo [字符串 | $变量] 举例:[root@Centos~]# echo $SHELL /bin/bash 2.date:显示及设置系统的时间或 ...
- 如何用RabbitMQ实现延迟队列
前言 在 jdk 的 juc 工具包中,提供了一种延迟队列 DelayQueue.延迟队列用处非常广泛,比如我们最常见的场景就是在网购或者外卖平台中发起一个订单,如果不付款,一般 15 分钟后就会被关 ...
- Linux Bash编程
在Linux系统介绍中,介绍了shell的多个版本,现在的Linux发行版基本都默认使用bash(Bourne Again shell),兼容Bourne shell (sh),本文将简要介绍Bash ...
- linux(5)查看历史命令执行记录history
前言 我们每次敲打linux命令的时候,有时候想用之前用过的命令,一般情况下,我们都会按↑↓箭头来寻找历史的命令记录,那如果我想用1天前执行的某条命令,难道还要按↑100次?显示这样是不现实的,我们可 ...
- MiniProfiler性能分析工具— .Net Core中用法
前言: 在日常开发中,应用程序的性能是我们需要关注的一个重点问题.当然我们有很多工具来分析程序性能:如:Zipkin等:但这些过于复杂,需要单独搭建. MiniProfiler就是一款简单,但功能强大 ...
- Codeforces301D. Yaroslav and Divisors
题意:2e5的全排列 每次询问一个区间有多少对数 满足一个数是另一个数的倍数 题解:考虑离线来做 看到有个说法说 在处理有两种约束的问题时 一般用数据结构边插入边询问的方式 这个题正是如此 我们用su ...
- uva10859 Placing Lampposts (树形dp+求两者最小值方法)
题目链接:点击打开链接 题意:给你一个n个点m条边的无向无环图,在尽量少的节点上放灯,使得所有边都被照亮,每盏灯将照亮以它为一个端点的所有边.在灯的总数最小的前提下,被两盏灯同时照亮的边数应尽量大. ...
- 错误: 未能完成程序集的安装(hr = 0x8007000b)。探测终止。
解决方案:VS中"工具"->"选项"->"Web项目"->"对网站和项目使用IIS Express的64位版& ...
- WSL ubuntu重置密码
1. 在powershell中切换到root: 2. 进入ubuntu: 3. 修改制定用户的密码: 4. 切换回默认的用户: