.net WebApi使用swagger 美化接口文档
本文将一步步演示如何用swagger美化WebApi接口文档,为接口文档添加接口名称说明,为请求参数和返回数据结构字段含义添加注释说明
一、为WebApi项目安装Swagger
首先我们新建一个WebApi项目
图1(新建WebApi项目)
右击项目,选择管理NuGet程序包,搜索swagger,为WebApi安装swagger
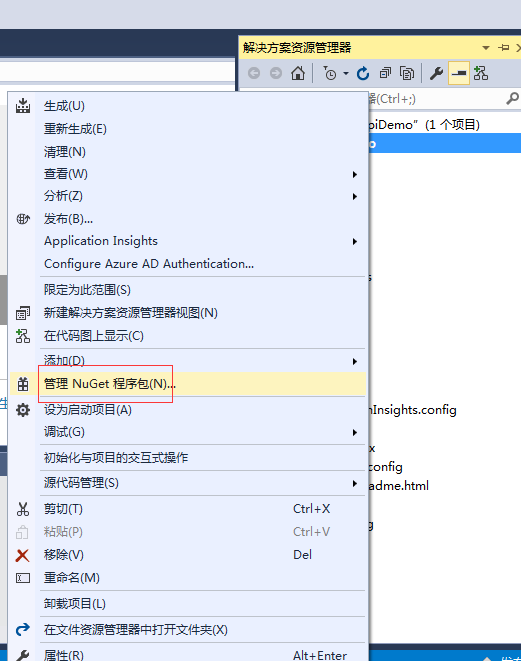
图2(右击项目或者解决方案,选择管理NuGet程序包)
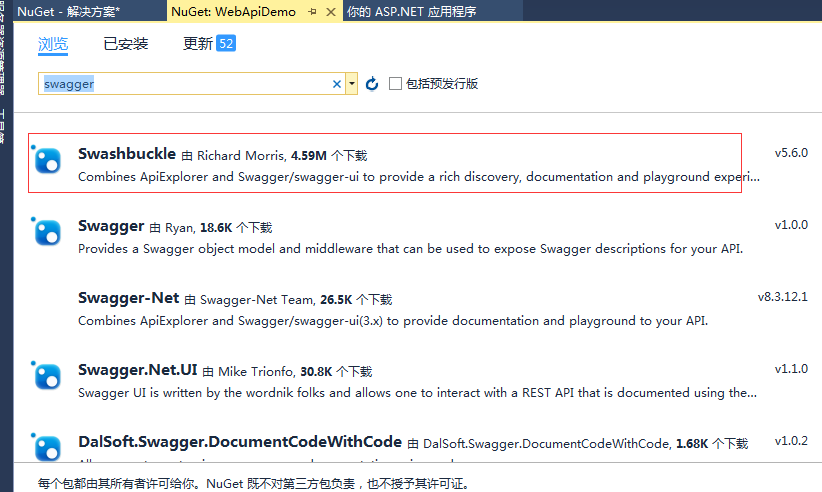
图2(在管理NuGet程序包中搜索Swagger)
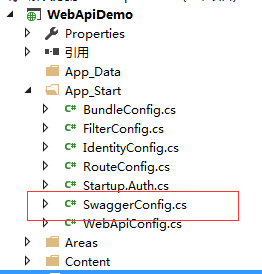
Swagger安装成功后,App_Start目录会多出一个SwaggerConfig.cs文件
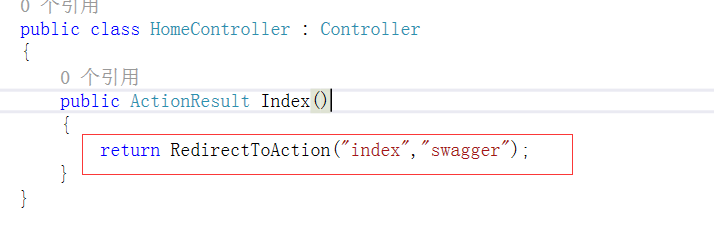
修改HomeController中的Index
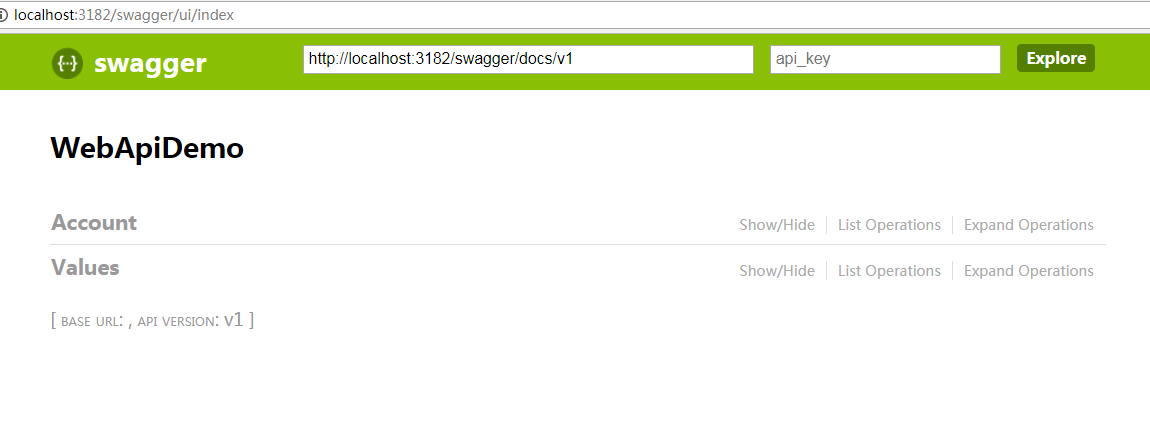
运行项目,出现如下图,说明Swagger安装成功
二,为接口添加请求参数字段说明
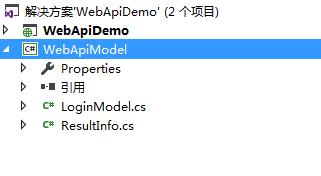
新建一个类库,用于存放WebApi请求和响应相关模型,并在WebApi中添加对该类库引用
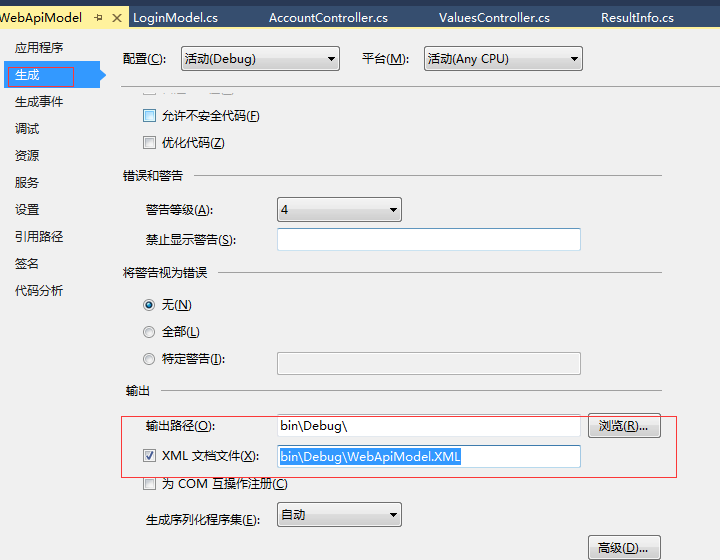
右击WebApiModel项目属性-->生成,勾选XML文档文件,为WebApiModel生成项目Xml文档
在WebApiModel中新增LoginModel类
using System;

using System.Collections.Generic;

using System.ComponentModel;

using System.Linq;

using System.Text;

using System.Threading.Tasks;

namespace WebApiModel

{

    [Description("登陆请求模型")]

    public class LoginModel

    {

        /// <summary>

        /// 登录名

        /// </summary>

        public string LoginName { get; set; }

        /// <summary>

        /// 登陆密码

        /// </summary>

        public string Password { get; set; }

    }

}
在WebApiDemo项目中新建一个Test Api控制器
在TestController中新增一个Login方法
 public class TestController : ApiController

    {

        /// <summary>

        /// 用户登录接口

        /// </summary>

        /// <param name="model"></param>

        /// <returns></returns>

        [HttpPost]

        public HttpResponseMessage Login([FromBody]LoginModel model)

        {

            HttpResponseMessage result = null;

            if (model.LoginName=="admin"&&model.Password=="pwd")

            {

                 result = new HttpResponseMessage { Content = new StringContent("登陆成功", Encoding.GetEncoding("UTF-8"), "application/json") };

                return result;

            }

             result = new HttpResponseMessage { Content = new StringContent("登陆失败", Encoding.GetEncoding("UTF-8"), "application/json") };

            return result;

        }

    }
修改SwaggerConfig.cs代码,加载XML注释文档
完整的SwaggerConfig.cs代码
using System.Web.Http;
using WebActivatorEx;
using WebApiDemo;
using Swashbuckle.Application;
using System; [assembly: PreApplicationStartMethod(typeof(SwaggerConfig), "Register")] namespace WebApiDemo
{
public class SwaggerConfig
{
public static void Register()
{
var thisAssembly = typeof(SwaggerConfig).Assembly; GlobalConfiguration.Configuration
.EnableSwagger(c =>
{
// By default, the service root url is inferred from the request used to access the docs.
// However, there may be situations (e.g. proxy and load-balanced environments) where this does not
// resolve correctly. You can workaround this by providing your own code to determine the root URL.
//
//c.RootUrl(req => GetRootUrlFromAppConfig()); // If schemes are not explicitly provided in a Swagger 2.0 document, then the scheme used to access
// the docs is taken as the default. If your API supports multiple schemes and you want to be explicit
// about them, you can use the "Schemes" option as shown below.
//
//c.Schemes(new[] { "http", "https" }); // Use "SingleApiVersion" to describe a single version API. Swagger 2.0 includes an "Info" object to
// hold additional metadata for an API. Version and title are required but you can also provide
// additional fields by chaining methods off SingleApiVersion.
//
c.SingleApiVersion("v1", "WebApiDemo"); // If you want the output Swagger docs to be indented properly, enable the "PrettyPrint" option.
//
//c.PrettyPrint(); // If your API has multiple versions, use "MultipleApiVersions" instead of "SingleApiVersion".
// In this case, you must provide a lambda that tells Swashbuckle which actions should be
// included in the docs for a given API version. Like "SingleApiVersion", each call to "Version"
// returns an "Info" builder so you can provide additional metadata per API version.
//
//c.MultipleApiVersions(
// (apiDesc, targetApiVersion) => ResolveVersionSupportByRouteConstraint(apiDesc, targetApiVersion),
// (vc) =>
// {
// vc.Version("v2", "Swashbuckle Dummy API V2");
// vc.Version("v1", "Swashbuckle Dummy API V1");
// }); // You can use "BasicAuth", "ApiKey" or "OAuth2" options to describe security schemes for the API.
// See https://github.com/swagger-api/swagger-spec/blob/master/versions/2.0.md for more details.
// NOTE: These only define the schemes and need to be coupled with a corresponding "security" property
// at the document or operation level to indicate which schemes are required for an operation. To do this,
// you'll need to implement a custom IDocumentFilter and/or IOperationFilter to set these properties
// according to your specific authorization implementation
//
//c.BasicAuth("basic")
// .Description("Basic HTTP Authentication");
//
// NOTE: You must also configure 'EnableApiKeySupport' below in the SwaggerUI section
//c.ApiKey("apiKey")
// .Description("API Key Authentication")
// .Name("apiKey")
// .In("header");
//
//c.OAuth2("oauth2")
// .Description("OAuth2 Implicit Grant")
// .Flow("implicit")
// .AuthorizationUrl("http://petstore.swagger.wordnik.com/api/oauth/dialog")
// //.TokenUrl("https://tempuri.org/token")
// .Scopes(scopes =>
// {
// scopes.Add("read", "Read access to protected resources");
// scopes.Add("write", "Write access to protected resources");
// }); // Set this flag to omit descriptions for any actions decorated with the Obsolete attribute
//c.IgnoreObsoleteActions(); // Each operation be assigned one or more tags which are then used by consumers for various reasons.
// For example, the swagger-ui groups operations according to the first tag of each operation.
// By default, this will be controller name but you can use the "GroupActionsBy" option to
// override with any value.
//
//c.GroupActionsBy(apiDesc => apiDesc.HttpMethod.ToString()); // You can also specify a custom sort order for groups (as defined by "GroupActionsBy") to dictate
// the order in which operations are listed. For example, if the default grouping is in place
// (controller name) and you specify a descending alphabetic sort order, then actions from a
// ProductsController will be listed before those from a CustomersController. This is typically
// used to customize the order of groupings in the swagger-ui.
//
//c.OrderActionGroupsBy(new DescendingAlphabeticComparer()); // If you annotate Controllers and API Types with
// Xml comments (http://msdn.microsoft.com/en-us/library/b2s063f7(v=vs.110).aspx), you can incorporate
// those comments into the generated docs and UI. You can enable this by providing the path to one or
// more Xml comment files.
//
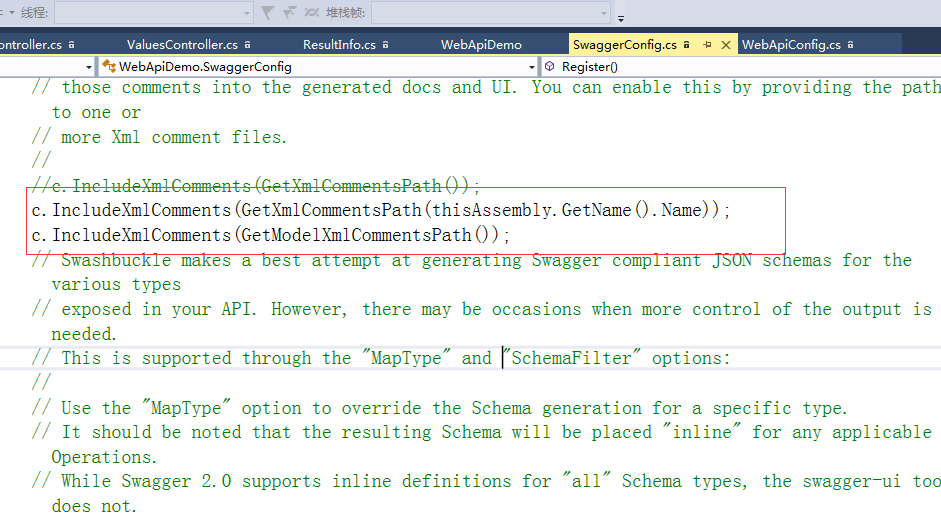
//c.IncludeXmlComments(GetXmlCommentsPath());
c.IncludeXmlComments(GetXmlCommentsPath(thisAssembly.GetName().Name));
c.IncludeXmlComments(GetModelXmlCommentsPath());
// Swashbuckle makes a best attempt at generating Swagger compliant JSON schemas for the various types
// exposed in your API. However, there may be occasions when more control of the output is needed.
// This is supported through the "MapType" and "SchemaFilter" options:
//
// Use the "MapType" option to override the Schema generation for a specific type.
// It should be noted that the resulting Schema will be placed "inline" for any applicable Operations.
// While Swagger 2.0 supports inline definitions for "all" Schema types, the swagger-ui tool does not.
// It expects "complex" Schemas to be defined separately and referenced. For this reason, you should only
// use the "MapType" option when the resulting Schema is a primitive or array type. If you need to alter a
// complex Schema, use a Schema filter.
//
//c.MapType<ProductType>(() => new Schema { type = "integer", format = "int32" }); // If you want to post-modify "complex" Schemas once they've been generated, across the board or for a
// specific type, you can wire up one or more Schema filters.
//
//c.SchemaFilter<ApplySchemaVendorExtensions>(); // In a Swagger 2.0 document, complex types are typically declared globally and referenced by unique
// Schema Id. By default, Swashbuckle does NOT use the full type name in Schema Ids. In most cases, this
// works well because it prevents the "implementation detail" of type namespaces from leaking into your
// Swagger docs and UI. However, if you have multiple types in your API with the same class name, you'll
// need to opt out of this behavior to avoid Schema Id conflicts.
//
//c.UseFullTypeNameInSchemaIds(); // Alternatively, you can provide your own custom strategy for inferring SchemaId's for
// describing "complex" types in your API.
//
//c.SchemaId(t => t.FullName.Contains('`') ? t.FullName.Substring(0, t.FullName.IndexOf('`')) : t.FullName); // Set this flag to omit schema property descriptions for any type properties decorated with the
// Obsolete attribute
//c.IgnoreObsoleteProperties(); // In accordance with the built in JsonSerializer, Swashbuckle will, by default, describe enums as integers.
// You can change the serializer behavior by configuring the StringToEnumConverter globally or for a given
// enum type. Swashbuckle will honor this change out-of-the-box. However, if you use a different
// approach to serialize enums as strings, you can also force Swashbuckle to describe them as strings.
//
//c.DescribeAllEnumsAsStrings(); // Similar to Schema filters, Swashbuckle also supports Operation and Document filters:
//
// Post-modify Operation descriptions once they've been generated by wiring up one or more
// Operation filters.
//
//c.OperationFilter<AddDefaultResponse>();
//
// If you've defined an OAuth2 flow as described above, you could use a custom filter
// to inspect some attribute on each action and infer which (if any) OAuth2 scopes are required
// to execute the operation
//
//c.OperationFilter<AssignOAuth2SecurityRequirements>(); // Post-modify the entire Swagger document by wiring up one or more Document filters.
// This gives full control to modify the final SwaggerDocument. You should have a good understanding of
// the Swagger 2.0 spec. - https://github.com/swagger-api/swagger-spec/blob/master/versions/2.0.md
// before using this option.
//
//c.DocumentFilter<ApplyDocumentVendorExtensions>(); // In contrast to WebApi, Swagger 2.0 does not include the query string component when mapping a URL
// to an action. As a result, Swashbuckle will raise an exception if it encounters multiple actions
// with the same path (sans query string) and HTTP method. You can workaround this by providing a
// custom strategy to pick a winner or merge the descriptions for the purposes of the Swagger docs
//
//c.ResolveConflictingActions(apiDescriptions => apiDescriptions.First()); // Wrap the default SwaggerGenerator with additional behavior (e.g. caching) or provide an
// alternative implementation for ISwaggerProvider with the CustomProvider option.
//
//c.CustomProvider((defaultProvider) => new CachingSwaggerProvider(defaultProvider));
})
.EnableSwaggerUi(c =>
{
// Use the "DocumentTitle" option to change the Document title.
// Very helpful when you have multiple Swagger pages open, to tell them apart.
//
//c.DocumentTitle("My Swagger UI"); // Use the "InjectStylesheet" option to enrich the UI with one or more additional CSS stylesheets.
// The file must be included in your project as an "Embedded Resource", and then the resource's
// "Logical Name" is passed to the method as shown below.
//
//c.InjectStylesheet(containingAssembly, "Swashbuckle.Dummy.SwaggerExtensions.testStyles1.css"); // Use the "InjectJavaScript" option to invoke one or more custom JavaScripts after the swagger-ui
// has loaded. The file must be included in your project as an "Embedded Resource", and then the resource's
// "Logical Name" is passed to the method as shown above.
//
//c.InjectJavaScript(thisAssembly, "Swashbuckle.Dummy.SwaggerExtensions.testScript1.js"); // The swagger-ui renders boolean data types as a dropdown. By default, it provides "true" and "false"
// strings as the possible choices. You can use this option to change these to something else,
// for example 0 and 1.
//
//c.BooleanValues(new[] { "0", "1" }); // By default, swagger-ui will validate specs against swagger.io's online validator and display the result
// in a badge at the bottom of the page. Use these options to set a different validator URL or to disable the
// feature entirely.
//c.SetValidatorUrl("http://localhost/validator");
//c.DisableValidator(); // Use this option to control how the Operation listing is displayed.
// It can be set to "None" (default), "List" (shows operations for each resource),
// or "Full" (fully expanded: shows operations and their details).
//
//c.DocExpansion(DocExpansion.List); // Specify which HTTP operations will have the 'Try it out!' option. An empty paramter list disables
// it for all operations.
//
//c.SupportedSubmitMethods("GET", "HEAD"); // Use the CustomAsset option to provide your own version of assets used in the swagger-ui.
// It's typically used to instruct Swashbuckle to return your version instead of the default
// when a request is made for "index.html". As with all custom content, the file must be included
// in your project as an "Embedded Resource", and then the resource's "Logical Name" is passed to
// the method as shown below.
//
//c.CustomAsset("index", containingAssembly, "YourWebApiProject.SwaggerExtensions.index.html"); // If your API has multiple versions and you've applied the MultipleApiVersions setting
// as described above, you can also enable a select box in the swagger-ui, that displays
// a discovery URL for each version. This provides a convenient way for users to browse documentation
// for different API versions.
//
//c.EnableDiscoveryUrlSelector(); // If your API supports the OAuth2 Implicit flow, and you've described it correctly, according to
// the Swagger 2.0 specification, you can enable UI support as shown below.
//
//c.EnableOAuth2Support(
// clientId: "test-client-id",
// clientSecret: null,
// realm: "test-realm",
// appName: "Swagger UI"
// //additionalQueryStringParams: new Dictionary<string, string>() { { "foo", "bar" } }
//); // If your API supports ApiKey, you can override the default values.
// "apiKeyIn" can either be "query" or "header"
//
//c.EnableApiKeySupport("apiKey", "header");
});
}
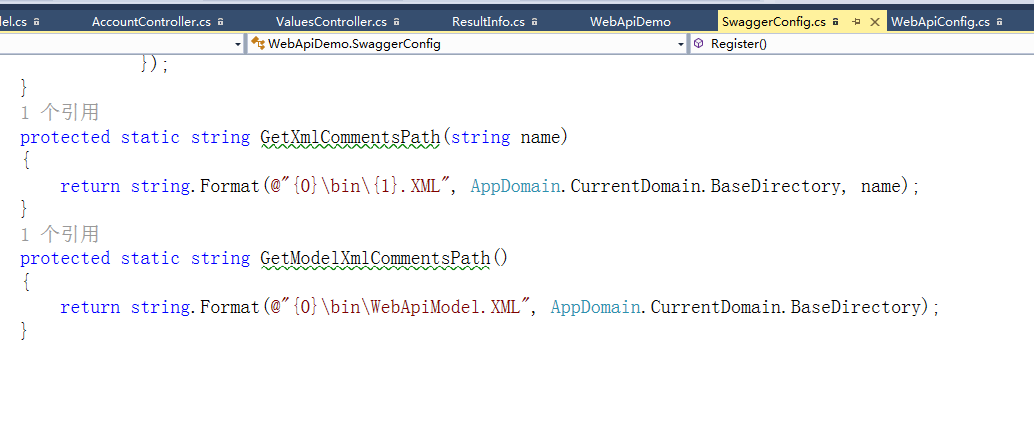
protected static string GetXmlCommentsPath(string name)
{
return string.Format(@"{0}\bin\{1}.XML", AppDomain.CurrentDomain.BaseDirectory, name);
}
protected static string GetModelXmlCommentsPath()
{
return string.Format(@"{0}\bin\WebApiModel.XML", AppDomain.CurrentDomain.BaseDirectory);
}
}
}
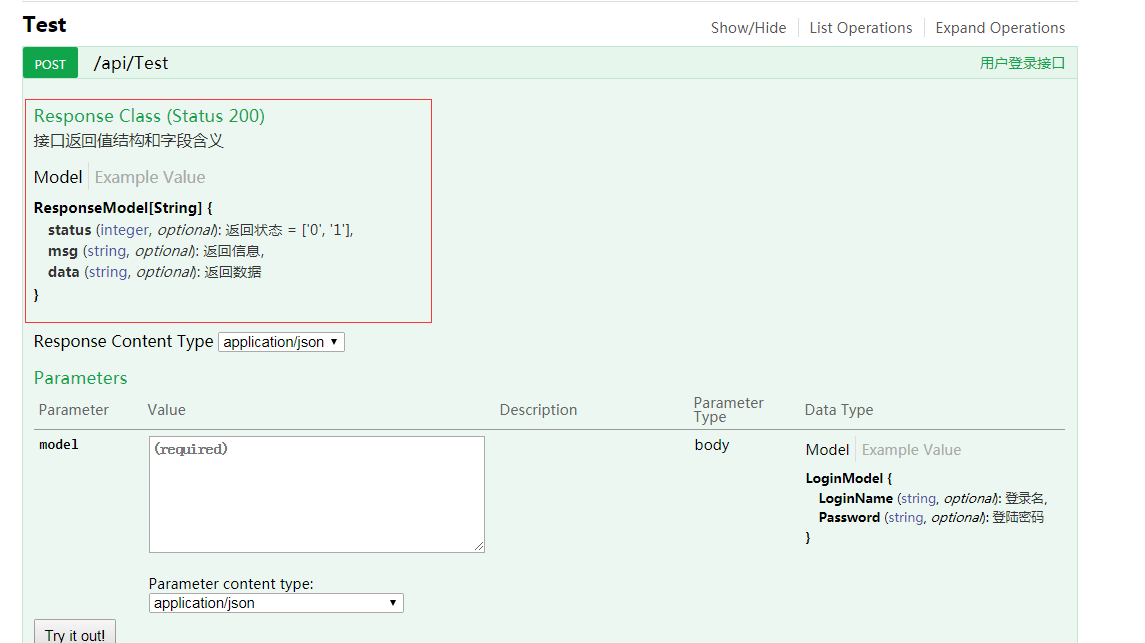
运行WebApiDemo项目,即可看到/api/Test请求参数结构字段以及每个参数含义
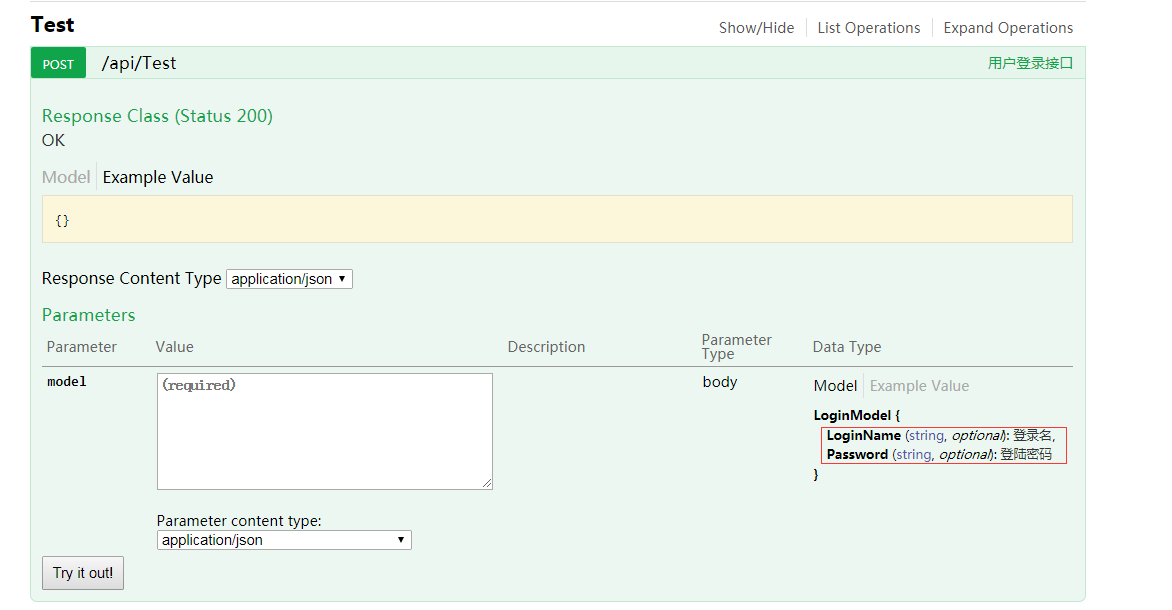
至此,为接口添加请求字段含义说明已完成。
三、为接口添加返回值的结构字段和字段含义说明
当接口的返回值为HttpResponseMessage时,结构文档页面中看不到返回值的结构和字段信息,但是Swagger中可以为接口添加SwaggerResponseAttribute方式,让其显示接口返回的字段并显示各个字段含义,下面我们一步步实现他
在WebApiModel中新增一个ResponseModel类,用于描述接口返回值
 public class ResponseModel<T>

    {

        /// <summary>

        /// 返回状态

        /// </summary>

        public StatusType status { get; set; }

        /// <summary>

        /// 返回信息

        /// </summary>

        public string msg { get; set; }

        /// <summary>

        /// 返回数据

        /// </summary>

        public T data { get; set; }

    }

    /// <summary>

    /// 表示接口返回状态可能的枚举

    /// </summary>

    [Description("业务操作结果的枚举")]

    public enum StatusType

    {

        /// <summary>

        ///     操作成功

        /// </summary>

        [Description("操作成功。")]

        Success,

        /// <summary>

        ///     操作失败

        /// </summary>

        [Description("操作失败。")]

        Error,

    }
为api/Login接口添加SwaggerResponseAttribute
public class TestController : ApiController

    {

        /// <summary>

        /// 用户登录接口

        /// </summary>

        /// <param name="model"></param>

        /// <returns></returns>

        [HttpPost]

        [Swashbuckle.Swagger.Annotations.SwaggerResponse(HttpStatusCode.OK,"接口返回值结构和字段含义",Type =typeof(ResponseModel<string>))]

        public HttpResponseMessage Login([FromBody]LoginModel model)

        {

            ResponseModel<string> response = new ResponseModel<string>();

            response.data = "";

            response.msg = "登录成功";

            response.status = StatusType.Success;

           return new HttpResponseMessage { Content = new StringContent(Newtonsoft.Json.JsonConvert.SerializeObject(response), Encoding.GetEncoding("UTF-8"), "application/json") };

        }

    }
重新运行项目,在页面中可以看到接口的返回值结构和各个字段的含义
最后,由于ResponseMode是一个泛型类,如果想显示自定义的实体类的各个字段和字段的含义说明,只需要在自定义实体类中为每个字段添加注释,并在结构中
添加相应的SwaggerResponseAttribute,例如,返回参数中是一个包含自定义User类的信息,那么可以这么写
[Swashbuckle.Swagger.Annotations.SwaggerResponse(HttpStatusCode.OK,"接口返回值结构和字段含义",Type =typeof(ResponseModel<User>))]
.net WebApi使用swagger 美化接口文档的更多相关文章
- WebAPI使用Swagger生成接口文档
开发工具:VS2017 版本15.7.1 新建项目,选择空模板,下面只勾选WebAPI 配置Web.config <system.webServer> 节点改为 <system.we ...
- ASP.NET WebApi 使用Swagger生成接口文档
前言 公司一直采用Word文档方式与客户端进行交流.随着时间的推移,接口变的越来越多,文档变得也很繁重.而且一份文档经常由多个开发人员维护,很难保证文档的完整性.而且有时写完代码也忘了去更新文档,为了 ...
- webapi 利用webapiHelp和swagger生成接口文档
webapi 利用webapiHelp和swagger生成接口文档.均依赖xml(需允许项目生成注释xml) webapiHelp:微软技术自带,仅含有模块.方法.请求-相应参数的注释. swagge ...
- ASP.NET WebAPI使用Swagger生成测试文档
ASP.NET WebAPI使用Swagger生成测试文档 SwaggerUI是一个简单的Restful API测试和文档工具.简单.漂亮.易用(官方demo).通过读取JSON配置显示API .项目 ...
- asp.net core 使用 swagger 生成接口文档
参考地址:http://www.cnblogs.com/daxnet/p/6181366.html http://www.jianshu.com/p/fa5a9b76f3ed 微软参考文档:https ...
- Spring Boot 集成 Swagger 构建接口文档
在应用开发过程中经常需要对其他应用或者客户端提供 RESTful API 接口,尤其是在版本快速迭代的开发过程中,修改接口的同时还需要同步修改对应的接口文档,这使我们总是做着重复的工作,并且如果忘记修 ...
- .net core 使用 swagger 生成接口文档
微软参考文档:https://docs.microsoft.com/en-us/aspnet/core/tutorials/web-api-help-pages-using-swagger?tabs= ...
- Asp.net Core WebApi 使用Swagger做帮助文档,并且自定义Swagger的UI
WebApi写好之后,在线帮助文档以及能够在线调试的工具是专业化的表现,而Swagger毫无疑问是做Docs的最佳工具,自动生成每个Controller的接口说明,自动将参数解析成json,并且能够在 ...
- asp.net core使用Swashbuckle.AspNetCore(swagger)生成接口文档
asp.net core中使用Swashbuckle.AspNetCore(swagger)生成接口文档 Swashbuckle.AspNetCore:swagger的asp.net core实现 项 ...
随机推荐
- linux 系统下 tar 的压缩与解压缩命令
1.压缩 [small@sun shine]# tar -zcvf java.tar.gz java java/ java/default/ java/default/THIRDPARTYLICENS ...
- Java并发编程的艺术笔记(二)——wait/notify机制
一.概述 一个线程修改了一个对象的值,另一个线程感知到变化从而做出相应的操作.前者是生产者,后者是消费者. 等待/通知机制,是指一个线程A调用了对象O的wait()方法进入等待状态,而另一个线程B调用 ...
- java 强弱软虚 四种引用,以及用到的场景
1.利用软引用和弱引用解决OOM问题:用一个HashMap来保存图片的路径和相应图片对象关联的软引用之间的映射关系,在内存不足时,JVM会自动回收这些缓存图片对象所占用的空间,从而有效地避免了OOM的 ...
- JAVA 第十一周学习总结
20175308 2018-2019-2 <Java程序设计>第十一周学习总结 教材学习内容总结 13.1 URL类: URL类是java.net包中的一个类,用URL创建的对象可以获取U ...
- js测试用
一,大纲 二,目录二 三,目录三
- spring boot + mybatis + layui + shiro后台权限管理系统
后台管理系统 版本更新 后续版本更新内容 链接入口: springboot + shiro之登录人数限制.登录判断重定向.session时间设置:https://blog.51cto.com/wyai ...
- legend3---PHP使用阿里云短信服务
legend3---PHP使用阿里云短信服务 一.总结 一句话总结: 使用步骤照官方文档,代码拷贝即可 1.php使用阿里云短信服务的步骤? 入驻阿里云->开通短信服务->获取Access ...
- 一、基础篇--1.1Java基础-int 和 Integer 有什么区别,Integer的值缓存范围
int和Integer的区别 int是基本数据类型,Integer是int的包装类. Integer必须实例化后才能使用,int变量不需要. Integer实际是对象的引用,生成一个新对象实际上是生成 ...
- Python 基础知识总结
strptime() 根据指定的格式将一个时间字符串解析为一个时间元组. time.strptime(time_str[,format]) 返回strcut_time对象 #time_str 是时间字 ...
- java中FastJson的json类型转换
JSON Gson: 来自Google,功能全面.快速.简洁.面向对象.数据传递和解析方便. Jackson:来源FasterXML项目,社区活跃,更新快 解析速度和效率比Gson快,但无法按需解析, ...