使用Spring Boot开发 “Hello World” Web应用
环境准备
由于现在很多IDE都支持Maven, 所以我们将使用Maven构建该工程;
开始之前,需要先安装Java和Maven:
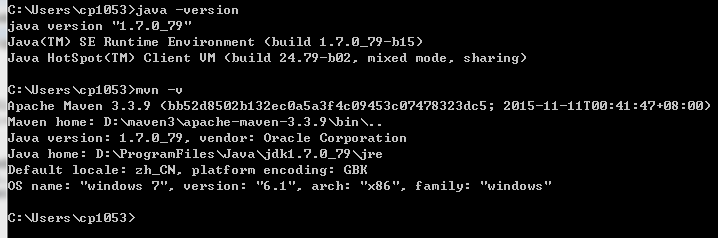
本工程将基于Spring Boot 1.4.3.RELEASE开发,推荐的Java版本是Java 7+,maven版本是3.2+,可使用如下命令检查是否符合要求:
创建POM
由于使用Maven构建,所以我们首先需要创建一个pom.xml文件,用于构建本工程,打开你最喜欢的编辑器(如Notepad++),添加如下内容:
<?xml version="1.0" encoding="UTF-8"?>

<project xmlns="http://maven.apache.org/POM/4.0.0" xmlns:xsi="http://www.w3.org/2001/XMLSchema-instance"

    xsi:schemaLocation="http://maven.apache.org/POM/4.0.0 http://maven.apache.org/xsd/maven-4.0.0.xsd">

    <modelVersion>4.0.0</modelVersion>

    <groupId>com.example</groupId>

    <artifactId>myproject</artifactId>

    <version>0.0.1-SNAPSHOT</version>

    <parent>

        <groupId>org.springframework.boot</groupId>

        <artifactId>spring-boot-starter-parent</artifactId>

        <version>1.4.3.RELEASE</version>

    </parent>

    <!-- Additional lines to be added here... -->

</project>
添加依赖
Spring Boot提供了一系列的“启动器”,使得添加依赖变得非常简单;
由于本工程是一个Web工程,所以我们选择添加spring-boot-starter-web“启动器”依赖;
添加spring-boot-starter-web依赖
    <dependencies>

        <dependency>

            <groupId>org.springframework.boot</groupId>

            <artifactId>spring-boot-starter-web</artifactId>

        </dependency>

    </dependencies>
为了更加直观的看到spring-boot-starter-web引入的依赖,我们可以使用mvn dependency:tree命令查看工程的依赖树,如下是添加前后的区别:
前(注意观察,虽然继承了spring-boot-starter-parent,但是并没有引入任何依赖):
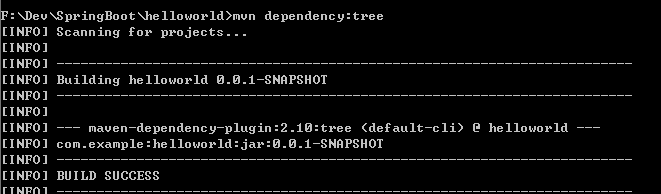
后:

可以发现,在添加前,项目没有任何依赖,添加完spring-boot-starter-web依赖后,Tomcat、Jackson、Spring Boot等依赖也都自动添加了进来。
最后,有一点值得注意的是,为了简便,我们这个工程是继承spring-boot-starter-parent工程,spring-boot-starter-parent帮我们预先定义了很多插件管理配置、编译级别(Java 6)、编码(utf-8)等,不过并没有添加任何依赖,有兴趣的可以查看spring-boot-starter-parent工程的pom.xml文件,链接如下:
编写代码
为了完成这个应用,我们需要创建一个简单的Java文件,如下,Maven默认情况下会去src/main/java目录编译java文件,所以我们要先创建这个目录结构,然后添加src/main/java/Example.java文件:
import org.springframework.boot.*;

import org.springframework.boot.autoconfigure.*;

import org.springframework.stereotype.*;

import org.springframework.web.bind.annotation.*;

@RestController

@EnableAutoConfiguration

public class Example {

    @RequestMapping("/")

    String home() {

        return "Hello World!";

    }

    public static void main(String[] args) throws Exception {

        SpringApplication.run(Example.class, args);

    }

}
注意观察以上代码,我们使用了@RestController和@RequestMapping两个Spring MVC的注解,
@RestController用于表明该类是一个Controller,且返回的内容直接写入到响应body里;
@RequestMapping
另外,还使用了@EnableAutoConfiguration注解,添加这个注解后,Spring Boot会基于你添加的依赖去自动配置Spring,由于spring-boot-starter-web添加了Tomcat和Spring MVC,所以,Spring Boot自动配置会假定你正在开发一个web应用程序,并依此自动添加相关Spring配置。
最后,要关注的是main方法,跟普通的main方法没什么区别,只有一句话,调用SpringApplication的run方法启动应用。
使用maven命令运行应用
由于继承了spring-boot-starter-parent工程,所以我们可以直接使用mvn spring-boot:run命令来运行程序,如下所示:
$ mvn spring-boot:run

  .   ____          _            __ _ _

 /\\ / ___'_ __ _ _(_)_ __  __ _ \ \ \ \

( ( )\___ | '_ | '_| | '_ \/ _` | \ \ \ \

 \\/  ___)| |_)| | | | | || (_| |  ) ) ) )

  '  |____| .__|_| |_|_| |_\__, | / / / /

 =========|_|==============|___/=/_/_/_/

 :: Spring Boot ::  (v1.4.3.RELEASE)

....... . . .

....... . . . (log output here)

....... . . .

........ Started Example in 2.222 seconds (JVM running for 6.514)
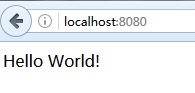
启动后,在浏览器输入http://localhost:8080/ 即可以看到Controller中home方法返回的结果:
另外使用ctrl-c,可以关闭应用。
创建一个可执行的jar包
很简单,添加一个maven插件,如下代码;
<build>

    <plugins>

        <plugin>

            <groupId>org.springframework.boot</groupId>

            <artifactId>spring-boot-maven-plugin</artifactId>

        </plugin>

    </plugins>

</build>
然后运行mvn package命令即可(注意,spring-boot-starter-parent的POM已经帮我们做了配置,绑定了repackage goal, 如果没使用继承parent POM,我们需要做更多配置,详情参考plugin documentation):
打完包后,我们可以在target目录下找到helloworld-0.0.1-SNAPSHOT.jar包。
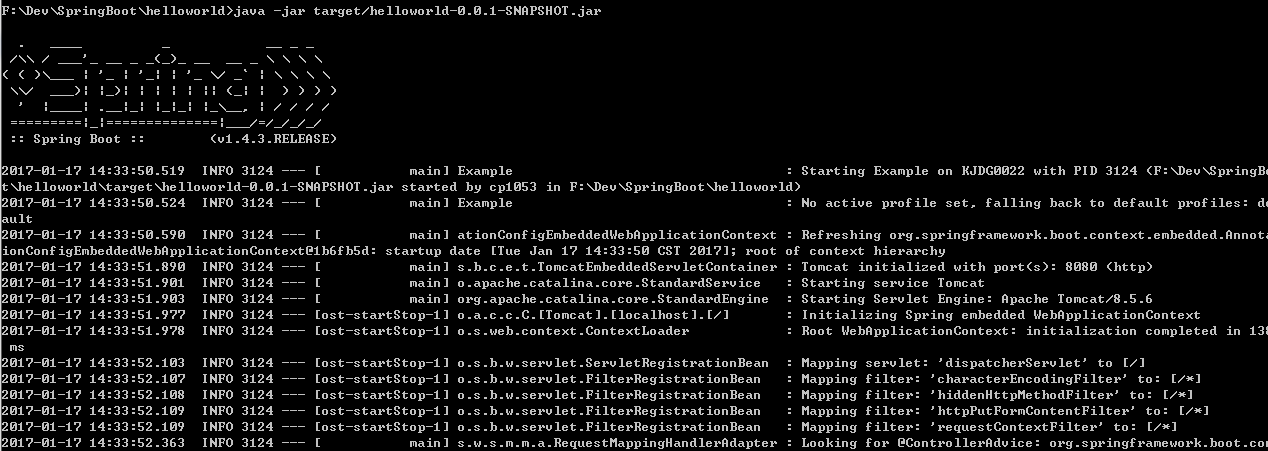
如果要运行程序的话,也很简便,输入 java -jar target/helloworld-0.0.1-SNAPSHOT.jar 命令即可启动应用,如下所示:
$ java -jar target/helloworld-0.0.1-SNAPSHOT.jar

  .   ____          _            __ _ _

 /\\ / ___'_ __ _ _(_)_ __  __ _ \ \ \ \

( ( )\___ | '_ | '_| | '_ \/ _` | \ \ \ \

 \\/  ___)| |_)| | | | | || (_| |  ) ) ) )

  '  |____| .__|_| |_|_| |_\__, | / / / /

 =========|_|==============|___/=/_/_/_/

 :: Spring Boot ::  (v1.4.3.RELEASE)

....... . . .

....... . . . (log output here)

....... . . .

........ Started Example in 2.536 seconds (JVM running for 2.864)
同样,启动后,在浏览器输入http://localhost:8080/ 即可以看到Controller中home方法返回的结果。
IDE推荐
最后,虽然本例子未使用任何IDE,主要是因为比较简单;如果开发复杂的应用,还是强烈推荐使用IDE,如Spring Tool Suite,我使用的是sts-3.8.3.RELEASE版本。
参考资料
http://docs.spring.io/spring-boot/docs/1.4.3.RELEASE/reference/htmlsingle/
使用Spring Boot开发 “Hello World” Web应用的更多相关文章
- 使用Spring Boot开发Web项目(二)之添加HTTPS支持
上篇博客使用Spring Boot开发Web项目我们简单介绍了使用如何使用Spring Boot创建一个使用了Thymeleaf模板引擎的Web项目,当然这还远远不够.今天我们再来看看如何给我们的We ...
- Spring Boot 2.X 对 web 的开发支持(二)
Spring Boot 2.X 对 web 的支持开发 上章节的 Spring Boot 的入门案例,我们感受到 Spring Boot 简单的配置即可运行项目. 今天了解 Spring Boot 对 ...
- [原创]Spring boot 框架构建jsp web应用
说明 Spring boot支持将web项目打包成一个可执行的jar包,内嵌tomcat服务器,独立部署 为支持jsp,则必须将项目打包为war包 pom.xml中设置打包方式 <packagi ...
- 天天玩微信,Spring Boot 开发私有即时通信系统了解一下
1/ 概述 利用Spring Boot作为基础框架,Spring Security作为安全框架,WebSocket作为通信框架,实现点对点聊天和群聊天. 2/ 所需依赖 Spring Boot 版本 ...
- Spring Boot 开发集成 WebSocket,实现私有即时通信系统
1/ 概述 利用Spring Boot作为基础框架,Spring Security作为安全框架,WebSocket作为通信框架,实现点对点聊天和群聊天. 2/ 所需依赖 Spring Boot 版本 ...
- Spring Boot开发RESTful接⼝服务及单元测试
Spring Boot开发RESTful接⼝服务及单元测试 常用注解解释说明: @Controller :修饰class,⽤来创建处理http请求的对象 @RestController :Spring ...
- 使用Spring boot开发RestFul 风格项目PUT/DELETE方法不起作用
在使用Spring boot 开发restful 风格的项目,put.delete方法不起作用,解决办法. 实体类Student @Data public class Student { privat ...
- SpringBoot实战(十)之使用Spring Boot Actuator构建RESTful Web服务
一.导入依赖 <?xml version="1.0" encoding="UTF-8"?> <project xmlns="http ...
- Spring Boot 开发系列一 开发环境的一些九九
从今天开始写这个Spring Boot 开发系列,我是第二周学习JAVA的,公司号称springboot把JAVA的开发提升到填空的能力,本人是NET转JAVA的,想看看这个填空的东西到底有多强.废话 ...
随机推荐
- 73. Set Matrix Zeroes 把矩阵同一行列的元素都改成0
[抄题]: Given a m x n matrix, if an element is 0, set its entire row and column to 0. Do it in-place. ...
- 自定义RPC框架--基于JAVA实现
视频教程地址 DT课堂(原名颜群) 整体思路RPC(Remote Procedure Call),即远程过程调用.使用RPC,可以像使用本地的程序一样使用远程计算机上的程序.RPC使得开发分布式程序更 ...
- Xadmin添加,编辑,删除
Xadmin添加,编辑,删除 1.HTML 编辑和添加页面得内容相同,使用include将他们整合 {% include xxx.html %} 获取指定页面的所有内容 1.单独建个html存放编辑和 ...
- [翻译]高并发框架 LMAX Disruptor 介绍
原文地址:Concurrency with LMAX Disruptor – An Introduction 译者序 前些天在并发编程网,看到了关于 Disruptor 的介绍.感觉此框架惊为天人,值 ...
- webserver
1. 控制台,浏览器输入http://localhost:8080/ using System; using System.Collections; using System.IO; using Sy ...
- jquery 表单校验
<link type="text/css" href="<%=basepath%>css/form/validate.css" rel=&qu ...
- vue使用路由跳转到上一页
this.$router.go(-1) <template> <div> <button class="btn btn-success" @click ...
- Python设计模式运用
1 面向对象 2 创建型模式 3 结构型模式 4 行为型模式
- spring生命周期流程图
Spring作为当前Java最流行.最强大的轻量级框架,受到了程序员的热烈欢迎.准确的了解Spring Bean的生命周期是非常必要的.我们通常使用ApplicationContext作为Spring ...
- 【慕课网实战】Spark Streaming实时流处理项目实战笔记二十一之铭文升级版
铭文一级: DataV功能说明1)点击量分省排名/运营商访问占比 Spark SQL项目实战课程: 通过IP就能解析到省份.城市.运营商 2)浏览器访问占比/操作系统占比 Hadoop项目:userA ...