
springboot和mybatis之thymleaf整合简单插入用户数据
编写mapper接口和对应的mapper.xml文件,注意对应的注解
@Mapper

@Repository

public interface StudentMapper {

    void insertStudent(Student student);

}
@Mapper注解标注这个接口是个mapper接口
@Repository
mapper.xml文件
<?xml version="1.0" encoding="UTF-8"?>

<!DOCTYPE mapper PUBLIC

        "-//mybatis.org//DTD Mapper 3.0//EN"

        "http://mybatis.org/dtd/mybatis-3-mapper.dtd">

<mapper namespace="com.wang.mapper.StudentMapper">

    <insert id="insertStudent" parameterType="student">

        insert into student(sname,age) values (#{sname},#{age})

    </insert>

</mapper>
创建pojo,注意需要继承serializable接口
public class Student implements Serializable {

    private String sname;

    private String sex;

    private Integer age;

    private Integer sid;

    public String getSname() {

        return sname;

    }

    public void setSname(String sname) {

        this.sname = sname;

    }

    public String getSex() {

        return sex;

    }

    public void setSex(String sex) {

        this.sex = sex;

    }

    public Integer getAge() {

        return age;

    }

    public void setAge(Integer age) {

        this.age = age;

    }

    public Integer getSid() {

        return sid;

    }

    public void setSid(Integer sid) {

        this.sid = sid;

    }

    public Student(String sname, String sex, Integer age, Integer sid) {

        this.sname = sname;

        this.sex = sex;

        this.age = age;

        this.sid = sid;

    }

}
service层实现
service接口
public interface studentService {

    void insertstudent(Student student);

}
对应service的实现类
@Service

@Transactional

public class studentserviceImpl implements studentService {

    @Autowired

    private StudentMapper studentMapper;

    public void insertstudent(Student student) {

        studentMapper.insertStudent(student);
@service将service类注册到spring容器
@transactional
注意为了能够操作数据库,这里传过来一个对应的mapper接口
controller编写
@Controller

@RequestMapping("/users")

public class studentController {

    @Autowired

    studentserviceImpl studentservice;

    /**

     * 跳转页面

     * @param

     */

    @RequestMapping("/{page}")

    public String showpage(@PathVariable String page){

        return page;

    }

    @RequestMapping("/adduser")

    public String adduser(Student student){

    studentservice.insertstudent(student);

        return "ok";

    }

}
对应的HTML页面
<!DOCTYPE html>

<html xmlns:th="http://www.thymeleaf.org">

<html lang="en">

<head>

    <meta charset="UTF-8">

    <title>yonghu</title>

</head>

<body>

<form th:action="@{/users/adduser}"  method="post">     <!-- 注意IDEA中有时候不会补全<  />,自己需要注意并加上/  -->

    <input type="text" name="sname" /><br/>

    <input type="text" name="age" /><br/>

    <input type="submit" value="confirm">

</form>

</body>

</html>
这里需要注意,为了能够使用th:标签,需要在html文件中引入命名空间
<html xmlns:th="http://www.thymeleaf.org">
跳转页面的html
<!DOCTYPE html>

<html lang="en">

<head>

    <meta charset="UTF-8">

    <title>Title</title>

</head>

<body>

save successfully

</body>

</html>
对应source目录下application.yml文件的配置内容
spring:                                 数据源的配置,这儿里出现一个问题,使用阿里巴巴对应的jar包的时候出现时区不一致的问题,需要设置时区

  datasource:

    driver-class-name: com.mysql.jdbc.Driver

    url: jdbc:mysql://localhost:3306/student?characterEncoding=utf-8

    username: root

    password:

    type: com.alibaba.druid.pool.DruidDataSource

  thymeleaf:

    suffix: .html

    prefix: classpath:/templates/         给thymleaf设置前缀和后缀,这样找页面的时候直接写上HTML文件的名字就行了。

    mode: HTML

    cache: true

    encoding: utf-8

mybatis:

  type-aliases-package: com.wang.pojo

  mapper-locations: classpath:mapper/*Mapper.xml
mybatis需要设置两个东西,一个别名和一个指定mapper.xml文件位置
对应上面红色问题的解决方法
命令行启动MySQL,执行下面语句设置时区
set global time_zone='+8:00';
最后查看对应时区
show variables like '%time_zone%';
最后启动类的编写(这里特别注意启动mapper扫面,里面放上扫描的包路径)
@SpringBootApplication

@MapperScan("com.wang.mapper.*")

public class App {

    public static void main(String[] args) {

        SpringApplication.run(App.class,args);

    }

}
工程结构
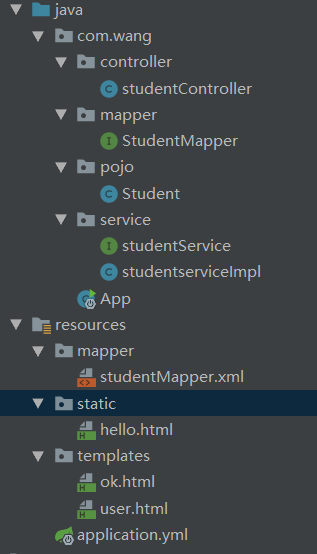
需要注意resources/static下面的内容是可以直接被访问的,以后还是需要注意一些类和方法的命名规则。
springboot和mybatis之thymleaf整合简单插入用户数据的更多相关文章
- 手写Mybatis和Spring整合简单版示例窥探Spring的强大扩展能力
Spring 扩展点 **本人博客网站 **IT小神 www.itxiaoshen.com 官网地址****:https://spring.io/projects/spring-framework T ...
- 学习spring第五天 mybatis+spring的整合(maven多模块数据查询使用了分页和连接池),以及aop
mybatis+spring的整合: 导入的依赖:1.数据库连接:mysql-connector-java 2.连接池:druid 3.servlet:javax.servlet-api 4.jstl ...
- MyBatis和spring整合简单实现
spring和MyBatis整合: 导入spring和MyBatis的整合jar包,以及其依赖jar包: 导入MyBatis和spring的整合jar包. spring的核心jar包. 定义Mybat ...
- Springboot与Mybatis整合
最近自己用springboot和mybatis做了整合,记录一下: 1.先导入用到的jar包 <dependency> <groupId>org.springframework ...
- Springboot与MyBatis简单整合
之前搭传统的ssm框架,配置文件很多,看了几天文档才把那些xml的逻辑关系搞得七七八八,搭起来也是很麻烦,那时我完全按网上那个demo的版本要求(jdk和tomcat),所以最后是各种问题没成功跑起来 ...
- SpringBoot+SpringMVC+MyBatis快速整合搭建
作为开发人员,大家都知道,SpringBoot是基于Spring4.0设计的,不仅继承了Spring框架原有的优秀特性,而且还通过简化配置来进一步简化了Spring应用的整个搭建和开发过程.另外Spr ...
- springboot使用之二:整合mybatis(xml方式)并添加PageHelper插件
整合mybatis实在前面项目的基础上进行的,前面项目具体整合请参照springboot使用之一. 一.整合mybatis 整合mybatis的时候可以从mybatis官网下载mybatis官网整合的 ...
- SpringBoot系列——MyBatis整合
前言 MyBatis官网:http://www.mybatis.org/mybatis-3/zh/index.html 本文记录springboot与mybatis的整合实例:1.以注解方式:2.手写 ...
- 30分钟带你了解Springboot与Mybatis整合最佳实践
前言:Springboot怎么使用想必也无需我多言,Mybitas作为实用性极强的ORM框架也深受广大开发人员喜爱,有关如何整合它们的文章在网络上随处可见.但是今天我会从实战的角度出发,谈谈我对二者结 ...
随机推荐
- .net调用系统软键盘(兼容win7及win10)
没有什么技术说明,也是查询出来的,在此做记录 public class StartKeyBoard { public static bool isShowNumBoard = fa ...
- delphi XML简单处理
unit Unit1; interface uses Winapi.Windows, Winapi.Messages, System.SysUtils, System.Variants, System ...
- Linux服务器同步Intetnet时间
Linux服务器同步Intetnet时间 在使用linux服务器(虚拟机)的过程中,经常会发现使用一段时间后,linux服务器的时间和我的宿主机的时间不一致,而宿主机的时间确实是internet时间, ...
- https://api.highcharts.com/gantt/
<a href="https://api.highcharts.com/gantt/">https://api.highcharts.com/gantt/</a& ...
- Windows系统中监控文件复制操作的几种方式
http://blog.sina.com.cn/s/blog_4596beaa0100lp4y.html 1. ICopyHook 作用: 监视文件夹和打印机移动,删除, 重命名, 复制操作. 可以得 ...
- centos7 下安装Docker CE
前提条件 操作系统要求 要保证centos-extrasrepository开启(enabled).默认处于开启状态. 推荐使用overlay2存储驱动 卸载老版本 $ sudo yum remove ...
- 手动卸载CAD 删除残留文件 清理遗留的文件
手动卸载基于 AutoCAD 产品的文件,从而删除所有残留文件. 清理安装失败所遗留的文件. 一.解决方案: 通过"控制面板"卸载该程序. 删除以下位置残留的 AutoCAD 文件 ...
- python学习笔记之三-计算运行时间
方法1 import datetime starttime = datetime.datetime.now() #long running endtime = datetime.datetime.no ...
- spring cloud gateway - RequestRateLimiter
1. Official website 5.7 RequestRateLimiter GatewayFilter Factory The RequestRateLimiter GatewayFilte ...
- day32基于tcp协议的远程执行命令
客户端 from socket import *import structimport json client = socket(AF_INET, SOCK_STREAM)client.connect ...