restTemplate源码解析(三)创建ClientHttpRequest请求对象
所有文章
https://www.cnblogs.com/lay2017/p/11740855.html
正文
上一篇文章中,我们大体看了一下restTemplate的核心逻辑。再回顾一下核心代码
protected <T> T doExecute(URI url, @Nullable HttpMethod method, @Nullable RequestCallback requestCallback,

        @Nullable ResponseExtractor<T> responseExtractor) throws RestClientException {

    ClientHttpResponse response = null;

    try {

        // 生成请求

        ClientHttpRequest request = createRequest(url, method);

        if (requestCallback != null) {

            // 设置header

            requestCallback.doWithRequest(request);

        }

        // 执行请求,获取响应

        response = request.execute();

        // 处理响应

        handleResponse(url, method, response);

        // 获取响应体对象

        return (responseExtractor != null ? responseExtractor.extractData(response) : null);

    }

    catch (IOException ex) {

        // ... 抛出异常

    }

    finally {

        if (response != null) {

            // 关闭响应流

            response.close();

        }

    }

}
本文将打开createRequest这个创建请求的方法,看看创建请求的实现细节
跟进createRequest方法
protected ClientHttpRequest createRequest(URI url, HttpMethod method) throws IOException {

    ClientHttpRequest request = getRequestFactory().createRequest(url, method);

    if (logger.isDebugEnabled()) {

        logger.debug("HTTP " + method.name() + " " + url);

    }

    return request;

}
这里是一个工厂模式,先获取一个ClientHttpRequestFactory的工厂实例,然后将创建的工作委托给工厂处理并返回结果。
打开getRequestFactory看看获取的工厂实例(注意:这里不考虑拦截器的部分,所以不向下阅读)
public ClientHttpRequestFactory getRequestFactory() {

    return this.requestFactory;

}
看看requestFactory成员变量
private ClientHttpRequestFactory requestFactory = new SimpleClientHttpRequestFactory();
默认是SimpleClientHttpRequestFactory的实现,当然我们可以自定义实现它。简单起见,本文直接看默认的实现。
获取了ClientHttpRequestFactory的实例,我们跟进SimpleClientHttpRequestFactory看看它是怎么实现createRequest方法的
@Override

public ClientHttpRequest createRequest(URI uri, HttpMethod httpMethod) throws IOException {

    // 通过URI生成了connection

    HttpURLConnection connection = openConnection(uri.toURL(), this.proxy);

    // 对Connection进行一些设置

    prepareConnection(connection, httpMethod.name());

    // 返回一个ClientHttpRequest的实现

    if (this.bufferRequestBody) {

        return new SimpleBufferingClientHttpRequest(connection, this.outputStreaming);

    }

    else {

        return new SimpleStreamingClientHttpRequest(connection, this.chunkSize, this.outputStreaming);

    }

}
到这里,我们可以知道SimpleClientHttpRequestFactory其实就是包装了一下HttpUrlConnection。createRequest做了两件事:
1)创建并设置一个HttpUrlConnection
2)构造并返回一个ClientHttpRequest的实例对象
打开openConnection方法看看HttpUrlConnection的创建
protected HttpURLConnection openConnection(URL url, @Nullable Proxy proxy) throws IOException {

    URLConnection urlConnection = (proxy != null ? url.openConnection(proxy) : url.openConnection());

    if (!HttpURLConnection.class.isInstance(urlConnection)) {

        throw new IllegalStateException("HttpURLConnection required for [" + url + "] but got: " + urlConnection);

    }

    return (HttpURLConnection) urlConnection;

}
很简单地通过URL对象的openConnection方法返回了一个UrlConnection。
再打开prepareConnection看看设置了啥
protected void prepareConnection(HttpURLConnection connection, String httpMethod) throws IOException {

    if (this.connectTimeout >= 0) {

        connection.setConnectTimeout(this.connectTimeout);

    }

    if (this.readTimeout >= 0) {

        connection.setReadTimeout(this.readTimeout);

    }

    connection.setDoInput(true);

    if ("GET".equals(httpMethod)) {

        connection.setInstanceFollowRedirects(true);

    }

    else {

        connection.setInstanceFollowRedirects(false);

    }

    if ("POST".equals(httpMethod) || "PUT".equals(httpMethod) ||

            "PATCH".equals(httpMethod) || "DELETE".equals(httpMethod)) {

        connection.setDoOutput(true);

    }

    else {

        connection.setDoOutput(false);

    }

    connection.setRequestMethod(httpMethod);

}
也是一些HttpUrlConnection很常见的设置,超时时间,允许输入输出,请求方法啥的
再回到刚刚的createRequest方法
private boolean bufferRequestBody = true;

@Override

public ClientHttpRequest createRequest(URI uri, HttpMethod httpMethod) throws IOException {

    // 通过URI生成了connection

    HttpURLConnection connection = openConnection(uri.toURL(), this.proxy);

    // 对Connection进行一些设置

    prepareConnection(connection, httpMethod.name());

    // 返回一个ClientHttpRequest的实现

    if (this.bufferRequestBody) {

        return new SimpleBufferingClientHttpRequest(connection, this.outputStreaming);

    }

    else {

        return new SimpleStreamingClientHttpRequest(connection, this.chunkSize, this.outputStreaming);

    }

}
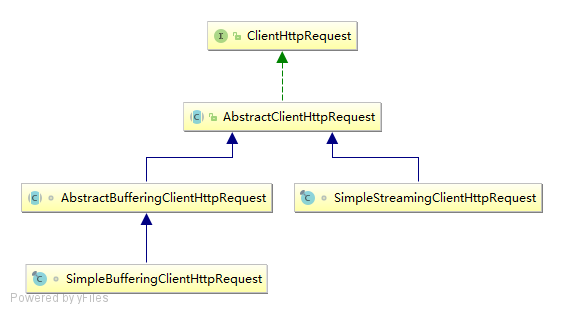
bufferRequestBody默认是true,将会返回ClientHttpRequest的默认实现SimpleBufferingClientHttpRequest的实例对象。
我们保持好奇心,瞄一眼SimpleBufferingClientHttpRequest的类图关系吧。
总结
createRequest方法通过ClientHttpRequestFactory创建并返回了一个ClientHttpRequest的实例。整体逻辑还是挺简单的,如果放到面向过程的代码里或许就是各种ifelse的逻辑。由于我们面向对象,所以会有这些抽象与组合的,习惯于这种代码风格还是挺重要的。
restTemplate源码解析(三)创建ClientHttpRequest请求对象的更多相关文章
- restTemplate源码解析(目录)
restTemplate是spring实现的,基于restful风格的http请求模板.使用restTemplate可以简化请求操作的复杂性,同时规范了代码风格.本系列文章,将根据以下目录顺序,从源码 ...
- Celery 源码解析三: Task 对象的实现
Task 的实现在 Celery 中你会发现有两处,一处位于 celery/app/task.py,这是第一个:第二个位于 celery/task/base.py 中,这是第二个.他们之间是有关系的, ...
- Mybatis源码解析(三) —— Mapper代理类的生成
Mybatis源码解析(三) -- Mapper代理类的生成 在本系列第一篇文章已经讲述过在Mybatis-Spring项目中,是通过 MapperFactoryBean 的 getObject( ...
- ReactiveCocoa源码解析(三) Signal代码的基本实现
上篇博客我们详细的聊了ReactiveSwift源码中的Bag容器,详情请参见<ReactiveSwift源码解析之Bag容器>.本篇博客我们就来聊一下信号量,也就是Signal的的几种状 ...
- ReactiveSwift源码解析(三) Signal代码的基本实现
上篇博客我们详细的聊了ReactiveSwift源码中的Bag容器,详情请参见<ReactiveSwift源码解析之Bag容器>.本篇博客我们就来聊一下信号量,也就是Signal的的几种状 ...
- React的React.createRef()/forwardRef()源码解析(三)
1.refs三种使用用法 1.字符串 1.1 dom节点上使用 获取真实的dom节点 //使用步骤: 1. <input ref="stringRef" /> 2. t ...
- dubbo源码解析-zookeeper创建节点
前言 在之前dubbo源码解析-本地暴露中的前言部分提到了两道高频的面试题,其中一道dubbo中zookeeper做注册中心,如果注册中心集群都挂掉,那发布者和订阅者还能通信吗?在上周的dubbo源码 ...
- vuex 源码解析(三) getter属性详解
有时候我们需要从store中的state中派生出一些状态,例如: <div id="app"> <p>{{reverseMessage}}</p> ...
- restTemplate源码解析(二)restTemplate的核心逻辑
所有文章 https://www.cnblogs.com/lay2017/p/11740855.html 正文 上一篇文章中,我们构造了一个RestTemplate的Bean实例对象.本文将主要了解一 ...
- restTemplate源码解析(五)处理ClientHttpResponse响应对象
所有文章 https://www.cnblogs.com/lay2017/p/11740855.html 正文 上一篇文章中,我们执行了ClientHttpRequest与服务端进行交互.并返回了一个 ...
随机推荐
- 创建Bitmap之Bitmap静态方法使用示例
package com.loaderman.customviewdemo; import android.app.Activity; import android.content.Intent; im ...
- Jmeter BeanShell 引用变量报错Error or number too big for integer
如果你通过CSV Data Set Config或者_StringFromFile函数来参数化你的请求,需要特别注意当参数为纯数字时,jmeter会默认将其识别成int型数据,说明jmeter并不是默 ...
- php 云片国外短信实例
<?php namespace Ruifi\App; class SmsL { public function smsIcode($moblie,$sms_code,$intl_code){ h ...
- csu 1901: 赏赐 OR 灾难
1901: 赏赐 OR 灾难 Submit Page Summary Time Limit: 1 Sec Memory Limit: 128 Mb Submitted: 86 ...
- eNSP——配置NAT
原理: 实验案例: 拓扑图: 实验编址: 1.基本配置 根据实验编址进行基本配置,并测试连通性. 2.配置静态NAT 公司在网关路由器R1上配置访问外网的默认路由. 需要在网关路由器R1上配置NAT地 ...
- boost::bind四种应用场景的例子
普通函数 int f( int a, int b ){return a + b;}boost::bind( f, _1, 9 )( 1 ) 成员函数 struct demo{int f( in ...
- 解决ffmpeg执行报错“ffmpeg: error while loading shared libraries: libavdevice.so.58: cannot open shared object file: No such file or directory”的问题
问题现象: 执行ffmpeg命令后报错: ffmpeg: error : cannot open shared object file: No such file or directory 出问题的环 ...
- Is Graph Bipartite?
Given an undirected graph, return true if and only if it is bipartite. Recall that a graph is bipart ...
- 国产龙芯服务器源码安装PostgreSQL数据库的方法
1. 公司最近有一些国产化项目的需求, 要求在国产CPU的服务器上面安装pg数据库等. 2.. 但是差查了下中标麒麟的官网,在龙芯MIPS的操作系统包源里面仅有 postgreSQL 9.2 版本的r ...
- javascript当中火狐的firebug如何单步调试程序?
[学习笔记] 2)火狐的firebug如何单步调试程序 马克-to-win:火狐中:工具/web 开发者/调试器,开始时没有文件,在浏览器当中点刷新按钮,文件就加载进来了. 文章转载自原文:https ...