Spring/Spring Boot整合Weblogic JMS实战
本文主要介绍weblogic jms的配置,包括JMS 服务器和JMS 模块(连接工厂、队列、远程 SAF 上下文、SAF 导入目的地、SAF 错误处理)的配置;并在Spring/Spring Boot环境下进行消息的监听及发送;为了更多的使用webloigc jms的功能,发送的队列使用saf配置的远程weblogic jms队列(两边的weblogic版本须一致),当然本地也是可以的。本文中demo所使用的软件环境为:Weblogic 10.3.6.0、Spring 5.1.2.RELEASE/Spring Boot 2.1.4.RELEASE、jdk8
注:saf配置的远程队列只能发送消息,不能监听消息。
1、Weblogic JMS配置
1.1、配置JMS 服务器
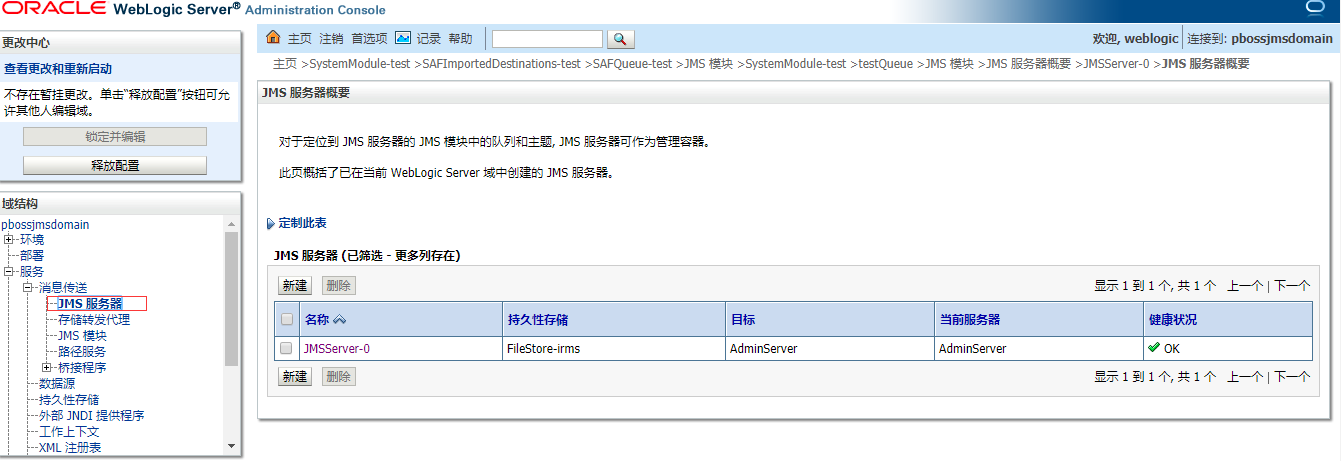
注:需配置持久性存储,没有就创建一个
1.2、配置JMS 模块
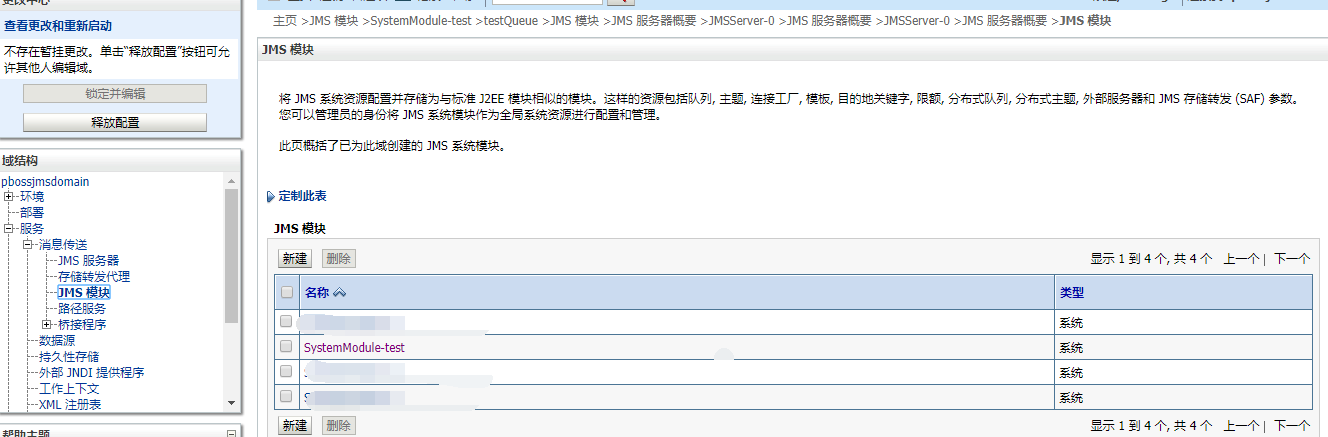
下面的功能都是在JMS 模块中配置:连接工厂、队列、远程 SAF 上下文、SAF 导入目的地、SAF 错误处理
这里就不一一截图配置过程了,按页面提示配置就行;配置结果如下
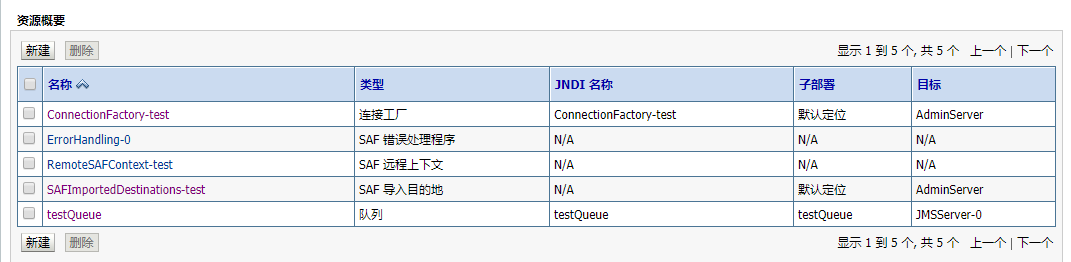
连接工厂需设置jndi,程序里会用到
SAF 远程上下文配置的远程地址及用户名密码信息
SAF 导入目的地配置的远程的队列消息及对应到本地的jndi
SAF 错误处理程序配置错误处理策略属性,选配
队列需设置jndi,程序里会用到
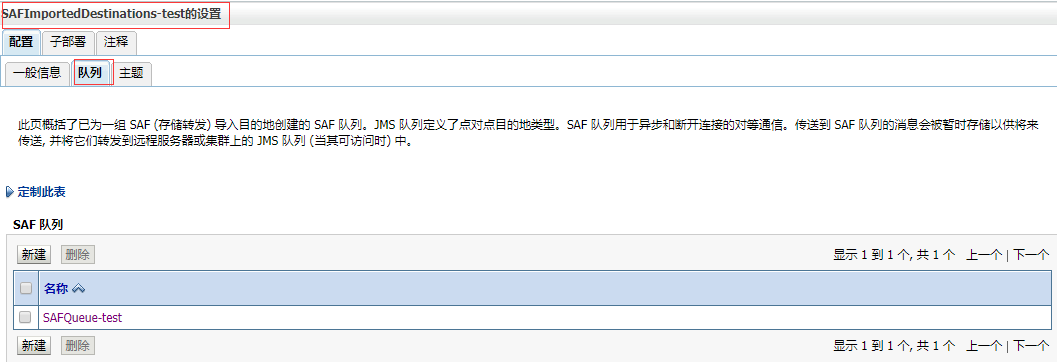
SAF 导入目的地配置的队列消息如下:
点击队列名称:
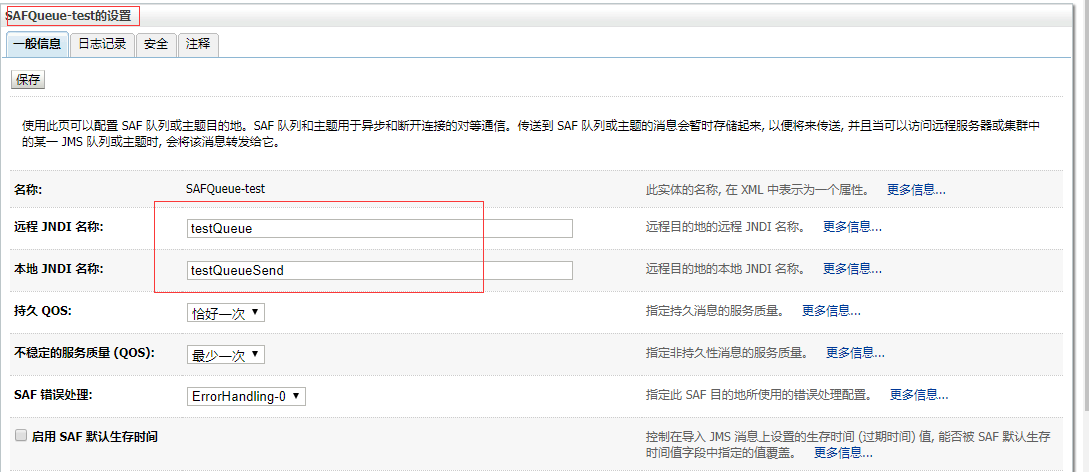
本地 JNDI 名称程序里会用到,向该jndi发送消息实际会发送到远程的队列里。
2、编写程序
2.1、Spring程序
2.1.1、applicationContext-jms.xml
增加jms的配置文件
<?xml version="1.0" encoding="UTF-8"?>

<beans xmlns="http://www.springframework.org/schema/beans"

    xmlns:xsi="http://www.w3.org/2001/XMLSchema-instance" xmlns:context="http://www.springframework.org/schema/context"

    xmlns:aop="http://www.springframework.org/schema/aop" xmlns:tx="http://www.springframework.org/schema/tx"

    xmlns:security="http://www.springframework.org/schema/security"

    xmlns:task="http://www.springframework.org/schema/task"

    xsi:schemaLocation="http://www.springframework.org/schema/beans

                        http://www.springframework.org/schema/beans/spring-beans-4.3.xsd

                        http://www.springframework.org/schema/aop

                        http://www.springframework.org/schema/aop/spring-aop-4.3.xsd

                        http://www.springframework.org/schema/tx

                        http://www.springframework.org/schema/tx/spring-tx-4.3.xsd

                        http://www.springframework.org/schema/context

                        http://www.springframework.org/schema/context/spring-context-4.3.xsd

                        http://www.springframework.org/schema/security

                        http://www.springframework.org/schema/security/spring-security-4.3.xsd

                        http://www.springframework.org/schema/task

                        http://www.springframework.org/schema/task/spring-task-4.3.xsd">

    <bean id="jndiTemplate" class="org.springframework.jndi.JndiTemplate">

        <property name="environment">

            <props>

                <prop key="java.naming.factory.initial">weblogic.jndi.WLInitialContextFactory</prop>

                <prop key="java.naming.provider.url">t3://10.39.196.10:7001</prop>

                <prop key="java.naming.security.principal">weblogic</prop>

                <prop key="java.naming.security.credentials">weblogic1</prop>

            </props>

        </property>

    </bean>

    <bean id="jmsConnectionFactory" class="org.springframework.jndi.JndiObjectFactoryBean">

        <property name="jndiTemplate" ref="jndiTemplate" />

        <property name="proxyInterface" value="javax.jms.ConnectionFactory" />

        <property name="jndiName" value="ConnectionFactory-test" />

    </bean>

    <bean id="testQueueSend" class="org.springframework.jndi.JndiObjectFactoryBean">

        <property name="jndiName" value="testQueueSend" />

        <property name="jndiTemplate" ref="jndiTemplate" />

    </bean>

    <bean id="testQueueReceive" class="org.springframework.jndi.JndiObjectFactoryBean">

        <property name="jndiName" value="testQueue" />

        <property name="jndiTemplate" ref="jndiTemplate" />

    </bean>

    <bean id="jmsTemplate" class="org.springframework.jms.core.JmsTemplate">

        <property name="connectionFactory" ref="jmsConnectionFactory" />

    </bean>

    <bean id="sender" class="com.inspur.demo.jms.Sender">

    </bean>

    <task:scheduled-tasks>

        <task:scheduled ref="sender" method="hello" cron="0/5 * * * * ?" />

    </task:scheduled-tasks>

    <bean id="receiver" class="com.inspur.demo.jms.Receiver">

    </bean>

    <bean id="listenerContainer" class="org.springframework.jms.listener.DefaultMessageListenerContainer">

        <property name="connectionFactory" ref="jmsConnectionFactory" />

        <property name="destination" ref="testQueueReceive" />

        <property name="messageListener" ref="receiver" />

        <property name="autoStartup" value="true" />

    </bean>

</beans>
jndiTemplate配置weblogic的连接信息
jmsConnectionFactory配置连接工厂
testQueueSend向该队列发送消息,对应上面saf远程目的地里队列的本地jndi名称,
testQueueReceive对该队列进行监听,接受消息
jmsTemplate配置jms的模板
sender发送消息的类,把该类配置为定时任务,定时发送消息;
receiver监听的类
listenerContainer监听容器
2.1.2、发送者
package com.inspur.demo.jms;

import javax.jms.Destination;

import javax.jms.JMSException;

import javax.jms.Message;

import javax.jms.Session;

import org.slf4j.Logger;

import org.slf4j.LoggerFactory;

import org.springframework.beans.factory.annotation.Autowired;

import org.springframework.beans.factory.annotation.Qualifier;

import org.springframework.jms.core.JmsTemplate;

import org.springframework.jms.core.MessageCreator;

public class Sender {

    protected static Logger logger = LoggerFactory.getLogger(Sender.class);

    //发送消息的队列

    @Autowired

    @Qualifier("testQueueSend")

    private Destination destination;

    @Autowired

    private JmsTemplate jmsTemplate;

    public void hello() {

        String message = System.currentTimeMillis() + "-hello";

        logger.info("Message Send:{}", message);

        jmsTemplate.send(destination, new MessageCreator() {

            @Override

            public Message createMessage(Session session) throws JMSException {

                return session.createTextMessage(message);

            }

        });

    }

}
使用JmsTemplate来发送消息。
2.1.3、接受者
package com.inspur.demo.jms;

import javax.jms.JMSException;

import javax.jms.Message;

import javax.jms.MessageListener;

import javax.jms.TextMessage;

import org.slf4j.Logger;

import org.slf4j.LoggerFactory;

public class Receiver implements MessageListener {

    protected static Logger logger = LoggerFactory.getLogger(Receiver.class);

    @Override

    public void onMessage(Message message) {

        try {

            String text = "";

            if (message instanceof TextMessage) {

                text = ((TextMessage) message).getText();

            }

            logger.info("Message received:{}", text);

        } catch (JMSException e) {

            e.printStackTrace();

        }

    }

}
2.2、Spring Boot程序
2.2.1、引入依赖
<dependency>

    <groupId>javax.jms</groupId>

    <artifactId>javax.jms-api</artifactId>

</dependency>

<dependency>

    <groupId>org.springframework</groupId>

    <artifactId>spring-jms</artifactId>

</dependency>

<dependency>

    <groupId>weblogic</groupId>

    <artifactId>wlfullclient</artifactId>

    <version>1.0.0</version>

    <systemPath>D:\Oracle\Middleware\wlserver_10.3\server\lib\wlfullclient.jar</systemPath>

    <scope>system</scope>

</dependency>
引入的weblogic jar包wlfullclient.jar默认室不存在的,需在D:\Oracle\Middleware\wlserver_10.3\server\lib目录下通过命令生成:java -jar wljarbuilder.jar
2.2.2、Weblogic JMS的配置类
package com.inspur.webframe.config;

import java.util.Properties;

import javax.jms.ConnectionFactory;

import javax.jms.Destination;

import org.slf4j.Logger;

import org.slf4j.LoggerFactory;

import org.springframework.beans.factory.annotation.Autowired;

import org.springframework.boot.autoconfigure.condition.ConditionalOnMissingBean;

import org.springframework.context.annotation.Bean;

import org.springframework.context.annotation.Configuration;

import org.springframework.jms.core.JmsTemplate;

import org.springframework.jms.listener.DefaultMessageListenerContainer;

import org.springframework.jndi.JndiObjectFactoryBean;

import org.springframework.jndi.JndiTemplate;

import com.inspur.demo.jms.Receiver;

@Configuration

public class WeblogicJmsConfig {

    private static Logger logger = LoggerFactory.getLogger(WeblogicJmsConfig.class);

    @Autowired

    private Receiver receiver;

    @Bean

    public JndiTemplate jndiTemplate() {

        Properties properties = new Properties();

        properties.setProperty("java.naming.factory.initial", "weblogic.jndi.WLInitialContextFactory");

        properties.setProperty("java.naming.provider.url", "t3://10.39.196.10:9001");

        properties.setProperty("java.naming.security.principal", "weblogic");

        properties.setProperty("java.naming.security.credentials", "weblogic1");

        JndiTemplate jndiTemplate = new JndiTemplate();

        jndiTemplate.setEnvironment(properties);

        return jndiTemplate;

    }

    @Bean

    public JndiObjectFactoryBean jmsConnectionFactory() {

        JndiObjectFactoryBean jndiObjectFactoryBean = new JndiObjectFactoryBean();

        jndiObjectFactoryBean.setJndiName("ConnectionFactory-test");

        jndiObjectFactoryBean.setJndiTemplate(jndiTemplate());

        return jndiObjectFactoryBean;

    }

    @Bean("testQueueSend")

    public JndiObjectFactoryBean testQueueSend() {

        JndiObjectFactoryBean jndiObjectFactoryBean = new JndiObjectFactoryBean();

        jndiObjectFactoryBean.setJndiName("testQueueSend");

        jndiObjectFactoryBean.setJndiTemplate(jndiTemplate());

        return jndiObjectFactoryBean;

    }

    @Bean("testQueueReceive")

    public JndiObjectFactoryBean testQueueReceive() {

        JndiObjectFactoryBean jndiObjectFactoryBean = new JndiObjectFactoryBean();

        jndiObjectFactoryBean.setJndiName("testQueue");

        jndiObjectFactoryBean.setJndiTemplate(jndiTemplate());

        return jndiObjectFactoryBean;

    }

    @Bean("jmsTemplate")

    @ConditionalOnMissingBean

    public JmsTemplate jmsTemplate() {

        JmsTemplate jmsTemplate = new JmsTemplate();

        jmsTemplate.setConnectionFactory((ConnectionFactory) jmsConnectionFactory().getObject());

        jmsTemplate.setDefaultDestination((Destination) testQueueSend().getObject());

        logger.info("jmsTemplate.isExplicitQosEnabled()={}", jmsTemplate.isExplicitQosEnabled());

        return jmsTemplate;

    }

    @Bean

    @ConditionalOnMissingBean

    public DefaultMessageListenerContainer listenerTopic() {

        DefaultMessageListenerContainer listener = new DefaultMessageListenerContainer();

        listener.setConnectionFactory((ConnectionFactory) jmsConnectionFactory().getObject());

        listener.setDestination((Destination)testQueueReceive().getObject());

        listener.setAutoStartup(true);

        listener.setMessageListener(receiver);

        return listener;

    }

}
这里配置的信息与上面applicationContext-jms.xml中配置的内容一致,只不过是通过程序的方式。这里面的一些变动的信息可以配置到application.properties中,如weblogic地址、用户名、密码、队列jndi等。
2.2.3、发送者
package com.inspur.demo.jms;

import javax.jms.Destination;

import javax.jms.JMSException;

import javax.jms.Message;

import javax.jms.Session;

import org.slf4j.Logger;

import org.slf4j.LoggerFactory;

import org.springframework.beans.factory.annotation.Autowired;

import org.springframework.beans.factory.annotation.Qualifier;

import org.springframework.jms.core.JmsTemplate;

import org.springframework.jms.core.MessageCreator;

import org.springframework.scheduling.annotation.Scheduled;

import org.springframework.stereotype.Component;

@Component

public class Sender {

    private static Logger logger = LoggerFactory.getLogger(Sender.class);

    //发送消息的队列

    @Autowired

    @Qualifier("testQueueSend")

    private Destination destination;

    @Autowired

    private JmsTemplate jmsTemplate;

    @Scheduled(cron = "0/5 * * * * ?")

    public void hello() {

        final String message = System.currentTimeMillis() + "-hello";

        logger.info("Message Send:{}", message);

        jmsTemplate.send(destination, new MessageCreator() {

            @Override

            public Message createMessage(Session session) throws JMSException {

                return session.createTextMessage(message);

            }

        });

    }

}
通过注解来定时发送。
2.2.4、接受者
package com.inspur.demo.jms;

import javax.jms.JMSException;

import javax.jms.Message;

import javax.jms.MessageListener;

import javax.jms.TextMessage;

import org.slf4j.Logger;

import org.slf4j.LoggerFactory;

import org.springframework.stereotype.Component;

@Component

public class Receiver implements MessageListener {

    protected static Logger logger = LoggerFactory.getLogger(Receiver.class);

    @Override

    public void onMessage(Message message) {

        try {

            String text = "";

            if (message instanceof TextMessage) {

                text = ((TextMessage) message).getText();

            }

            logger.info("Message received:{}", text);

        } catch (JMSException e) {

            e.printStackTrace();

        }

    }

}
增加@Component注解,方便配置类中引用。
2.2.5、启动类
在启动类中需增加@EnableAutoConfiguration(exclude = JmxAutoConfiguration.class)注解,否则会报javax.naming.NameNotFoundException: remaining name: env/jmx/runtime异常。原因可能是Spring boot启动时试图创建一个在weblogic api库中检测到的bean(mbeanExporter),这个bean需要env/jmx/runtime JNDI;所以要去除JMX的自动配置。
3、测试
1.发送消息
启动Spring或Spring Boot程序后,每隔5秒中会往testQueueSend队列(远程队列)中发送一条消息,可到Weblogic控制台查看消息.
2.接受消息
在Weblogic控制台手工往testQueueReceive队列插入一条消息,程序日志会打印该消息内容。
Spring/Spring Boot整合Weblogic JMS实战的更多相关文章
- RabbitMQ与Spring的框架整合之Spring Boot实战
1.RabbitMQ与Spring的框架整合之Spring Boot实战. 首先创建maven项目的RabbitMQ的消息生产者rabbitmq-springboot-provider项目,配置pom ...
- Spring Boot整合实战Spring Security JWT权限鉴权系统
目前流行的前后端分离让Java程序员可以更加专注的做好后台业务逻辑的功能实现,提供如返回Json格式的数据接口就可以.像以前做项目的安全认证基于 session 的登录拦截,属于后端全栈式的开发的模式 ...
- spring boot整合activemq消息中间件
spring boot整合activemq消息中间件 <project xmlns="http://maven.apache.org/POM/4.0.0" xmlns:xsi ...
- activeMQ入门+spring boot整合activeMQ
最近想要学习MOM(消息中间件:Message Oriented Middleware),就从比较基础的activeMQ学起,rabbitMQ.zeroMQ.rocketMQ.Kafka等后续再去学习 ...
- Spring Boot 从入门到实战汇总
之前写过几篇spring boot入门到实战的博文,因为某些原因没能继续. 框架更新迭代很快,之前还是基于1.x,现在2.x都出来很久了.还是希望能从基于该框架项目开发的整体有一个比较系统的梳理,于是 ...
- Spring boot 整合spring Data JPA+Spring Security+Thymeleaf框架(上)
近期上班太忙所以耽搁了给大家分享实战springboot 框架的使用. 以下是spring boot 整合多个框架的使用. 首先是准备工作要做好. 第一 导入框架所需的包,我们用的事maven 进行 ...
- Spring Boot (十三): Spring Boot 整合 RabbitMQ
1. 前言 RabbitMQ 是一个消息队列,说到消息队列,大家可能多多少少有听过,它主要的功能是用来实现应用服务的异步与解耦,同时也能起到削峰填谷.消息分发的作用. 消息队列在比较主要的一个作用是用 ...
- RabbitMQ与Spring的框架整合之Spring Cloud Stream实战
1.RabbitMQ与Spring Cloud Stream整合实战.SpringCloud Stream整体结构核心概念图,如下所示: 图示解释:Outputs输出,即消息的发送端.Inputs输入 ...
- RabbitMQ使用及与spring boot整合
1.MQ 消息队列(Message Queue,简称MQ)——应用程序和应用程序之间的通信方法 应用:不同进程Process/线程Thread之间通信 比较流行的中间件: ActiveMQ Rabbi ...
随机推荐
- Flutter -------- 解析JSON数据
SON序列化方法: 手动序列化和反序列化通过代码生成自动序列化和反序列化 手动JSON序列化是指使使用dart:convert中内置的JSON解码器.它将原始JSON字符串传递给JSON.decode ...
- 使用 CircleCI 2.0 进行持续集成/持续部署
使用 CircleCI 2.0 进行持续集成/持续部署 - 简书https://www.jianshu.com/p/36af6af74dfc Signup - CircleCIhttps://circ ...
- jenkins关联shell命令修改pom项目版本
#获取pom文件内的项目版本 version=`awk '/<version>[^<]+<\/version>/{gsub(/<version>|<\/ ...
- mobile crane 1
void MobileCrane::rotateRope2() { //double r_angle1 = rotateRope + rorate3; //std::cout << &qu ...
- Java EE互联网轻量级框架整合开发— SSM框架(中文版带书签)、原书代码
Java EE互联网轻量级框架整合开发 第1部分 入门和技术基础 第1章 认识SSM框架和Redis 2 1.1 Spring框架 2 1.2 MyBatis简介 6 1.3 Spring MVC简介 ...
- PAT 甲级 1147 Heaps (30 分) (层序遍历,如何建树,后序输出,还有更简单的方法~)
1147 Heaps (30 分) In computer science, a heap is a specialized tree-based data structure that sati ...
- delphi self.Update 什么作用
更新指定窗口的客户区.如果窗口更新的区域不为空,UpdateWindow函数就发送一个WM_PAINT消息来更新指定窗口的客户区.函数绕过应用程序的消息队列,直接发送WM_PAINT消息给指定窗口的窗 ...
- Elasticsearch - 处理冲突
http://blog.csdn.net/xifeijian/article/details/49615559
- IE6利用iframe遮挡 弹层 select
ie6的老bug了,select老是会挡住 弹层里的内容. 解决办法:(box需要设置高度) <div class="box"> <!--[if IE 6]> ...
- jcmd的简单实用
命令jcmd 显示所有java进程id及相关信息 命令 jcmd java_pid help 显示某个java进程的所有可用命令 ➜ jobs jcmd 61185 help 61185: The f ...