
activeMQ入门+spring boot整合activeMQ
最近想要学习MOM(消息中间件:Message Oriented Middleware),就从比较基础的activeMQ学起,rabbitMQ、zeroMQ、rocketMQ、Kafka等后续再去学习。
上面说activeMQ是一种消息中间件,可是为什么要使用activeMQ?
在没有使用JMS的时候,很多应用会出现同步通信(客户端发起请求后需要等待服务端返回结果才能继续执行)、客户端服务端耦合、单一点对点(P2P)通信的问题,JMS可以通过面向消息中间件的方式很好的解决了上面的问题。
JMS规范术语:
Provider/MessageProvider:生产者
Consumer/MessageConsumer:消费者
消息形式:
1、点对点(queue)
2、一对多(topic)
ConnectionFactory:连接工厂,JMS用它创建连接
Connnection:JMS Client到JMS Provider的连接
Destination:消息目的地,由Session创建
Session:会话,由Connection创建,实质上就是发送、接受消息的一个线程,因此生产者、消费者都是Session创建的
我这里安装的是Windows版本的,安装好了之后就是这样的目录

到bin目录下,启动activemq.bat
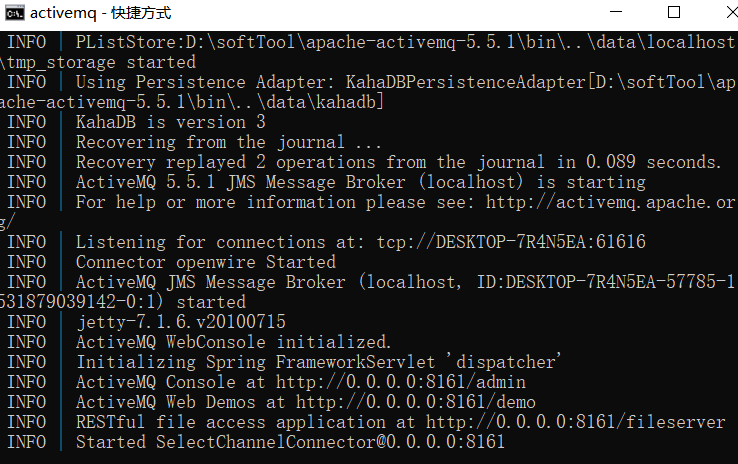
这样就启动成功了。
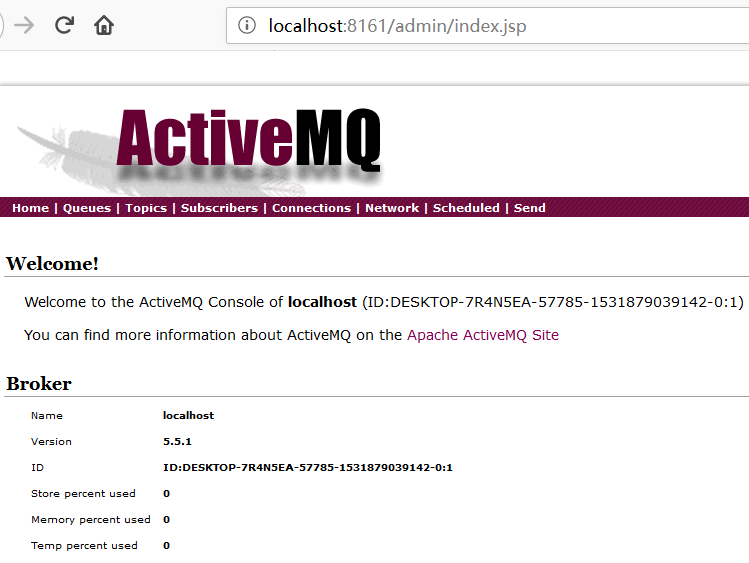
访问http://localhost:8161/admin/index.jsp可以看到管控台,如下图:
spring boot整合activeMQ:
pom.xml中引用
<dependency>

            <groupId>org.springframework.boot</groupId>

            <artifactId>spring-boot-starter-activemq</artifactId>

        </dependency>

        <dependency>

            <groupId>org.apache.activemq</groupId>

            <artifactId>activemq-pool</artifactId>

            <!-- <version>5.7.0</version> -->

        </dependency>
在application.properties中配置activeMQ连接:
spring.activemq.broker-url=tcp://localhost:61616

spring.activemq.in-memory=true

spring.activemq.pool.enabled=false
创建消息生产者:
/**

 * @author huangzhang

 * @description

 * @date Created in 2018/7/16 18:57

 */

@Service("provider")

public class Provider {

    @Autowired

    private JmsMessagingTemplate jmsMessagingTemplate;

    public void sendMessage(Destination destination, final String message){

        jmsMessagingTemplate.convertAndSend(destination,message);

    }
  //消费消费者返回的队列"return.queue"中的消息

    @JmsListener(destination="return.queue")

    public void consumerMessage(String string){

        System.out.println("从return.queue队列收到的回复报文为:"+string);

    }

}
创建第一个消费者:
/**

 * @author huangzhang

 * @description

 * @date Created in 2018/7/16 19:31

 */

@Component

public class Consumer {

    @JmsListener(destination = "mytest.queue")

    public void receiveQueue(String text){

        System.out.println("Consumer收到的报文为:"+text);

    }

}
创建第二个消费者(这里不光消费了生产者插入队列中的message,而且将返回值插入到了"return.queue"队列中):
/**

 * @author huangzhang

 * @description

 * @date Created in 2018/7/16 19:33

 */

@Component

public class Consumer1 {

    @JmsListener(destination = "mytest.queue")

    @SendTo("return.queue")

    public String receiveQueue(String message){

        System.out.println("Consumer1收到的报文为:"+message);

        return "========return message "+message;

    }

}
测试方法:
@Service

public class SpringbootJmsApplicationTests {

    @Autowired

    private Provider provider;

    public void contextLoads() throws InterruptedException {

        Destination destination = new ActiveMQQueue("mytest.queue");

        for(int i=0; i<10; i++){

            provider.sendMessage(destination, "huangzhang "+i);

        }

    }

}
这里我在controller中调用了测试方法:
/**

 * @author huangzhang

 * @description

 * @date Created in 2018/7/16 20:23

 */

@Controller

public class Test {

    @Autowired

    SpringbootJmsApplicationTests springbootJmsApplicationTests;

    @RequestMapping("/")

    @ResponseBody

    public String test01()throws Exception{

        springbootJmsApplicationTests.contextLoads();

        return "success!";

    }

}
访问http://localhost:8080/对此demo进行测试
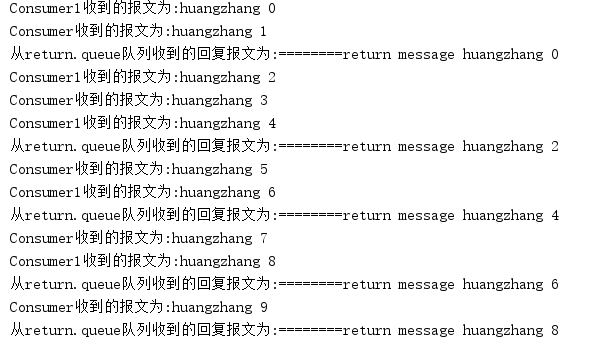
这里是执行结果,可以看出,两个消费者分别消费了生产者放入消息队列中的消息,并且Consumer1消费者将返回结果放入了队列中供生产者消费。
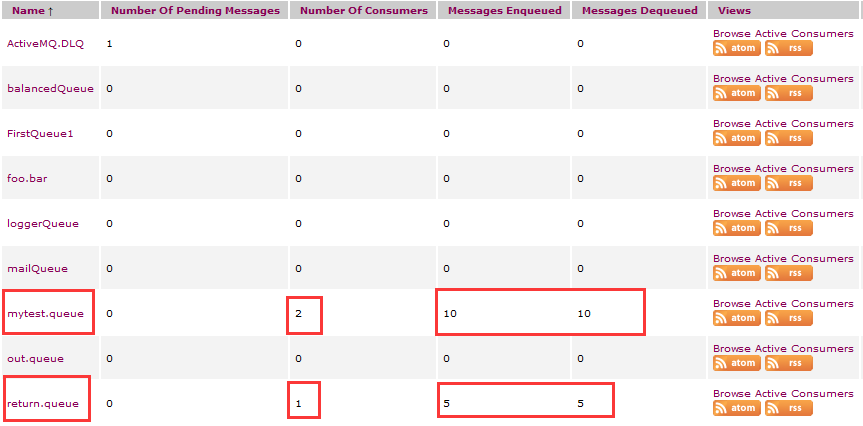
查看Queues

这里可以看出我们生产者循环往mytest.queue队列中写入10次,由两个消费者消费了这10次消息
consumer1消费了5次消息,并往返回队列return.queue中写入5次,由原生产者消费了者5次消息
到这里一个简单的spring boot整合activeMQ的一对一(queue)模式的demo就完成了(请多指正)。
下面我们对provider和consumer进行改造,实现多对多(topic)模式:
对test类进行修改,修改为以下代码:
@Service

public class SpringbootJmsApplicationTests {

    @Autowired

    private Provider provider;

    @Autowired

    private TopicSender topicSender;

    /*public void contextLoads() throws Exception {

        Destination destination = new ActiveMQQueue("mytest.queue");

        for(int i=0; i<10; i++){

            provider.sendMessage(destination, "huangzhang "+i);

        }

    }*/

    public void topicSend(){

        Destination destination  = new ActiveMQTopic("test.topic");

        for (int i = 0; i < 10 ; i++){

            provider.sendMessage(destination, "topic"+i);

        }

    }

}
订阅者为:
/**

 * @author huangzhang

 * @description

 * @date Created in 2018/7/16 19:31

 */

@Component

public class Consumer {

    /*@JmsListener(destination = "mytest.queue")

    public void receiveQueue(String text){

        System.out.println("Consumer收到的报文为:"+text);

    }*/

    @JmsListener(destination = "test.topic")

    public void receiveQueue1(String text){

        System.out.println("Consumer收到的----topic----报文为:"+text);

    }

}
两个订阅者修改方式一样。
然后像queue一样,通过controller调用test方法:
/**

 * @author huangzhang

 * @description

 * @date Created in 2018/7/10 20:23

 */

@Controller

public class Test {

    @Autowired

    SpringbootJmsApplicationTests springbootJmsApplicationTests;

    @RequestMapping("/")

    @ResponseBody

    public String test01()throws Exception{

//        springbootJmsApplicationTests.contextLoads();

        springbootJmsApplicationTests.topicSend();

        return "success!";

    }

}
同样的启动项目之后调用http://localhost:8080/接口,控制台打印如下:
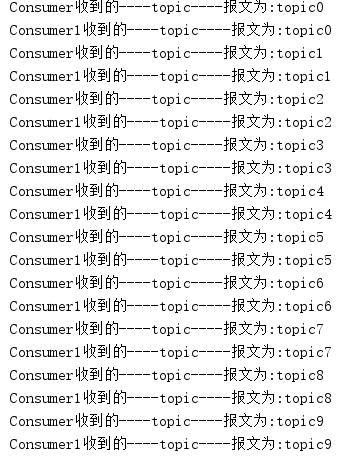
我们发现,这里consumer和consumer1两个订阅者都收到了10条订阅的"test.topic"消息,再次证明:
生产者发送一条消息到queue,只有一个消费者能收到;
发布者发送到topic的消息,只要订阅了topic的订阅者就会收到消息。
activeMQ入门+spring boot整合activeMQ的更多相关文章
- spring boot整合activemq消息中间件
spring boot整合activemq消息中间件 <project xmlns="http://maven.apache.org/POM/4.0.0" xmlns:xsi ...
- spring boot 整合activemq
1 Spring Boot与ActiveMQ整合 1.1使用内嵌服务 (1)在pom.xml中引入ActiveMQ起步依赖 <properties> <spring.version& ...
- Spring Boot 整合 ActiveMQ
依赖 <dependency> <groupId>org.springframework.boot</groupId> <artifactId>spri ...
- liunx 安装ActiveMQ 及 spring boot 初步整合 activemq
源码地址: https://gitee.com/kevin9401/microservice.git 一.安装 ActiveMQ: 1. 下载 ActiveMQ wget https://arch ...
- ActiveMQ与Spring / SpringBoot 整合(四)
1. 对 Spring 的整合 1.1 所需jar 包 <!-- activeMQ jms 的支持 --> <dependency> <groupId>org.sp ...
- Spring Boot入门 and Spring Boot与ActiveMQ整合
1.Spring Boot入门 1.1什么是Spring Boot Spring 诞生时是 Java 企业版(Java Enterprise Edition,JEE,也称 J2EE)的轻量级代替品.无 ...
- Spring Boot与ActiveMQ整合
Spring Boot与ActiveMQ整合 1使用内嵌服务 (1)在pom.xml中引入ActiveMQ起步依赖 <dependency> <groupId>org.spri ...
- spring boot集成activemq
spring boot集成activemq 转自:https://blog.csdn.net/maiyikai/article/details/77199300
- Spring boot 集成ActiveMQ(包含双向队列实现)
集百家之长,成一家之言. 1. 下载ActiveMQ https://mirrors.tuna.tsinghua.edu.cn/apache/activemq/5.15.9/apache-activ ...
随机推荐
- ceph中pool的管理
1.创建pool 创建ceph pool的命令如下,它的参数包括pool名字.PG和PGP的数量. 若少于5个OSD, 设置pg_num为128. 5~10个OSD,设置pg_num为512. 10~ ...
- 【Android开发精要笔记】Android组件模型解析
Android组件模型解析 Android中的Mashup 将应用切分成不同类别的组件,通过统一的定位模型和接口标准将他们整合在一起,来共同完成某项任务.在Android的Mashup模式下,每个组件 ...
- struts2的validate输入验证
原创 struts2的输入验证有两种方式: 使用validate()方法实现验证 使用验证文件实现验证 下面通过一个例子介绍validate()方法验证——实现客户注册输入验证 设计的JSP页面代码: ...
- c#代码片段新建(sinppet)
在c#里面我们经常用到 1.if 然后按2下Tab,出来下面一段代码 if (true) { } 2.propfull private int myVar; public int MyProperty ...
- ASP.NET MVC 全局过滤器(FilterConfig)、标记在控制器上和方法上的筛选器执行顺序
FilterConfig->控制器上的筛选器-->方法上的筛选器(大-->小,上-->下) 全局-->控制器->个别 尝试的时候记得把返回true protecte ...
- 【题解】 UOJ #2. 【NOI2014】起床困难综合症
传送门 不是很简单? 考虑一下这个数的二进制位是什么,要么是1,要么是0. 然后怎么做? 因为一开始可以选0~m的数,那么二进制为中全是0的肯定是可以选的. 接着考虑全是1的怎么选? 如果全都是1的而 ...
- AT2165 Median Pyramid Hard
题目链接:戳我 一看范围1e5,往二分上想. 可是再怎么也没有想到这个神仙的二分答案qwq 我们二分一个数x,设比他大的数为1,小于等于他的数为0.那么我们就可以把原来的那个转化成一个01塔. 然后我 ...
- 用Visual Studio 2015成功编译、发布UMDF驱动到目标机!!
开发工具:Visual Studio 2015企业版 主 机:windows10 X64企业版,主机是安装了Visual Studio 2015的操作系统,主要进行驱动开发和调试. 目 标 ...
- drf 三级菜单后台序列化以及数据库的设计
第一种, model.py结构: class GoodsCategory(models.Model): """ 商品类别 """ CATEG ...
- P4597 序列sequence
传送门 题解 完全看不懂大佬们在说什么……特别是chen_zhe大佬写的…… 来说说个人的理解吧 大佬们说:考虑当前的数$x$和之前的最大数$y$,(默认$x<y$,因为如果$x>=y$已 ...