window nginx 简单搭建服务器访问静态资源
nginx命令:
启动: start nginx
停止:nginx -s stop || nginx -s quit
注:stop是快速停止nginx,可能并不保存相关信息;quit是完整有序的停止nginx,并保存相关信息。
查看版本:nginx -v
重载配置:nginx -s reload
检查语法:nginx -t
步骤:
一:安装window (我目前使用的系统是win7)
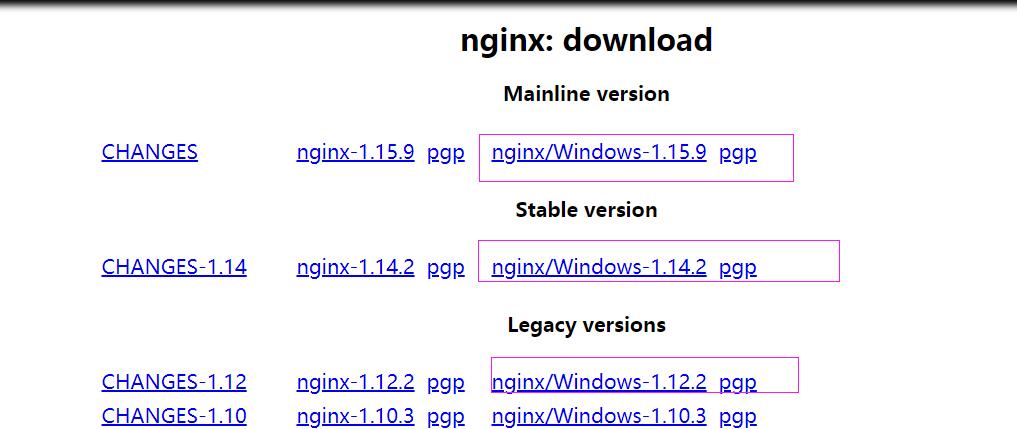
官网下载地址: https://nginx.org/en/download.html 如下图点击windows下载解压:(我安装版本:nginx-1.14.2)

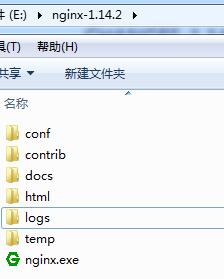
解压之后的文件目录:

二:运行nginx
在当前目录中打开cmd,快捷键方式:ctrl+shift -->鼠标右键---》在此处打开命令窗口
启动nginx: start nginx
在浏览地址栏输入:localhost 就会启动nginx默认html页面 || 在cmd输入ipconfig获取当前使用电脑的ip地址

如上图启动成功;
三:配置自己个服务端口
打开:nginx-1.14.2/conf/nginx.conf
#user  nobody;

worker_processes  1;

#error_log  logs/error.log;

#error_log  logs/error.log  notice;

#error_log  logs/error.log  info;

#pid        logs/nginx.pid;

events {

    worker_connections  1024;

}

http {

    include       mime.types;

    default_type  application/octet-stream;

    #log_format  main  '$remote_addr - $remote_user [$time_local] "$request" '

    #                  '$status $body_bytes_sent "$http_referer" '

    #                  '"$http_user_agent" "$http_x_forwarded_for"';

    #access_log  logs/access.log  main;

    sendfile        on;

    #tcp_nopush     on;

    #keepalive_timeout  0;

    keepalive_timeout  65;

    #gzip  on;

    server {

        listen       9000;//我修改过,防止和我启动其他服务发生冲突 这样我在启动nginx,打开默认页面url:localhost:9000

        server_name  localhost;

        #charset koi8-r;

        #access_log  logs/host.access.log  main;

        location / {

            root   html;

            index  index.html index.htm;

        }

        #error_page  404              /404.html;

        # redirect server error pages to the static page /50x.html

        #

        error_page   500 502 503 504  /50x.html;

        location = /50x.html {

            root   html;

        }

        # proxy the PHP scripts to Apache listening on 127.0.0.1:80

        #

        #location ~ \.php$ {

        #    proxy_pass   http://127.0.0.1;

        #}

        # pass the PHP scripts to FastCGI server listening on 127.0.0.1:9000

        #

        #location ~ \.php$ {

        #    root           html;

        #    fastcgi_pass   127.0.0.1:9000;

        #    fastcgi_index  index.php;

        #    fastcgi_param  SCRIPT_FILENAME  /scripts$fastcgi_script_name;

        #    include        fastcgi_params;

        #}

        # deny access to .htaccess files, if Apache's document root

        # concurs with nginx's one

        #

        #location ~ /\.ht {

        #    deny  all;

        #}

    }

    server {  #这里是我自己配置服务端口

        listen       8081;

        server_name resouce;

        root  D:/book/resouces;  #访问文件根目录

        autoindex on;  #是否浏览文件下的列表

        location / {  #是否允许跨域

            add_header Access-Control-Allow-Origin *;

        }

        add_header Cache-Control "no-cache,must-revalidate";# 是否缓存

    }

    # another virtual host using mix of IP-, name-, and port-based configuration

    #

    #server {

    #    listen       8000;

    #    listen       somename:8080;

    #    server_name  somename  alias  another.alias;

    #    location / {

    #        root   html;

    #        index  index.html index.htm;

    #    }

    #}

    # HTTPS server

    #

    #server {

    #    listen       443 ssl;

    #    server_name  localhost;

    #    ssl_certificate      cert.pem;

    #    ssl_certificate_key  cert.key;

    #    ssl_session_cache    shared:SSL:1m;

    #    ssl_session_timeout  5m;

    #    ssl_ciphers  HIGH:!aNULL:!MD5;

    #    ssl_prefer_server_ciphers  on;

    #    location / {

    #        root   html;

    #        index  index.html index.htm;

    #    }

    #}

}
上面listen:8081就是我自己配置服务器端口,只要启动nginx 我就可以通过localhost:8081访问我resouce目录下的文件

这样简单的,nginx 静态资源服务器就搭建成功了;
以下是我遇到的问题:
①修改完配置之后,我nginx -s reload报错:
[错误]|nginx: [error] invalid PID number "" in "/usr/local/nginx-1.12.2/nginx_my.pid"
解决方案:检查nginx是否在启动(打开页面查看是否可以打开 || 使用命令 nginx -s reopen || 查看电脑进程是否存在 nginx 等等),确定启动之后再nginx -s reload;
原因:nginx -s reload 仅告诉正在运行的nginx进程重新加载其配置,停止之后,没有正在运行的nginx进程发送信号,才会报错,找不到nginx_my.pid中的PID
参考页面:https://blog.csdn.net/qq_28296925/article/details/80416552
比较简单,只是作为一个简单的小记。
window nginx 简单搭建服务器访问静态资源的更多相关文章
- web站点优化之使用tengine搭建静态资源服务器,静态资源合并加载案例剖析
在一个项目还是单体架构的时候,所有的js,css,image都会在一个web网站上,看起来并没有什么问题,比如下面这样: 但是当web网站流量起来的时候,这个单体架构必须要进行横向扩展,而在原来的架构 ...
- nodejs 构建本地web测试服务器 以及 解决访问静态资源的问题!
直接打开html文件,是以file:///方式打开的,这种方式很多时候会遇到跨域的问题,因此我们一般会搭建一个简易的本地服务器,来运行测试页面. 一.构建静态服务器 1.使用express模块 建立个 ...
- Spring Mvc Web 配置拦截规则与访问静态资源 (三)
拦截规则配置 1. *.do <!-- Processes application requests --> <servlet> <servlet-name>app ...
- django 不能访问静态资源的解决办法
最近在中文win10下使用python的django搭建web测试服务器,发现一个诡异的现象,正常配置好django的模型,视图和模板, 1.setting.py内容如下: ""& ...
- springboot 2.X 在访问静态资源的的时候出现404的问题
通过idea快速搭建一个springboot项目: springboot版本2.1.6 在网上看的资料,springboot静态资源访问如下: "classpath:/META‐INF/re ...
- idea中JSP页面不能访问静态资源(图片,js,css)
必须配置SpringMvc对访问静态资源的支持,idea默认就是在main/webapp 下的文件路径,要在web-info同级的resource文件下放置,JSP中 ${pageContext.re ...
- 访问静态资源有问题(配置url-pattern 用"/")(两种静态资源处理)
发起的请求是由哪些服务器程序处理的 http://localhost:8080/ch05_url_pattern/index.jsp: tomcat(jsp会转为servlet) http://loc ...
- spring访问静态资源出错,No mapping found for HTTP request with URI xxx/resources/js/jquery.min.js...
问题:spring访问静态资源出错,No mapping found for HTTP request with URI xxx/resources/js/jquery.min.js... web.x ...
- SpringMVC访问静态资源的三种方式(转)
本文转自:http://www.iigrowing.cn/springmvc_fang_wen_jing_tai_zi_yuan_de_san_zhong_fang_shi.html 如何你的Disp ...
随机推荐
- laravel7 ajax H-ui框架添加数据至数据库
1:定义路由: //租房 Route::resource('house','fang\FangattrController'); 2:控制器访问前端框架: public function create ...
- laravel7 权限菜单设置简易升缩
1:数据库填写数据,pid=0为顶级菜单,pid=对应的id为顶级菜单的子菜单 2:laravel7 创建模型并链接对应的表名 <?php namespace App\models; use I ...
- 怎么做 HDFS 的原地平滑缩容?
背景 当数据规模越来越大,存储成本也水涨船高.随着时间推移,数据热度分布往往呈 2⁄8 原则,即 80% 的访问集中在 20% 的数据上.对于那不经常访问的 80% 数据来说,使用多个 SSD 来存储 ...
- SQL常用数据类型 字段约束
SQL中的常用数据类型: 整数:int 小数:double 字符串:varchar(长度),建议 用2的整数倍 日期:date 格式: 'YYYY-MM-DD' SQL中的约束: a.主键约束:pri ...
- 高级IO模型之kqueue和epoll
目录 简介 block IO和nonblocking IO IO多路复用和select poll epoll kqueue epoll和kqueue的优势 简介 任何一个程序都离不开IO,有些是很明显 ...
- Shell:常见错误总结(一)
Blog:博客园 个人 译自BashPitfalls 本文总结了编写Shell脚本中的常见错误. for f in $(ls *.mp3) 最常犯的错之一就是编写这样的循环: for f in $(l ...
- JavaScript 事件循环(1) —— 从 setTimeout 说起
转变认知 setTimeout 可能是很多前端工程师爱用的方法,它可以使得一段代码延迟执行,例如: setTimeout(() => console.log('A'), 1000); // 在1 ...
- Android BLE 蓝牙开发——扫码枪基于BLESSED
一.蓝牙模式HID与BLE 当扫码枪与手机连接时,通常采用的是蓝牙HID(Human Interface Device)模式.本质上是一个把扫码枪作为一个硬件键盘,按照键盘协议把扫码后的结果逐个输入到 ...
- java 队列
Java中的list和set有什么区别 list与set方法的区别有:list可以允许重复对象和插入多个null值,而set不允许:list容器是有序的,而set容器是无序的等等 Java中的集合 ...
- 建立META-INF/spring.factories文件的意义何在
平常我们如何将Bean注入到容器当中 @Configuration @EnableConfigurationProperties(HelloProperties.class) public class ...
