
2017-2018-2 20165231 实验四 Android程序设计
实验报告封面
课程:Java程序设计 班级:1652班 姓名:王杨鸿永 学号:20165231
指导教师:娄嘉鹏 实验日期:2018年5月14日
实验时间:15:25 - 17:15 实验序号:实验四
实验名称:Android程序设计
实验内容
实验一
- Android Stuidio的安装测试: 参考《Java和Android开发学习指南(第二版)(EPUBIT,Java for Android 2nd)》第二十四章:
- 参考http://www.cnblogs.com/rocedu/p/6371315.html#SECANDROID,安装 Android Stuidio
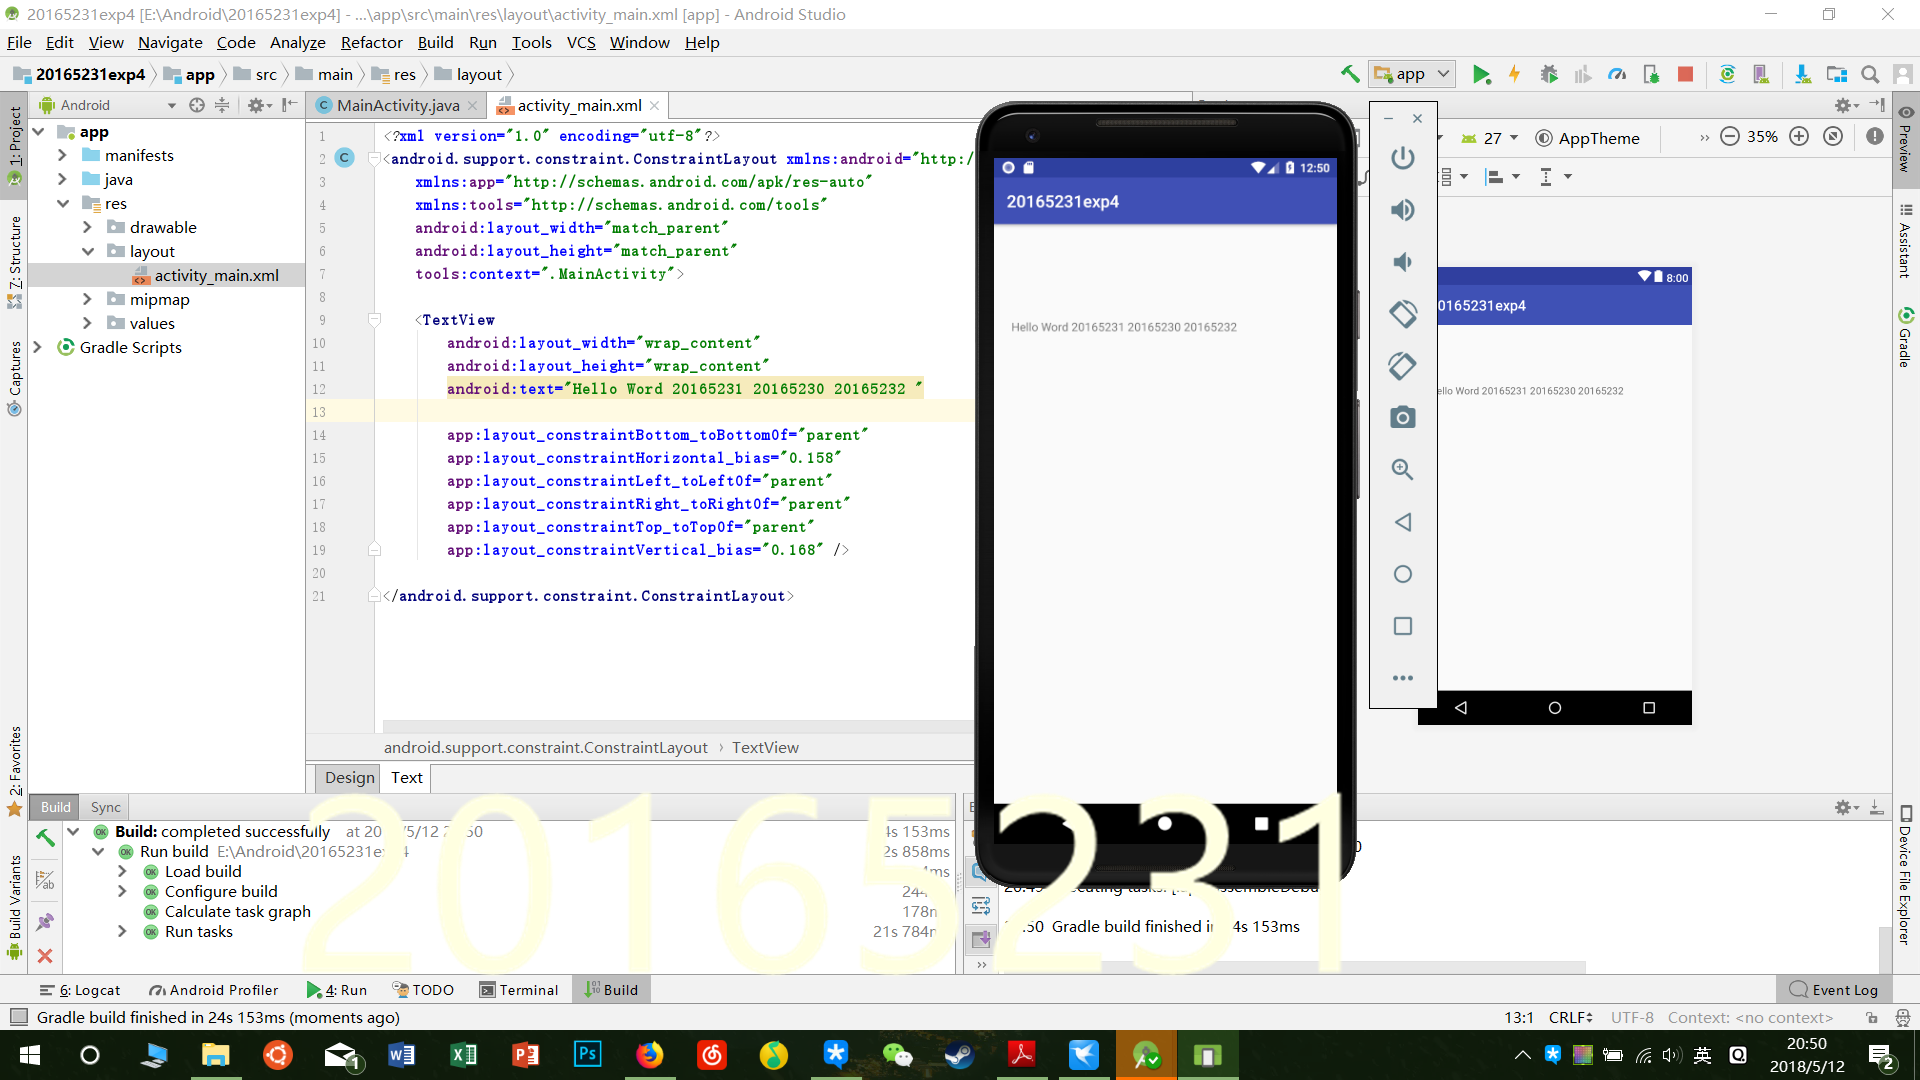
- 完成Hello World, 要求修改res目录中的内容,Hello World后要显示自己的学号,自己学号前后一名同学的学号,提交代码运行截图和码云Git链接,截图没有学号要扣分
- 学习Android Stuidio调试应用程序
修改res目录中activity_main.xml的内容,显示自己的学号:
<?xml version="1.0" encoding="utf-8"?>

<android.support.constraint.ConstraintLayout xmlns:android="http://schemas.android.com/apk/res/android"

    xmlns:app="http://schemas.android.com/apk/res-auto"

    xmlns:tools="http://schemas.android.com/tools"

    android:layout_width="match_parent"

    android:layout_height="match_parent"

    tools:context=".MainActivity">

    <TextView

        android:layout_width="wrap_content"

        android:layout_height="wrap_content"

        android:text="Hello Word 20165231 20165230 20165232 "

        app:layout_constraintBottom_toBottomOf="parent"

        app:layout_constraintHorizontal_bias="0.158"

        app:layout_constraintLeft_toLeftOf="parent"

        app:layout_constraintRight_toRightOf="parent"

        app:layout_constraintTop_toTopOf="parent"

        app:layout_constraintVertical_bias="0.168" />

</android.support.constraint.ConstraintLayout>
实验二
Activity测试: 参考《Java和Android开发学习指南(第二版)(EPUBIT,Java for Android 2nd)》第二十五章:
构建项目,运行教材相关代码
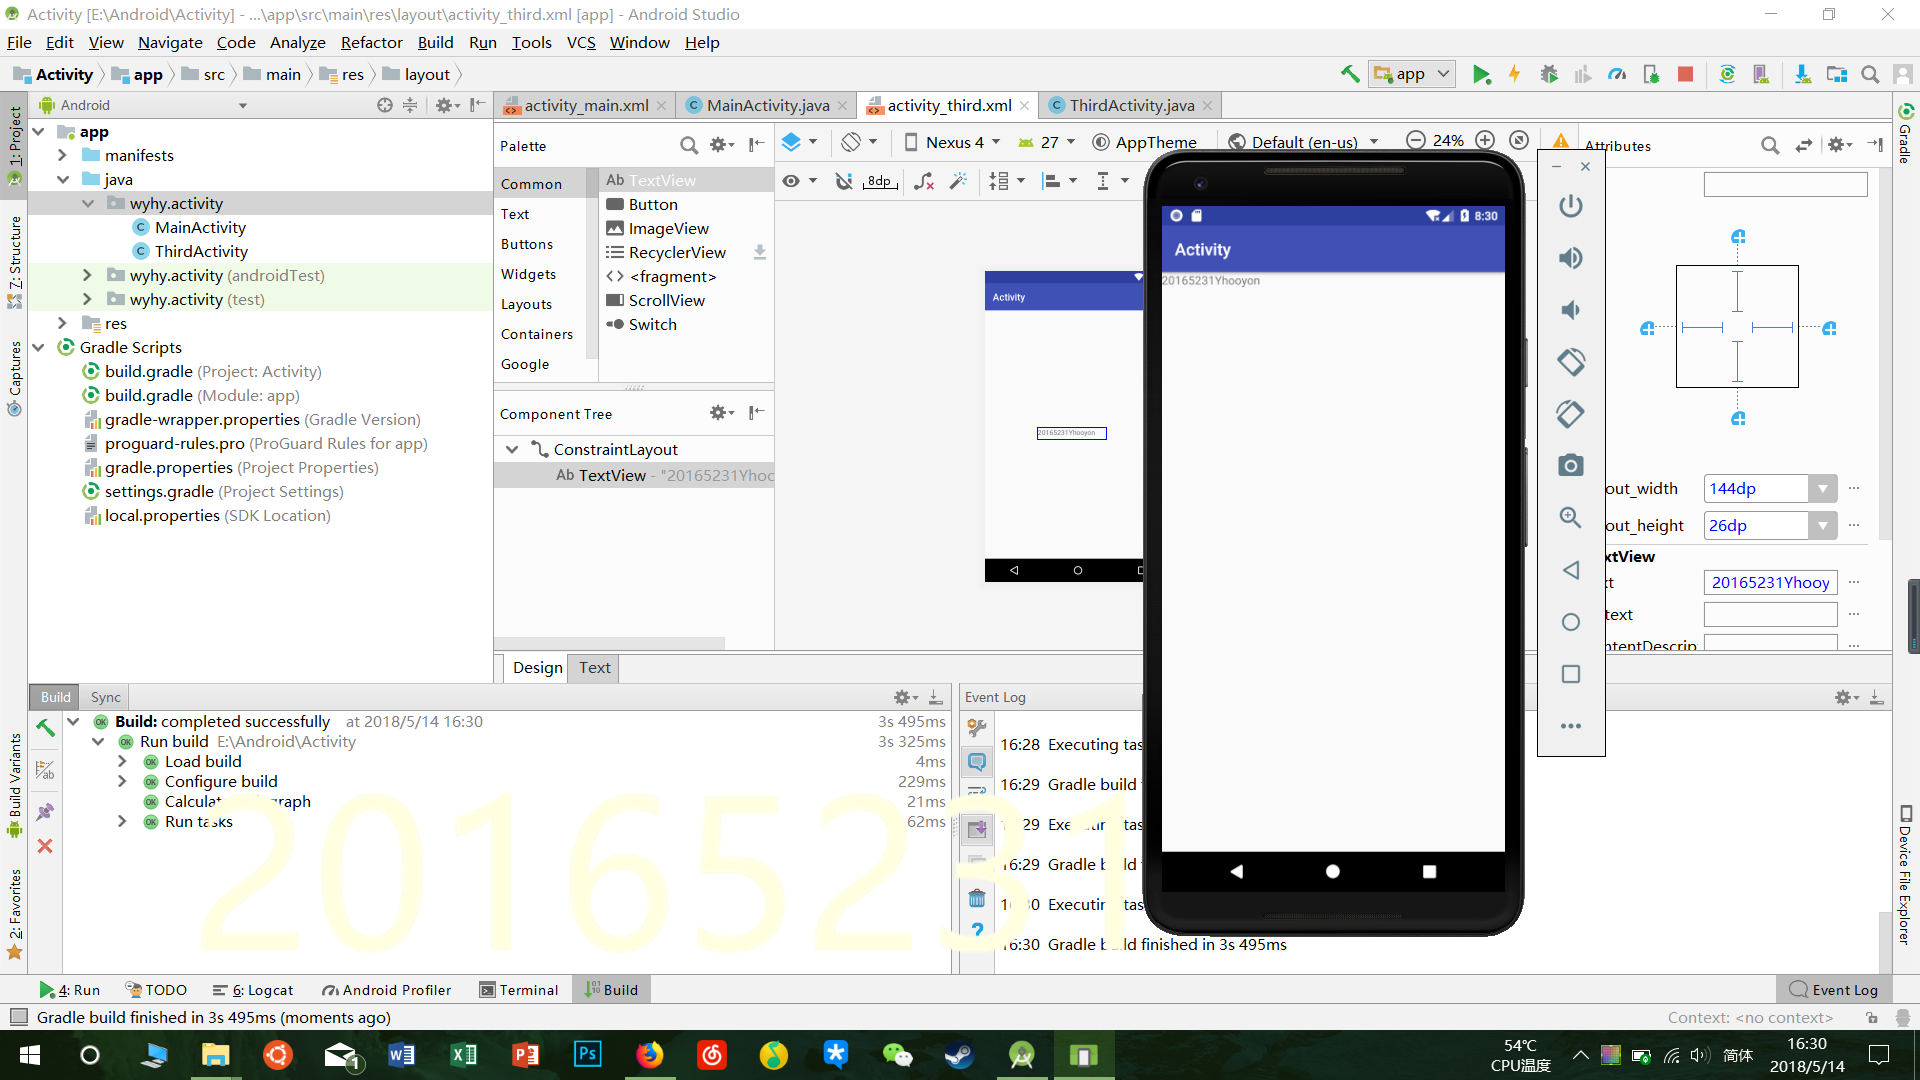
创建 ThirdActivity, 在ThirdActivity中显示自己的学号,修改代码让MainActivity启动ThirdActivity
提交代码运行截图和码云Git链接,截图要有学号水印,否则会扣分
MainActivity:
package wyhy.activity;

import android.app.Activity;

import android.content.Intent;

import android.os.Bundle;

import android.view.Menu;

import android.view.MotionEvent;

import android.view.View;

import android.view.View.OnTouchListener;

import android.widget.TextView;

public class MainActivity extends Activity implements

        OnTouchListener {

    @Override

       protected void onCreate(Bundle savedInstanceState) {

        super.onCreate(savedInstanceState);

        setContentView(R.layout.activity_main);

        TextView tv = (TextView) findViewById(R.id.textView1);

        tv.setOnTouchListener(this);}

    @Override

    public boolean onCreateOptionsMenu(Menu menu) {

        // Inflate the menu; this adds items to the action bar if it

        // is present.

        getMenuInflater().inflate(R.menu.menu_main, menu);

        return true; }

    @Override

    public boolean onTouch(View arg0, MotionEvent event)

    {

        Intent intent = new Intent(this, ThirdActivity.class);

        intent.putExtra("message", "20165231 Yhooyon");

        startActivity(intent);

    return true; }

}
创建ThirdActivity,先点击左上角的file->new->Activity->empty Activity
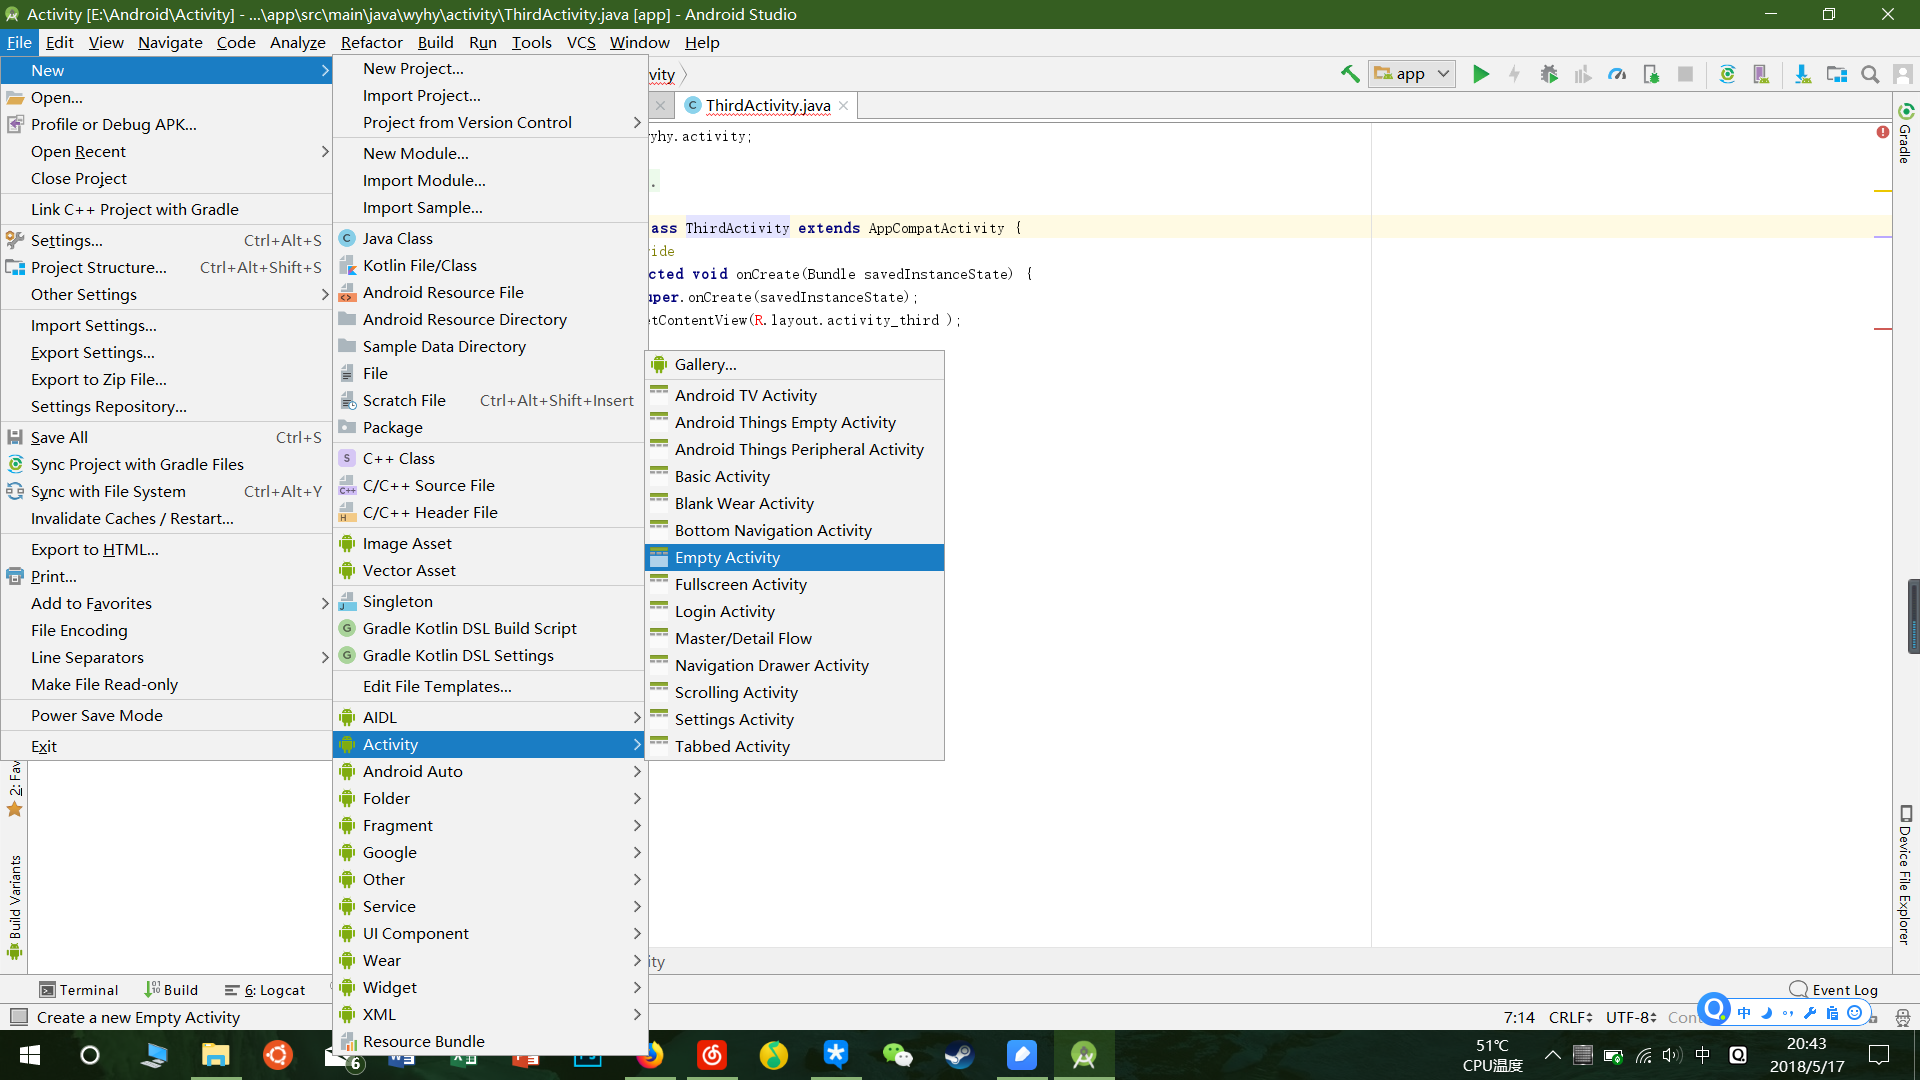
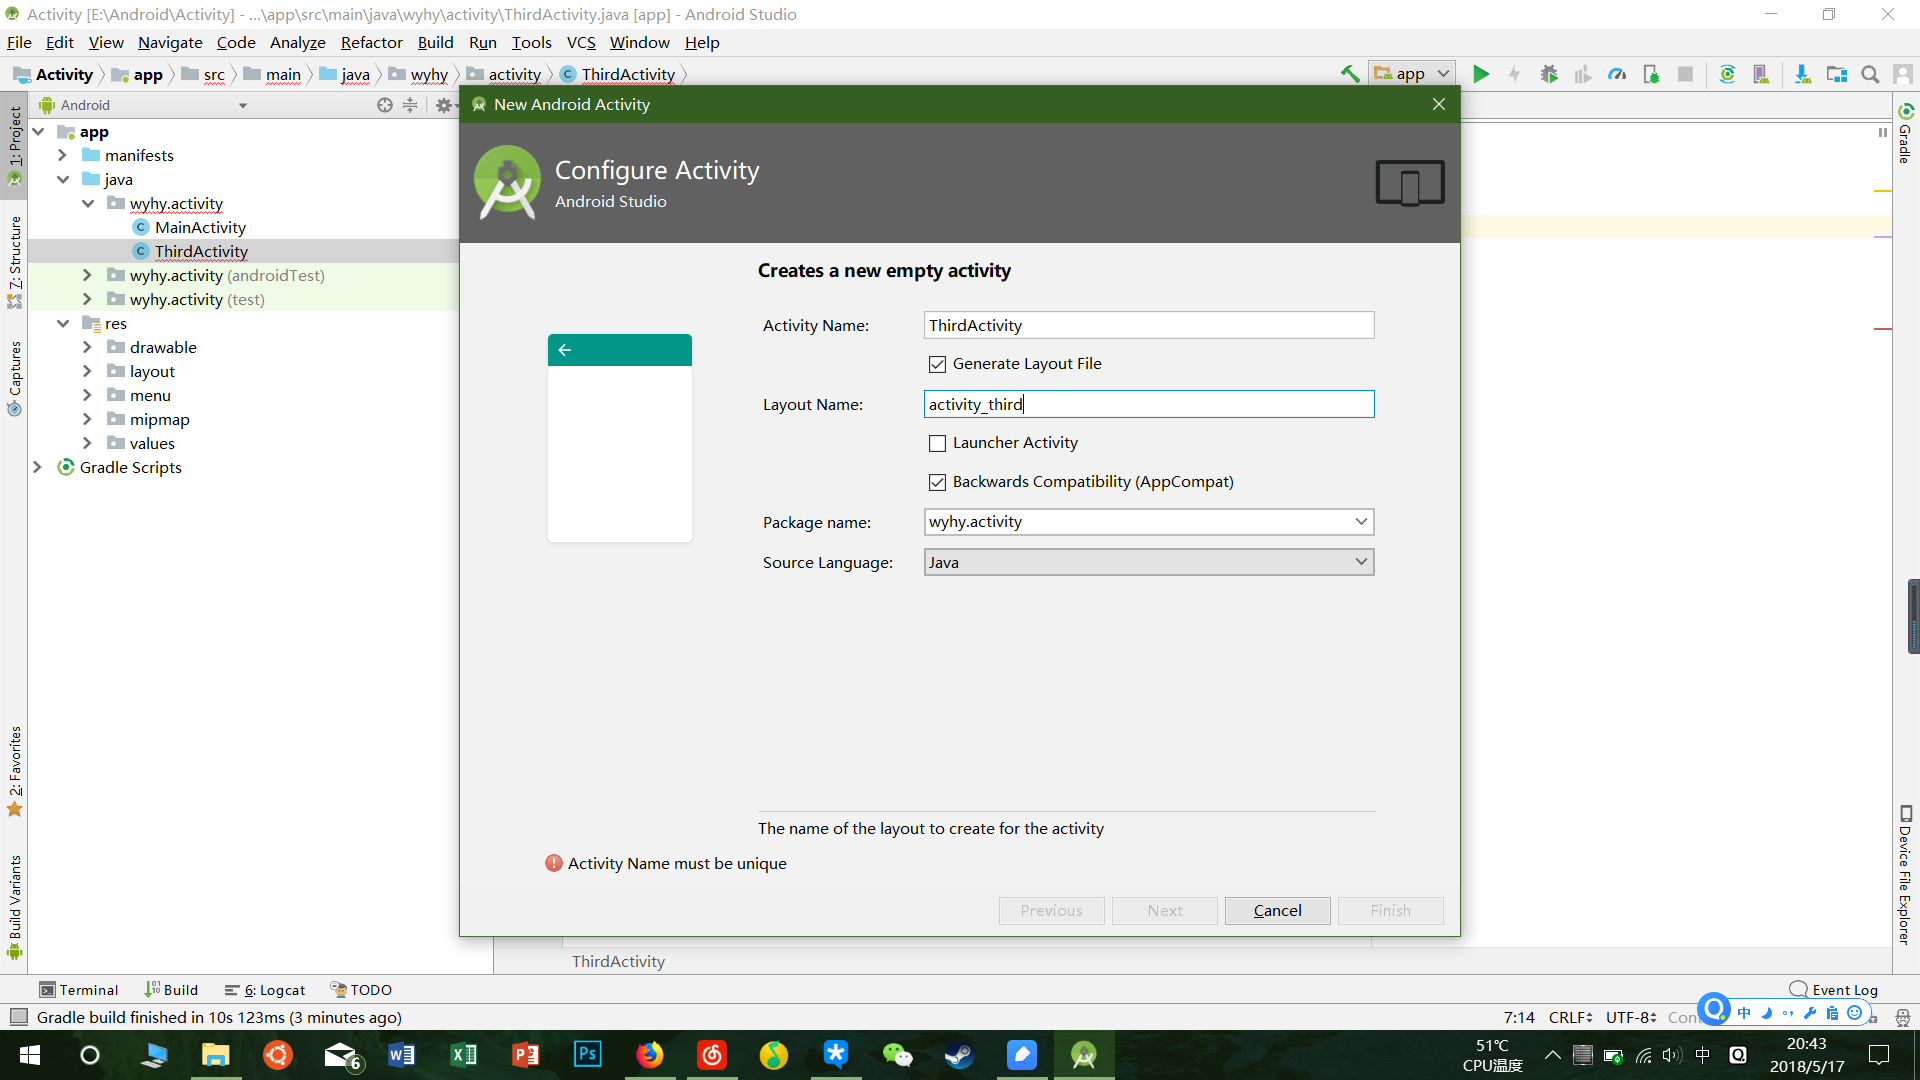
然后修改为你所需要的名字就连同对应的.xml文件也创建好了。
- activity_main.xml
<?xml version="1.0" encoding="utf-8"?>

<android.support.constraint.ConstraintLayout xmlns:android="http://schemas.android.com/apk/res/android"

    xmlns:app="http://schemas.android.com/apk/res-auto"

    xmlns:tools="http://schemas.android.com/tools"

    android:layout_width="match_parent"

    android:layout_height="match_parent"

    tools:context="wyhy.activity.MainActivity">

    <TextView

        android:layout_width="wrap_content"

        android:layout_height="wrap_content"

        android:text="20165231 Yhooyon"

        app:layout_constraintBottom_toBottomOf="parent"

        app:layout_constraintLeft_toLeftOf="parent"

        app:layout_constraintRight_toRightOf="parent"

        app:layout_constraintTop_toTopOf="parent" />

</android.support.constraint.ConstraintLayout>
- activity_third.xml
<?xml version="1.0" encoding="utf-8"?>

<android.support.constraint.ConstraintLayout xmlns:android="http://schemas.android.com/apk/res/android"

    xmlns:tools="http://schemas.android.com/tools"

    android:layout_width="match_parent"

    android:layout_height="match_parent">

    <TextView

        android:layout_width="144dp"

        android:layout_height="26dp"

        android:text="20165231 Yhooyon"

        tools:ignore="MissingConstraints"

        tools:layout_editor_absoluteX="109dp"

        tools:layout_editor_absoluteY="242dp" />

</android.support.constraint.ConstraintLayout>
实验三
UI测试: 参考《Java和Android开发学习指南(第二版)(EPUBIT,Java for Android 2nd)》第二十六章:
构建项目,运行教材相关代码
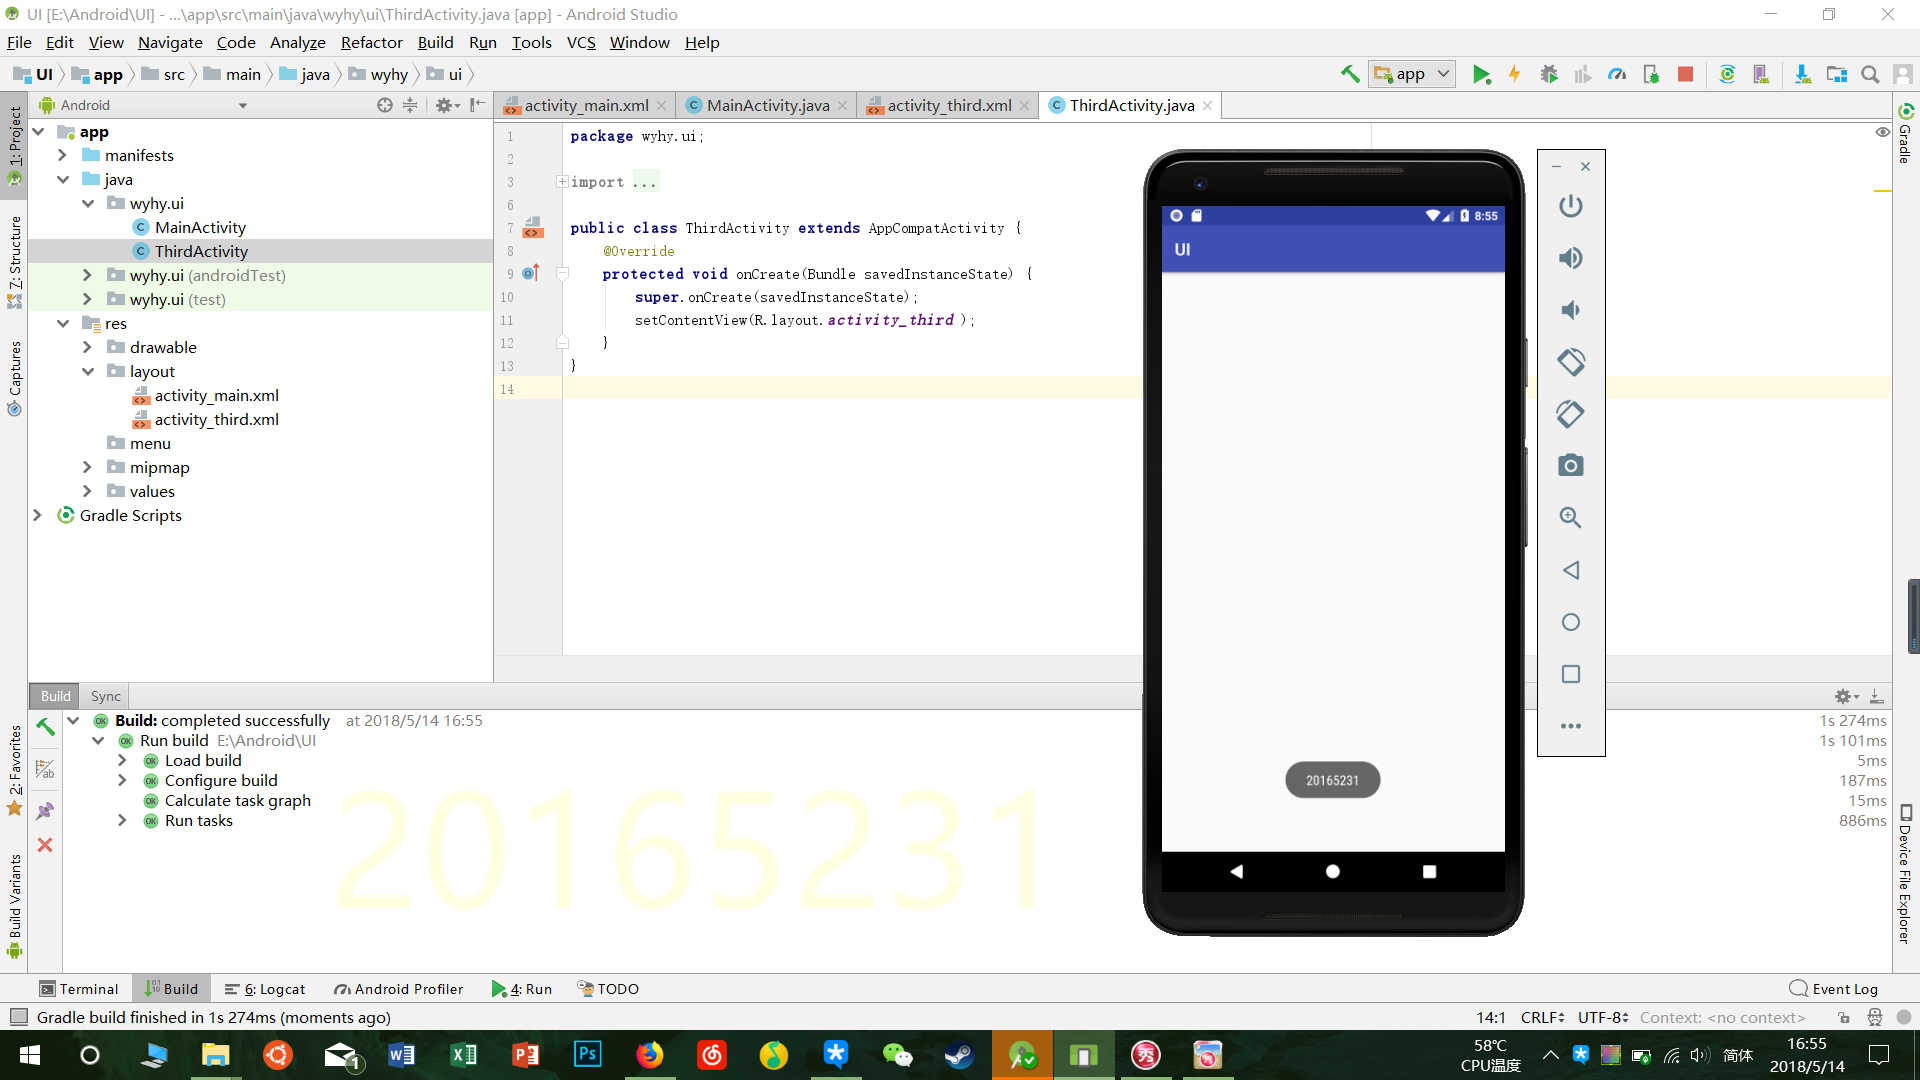
修改代码让Toast消息中显示自己的学号信息
提交代码运行截图和码云Git链接,截图要有学号水印,否则会扣分
Main_Activity
package wyhy.ui;

import android.content.Intent;

import android.support.v7.app.AppCompatActivity;

import android.os.Bundle;

import android.widget.Toast;

public class MainActivity extends AppCompatActivity {

    @Override

    protected void onCreate(Bundle savedInstanceState) {

        super.onCreate(savedInstanceState);

        Toast.makeText(this,"20165231",Toast.LENGTH_LONG).show();

    }

}
- activity_main.xml
<?xml version="1.0" encoding="utf-8"?>

<android.support.constraint.ConstraintLayout xmlns:android="http://schemas.android.com/apk/res/android"

    xmlns:app="http://schemas.android.com/apk/res-auto"

    xmlns:tools="http://schemas.android.com/tools"

    android:layout_width="match_parent"

    android:layout_height="match_parent"

    tools:context="wyhy.ui.MainActivity">

    <TextView

        android:layout_width="wrap_content"

        android:layout_height="wrap_content"

        android:text="20165231"

        app:layout_constraintBottom_toBottomOf="parent"

        app:layout_constraintLeft_toLeftOf="parent"

        app:layout_constraintRight_toRightOf="parent"

        app:layout_constraintTop_toTopOf="parent" />

</android.support.constraint.ConstraintLayout>
任务四
布局测试: 参考《Java和Android开发学习指南(第二版)(EPUBIT,Java for Android 2nd)》第二十七章:
- 构建项目,运行教材相关代码
- 修改布局让P290页的界面与教材不同
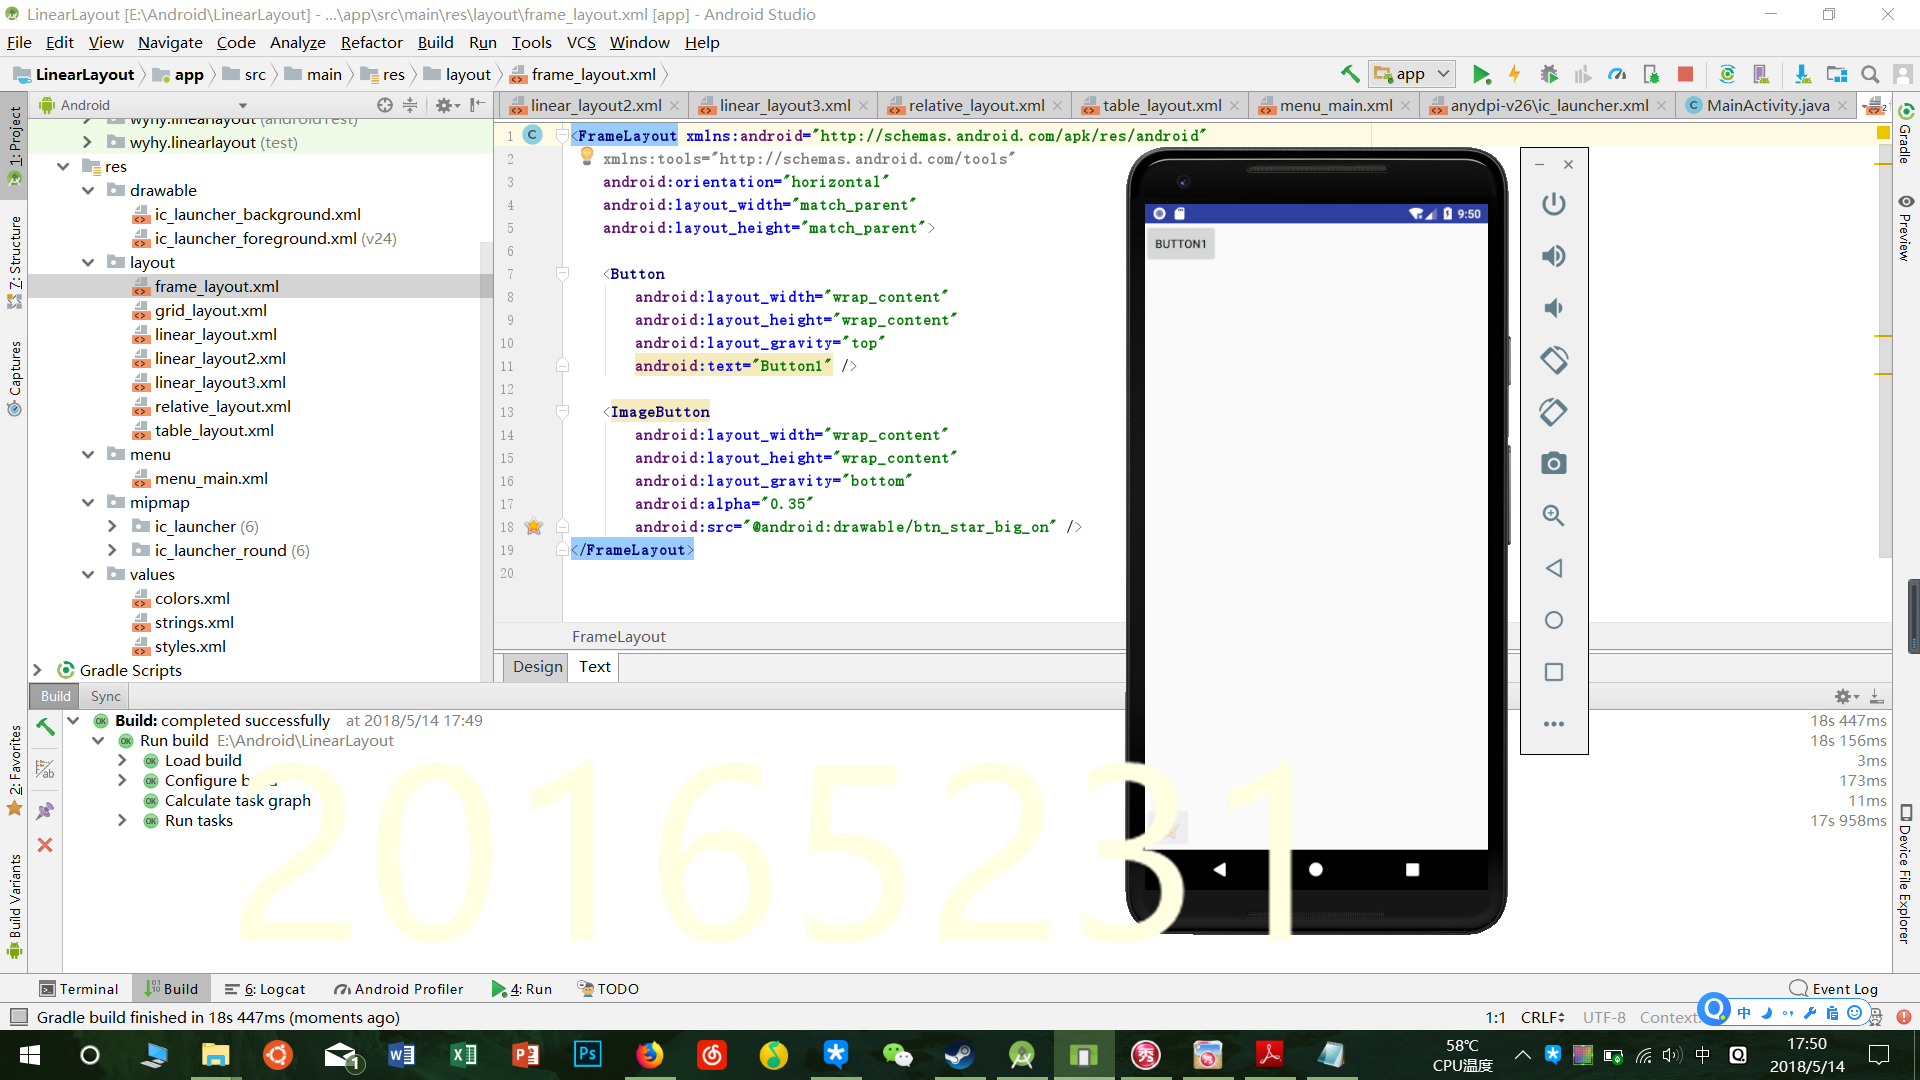
- 提交代码运行截图和码云Git链接,截图要有学号水印,否则会扣分
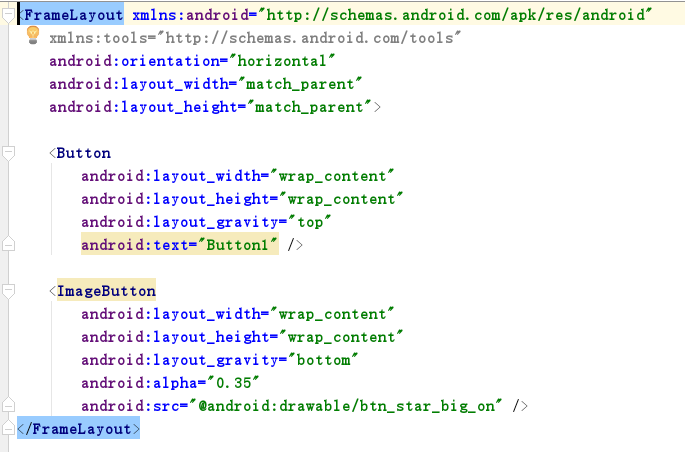
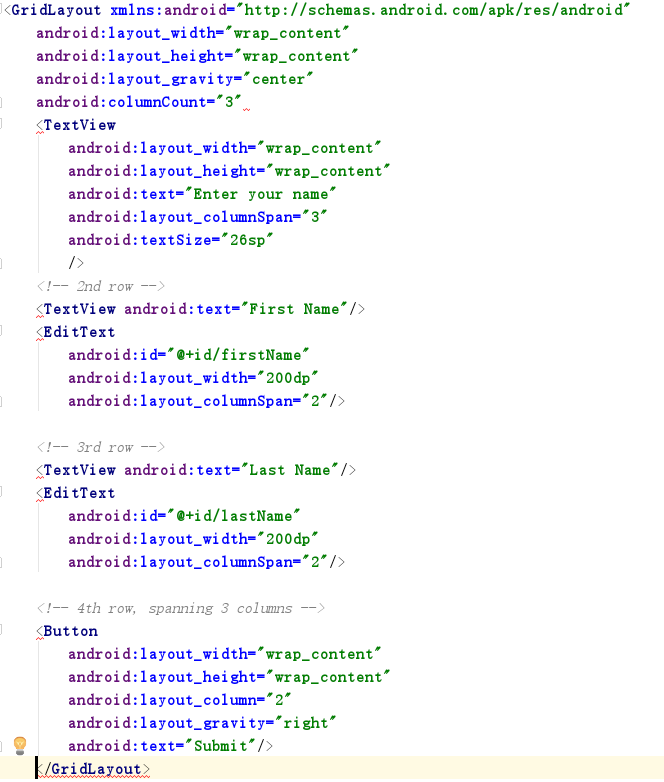
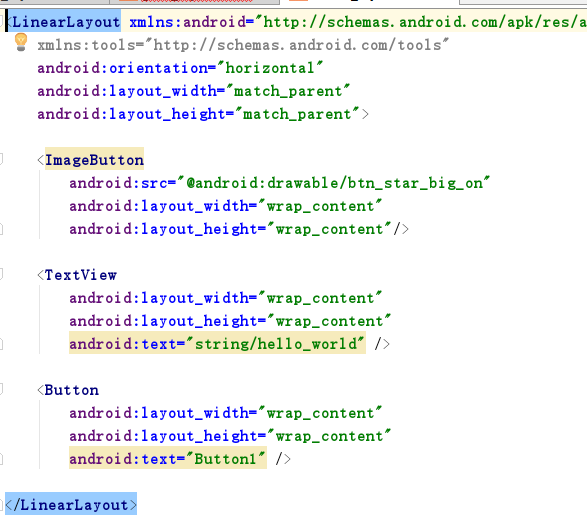
- 布局文件
frame_layout.xml
grid_layout.xml
linear_layout.xml
linear_layout2.xml
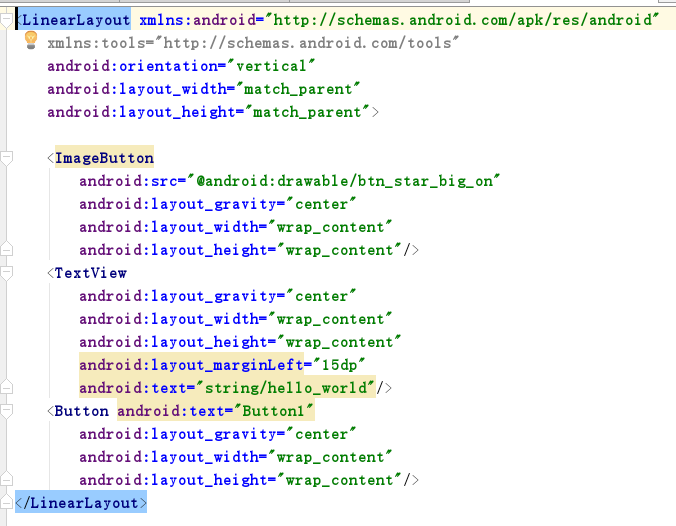
linear_layout3.xml
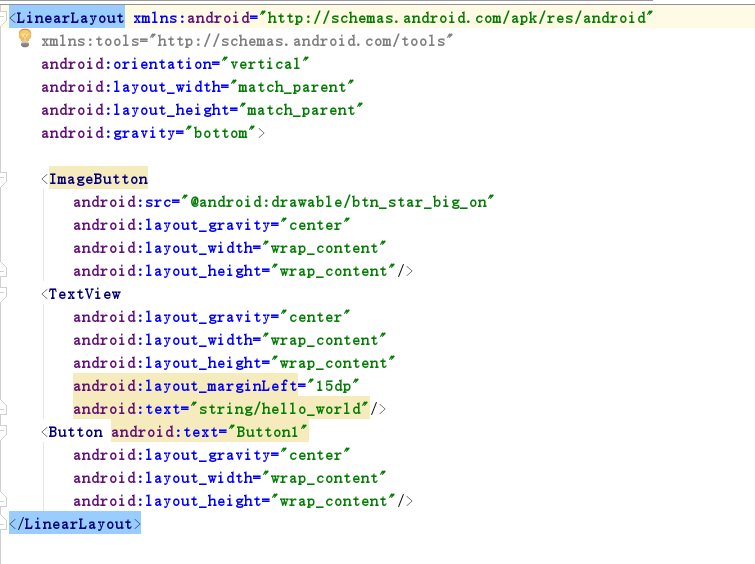
relative_layout.xml
<RelativeLayout xmlns:android="http://schemas.android.com/apk/res/android"

    xmlns:tools="http://schemas.android.com/tools"

    android:layout_width="match_parent"

    android:layout_height="match_parent"

    android:paddingLeft="2dp"

    android:paddingRight="2dp">

    <Button

        android:id="@+id/cancelButton"

        android:layout_width="wrap_content"

        android:layout_height="wrap_content"

        android:text="Cancel" />

    <Button

        android:id="@+id/saveButton"

        android:layout_width="wrap_content"

        android:layout_height="wrap_content"

        android:layout_toRightOf="@id/cancelButton"

        android:text="Save" />

    <ImageView

        android:layout_width="150dp"

        android:layout_height="150dp"

        android:layout_marginTop="230dp"

        android:padding="4dp"

        android:layout_below="@id/cancelButton"

        android:layout_centerHorizontal="true"

        android:src="@android:drawable/ic_btn_speak_now"

        />

    <LinearLayout

        android:id="@+id/filter_button_container"

        android:layout_width="match_parent"

        android:layout_height="wrap_content"

        android:layout_alignParentBottom="true"

        android:gravity="center|bottom"

        android:background="@android:color/white"

        android:orientation="horizontal" >

        <Button

            android:id="@+id/filterButton"

            android:layout_width="wrap_content"

            android:layout_height="fill_parent"

            android:text="Filter" />

        <Button

            android:id="@+id/shareButton"

            android:layout_width="wrap_content"

            android:layout_height="fill_parent"

            android:text="Share" />

        <Button

            android:id="@+id/deleteButton"

            android:layout_width="wrap_content"

            android:layout_height="fill_parent"

            android:text="Delete" />

    </LinearLayout>

</RelativeLayout>
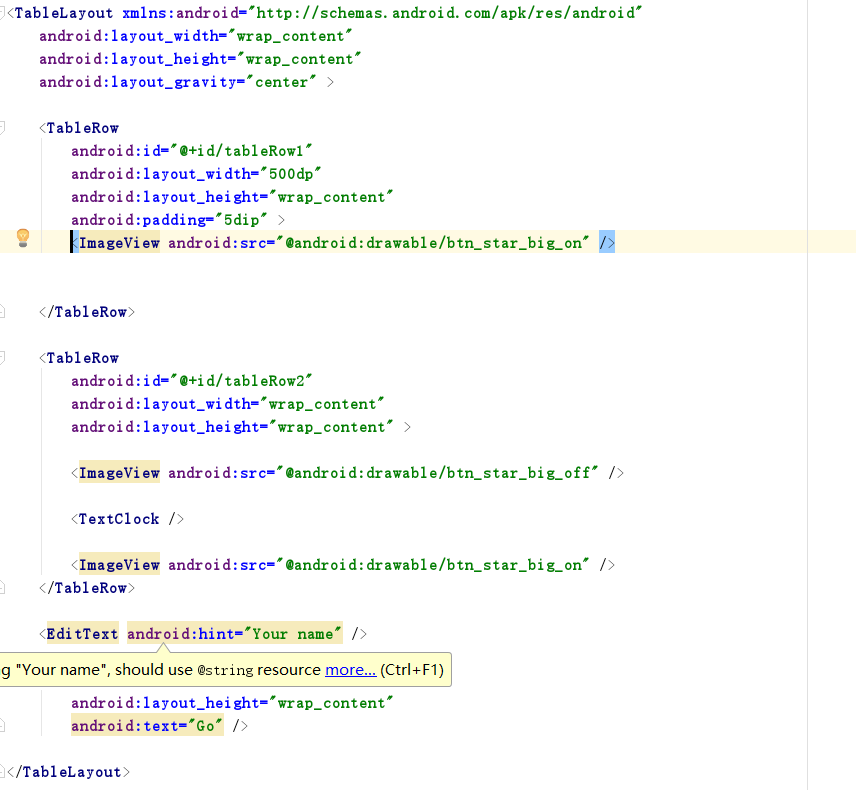
table_layout
运行结果:
任务五
事件处理测试: 参考《Java和Android开发学习指南(第二版)(EPUBIT,Java for Android 2nd)》第二十八章:
构建项目,运行教材相关代码
提交代码运行截图和码云Git链接,截图要有学号水印,否则会扣分
Main_Activity:
package wyhy.test5;

import android.app.Activity;

import android.graphics.Color;

import android.os.Bundle;

import android.view.Menu;

import android.view.View;

import android.widget.AnalogClock;

public class MainActivity extends Activity {

    int counter = 0;

    int[] colors = {Color.BLACK, Color.BLUE, Color.CYAN, Color.DKGRAY, Color.GRAY, Color.GREEN, Color.LTGRAY, Color.MAGENTA, Color.RED, Color.WHITE, Color.YELLOW};

    @Override

    protected void onCreate(Bundle savedInstanceState) {

        super.onCreate(savedInstanceState);

        setContentView(R.layout.activity_main);

    }

    @Override

    public boolean onCreateOptionsMenu(Menu menu) {

        // Inflate the menu; this adds items to the action bar if it

        // is present.

        getMenuInflater().inflate(R.menu.menu_main, menu);

        return true;

    }

    public void changeColor(View view) {

        if (counter == colors.length) {

            counter = 0;

        }

        view.setBackgroundColor(colors[counter++]);

    }

}
activity_main.xml
<RelativeLayout xmlns:android="http://schemas.android.com/apk/res/android"

    xmlns:tools="http://schemas.android.com/tools"

    android:layout_width="match_parent"

    android:layout_height="match_parent"

    android:paddingBottom="20dp"

    android:paddingLeft="20dp"

    android:paddingRight="20dp"

    tools:context=".MainActivity">

    <TextView

        android:layout_width="wrap_content"

        android:layout_height="wrap_content"

        android:text="20165231"></TextView>

    <AnalogClock

        android:id="@+id/analogClock1"

        android:layout_width="wrap_content"

        android:layout_height="wrap_content"

        android:layout_alignParentTop="true"

        android:layout_centerHorizontal="true"

        android:layout_marginTop="90dp"

        android:onClick="changeColor" />

</RelativeLayout>
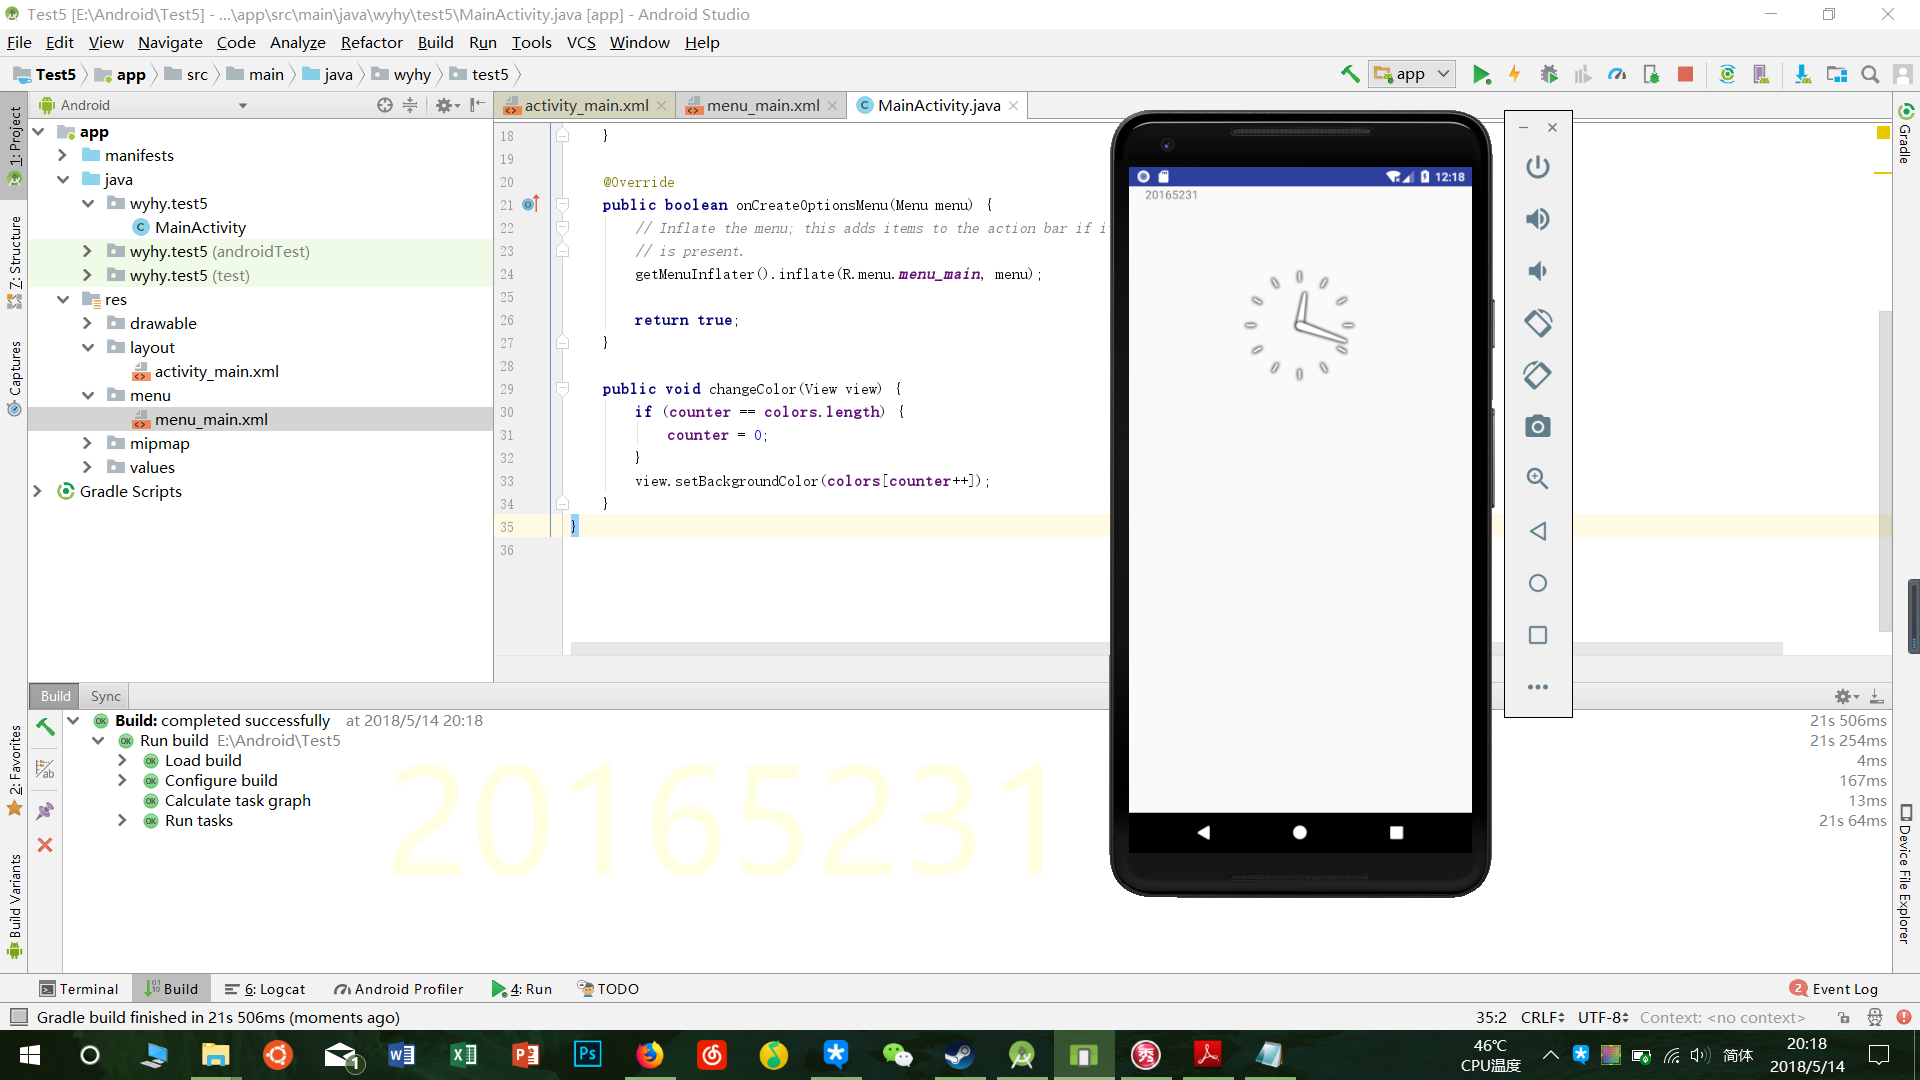
点击时钟表盘可以变色
2017-2018-2 20165231 实验四 Android程序设计的更多相关文章
- 20165230 《Java程序设计》实验四 Android程序设计实验报告
20165230 <Java程序设计>实验四 Android程序设计实验报告 一.实验报告封面 课程:Java程序设计 班级:1652班 姓名:田坤烨 学号:20165230 成绩: 指导 ...
- 20165235实验四 Android程序设计
20165235实验四 Android程序设计 实验课程:JAVA编程设计 实验名称:Android开发 姓名:祁瑛 学号:20165235 实验时间:2018.05.16 指导老师:娄家鹏 Andr ...
- 20165220Java实验四 Android程序设计
一.实验报告封面 课程:Java程序设计 班级:1652班 姓名:葛宇豪 学号:20165220 指导教师:娄嘉鹏 实验日期:2018年5月14日 实验时间:13:45 - 15:25 实验序号:实验 ...
- 20172328《程序设计与数据结构》实验四 Android程序设计报告
20172328<程序设计与数据结构>实验四 Android程序设计报告 课程:<程序设计与数据结构> 班级: 1723 姓名: 李馨雨 学号:20172328 实验教师:王志 ...
- 20172302《程序设计与数据结构》实验四Android程序设计实验报告
课程:<程序设计与数据结构> 班级: 1723 姓名: 侯泽洋 学号:20172302 实验教师:王志强老师 实验日期:2018年5月30日 必修/选修: 必修 1.实验内容 (1)And ...
- 实验四 Android程序设计
20155224 实验四 Android程序设计 实验报告 实验报告封面: 课程:Java程序设计 班级:1652班 姓名:王高源 学号:20165225 指导教师:娄嘉鹏 实验日期:2018年5月1 ...
- 20165236 实验四 Android程序设计
20165236 实验四 Android程序设计 一.实验报告 课程:Java程序设计 班级:1652班 姓名:郭金涛 学号:20165236 指导教师:娄嘉鹏 实验 ...
- 20165324 Java实验四 Android程序设计
20165324 Java实验四 Android程序设计 一.实验报告封面 课程:Java程序设计 班级:1653班 姓名:何春江 学号:20165324 指导教师:娄嘉鹏 实验日期:2018年5月1 ...
- 实验四 Android程序设计 实验报告
实验四 Android程序设计 实验报告 目录 代码托管地址 Android程序设计-1 Android程序设计-2 Android程序设计-3 Android程序设计-4 Android程序设计-5 ...
随机推荐
- 25 个常用的 Linux iptables 规则
# 1. 删除所有现有规则 iptables -F # 2. 设置默认的 chain 策略 iptables -P INPUT DROP iptables -P FORWARD DROP ipta ...
- opencv: 基本知识(二);
1.cvArr* 与 cv::Mat之间的转换; cv::Mat ---- > cvArr* cv::Mat img; IplImage temp = IplImage(img); cvArr ...
- Maven Tomcat7+ 实现自动化部署
首先在Tomcat里配置deploy的用户(tomcat根目录/conf/tomcat-users.xml): <role rolename="tomcat"/> &l ...
- linux shell变量的截取
变量的截断,经常用到的是${},##和%%几个特殊符号.假设我们定义了一个变量为:file=/dir1/dir2/dir3/my.file.txt ,可以用${ }分别替换得到不同的值: ${file ...
- 利用WinRAR命令行压缩文件或文件夹
压缩文件夹winrar.exe a -ag -k -r -s -ibck c:/bak.rar c:/dat/ 压缩多个文件winrar a -ag -ibck bak.rar filename1 f ...
- iptables之NAT端口转发设置
背景:服务器A:103.110.114.8/192.168.1.8,有外网ip,是IDC的一台服务器服务器B:192.168.1.150,没有外网ip,A服务器是它的宿主机,能相互ping通服务器C: ...
- C++回顾day02---<拷贝构造函数:重点>
一:补充---无参构造函数(默认无参构造函数)在实例化对象时注意点 (一)若没有写构造函数,则类会含有一个默认无参构造函数 (二)若自定义一个构造函数,则类不会提供默认构造函数 class A { p ...
- Linux记录-linux系统监控命令汇总
命令 功能应用 用法举例 free 查看内存使用情况,包括物理内存和虚拟内存 free -h或free -m vmstat 对系统的整体情况进行统计,包括内核进程.虚拟内存.磁盘.陷阱 ...
- Ubuntu Server 16.04 安装MySQL并设置远程访问
Ubuntu Server 16.04 安装MySQL 1. 使用root账号 sudo apt-get install mysql-serversudo apt-get install mysql- ...
- 【英文文档】Solidifier for Windows Installation Guide
Page 1Solidifier for Windows Installation Guide Page 2McAfee, Inc.McAfee® Solidifier for Windows In ...