RockyLinux9编译安装MySQL5.7
Linux版本: Rocky Linux release 9.5 (Blue Onyx)
1.下载
打开MySQL-Community-Server官方下载页面:https://downloads.mysql.com/archives/community/
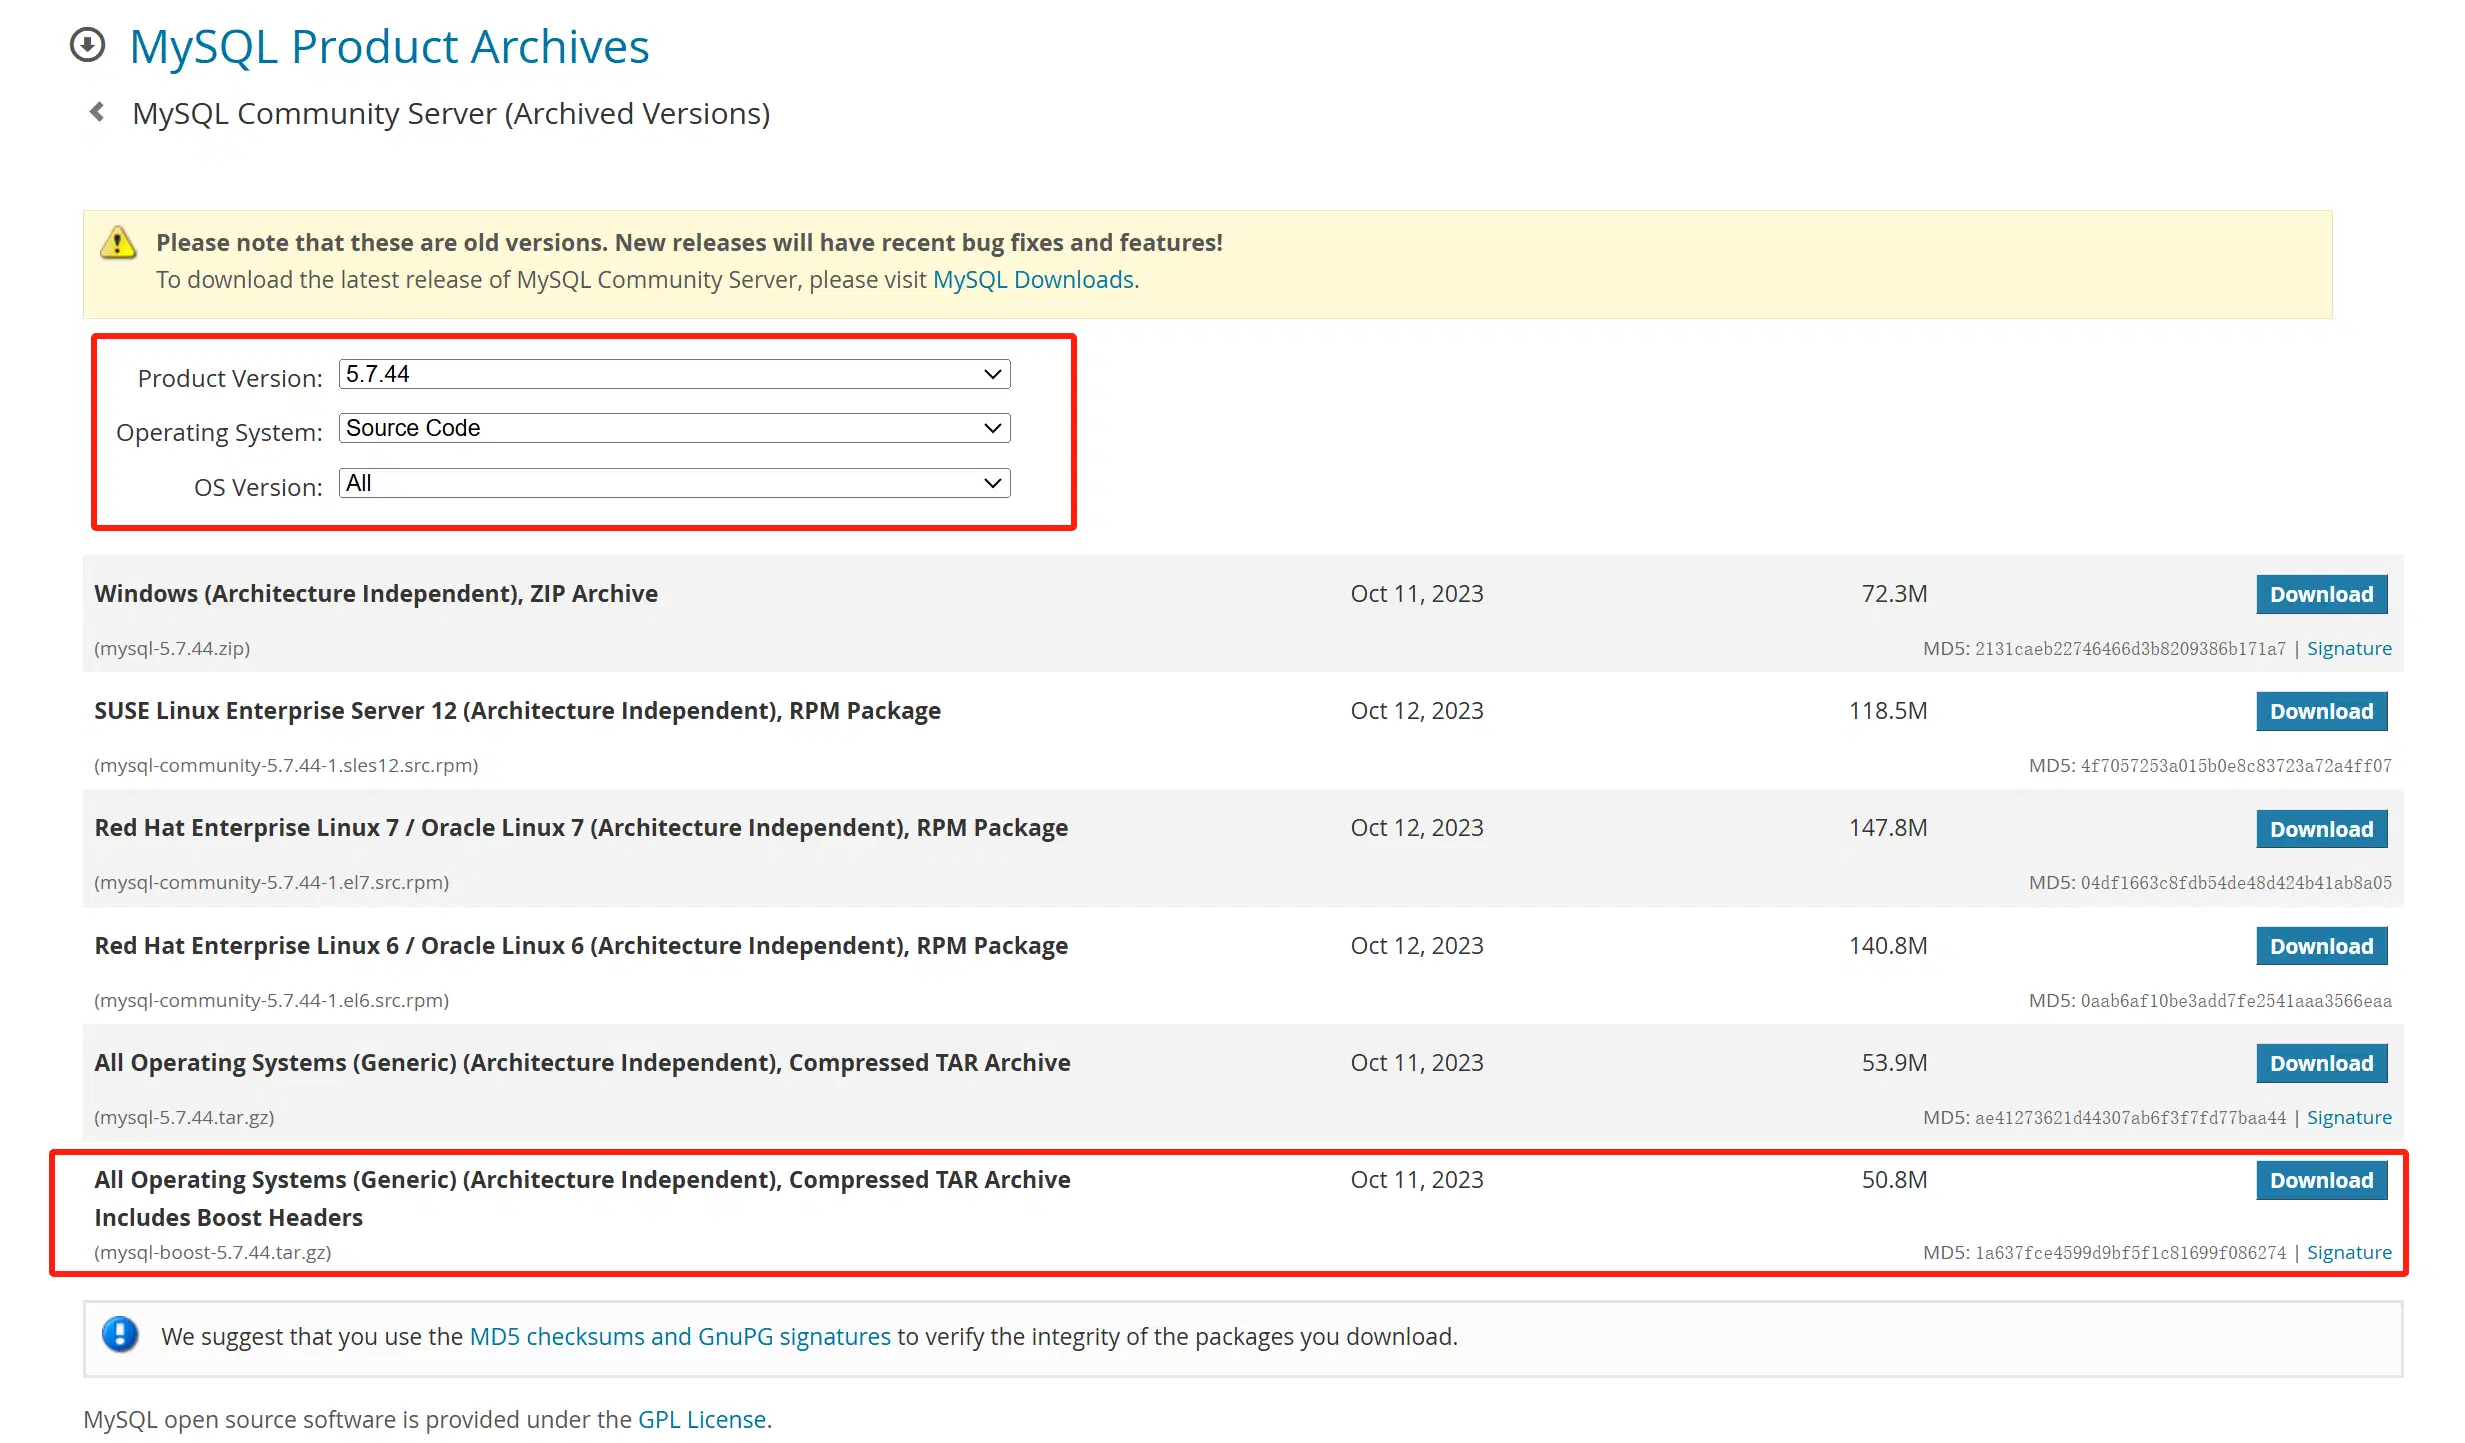
筛选出要下载的版本,Product Version选择5.7.44,也就是最后一个小版本,Operating System选择Source Code,OS Version选择All,然后选择最后一个自带boost的MySQL源码包(mysql-boost-5.7.44.tar.gz),进行下载,并将下载到的源码包先放到服务器的/opt目录下。
mysql-boost-5.7.44.tar.gz
https://downloads.mysql.com/archives/get/p/23/file/mysql-boost-5.7.44.tar.gz
解压tar包,得到文件夹mysql-5.7.44,里面就是MySQL源码和一些构建信息
[root@localhost opt]# cd mysql-5.7.44/

[root@localhost mysql-5.7.44]# ll

total 528

drwxr-xr-x.  2 7161 31415   4096 Oct 11  2023 BUILD

-rw-r--r--.  1 7161 31415  29939 Oct 11  2023 CMakeLists.txt

drwxr-xr-x.  2 7161 31415     98 Oct 11  2023 Docs

-rw-r--r--.  1 7161 31415  67369 Oct 11  2023 Doxyfile-perfschema

-rw-r--r--.  1 7161 31415    333 Oct 11  2023 INSTALL

-rw-r--r--.  1 7161 31415 260678 Oct 11  2023 LICENSE

-rw-r--r--.  1 7161 31415    566 Oct 11  2023 README

-rw-r--r--.  1 7161 31415     88 Oct 11  2023 VERSION

drwxr-xr-x.  3 7161 31415     26 Oct 11  2023 boost

drwxr-xr-x.  6 7161 31415   4096 Oct 11  2023 client

drwxr-xr-x.  4 7161 31415   4096 Oct 11  2023 cmake

-rw-r--r--.  1 7161 31415  14584 Oct 11  2023 config.h.cmake

-rw-r--r--.  1 7161 31415  25217 Oct 11  2023 configure.cmake

drwxr-xr-x.  2 7161 31415   4096 Oct 11  2023 dbug

drwxr-xr-x.  8 7161 31415   4096 Oct 11  2023 extra

drwxr-xr-x.  5 7161 31415   4096 Oct 11  2023 include

drwxr-xr-x.  5 7161 31415    135 Oct 11  2023 libbinlogevents

drwxr-xr-x.  3 7161 31415     39 Oct 11  2023 libbinlogstandalone

drwxr-xr-x.  4 7161 31415   4096 Oct 11  2023 libmysql

drwxr-xr-x.  3 7161 31415   4096 Oct 11  2023 libmysqld

drwxr-xr-x.  2 7161 31415   4096 Oct 11  2023 libservices

drwxr-xr-x.  2 7161 31415   4096 Oct 11  2023 man

drwxr-xr-x. 10 7161 31415   4096 Oct 11  2023 mysql-test

drwxr-xr-x.  2 7161 31415   4096 Oct 11  2023 mysys

drwxr-xr-x.  2 7161 31415   4096 Oct 11  2023 mysys_ssl

drwxr-xr-x. 10 7161 31415    131 Oct 11  2023 packaging

drwxr-xr-x. 18 7161 31415   4096 Oct 11  2023 plugin

drwxr-xr-x.  4 7161 31415     36 Oct 11  2023 rapid

drwxr-xr-x.  2 7161 31415   4096 Oct 11  2023 regex

drwxr-xr-x.  4 7161 31415   4096 Oct 11  2023 scripts

drwxr-xr-x.  2 7161 31415      6 Oct 11  2023 source_downloads

drwxr-xr-x.  8 7161 31415  20480 Oct 11  2023 sql

drwxr-xr-x.  2 7161 31415   4096 Oct 11  2023 sql-common

drwxr-xr-x. 13 7161 31415    175 Oct 11  2023 storage

drwxr-xr-x.  2 7161 31415   4096 Oct 11  2023 strings

drwxr-xr-x.  4 7161 31415   4096 Oct 11  2023 support-files

drwxr-xr-x.  2 7161 31415     98 Oct 11  2023 testclients

drwxr-xr-x.  5 7161 31415     70 Oct 11  2023 unittest

drwxr-xr-x.  3 7161 31415   4096 Oct 11  2023 vio

drwxr-xr-x.  2 7161 31415     32 Oct 11  2023 win
进入boost/文件夹下,可以看到目前版本依赖的boost版本是哪个,一会编译时会用到。
[root@localhost mysql-5.7.44]# cd boost/

[root@localhost boost]# ll

total 0

drwxr-xr-x. 3 7161 31415 19 Oct 11  2023 boost_1_59_0
2.编译安装前准备
1.新添加一个用户: mysql
useradd mysql
2.安装编译所需要的软件包依赖
yum -y install make gcc-c++ cmake bison perl autoconf ncurses-devel openssl-devel libtirpc
在Rocky9上,有的依赖包没有自带,也无法通过yum安装,需要下载.rpm到本地,然后通过rpm -ivh安装
yum install -y wget

wget https://dl.rockylinux.org/pub/rocky/9/devel/x86_64/os/Packages/l/libtirpc-devel-1.3.3-9.el9.x86_64.rpm

wget https://dl.rockylinux.org/pub/rocky/9/AppStream/x86_64/os/Packages/r/rpcgen-1.4-9.el9.x86_64.rpm

rpm -ivh libtirpc-devel-1.3.3-9.el9.x86_64.rpm

rpm -ivh rpcgen-1.4-9.el9.x86_64.rpm
3./usr/local/下必须新建文件夹mysql
mkdir /usr/local/mysql
3.编译安装
1.在源码目录/opt/mysql-5.7.44下执行cmake命令,进行编译前的检查和配置,使用CMake配置和生成MySQL源码编译所需的构建系统文件,安装MySQL到/usr/local/mysql目录下,-DWITH_BOOST=的路径根据源码包内自带boost的版本而定,默认端口3306,数据路径/usr/local/mysql/data,字符集utf8mb4
cmake \

-DCMAKE_INSTALL_PREFIX=/usr/local/mysql \

-DMYSQL_DATADIR=/usr/local/mysql/data \

-DMYSQL_UNIX_ADDR=/usr/local/mysql/mysql.sock \

-DSYSCONFDIR=/usr/local/mysql \

-DWITH_MYISAM_STORAGE_ENGINE=1 \

-DWITH_ARCHIVE_STORAGE_ENGINE=1 \

-DWITH_BLACKHOLE_STORAGE_ENGINE=1 \

-DWITH_INNOBASE_STORAGE_ENGINE=1 \

-DWITH_MEMORY_STORAGE_ENGINE=1 \

-DWITH_READLINE=1 \

-DMYSQL_TCP_PORT=3306 \

-DENABLED_LOCAL_INFILE=1 \

-DWITH_PARTITION_STORAGE_ENGINE=1 \

-DEXTRA_CHARSETS=all \

-DDEFAULT_CHARSET=utf8mb4 \

-DDEFAULT_COLLATION=utf8mb4_general_ci \

-DWITH_BOOST=boost/boost_1_59_0/
2.cmake命令执行成功后,执行以下make命令开始编译安装
make && make install
执行后,开始编译,不断输出日志,编译的过程很耗时间,需要等待很久,编译完成后,可以在/usr/local/mysql目录下看到编译好的MySQL
[root@localhost mysql-5.7.44]# cd /usr/local/mysql/

[root@localhost mysql]# ll

total 280

-rw-r--r--.  1 root root 260678 Oct 11  2023 LICENSE

-rw-r--r--.  1 root root    566 Oct 11  2023 README

-rw-r--r--.  1 root root    566 Oct 11  2023 README-test

drwxr-xr-x.  2 root root   4096 Dec 15 20:12 bin

drwxr-xr-x.  2 root root     73 Dec 15 20:12 docs

drwxr-xr-x.  3 root root   4096 Dec 15 20:12 include

drwxr-xr-x.  4 root root    192 Dec 15 20:12 lib

drwxr-xr-x.  4 root root     30 Dec 15 20:12 man

drwxr-xr-x. 10 root root   4096 Dec 15 20:12 mysql-test

drwxr-xr-x. 28 root root   4096 Dec 15 20:12 share

drwxr-xr-x.  2 root root     90 Dec 15 20:12 support-files
4.安装后配置
1.在/usr/local/mysql创建一个mysql配置文件,并写入字符集相关配置进去。
vi /usr/local/mysql/my.cnf
[mysqld]

# 设置字符集为 utf8mb4

character-set-server = utf8mb4

collation-server = utf8mb4_unicode_ci

# 可选: 设置客户端和连接的字符集

[client]

default-character-set = utf8mb4

[mysql]

default-character-set = utf8mb4
2.在/usr/local/mysql下执行命令初始化MySQL数据库
./bin/mysqld --defaults-file=/usr/local/mysql/my.cnf --initialize --user=mysql
命令执行完成后,会为我们生成一个临时的root密码TKwei-cPH7>?,初始化完成后,目录内会多出一个data文件夹
[root@localhost mysql]# ./bin/mysqld --defaults-file=/usr/local/mysql/my.cnf  --initialize --user=mysql

2024-12-15T13:56:33.192253Z 0 [Warning] TIMESTAMP with implicit DEFAULT value is deprecated. Please use --explicit_defaults_for_timestamp server option (see documentation for more details).

2024-12-15T13:56:34.692706Z 0 [Warning] InnoDB: New log files created, LSN=45790

2024-12-15T13:56:34.976850Z 0 [Warning] InnoDB: Creating foreign key constraint system tables.

2024-12-15T13:56:35.074466Z 0 [Warning] No existing UUID has been found, so we assume that this is the first time that this server has been started. Generating a new UUID: 658fc67b-baec-11ef-9db1-000c29c17c8f.

2024-12-15T13:56:35.079233Z 0 [Warning] Gtid table is not ready to be used. Table 'mysql.gtid_executed' cannot be opened.

2024-12-15T13:56:35.873224Z 0 [Warning] A deprecated TLS version TLSv1 is enabled. Please use TLSv1.2 or higher.

2024-12-15T13:56:35.873307Z 0 [Warning] A deprecated TLS version TLSv1.1 is enabled. Please use TLSv1.2 or higher.

2024-12-15T13:56:35.882642Z 0 [Warning] CA certificate ca.pem is self signed.

2024-12-15T13:56:36.037915Z 1 [Note] A temporary password is generated for root@localhost: TKwei-cPH7>?
[root@localhost mysql]# cd /usr/local/mysql/

[root@localhost mysql]# ll

total 284

-rw-r--r--.  1 root  root  260678 Oct 11  2023 LICENSE

-rw-r--r--.  1 root  root     566 Oct 11  2023 README

-rw-r--r--.  1 root  root     566 Oct 11  2023 README-test

drwxr-xr-x.  2 root  root    4096 Dec 15 20:12 bin

drwxr-x---.  5 mysql mysql   4096 Dec 15 21:56 data

drwxr-xr-x.  2 root  root      73 Dec 15 20:12 docs

drwxr-xr-x.  3 root  root    4096 Dec 15 20:12 include

drwxr-xr-x.  4 root  root     192 Dec 15 20:12 lib

drwxr-xr-x.  4 root  root      30 Dec 15 20:12 man

-rw-r--r--.  1 root  root       0 Dec 15 21:56 my.cnf

drwxr-xr-x. 10 root  root    4096 Dec 15 20:12 mysql-test

drwxr-xr-x. 28 root  root    4096 Dec 15 20:12 share

drwxr-xr-x.  2 root  root      90 Dec 15 20:12 support-files
3.在/usr/local/mysql目录执行以下命令,将文件所有者设置为之前新建的mysql用户
chown -R mysql:mysql ./
[root@localhost mysql]# ll

total 284

-rw-r--r--.  1 mysql mysql 260678 Oct 11  2023 LICENSE

-rw-r--r--.  1 mysql mysql    566 Oct 11  2023 README

-rw-r--r--.  1 mysql mysql    566 Oct 11  2023 README-test

drwxr-xr-x.  2 mysql mysql   4096 Dec 15 20:12 bin

drwxr-x---.  5 mysql mysql   4096 Dec 15 21:56 data

drwxr-xr-x.  2 mysql mysql     73 Dec 15 20:12 docs

drwxr-xr-x.  3 mysql mysql   4096 Dec 15 20:12 include

drwxr-xr-x.  4 mysql mysql    192 Dec 15 20:12 lib

drwxr-xr-x.  4 mysql mysql     30 Dec 15 20:12 man

-rw-r--r--.  1 mysql mysql      0 Dec 15 21:56 my.cnf

drwxr-xr-x. 10 mysql mysql   4096 Dec 15 20:12 mysql-test

drwxr-xr-x. 28 mysql mysql   4096 Dec 15 20:12 share

drwxr-xr-x.  2 mysql mysql     90 Dec 15 20:12 support-files
5.启动和测试MySQL Server
在/usr/local/mysql下执行启动脚本文件启动数据库
./support-files/mysql.server start
关闭
./support-files/mysql.server stop
重启
./support-files/mysql.server restart
登录数据库测试,切换到目录/usr/local/mysql,在执行./bin/mysql -uroot -p命令登录数据库操作时,系统提示我们需要修改默认的root密码
[root@localhost mysql]# ./bin/mysql -uroot -p

Enter password:

Welcome to the MySQL monitor.  Commands end with ; or \g.

Your MySQL connection id is 5

Server version: 5.7.44

Copyright (c) 2000, 2023, Oracle and/or its affiliates.

Oracle is a registered trademark of Oracle Corporation and/or its

affiliates. Other names may be trademarks of their respective

owners.

Type 'help;' or '\h' for help. Type '\c' to clear the current input statement.

mysql> show databases;

ERROR 1820 (HY000): You must reset your password using ALTER USER statement before executing this statement.
修改默认密码
mysql> SET PASSWORD = PASSWORD('lzj');
修改后要刷新权限
mysql> FLUSH PRIVILEGES;
刷新权限后退出使用新密码再次登录,此时已经可以正常操作数据库了。
[root@localhost mysql]# ./bin/mysql -uroot -plzj

mysql: [Warning] Using a password on the command line interface can be insecure.

Welcome to the MySQL monitor.  Commands end with ; or \g.

Your MySQL connection id is 7

Server version: 5.7.44 Source distribution

Copyright (c) 2000, 2023, Oracle and/or its affiliates.

Oracle is a registered trademark of Oracle Corporation and/or its

affiliates. Other names may be trademarks of their respective

owners.

Type 'help;' or '\h' for help. Type '\c' to clear the current input statement.

mysql> show databases;

+--------------------+

| Database           |

+--------------------+

| information_schema |

| mysql              |

| performance_schema |

| sys                |

+--------------------+

4 rows in set (0.00 sec)

mysql> select version();

+-----------+

| version() |

+-----------+

| 5.7.44    |

+-----------+

1 row in set (0.00 sec)

mysql> SHOW VARIABLES LIKE 'character_set%';

+--------------------------+----------------------------------+

| Variable_name            | Value                            |

+--------------------------+----------------------------------+

| character_set_client     | utf8mb4                          |

| character_set_connection | utf8mb4                          |

| character_set_database   | utf8mb4                          |

| character_set_filesystem | binary                           |

| character_set_results    | utf8mb4                          |

| character_set_server     | utf8mb4                          |

| character_set_system     | utf8                             |

| character_sets_dir       | /usr/local/mysql/share/charsets/ |

+--------------------------+----------------------------------+

8 rows in set (0.01 sec)
至此,就完成了在RockyLinux9上面安装和运行MySQL5.7
RockyLinux9编译安装MySQL5.7的更多相关文章
- CentOS6.3 编译安装LAMP(3):编译安装 MySQL5.5.25
所需源码包: /usr/local/src/MySQL-5.5.25/cmake-2.8.8.tar.gz /usr/local/src/MySQL-5.5.25/mysql-5.5.25.tar.g ...
- 基于cmake编译安装MySQL-5.5
cmake的重要特性之一是其独立于源码(out-of-source)的编译功能,即编译工作可以在另一个指定的目录中而非源码目录中进行,这可以保证源码目录不受任何一次编译的影响,因此在同一个源码树上可以 ...
- centos6.5环境源码编译安装mysql5.6.34
centos6.5环境源码编译安装mysql5.6.34 源码下载地址http://dev.mysql.com/downloads/mysql/5.6.html#downloads 选择Generic ...
- Ubuntu14.04编译安装mysql5.6.26
Ubuntu14.04编译安装mysql5.6.26 (1)安装编译源码需要的包 sudo apt-get install make cmake gcc g++ bison libncurses5-d ...
- centos6.6下编译安装mysql5.6之后启动失败:Starting MySQL... ERROR! The server quit without updating PID file (/var/lib/mysql/localhost.localdomain.pid).
今天在编译安装mysql5.6时候出现Starting MySQL... ERROR! The server quit without updating PID file (/var/lib/mysq ...
- centos7编译安装MySQL5.7.9
title: centos7编译安装MySQL5.7.9 date: 2016-05-12 16:20:17 tags: --- Centos7编译安装mysql5.7.9 mysql5.7有更好的性 ...
- centos6.7下 编译安装MySQL5.7
centos6.7下编译安装MySQL5.7 准备工作 #-----依赖包及MySQL和boost安装包----- #yum包安装: shell> yum -y install gcc-c++ ...
- centos6.7编译安装mysql5.7.17
centos6.7编译安装mysql5.7.17 2017-03-24 09:57:15 提示:mysql5.7.17和之前5.56以前的版本安装不一样,需要用cmake 另外,看本文档的mysql编 ...
- centos7.2环境编译安装mysql5.5.48
一.安装cmake编译工具 跨平台编译器 查看是否已经安装了gcc # rpm -qa | grep gcc # yum install -y gcc-c++ # yum install -y cma ...
- 源码编译安装mysql5.5.33
源码编译安装mysql5.5.33 一.安装cmake编译工具 跨平台编译器 # yum install -y gcc* # yum install -y cmake 解决依赖关系 # yum ins ...
随机推荐
- AI运动小程序开发常见问题集锦一
截止到现在写博文时,我们的AI运动识别小程序插件已经迭代了23个版本,成功应用于健身.体育.体测.AR互动等场景:为了让正在集成或者计划进行功能扩展优化的用户,少走弯路.投入更少的开发资源,我们归集了 ...
- php open_basedir的使用
今天跨省问为什么file_exists检测一个相对路径的文件无法获取到true,文件明明有,但是获取不到,我看了一下,感觉可能是因为这个文件是软链接过来的有关系. 然后他找了找发现是和这么一个文件.u ...
- vivo 企业云盘服务端实现简介
作者:来自 vivo 互联网存储团队- Cheng Zhi 本文将介绍企业云盘的基本功能以及服务端实现. 一.背景 vivo 企业云盘是一个企业级文件数据管理服务,解决办公数据的存储.共享.审计等文件 ...
- 在vue2中按顺序调用多个接口,接收返回数据
最近有一个点一个按钮调用多个接口,并且按顺序串行调用,根据后端返回的逻辑,区分接口之间的串行关系,前面的接口失败是否继续执行下面接口,有两种方式,都是循环调用接口,实现方式有点差别 第一种reduce ...
- AtCoder Beginner Contest 295
Three Days Ago 我们定义一个只由数字构成的字符串中的字符能够被重排成相同的两份,我们称这个字符串是个好字符串,比如12341234 现在给定一个字符串\(S\),找出所有的\([l,r] ...
- 开源 - Ideal库 - Excel帮助类,TableHelper实现(二)
书接上回,我们今天开始实现对象集合与DataTable的相互转换. 01.接口设计 上文中已经详细讲解了整体设计思路以及大致设计了需要哪些方法.下面我们先针对上文设计思想确定对外提供的接口.具体接口如 ...
- DevEco Studio 实战第一节:字符串拼接与组件构建
DevEco Studio 实战第一节:字符串拼接与组件构建 引言 在现代软件开发中,TypeScript 提供了强类型的优势,而 DevEco Studio 作为华为推出的开发集成环境,提供了便捷的 ...
- cmu15545笔记-并发控制总结(Concurrency Control Summary)
目录 总览 ACID 串行化与冲突操作 隔离级别 概念层级 二阶段锁 原理 级联回滚 强二阶段锁 死锁检测和避免 锁层级 实践应用 实现的隔离级别 OOC 原理 三个阶段 实现的隔离级别 处理幻读 M ...
- 指针, C语言的精髓
指针, C语言的精髓 莫队先咕几天, 容我先讲完树剖 (因为后面树上的东西好多都要用树剖求 LCA). 什么是指针 保存变量地址的变量叫做指针. 这是大概的定义, 但是Defad认为这个定义不太好理解 ...
- Java根据前端返回的字段名进行查询数据
在Java后端开发中,我们经常需要根据前端传递的参数(如字段名)来动态查询数据库中的数据.这种需求通常出现在需要实现通用查询功能或者复杂查询接口的场景中.为了实现这个功能,我们需要结合Java的反射机 ...