
LNMP(Linux+Nginx+MySQL+PHP)centos6.4安装
nginx命令
停止nginx服务:# /etc/init.d/nginx stop
启动nginx服务:# /etc/init.d/nginx start
编辑nginx配置文件:# vim /etc/nginx/nginx.conf
/etc/init.d/php-fpm restart
service php-fpm start
最后只要 yum -y update 一下,全是最新的
别忘了开机启动
chkconfig --level 345 mysqld on
chkconfig --level 345 php-fpm on
chkconfig --level 345 nginx on
你可以用下列方法检查配置文件是否有语法错误
# /etc/init.d/nginx configtest
问题:
1.打开phpmyadmin时出现mysqli扩展
设置:extension_ext = "/var/lib64/php/modules";
2.打开phpmyadmin时,出现:Error during session start; please check your PHP and/or webserver log file and configure your PHP installation properly. Also ensure that cookies are enabled in your browser.
首先看session.auto_start = 0,如果设置0不行,就设置1.
如果还不行,看session.save_path,看看这个路径有没有权限。
1.MySQL
yum源:http://dev.mysql.com/downloads/repo/yum/
配置yum源:http://dev.mysql.com/doc/mysql-repo-excerpt/5.6/en/linux-installation-yum-repo.html
# yum -y install mysql-server
# chkconfig mysqld on
# service mysqld start
2.Nginx.
在/etc/yum.repos.d/目录下建立一个nginx.repo软件源配置文件。命令如下:
# cd /etc/yum.repos.d/
# vim
然后填写如下文件内容
[nginx]

name=nginx repo

baseurl=http://nginx.org/packages/centos/$releasever/$basearch/

gpgcheck=

enabled=
注意:一定要看这句话(参考:http://nginx.org/en/linux_packages.html#stable)
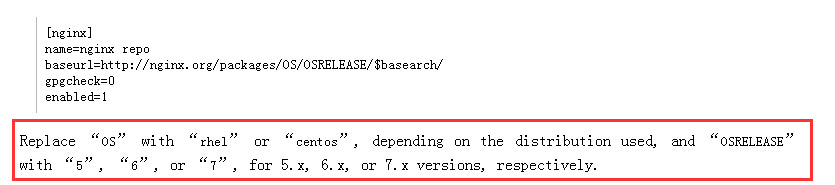
执行vim命令保存文件为nginx.repo完整路径是/etc/yum.repos.d/nginx.repo
:w
执行yum命令安装nginx
yum install nginx
添加防火墙
在安装完成nginx后,需要设置防火墙设置允许80端口,操作如下:
# vim /etc/sysconfig/iptables
添加一行
-A INPUT –m state –state NEW –m tcp –p tcp –dport –j ACCEPT
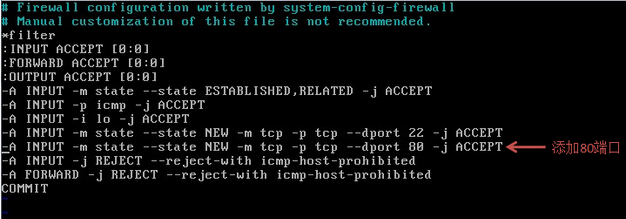
在修改完防火墙后需要执行如下命令重启防火
# /etc/init.d/iptables restart
紧接着启动nginx
# /etc/init.d/nginx start
然后保存并退出:wq
nginx伪静态:
1.将include /www/web1.nginx加入到nginx的虚拟机配置文件中,
加入到location / {}部分。
2.伪静态文件:
rewrite ^/about\.html$ /?do=profile last;
注意:1.前部分需要加根目录斜线"/";
2.将RewriteRule改成rewrite;
3.末尾加上 last;
编译安装:(参考:http://lxsym.blog.51cto.com/1364623/293096)
安装PHP(PHP5.3以后,php-fpm就是php的核心模块存在了)
这个地方是最重要的地方,因为默认情况下Nginx和PHP他俩之间是一点感觉没有的。在之前,很多朋友都搭建过Apache+PHP,Apache+PHP编译后生成的是模块文件,而Nginx+PHP需要PHP生成可执行文件才可以,所以要利用fastcgi技术来实现Nginx与PHP的整合,这个只要我们安装是启用FastCGI即可。此次我们安装PHP不仅使用了FastCGI,而且还使用了PHP-FPM这么一个东东,PHP-FPM说白了是一个管理FastCGI的一个管理器,它作为PHP的插件纯在,在安装PHP要想使用PHP-FPM时就需要把PHP-FPM以补丁的形式安装到PHP中,而且PHP要与PHP-FPM版本一致,这是必须的,切记!
整合Nginx与PHP
上面已经讲过,Nginx自己并不处理动态网页的请求,而且Nginx将得到的动态请求转交给PHP,下面我们打开Nginx的配置文件看一下
#vi /etc/nginx/conf.d/default.conf
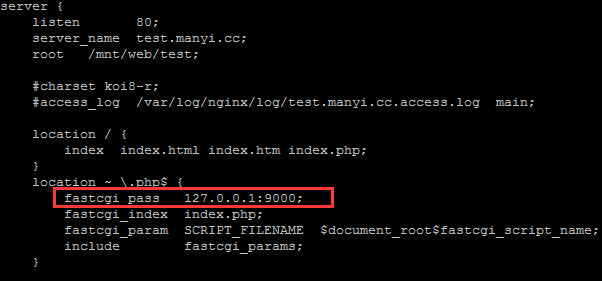
看上图,Nginx已经知道怎么把得到的请求传达给PHP,Nginx在得到*.php请求时,会把请求通过9000端口传给PHP。
那么只有Nginx自己知道咋找PHP了还不行,还需要PHP知道咋找Nginx,PS:你见过大街上的JJMM约会时有不是相互认识对方,或者是不知道用啥方法和对方接头的?这点我们不需要担心,PHP-FPM已经在配置文件中定义了从哪接受PHP请求,我们可以打开配置文件看一下
#vi /etc/php-fpm.d/www.conf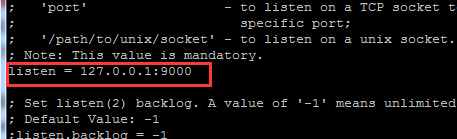
如上图所示,我们在前面已经看到过Nginx是通过本机的9000端口将PHP请求转发给PHP的,而上图我们可以看到PHP自己是从本机的9000端口侦听数据 ,Nginx与PHP通过本机的9000端口完成了数据请求。
php源码安装:
1.cd /usr/local/php/
wget http://cn2.php.net/distributions/php-5.6.8.tar.gz
2.
./configure --prefix=/usr/local/php --enable-fpm --enable-mbstring --with-mysql=/usr/local/mysql --with-iconv-dir=/usr/local --with-apxs2=/usr/local/apache2/bin/apxs
PHP编译安装出现的各种问题:
php版本:php-5.4.3
安装前.先安装些软件和库文件
yum install -y gcc gcc-c++ make zlib zlib-devel pcre pcre-devel libjpeg libjpeg-devel libpng libpng-devel freetype freetype-devel libxml2 libxml2-devel glibc glibc-devel glib2 glib2-devel bzip2 bzip2-devel ncurses ncurses-devel curl curl-devel e2fsprogs e2fsprogs-devel krb5 krb5-devel openssl openssl-devel openldap openldap-devel nss_ldap openldap-clients openldap-servers
领导要我们自己手动装 不允许我们直接用yum 所以上面的都没执行
编译安装PHP
进入php的解压目录
./configure --prefix=/usr/local/php --enable-fpm --with-mcrypt=/usr/local/libmcrypt --with-zlib --enable-mbstring --with-openssl --with-mysql --with-mysqli --with-mysql-sock --with-gd --with-jpeg-dir=/usr/lib --enable-gd-native-ttf --enable-pdo --with-pdo-mysql --with-gettext --with-curl --with-pdo-mysql --enable-sockets --enable-bcmath --enable-xml --with-bz2 --enable-zip --enable-freetype
运行之后遇到的问题:
error 1
checking for xml2-config path...
configure: error: xml2-config not found. Please check your libxml2 installation.
(看提示就明白 是一个lib库没装 先用 yum search 名字 看是否能搜到名字 ,找到名字后 把软件包 开发包装上)
解决办法
yum install libxml2-devel.x86_64
error 2
checking for pkg-config... /usr/bin/pkg-config
configure: error: Cannot find OpenSSL's <evp.h>
这是ssl没装
解决办法
yum install openssl.x86_64 openssl-devel.x86_64 -y
error 3
checking for BZip2 in default path... not found
configure: error: Please reinstall the BZip2 distribution
这是bzip2软件包没有安装
解决办法
yum install bzip2-devel.x86_64 -y
error 4
configure: error: Please reinstall the libcurl distribution -
easy.h should be in <curl-dir>/include/curl/
curl和curl库文件没有安装
解决办法
yum install libcurl.x86_64 libcurl-devel.x86_64 -y
error 5
checking whether to enable JIS-mapped Japanese font support in GD... no
checking for fabsf... yes
checking for floorf... yes
configure: error: jpeglib.h not found
GD库没有安装
解决办法
yum install libjpeg.x86_64 libpng.x86_64 freetype.x86_64 libjpeg-devel.x86_64 libpng-devel.x86_64 freetype-devel.x86_64 -y
error 6
checking for stdarg.h... (cached) yes
checking for mcrypt support... yes
configure: error: mcrypt.h not found. Please reinstall libmcrypt.
libmcrypt库没有安装 ,要是不能用yun安装的话 就要去下载个gz包 自己编译安装
(编译安装 ./configure --piefix=/usr/local/libmcrypt make && make install)
~~~~~~~~~~~~~~~~~~~~~~~~~~~~~~~~~~~~~~~~~~~~~~~~
要是错误里面含有mysql的 那是mysql-devel 没有安装
~~~~~~~~~~~~~~~~~~~~~~~~~~~~~~~~~~~~~~~~~~~~~~~~~~
出现
Generating files configure: creating ./config.status creating main/internal_functions.c creating main/internal_functions_cli.c
编译PHP的--with-gd=/usr/include
错误提示:
configure: error: Unable to find gd.h anywhere under
表明已经装好GD库啦,把后面的路径取消就可以啦
--with-gd --with-jpeg --with-png
ok
LNMP(Linux+Nginx+MySQL+PHP)centos6.4安装的更多相关文章
- LNMP(Linux+Nginx+MySQL+PHP) yum方式安装Redis
一.环境信息 CentOS Linux release 8.1.1911 (Core) Redis server v=5.0.3 二.yum方式安装 1.添加EPEL仓库 sudo yum insta ...
- centos7安装Lnmp(Linux+Nginx+MySql+Php+phpMyAdmin+Apache)
centos7安装Lnmp(Linux+Nginx+MySql+Php)及Apache Nginx是俄罗斯人编写的十分轻量级的HTTP服务器,Nginx是一个高性能的HTTP和反向代理服务器,Ng ...
- LNMP(linux+nginx+mysql+php)服务器环境配置【转载】
本文转载自 园友David_Tang的博客,如有侵权请联系本人及时删除,原文地址: http://www.cnblogs.com/mchina/archive/2012/05/17/2507102.h ...
- 阿里云Linux CentOS8.1 64位服务器安装LNMP(Linux+Nginx+MySQL+PHP)
LNMP环境和软件版本: 名称 版本号 查询命令 Linux系统 CentOS Linux release 8.1.1911 (Core) cat /etc/redhat-release Nginx ...
- 安装lnmp(linux nginx mysql php)
下载或者在云盘里找lnmp1.2-full.tar.gz 用 tar -zxvf lnmp1.2-full.tar.gz解压 进入 ,运行./install.sh安装.根据提示. 如果出现yum锁定, ...
- LNMP(linux+nginx+mysql+php)服务器环境配置
一.简介 Nginx是俄罗斯人编写的十分轻量级的HTTP服务器,Nginx,它的发音为 “engine X”, 是一个高性能的HTTP和反向代理服务器,同时也是一个IMAP/POP3/SMTP 代理服 ...
- centos6服务器YUM安装LNMP(LINUX+NGINX+MYSQL+PHP)
之前都用的lamp,这次配置一个lnmp来看看,试试Nginx是不是好用 关闭SELINUXvi /etc/selinux/config#SELINUX=enforcing #注释掉#SELINUXT ...
- centos 6.5 安装lnmp(linux+nginx+mysql+php)
参考:http://www.cnblogs.com/AloneSword/archive/2013/03/18/2966750.html (总结并简要) 一安装cmake wget -c http:/ ...
- 5.LNMP(Linux + Nginx + MySQL + PHP)环境安装
1.安装Nginx: yum install yum-priorities -y wget http://nginx.org/packages/centos/7/noarch/RPMS/nginx-r ...
随机推荐
- EF+Sqlite 动态设置连接字符串
摘要 在做c/s项目的时候,如果使用ef+sqlite,我们不知道客户端会安装在哪里,需要动态的来设置db所在路径. 解决办法 /// <summary> /// 数据上下文 /// &l ...
- IOS开发中的CGFloat、CGPoint、CGSize和CGRect
IOS开发中的CGFloat.CGPoint.CGSize和CGRect http://developer.apple.com/library/ios/#documentation/GraphicsI ...
- Apache Tomcat 9 Installation on Linux (RHEL and clones)
Apache Tomcat 9 is not available from the standard RHEL distributions, so this article provides info ...
- 一文犀利看懂中美贸易战 z
如今的中国面对着前所未有的经济全球化的大环境.面对着如何成为创新性国家的重任. 钛媒体注:美国东部时间 7 月 6 日凌晨0:01 分,美国正式开始对 340 亿美元的中国产品加征 25% 的关税,这 ...
- poj 3041(最大匹配问题)
http://poj.org/problem?id=3041 Asteroids Time Limit: 1000MS Memory Limit: 65536K Total Submissions ...
- CSS:如何学习 CSS?
马上该转战互联网领域了,在此总结一下 CSS 学习的思路. 理解 CSS 的基本语法. 理解盒子模型. 理解文档流和定位. 理解浮动和清除. 理解各种 CSS 样式. 目前发现的最好的资源是:http ...
- Redis在Mac下的安装与使用方法
首先从Redis官网http://www.redis.io去下载最新版本的Redis安装文件(此处以Redis版本为例进行说明). Redis 2.6.16版本的下载地址:http://downl ...
- JQuery攻略(五)表单验证
表单验证,字段空白,输入合法,数据合法....... 此章节有 1.1字段验证 1.2正则表达式验证 1.3复选框的勾选 1.1字段验证 1.字段非空 $(document).ready(functi ...
- Xcode修改项目的Build Location
Xcode默认project通过build输出的目录,存放于目录 /Users/用户名/Library/Developer/Xcode/DerivedData/产品名称-hjwqiconnjhpjle ...
- ios之CABasicAnimation
博主:最近iOS开发中用到CoreAnimation的framework来做动画效果,虽然以前也用过,但一直没有系统学习过,今天看到一篇非常详细的博文(虽然是日语,但真的写的很好),在此翻译出来供大家 ...