centos install docker setup centos7 安装docker
centos7 安装docker
1: 安装必要的一些系统工具
sudo yum install -y yum-utils device-mapper-persistent-data lvm2
2: 添加软件源信息
sudo yum-config-manager --add-repo http://mirrors.aliyun.com/docker-ce/linux/centos/docker-ce.repo
3: 更新并安装 Docker-CE
sudo yum makecache fast
sudo yum -y install docker-ce
4: 开启Docker服务
systemctl docker start
docker info 查看信息
[root@localhost system]# docker info
Containers: 1
Running: 0
Paused: 0
Stopped: 1
Images: 1
Server Version: 17.12.0-ce
Storage Driver: devicemapper
Pool Name: docker-259:1-2149612562-pool
Pool Blocksize: 65.54kB
Base Device Size: 10.74GB
Backing Filesystem: xfs
Udev Sync Supported: true
Data file: /dev/loop0
Metadata file: /dev/loop1
Data loop file: /var/lib/docker/devicemapper/devicemapper/data
Metadata loop file: /var/lib/docker/devicemapper/devicemapper/metadata
Data Space Used: 19.73MB
Data Space Total: 107.4GB
Data Space Available: 107.4GB
Metadata Space Used: 593.9kB
Metadata Space Total: 2.147GB
Metadata Space Available: 2.147GB
Thin Pool Minimum Free Space: 10.74GB
Deferred Removal Enabled: true
Deferred Deletion Enabled: true
Deferred Deleted Device Count: 0
Library Version: 1.02.140-RHEL7 (2017-05-03)
Logging Driver: json-file
Cgroup Driver: cgroupfs
Plugins:
Volume: local
Network: bridge host macvlan null overlay
Log: awslogs fluentd gcplogs gelf journald json-file logentries splunk syslog
Swarm: inactive
Runtimes: runc
Default Runtime: runc
Init Binary: docker-init
containerd version: 89623f28b87a6004d4b785663257362d1658a729
runc version: N/A (expected: b2567b37d7b75eb4cf325b77297b140ea686ce8f)
init version: 949e6fa
Security Options:
seccomp
Profile: default
Kernel Version: 3.10.0-327.el7.x86_64
Operating System: CentOS Linux 7 (Core)
OSType: linux
Architecture: x86_64
CPUs: 24
Total Memory: 125.7GiB
Name: localhost.localdomain
ID: ZWN2:HKKK:ZZLD:UXLN:MCRT:K2UA:5QE2:V3WQ:WSD3:YLXM:M5VI:7SDK
Docker Root Dir: /var/lib/docker
Debug Mode (client): false
Debug Mode (server): false
Registry: https://index.docker.io/v1/
Labels:
Experimental: false
Insecure Registries:
127.0.0.0/8
WARNING: devicemapper: usage of loopback devices is strongly discouraged for production use.
Use `--storage-opt dm.thinpooldev` to specify a custom block storage device.
WARNING: bridge-nf-call-iptables is disabled
WARNING: bridge-nf-call-ip6tables is disabled
第一个警告可以修改默认的存储方式来消除
大意是用loopback的方式运行docker是强烈不建议的,后面也告诉了解决这个警告的办法,
网上搜索的一些解决办法,大意也是docker daemon启动参数加入
DOCKER_STORAGE_OPTIONS="--storage-opt dm.no_warn_on_loop_devices=true"来规避警告。
而实际这样无异于掩耳盗铃,从加入的参数的意思也能看出如此。事实上,根本的解决办法,
要从docker 的不同的存储驱动说起。

目前docker支持的存储驱动类型,有aufs,Device mapper,btrfs,overlayfs和zfs,
所有驱动都用到写时复制(CoW)的技术。而出现警告的原因,就是在centos系统上(默认不支持aufs),
docker daemon启动时,找到的后端存储驱动只有device mapper类型,就会通过loopback的方式,创造100G的sparse文件,
并将其作为device mapper的存储池,而所有容器都从该存储池中分配默认10G的存储空间使用
(可以理解为通过dd命令创造一个稀疏文件,再把这个稀疏的文件当做块设备通过loopback挂载出来)。
而loopback的方式,性能和稳定性都不是很好,所以才出现上述警告。因此解决的办法,
也在使用device mapper存储时,避免使用loopback即可
具体参考 http://www.cnblogs.com/sxwen/p/8304209.html
消除警告
WARNING: bridge-nf-call-iptables is disabled
WARNING: bridge-nf-call-ip6tables is disabled
[root@localhost system]# tee -a /etc/sysctl.conf <<-EOF
net.bridge.bridge-nf-call-ip6tables = 1
net.bridge.bridge-nf-call-iptables = 1
EOF
使之生效
[root@localhost system]# sysctl -p
net.bridge.bridge-nf-call-ip6tables = 1
net.bridge.bridge-nf-call-iptables = 1
docker info 警告已经消除
镜像加速器
aliyun 的镜像加速器 首先要注册自己的阿里云账户,aliyun 为每个账户设置了唯一的加速器
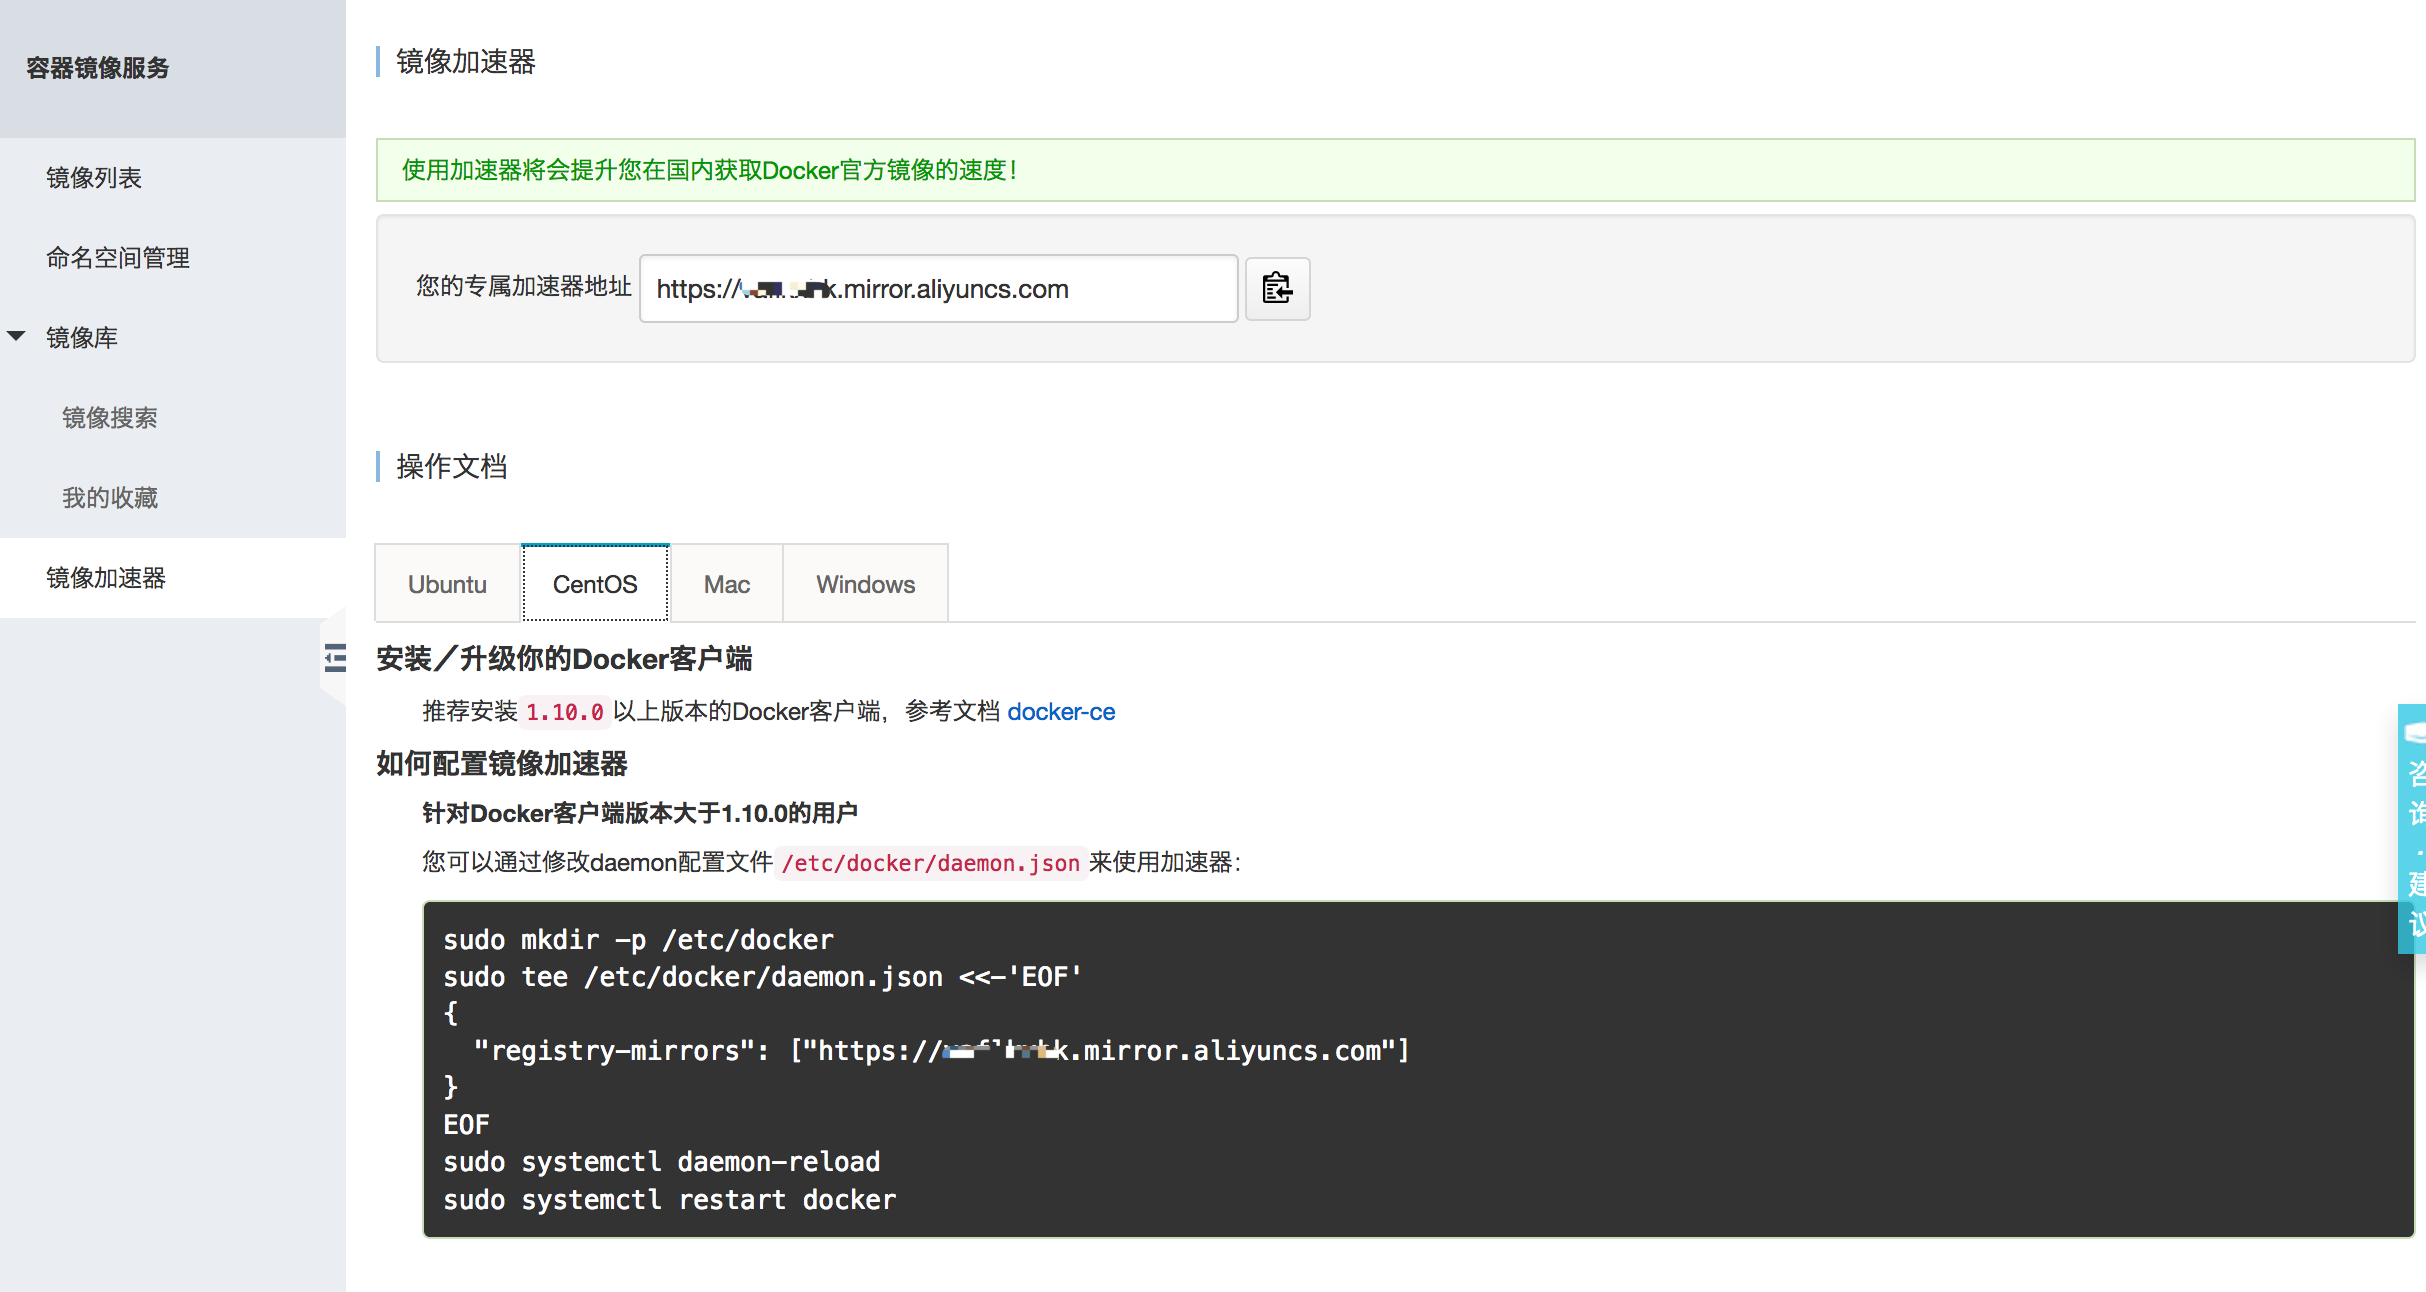
网上有很多在 /etc/docker/daemon.json 中设置的,包括aliyun 文档也是这样设置,如果没有daemon.json 文件需要自己创建
[root@localhost ~]# cat /etc/docker/daemon.json

{

"registry-mirrors":["https://vaflkxbk.mirror.aliyuncs.com"]

}
另外一种方式如下:
1.复制/lib/systemd/system/docker.service 到/etc/systemd/system/ 目录下
[root@localhost system]# cp -n /lib/systemd/system/docker.service /etc/systemd/system/
2.修改ExecStart 该行如下
sed -i 's|ExecStart=/usr/bin/dockerd|ExecStart=/usr/bin/dockerd --registry-mirror=https://vaflkxb*.mirror.aliyuncs.com|g' /etc/systemd/system/docker.service
ExecStart=/usr/bin/dockerd --registry-mirror=https://vafl***.mirror.aliyuncs.com
[root@localhost system]# cat /etc/systemd/system/docker.service
[Unit]
Description=Docker Application Container Engine
Documentation=https://docs.docker.com
After=network-online.target firewalld.service
Wants=network-online.target
[Service]
Type=notify
# the default is not to use systemd for cgroups because the delegate issues still
# exists and systemd currently does not support the cgroup feature set required
# for containers run by docker
ExecStart=/usr/bin/dockerd --registry-mirror=https://vaflk***.mirror.aliyuncs.com
ExecReload=/bin/kill -s HUP $MAINPID
# Having non-zero Limit*s causes performance problems due to accounting overhead
# in the kernel. We recommend using cgroups to do container-local accounting.
LimitNOFILE=infinity
LimitNPROC=infinity
LimitCORE=infinity
# Uncomment TasksMax if your systemd version supports it.
# Only systemd 226 and above support this version.
#TasksMax=infinity
TimeoutStartSec=0
# set delegate yes so that systemd does not reset the cgroups of docker containers
Delegate=yes
# kill only the docker process, not all processes in the cgroup
KillMode=process
# restart the docker process if it exits prematurely
Restart=on-failure
StartLimitBurst=3
StartLimitInterval=60s
[Install]
WantedBy=multi-user.target
3.重启服务
[root@localhost system]# systemctl daemon-reload
[root@localhost system]# systemctl restart docker
[root@localhost system]#
4. docker info 验证 registry 是否有aliyun
5. pull mysql 数据库验证速度,比默认registry块好多倍
[root@localhost system]# docker pull mysql
Using default tag: latest
latest: Pulling from library/mysql
f49cf87b52c1: Pull complete
78032de49d65: Pull complete
837546b20bc4: Pull complete
9b8316af6cc6: Pull complete
1056cf29b9f1: Pull complete
86f3913b029a: Pull complete
f98eea8321ca: Pull complete
3a8e3ebdeaf5: Pull complete
4be06ac1c51e: Pull complete
920c7ffb7747: Pull complete
Digest: sha256:7cdb08f30a54d109ddded59525937592cb6852ff635a546626a8960d9ec34c30
Status: Downloaded newer image for mysql:latest
[root@localhost system]#
[root@localhost system]#
[root@localhost system]# docker image list
REPOSITORY TAG IMAGE ID CREATED SIZE
mysql latest f008d8ff927d 33 hours ago 409MB
hello-world latest f2a91732366c 8 weeks ago 1.85kB
[root@localhost system]#
[root@localhost system]#
[root@localhost system]#
[root@localhost system]#
centos install docker setup centos7 安装docker的更多相关文章
- 【Docker】 CentOS7 安装 Docker 及其使用方法 ( 一 )
系列目录: [Docker] CentOS7 安装 Docker 及其使用方法 ( 一 ) [Docker] 使用Docker 在阿里云 Centos7 部署 MySQL 和 Redis (二) [D ...
- Ubuntu18.04安装Docker, centos7安装Docker
Ubuntu18.04安装Docker 第一种方法从Ubuntu的仓库直接下载安装: 安装比较简单,这种安装的Docker不是最新版本,不过对于学习够用了,依次执行下面命令进行安装. $ sudo a ...
- 【docker】 centos7 安装docker
1.Docker 要求 CentOS 系统的内核版本高于 3.10 ,查看本页面的前提条件来验证你的CentOS 版本是否支持 Docker 通过 uname -r 命令查看你当前的内核版本 unam ...
- Centos7安装Docker 基于Dockerfile 搭建httpd运行环境
Centos7安装Docker 基于Dockerfile 搭建httpd运行环境 docker docker搭建 docker build 本文档完成目标内容如下 使用Docker搭建http服务器一 ...
- centos7安装docker并安装jdk和tomcat(常用命令)
阿里专属的镜像加速 在宿主机器编辑文件:vi /etc/docker/daemon.json 阿里专属的镜像加速地址,类似于"https://91cntlkt.mirror.aliyuncs ...
- centos7安装 docker
centos7安装 docker 切换到 root用户,执行: [root@localhost frinder]# yum install docker已加载插件:fastestmirror, lan ...
- 【运维技术】VM虚拟机上使用centos7安装docker启动gogs服务教程【含B站视频教程】
VM虚拟机上使用centos7安装docker启动gogs服务视频教程 BiliBili视频教程链接飞机票,点我 使用VMware Workstation安装Centos7 MinMal系统 第一步: ...
- 获取Centos7安装Docker各种姿势(指定版本)(转载)
Centos7安装docker社区(CE)版 官网指导:https://docs.docker.com/engine/installation/linux/docker-ce/centos/#inst ...
- CentOS7安装docker 18.06
原文:CentOS7安装docker 18.06 一.CentOS Docker 安装 参考docker 官方网站:https://docs.docker.com/install/linux/dock ...
随机推荐
- iOS学习(项目中遇到的错误1)
1.[AppModel copyWithZone:]: unrecognized selector sent to instance 0x7ffda9f4cf70 *** Terminating ap ...
- Git提交时提示‘The file will have its original line endings in your working directory’
Git提交时提示'The file will have its original line endings in your working directory' Git出现错误 git add -A ...
- react-native 启动页(react-native-splash-screen)
用于解决iOS和Android启动白屏问题及简单的启动页面展示 下载 react-native-splash-screen yarn add react-native-splash-screen re ...
- java编程思想读书笔记 第十二章 通过异常处理错误(下)
1.异常的限制 当覆盖方法的时候,仅仅能抛出在基类方法的异常说明里列出的那些异常. 这意味着,当基类使用的代码应用到其派生类对象的时候,一样能够工资,异常也不例外. 以下的样例是在编译时施加在异常上面 ...
- 单例模式 - GCD 、兼容ARC和MRC
单例模式 - GCD .兼容ARC和MRC 单例模式的作用: 1,能够保证在程序执行过程.一个类仅仅有一个实例,并且该实例易于供外界訪问 2,从而方便地控制了实例个数,并节约系统资源 单例模式的使用场 ...
- 前端自动化Grunt教程
最近在学习Bootstrap,了解一部分之后,发现Bootstrap使用了LESS,好嘛,开始学习LESS,LESS了解部分,发现自动编译工具Grunt,了解Grunt过程发现需要使用node.js的 ...
- HTMLTestRunner 异常输出中文乱码
1.在代码中加入下面的代码并保存: # -.- coding:utf-8 -.- import sys reload(sys) sys.setdefaultencoding('utf-8') 2.找到 ...
- linux 下gtest 安装
cd gtest_dir //解压后的目录 mkdir mybuild # Create a directory to hold the build output. cd mybuild cmake ...
- sprint3 【每日scrum】 TD助手站立会议第七天
站立会议 组员 昨天 今天 困难 签到 刘铸辉 (组长) 在日历各个事件上都增加闹钟显示,并将数据传递给日程和时间表 调整闹钟和整个项目的显示效果,最后做出了微信界面滑动的显示效果 闹钟在广播协议的时 ...
- Android的View 事件传递
欢迎转载,请附出处: http://blog.csdn.net/as02446418/article/details/47422891 1.基础知识 (1) 全部 Touch 事件都被封装成了 Mot ...