SpringBoot第十一篇:SpringBoot+MyBatis+Thymelaf实现CRUD
作者:追梦1819
原文:https://www.cnblogs.com/yanfei1819/p/10936304.html
版权声明:本文为博主原创文章,转载请附上博文链接!
引言
总结前面几章,我们了解了 SpringBoot 的基本用法及其配置,整合各大 ORM 框架,并了解了 Thymelaf 的基本用法。
本章将综合前面的知识,做一个完整Java web 的增删改查的示例。一来是对知识的整合,二来是考虑到很多读者是新手,一个完整的示例可能更加有助于其对 SpringBoot 的理解和掌握。
前面的ORM 框架有多种,本章中选取的是 MyBatis(没有使用 MyBatis 相关插件) ,作者比较喜欢该框架,同时在行业中的应用也很广泛。
版本信息
- JDK:1.8
- SpringBoot :2.1.4.RELEASE
- maven:3.3.9
- MyBatis:2.0.1
- Thymelaf:2.1.4.RELEASE
- IDEA:2019.1.1
准备工作
初始化数据库
本示例中,建立手机表,字段包括:名称、价格、颜色和生产日期。
SET NAMES utf8mb4;

SET FOREIGN_KEY_CHECKS = 0;

CREATE TABLE `mobile_phone`  (

  `id` int(11) NOT NULL AUTO_INCREMENT COMMENT 'id',

  `name` varchar(20) CHARACTER SET utf8 COLLATE utf8_general_ci NOT NULL COMMENT '名称',

  `price` decimal(7, 2) NOT NULL COMMENT '价格',

  `color` varchar(10) CHARACTER SET utf8 COLLATE utf8_general_ci NOT NULL COMMENT '颜色',

  `production_date` varchar(255) CHARACTER SET latin1 COLLATE latin1_swedish_ci NOT NULL COMMENT '生产日期',

  PRIMARY KEY (`id`) USING BTREE

) ENGINE = InnoDB AUTO_INCREMENT = 3 CHARACTER SET = latin1 COLLATE = latin1_swedish_ci ROW_FORMAT = Compact;

INSERT INTO `mobile_phone` VALUES (1, '苹果', 6988.00, '银色', '2018-12-12');

INSERT INTO `mobile_phone` VALUES (2, '华为', 3988.00, '白色', '2019-12-09');

SET FOREIGN_KEY_CHECKS = 1;
创建项目
以下是作者用 idea 创建的示例项目:

项目结构是作者的个人习惯,基本也符合 Java Web 的分层结构。下面也再次说明一下项目结构的含义:
com.yanfei1819.springbootmybatisthymeleafdemo.db.dao项目的持久化层,与数据库交互;
com.yanfei1819.springbootmybatisthymeleafdemo.db.dto与数据库交互的实体类;
com.yanfei1819.springbootmybatisthymeleafdemo.entity.response接口返回的参数实体类;
com.yanfei1819.springbootmybatisthymeleafdemo.entity.vo与页面交互的实体类;
com.yanfei1819.springbootmybatisthymeleafdemo.service项目业务层的接口和实现类;
com.yanfei1819.springbootmybatisthymeleafdemo.web.controller项目的 controller 层,外部直接访问;
com.yanfei1819.springbootmybatisthymeleafdemo.SpringbootMybatisThymeleafDemoApplication项目入口启动类;
\src\main\resources\static存放项目静态资源文件;
\src\main\resources\templatesSpringBoot 默认的模板引擎存放位置(可自定义)。
代码说明
1、 代码是按照作者的以往的编写习惯写的,并非标准,仅供大家参考;
2、 示例中的代码,都是严格按照分层的,包括数据接收的实体类;
3、 有读者有疑问,项目中为什么会有两个属性完全一致的实体类,xxxDTO 和 xxxVO ?其实这是为了增加项目的扩展性和健壮性而设的,xxxDTO 与数据库交互,xxxVO 与页面交互,严格分层了。其实实体类的种类根据项目规模大小而定,项目越大,可能定义的实体类的种类越多。名称可以参照《阿里巴巴Java开发手册》:

4、 示例代码,作者虽然尽量遵守了代码规范,但是由于篇幅所限,还是简化了逻辑,只演示了基本的功能。时间项目中的业务逻辑可能比这个复杂很多,比如,实际项目中可能有分页查询、条件查询、排序等。所以读者要注意;
5、 在本文中,通用由于篇幅的原因,只列出示例中的核心代码,如果读者想获取完整的代码,可以移步到 本人的GitHub 进行下载;
6、 示例中只做了功能的演示,没有 CSS 样式,读者可自行添加。
综合使用
一、引入 maven 依赖:
<dependencies>

    <dependency>

        <groupId>org.springframework.boot</groupId>

        <artifactId>spring-boot-starter-web</artifactId>

    </dependency>

    <dependency>

        <groupId>org.mybatis.spring.boot</groupId>

        <artifactId>mybatis-spring-boot-starter</artifactId>

        <version>2.0.1</version>

    </dependency>

    <dependency>

        <groupId>org.springframework.boot</groupId>

        <artifactId>spring-boot-starter-thymeleaf</artifactId>

    </dependency>

    <dependency>

        <groupId>mysql</groupId>

        <artifactId>mysql-connector-java</artifactId>

        <scope>runtime</scope>

    </dependency>

</dependencies>
二、配置相关的信息:
### 数据库信息

spring.datasource.driver-class-name=com.mysql.jdbc.Driver

spring.datasource.url=jdbc:mysql://localhost:3306/test?serverTimezone=GMT%2B8

spring.datasource.username=root

spring.datasource.password=root

### 模板引擎

spring.thymeleaf.servlet.content-type=text/html

spring.thymeleaf.prefix=classpath:/templates/

spring.thymeleaf.suffix=.html

### 驼峰命名法转换

mybatis.configuration.map-underscore-to-camel-case=true
其余的信息,可自行配置。
三、创建 db 层:
实体类:
public class MobilePhoneDTO {

    private Long id;

    private String name;

    private Double price;

    private String color;

    private String productionDate;

	// get/set 省略

}
dao类:
public interface MobilePhoneDAO {

    @Select("select * from mobile_phone ")

    List<MobilePhoneDTO> listMobilePhones();

    @Select("select * from mobile_phone where id = #{id}")

    MobilePhoneDTO getMobilePhoneById(Long id);

    @Update("insert into mobile_phone(`name`,price,color,production_date) values(#{name},#{price},#{color},#{productionDate}")

    int insertMobilePhone(MobilePhoneDTO dto);

    @Update("UPDATE mobile_phone set `name`=#{name},price=#{price},color=#{color},production_date=#{productionDate} WHERE id=#{id}")

    int updateMobilePhone(MobilePhoneDTO dto);

    @Delete("DELETE FROM mobile_phone WHERE id = #{id}")

    int deleteMobilePhoneById(Long id);

}
四、创建 service 层:
接口:
public interface MobilePhoneService {

    List<MobilePhoneVO> listMobilePhones();

    MobilePhoneVO getMobilePhoneById(Long id);

    BaseResponse updateMobilePhone(MobilePhoneVO vo);

    BaseResponse insertMobilePhone(MobilePhoneVO vo);

    BaseResponse deleteMobilePhoneById(Long id);

}
实现类:
@Service

public class MobilePhoneServiceImpl implements MobilePhoneService {

    @Autowired

    private MobilePhoneDAO mobilePhoneDAO;

    @Override

    public List<MobilePhoneVO> listMobilePhones() {

        List<MobilePhoneDTO> dtos = mobilePhoneDAO.listMobilePhones();

        List<MobilePhoneVO> vos = new ArrayList<>();

        for (MobilePhoneDTO dto : dtos) {

            MobilePhoneVO vo = new MobilePhoneVO();

            BeanUtils.copyProperties(dto,vo);

            vos.add(vo);

        }

        return vos;

    }

    @Override

    public MobilePhoneVO getMobilePhoneById(Long id) {

        MobilePhoneDTO dto = mobilePhoneDAO.getMobilePhoneById(id);

        MobilePhoneVO vo = new MobilePhoneVO();

        BeanUtils.copyProperties(dto,vo);

        return vo;

    }

    @Override

    public BaseResponse updateMobilePhone(MobilePhoneVO vo) {

        MobilePhoneDTO dto = new MobilePhoneDTO();

        BeanUtils.copyProperties(vo,dto);

        int updateCount = mobilePhoneDAO.updateMobilePhone(dto);

        if(updateCount<1){

            return new BaseResponse("数据更新失败");

        }

        return new BaseResponse();

    }

    @Override

    public BaseResponse insertMobilePhone(MobilePhoneVO vo) {

        MobilePhoneDTO dto = new MobilePhoneDTO();

        BeanUtils.copyProperties(vo,dto);

        int insertCount = mobilePhoneDAO.insertMobilePhone(dto);

        if(insertCount<1){

            return new BaseResponse("数据插入失败");

        }

        return new BaseResponse();

    }

    @Override

    public BaseResponse deleteMobilePhoneById(Long id) {

        int deleteCount = mobilePhoneDAO.deleteMobilePhoneById(id);

        if(deleteCount<1){

            return new BaseResponse("数据删除失败");

        }

        return new BaseResponse();

    }

}
以上的实现中,包含了增删改查等功能。
此处为了更加友好的返回数值,增加了 BaseResponse 类,该类是:
public class BaseResponse<T> {

    private Integer code;

    private String msg;

    private T data;

    // set/get 省略

    public static BaseResponse defaultNo(String msg) {

        return new BaseResponse(1,msg);

    }

    public static BaseResponse defaultOk() {

        return new BaseResponse();

    }

    public BaseResponse() {

        this.code = 0;

        this.msg = "success";

    }

    public BaseResponse(String msg) {

        this.code = 1;

        this.msg = msg;

    }

    public BaseResponse(T data) {

        this.data = data;

        this.code = 0;

        this.msg = "success";

    }

    public BaseResponse(Integer code, String msg){

        this.code = code;

        this.msg = msg;

    }

}
细心的读者可能会发现以上的一个细节,有的方法返回了 BaseResponse,但是有的方法直接返回了页面的实体类 MobilePhoneVO。
此处为了做演示,特意做了两种返回参数处理情况。通常情况下,我们在开发前后端分离项目的时候,都会将返回的数值封装为 json 格式,以便后端可以与 PC 端和 APP 端同时进行交互。如果非前后端分离,那基本就不做要求了。
不过,作者给大家的建议是,能统一格式时尽量统一,代码看起来也更加优雅一些。
五、创建 controller 层:
@Controller

@RequestMapping("/mobile/phone")

public class MobilePhoneController {

    @Autowired

    private MobilePhoneService service;

    @GetMapping("/listMobilePhones")

    public String listMobilePhones(Model model){

        List<MobilePhoneVO> vos = service.listMobilePhones();

        model.addAttribute("response",vos);

        return "mobilephoneList";

    }

    @GetMapping("/get/{id}")

    @ResponseBody

    public BaseResponse getMobilePhoneById(@PathVariable Long id){

        MobilePhoneVO vo = service.getMobilePhoneById(id);

        return new BaseResponse(vo);

    }

    @PostMapping("/insertMobilePhone")

    @ResponseBody

    public BaseResponse insertMobilePhone(@RequestBody MobilePhoneVO vo){

        return service.insertMobilePhone(vo);

    }

    // 进入编辑页面

    @GetMapping("/toEditMobilePhone")

    public String toAddMobilePhone(Model model,Long id){

        MobilePhoneVO vo = service.getMobilePhoneById(id);

        model.addAttribute("vo",vo);

        return "toEditMobilePhone";

    }

    @PostMapping("/updateMobilePhone")

    @ResponseBody

    public String updateMobilePhone(@RequestBody MobilePhoneVO vo){

        service.updateMobilePhone(vo);

        return "redirect:mobilephoneList"; // 跳转至列表页

    }

    @GetMapping("/delete/{id}")

    @ResponseBody

    public BaseResponse deleteMobilePhoneById(@PathVariable Long id){

        return service.deleteMobilePhoneById(id);

    }

}
controller 层包括增删改查接口,同时提供页面跳转的接口(此处只做了编辑功能,其余的都类似)。在做增删改后,一般是跳转至列表页面。当然,你也可以加入其它的交互逻辑。
六、创建页面:
列表页 mobilephoneList:
<!DOCTYPE html>

<html lang="en" xmlns:th="http://www.thymeleaf.org">

<head>

    <meta http-equiv="Content-Type" content="text/html; charset=UTF-8">

    <meta name="viewport" content="width=device-width, initial-scale=1, shrink-to-fit=no">

    <meta name="description" content="">

    <meta name="author" content="">

    <title>追梦1819的SpringBoot教程</title>

    <style>

        table, table tr th, table tr td {

            border: 1px solid #0094ff;

        }

    </style>

</head>

<body>

<div class="container-fluid">

    <div class="row">

        <main role="main">

            <div class="content_bottom_right" id="mobilephoneList">

                <div class="input-group">

                    <table class="table text-nowrap imagetable">

                        <thead>

                        <tr>

                            <th>序号</th>

                            <th>名称</th>

                            <th>价格</th>

                            <th>颜色</th>

                            <th>生产日期</th>

                            <th>操作</th>

                        </tr>

                        </thead>

                        <tbody th:each="mobilephone,item:${response}">

                        <tr>

                            <td>[[${item.count}]]</td>

                            <td>[[${mobilephone.name}]]</td>

                            <td>[[${mobilephone.price}]]</td>

                            <td>[[${mobilephone.color}]]</td>

                            <td>[[${mobilephone.productionDate}]]</td>

                            <td>

                                <a>详情</a>

                                <a th:href="@{/mobile/phone/toEditMobilePhone(id=${mobilephone.id})}">编辑</a>

                                <a>删除</a>

                            </td>

                        </tr>

                        </tbody>

                    </table>

                </div>

            </div>

        </main>

    </div>

</div>

</body>

</html>
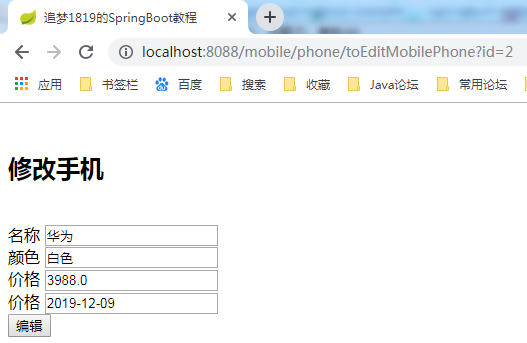
添加页:
<!DOCTYPE html>

<html lang="en" xmlns:th="http://www.thymeleaf.org">

<head>

    <meta http-equiv="Content-Type" content="text/html; charset=UTF-8">

    <meta name="viewport" content="width=device-width, initial-scale=1, shrink-to-fit=no">

    <meta name="description" content="">

    <meta name="author" content="">

    <title>追梦1819的SpringBoot教程</title>

</head>

<body class="container">

<br/>

<h2>修改手机</h2>

<br/>

<div>

    <form class="form-horizontal"  th:action="@{/mobile/phone/updateMobilePhone}" th:object="${vo}"  method="post">

        <div>

            <label>名称</label>

            <input name="name" id="name" th:value="*{name}">

        </div>

        <div>

            <label>颜色</label>

            <input name="color" id="color" th:value="*{color}">

        </div>

        <div>

            <label>价格</label>

            <input name="price" id="price" th:value="*{price}">

        </div>

        <div>

            <label>价格</label>

            <input name="productionDate" id="productionDate" th:value="*{productionDate}">

        </div>

        <input type="submit" value="添加"/>

    </form>

</div>

</body>

</html>
以上页面说明几点:
- 使用 thymelaf 模板引擎,页面必须添加
xmlns:th="http://www.thymeleaf.org"; - 为了简化代码,以上只做了编辑页,其余的详情什么的,都是相同的用法;
- thymelaf 可以与其他框架集成,比如 bootstrap、JQuery 等。
最后,可以看看效果:

最后,补充一些关于thymelaf常用的属性值配置:
# THYMELEAF (ThymeleafAutoConfiguration)

#开启模板缓存(默认值:true)

spring.thymeleaf.cache=true

#Check that the template exists before rendering it.

spring.thymeleaf.check-template=true

#检查模板位置是否正确(默认值:true)

spring.thymeleaf.check-template-location=true

#Content-Type的值(默认值:text/html)

spring.thymeleaf.content-type=text/html

#开启MVC Thymeleaf视图解析(默认值:true)

spring.thymeleaf.enabled=true

#模板编码

spring.thymeleaf.encoding=UTF-8

#要被排除在解析之外的视图名称列表,用逗号分隔

spring.thymeleaf.excluded-view-names=

#要运用于模板之上的模板模式。另见StandardTemplate-ModeHandlers(默认值:HTML5)

spring.thymeleaf.mode=HTML5

#在构建URL时添加到视图名称前的前缀(默认值:classpath:/templates/)

spring.thymeleaf.prefix=classpath:/templates/

#在构建URL时添加到视图名称后的后缀(默认值:.html)

spring.thymeleaf.suffix=.html

#Thymeleaf模板解析器在解析器链中的顺序。默认情况下,它排第一位。顺序从1开始,只有在定义了额外的TemplateResolver Bean时才需要设置这个属性。

spring.thymeleaf.template-resolver-order=

#可解析的视图名称列表,用逗号分隔

spring.thymeleaf.view-names=
总结
至此,基本完成了 SpringBoot + MyBatis + Thymelaf 的综合演示。功能很简单,用法也很简单,只不过做了整体的综合。本章中演示的 ORM 框架是 MyBatis,读者可以自行将 SpringBoot + Thymelaf + 其他 ORM 框架整合,以加深理解。
源码:我的GitHub

SpringBoot第十一篇:SpringBoot+MyBatis+Thymelaf实现CRUD的更多相关文章
- 从.Net到Java学习第十一篇——SpringBoot登录实现
从.Net到Java学习系列目录 通过前面10篇文章的学习,相信我们对SpringBoot已经有了一些了解,那么如何来验证我们的学习成果呢?当然是通过做项目来证明啦!所以从这一篇开始我将会对之前自己做 ...
- SpringBoot第二十一篇:整合ActiveMQ
作者:追梦1819 原文:https://www.cnblogs.com/yanfei1819/p/11190048.html 版权声明:本文为博主原创文章,转载请附上博文链接! 引言 前一章节中 ...
- springboot(二十一):SpringBoot使用Mybatis注解开发教程-分页-动态sql
https://blog.csdn.net/KingBoyWorld/article/details/78948304
- SpringBoot系列十一:SpringBoot整合Restful架构(使用 RestTemplate 模版实现 Rest 服务调用、Swagger 集成、动态修改日志级别)
声明:本文来源于MLDN培训视频的课堂笔记,写在这里只是为了方便查阅. 1.概念:SpringBoot整合Restful架构 2.背景 Spring 与 Restful 整合才是微架构的核心,虽然在整 ...
- Springboot 系列(十一)使用 Mybatis(自动生成插件) 访问数据库
1. Springboot mybatis 介绍 MyBatis 是一款优秀的持久层框架,它支持定制化 SQL.存储过程以及高级映射.MyBatis 避免了几乎所有的 JDBC 代码和手动设置参数获取 ...
- 第一篇 Springboot + Web MVC + MyBatis + 简单UI + Thymeleaf实现
源码链接:https://pan.baidu.com/s/1-LtF56dnCM277v5lILRM7g 提取码:c374 第二篇 Springboot mybatis generate根据数据库表自 ...
- SpringBoot第六篇:整合通用Mapper
作者:追梦1819 原文:https://www.cnblogs.com/yanfei1819/p/10876339.html 版权声明:本文为博主原创文章,转载请附上博文链接! 引言 在以往的项 ...
- SpringBoot第二十三篇:安全性之Spring Security
作者:追梦1819 原文:https://www.cnblogs.com/yanfei1819/p/11350255.html 版权声明:本文为博主原创文章,转载请附上博文链接! 引言 系统的安全 ...
- SpringBoot第七篇:整合Mybatis-Plus
作者:追梦1819 原文:https://www.cnblogs.com/yanfei1819/p/10881666.html 版权声明:本文为博主原创文章,转载请附上博文链接! 引言 一看这个名 ...
随机推荐
- Python数据结构之列表、元组及字典
一位大牛Niklaus Wirth曾有一本书,名为<Algorithms+Data Structures=Programs>,翻译过来也就是算法+数据结构=程序.而本文就是介绍一下Pyth ...
- CTF 两道web整数溢出题目(猫咪银行和ltshop)
①猫咪银行: (2018中科大hackgame) 一开始给十个CTB,而flag需要20个CTB,我们需要理财赚够20个. 理财是只能买入TDSU才可以获得收益.我们先上来直接把CTB全部换成TDSU ...
- getshell不用英文数字 或者不用下划线
getshell不用英文字母和数字 上代码 实际代码没有echo strlen($code);我测试的时候加上去的 思路是eval执行getFlag函数. 过滤了字母和数字,长度得小于40 直接看pa ...
- Java学习之字符串类
String在Java中是一个类类型(非主类型),是一个不可被继承的final类,而且字符串对象是一个不可变对象.声明的String对象应该被分配到堆中,声明的变量名应该持有的是String对象的引用 ...
- 牛客多校第六场C
一个数很大,并不能预处理,所以要进行公式变换,存前一个的值就好 #include <bits/stdc++.h> using namespace std; typedef long lon ...
- SpringCloud Eureka参数配置项详解
SpringCloud Eureka参数配置项详解(转) Eureka涉及到的参数配置项数量众多,它的很多功能都是通过参数配置来实现的,了解这些参数的含义有助于我们更好的应用Eureka的各种功能,下 ...
- order by 对null的处理
[Oracle 结论] order by colum asc 时,null默认被放在最后order by colum desc 时,null默认被放在最前nulls first 时,强制null放在最 ...
- 【bzoj3277/bzoj3473】串/字符串 广义后缀自动机
题目描述 字符串是oi界常考的问题.现在给定你n个字符串,询问每个字符串有多少子串(不包括空串)是所有n个字符串中至少k个字符串的子串(注意包括本身). 输入 第一行两个整数n,k.接下来n行每行一个 ...
- [ZZOJ#31]类欧几里得
[ZZOJ#31]类欧几里得 试题描述 这是一道模板题. 给出 \(a, b, c, n\),请你求出 \(\sum_{x=0}^n{\lfloor \frac{a \cdot x + b}{c} \ ...
- Codeforces Round #281 (Div. 2) A 模拟
A. Vasya and Football time limit per test 2 seconds memory limit per test 256 megabytes input standa ...