
ceph使用对象网关
1. 介绍
三种验证客户端的方式选一种就行了
2. 安装
2.1 创建对象存储网关系统
步骤1:安装文档安装ceph
步骤2:初始化缓存网关
[root@node1 my-cluster]# ceph-deploy rgw create node1
[ceph_deploy.conf][DEBUG ] found configuration file at: /root/.cephdeploy.conf

[ceph_deploy.cli][INFO  ] Invoked (1.5.): /usr/bin/ceph-deploy rgw create node1

[ceph_deploy.cli][INFO  ] ceph-deploy options:

[ceph_deploy.cli][INFO  ]  username                      : None

[ceph_deploy.cli][INFO  ]  verbose                       : False

[ceph_deploy.cli][INFO  ]  rgw                           : [('node1', 'rgw.node1')]

[ceph_deploy.cli][INFO  ]  overwrite_conf                : False

[ceph_deploy.cli][INFO  ]  subcommand                    : create

[ceph_deploy.cli][INFO  ]  quiet                         : False

[ceph_deploy.cli][INFO  ]  cd_conf                       : <ceph_deploy.conf.cephdeploy.Conf instance at 0xe233f8>

[ceph_deploy.cli][INFO  ]  cluster                       : ceph

[ceph_deploy.cli][INFO  ]  func                          : <function rgw at 0xd67758>

[ceph_deploy.cli][INFO  ]  ceph_conf                     : None

[ceph_deploy.cli][INFO  ]  default_release               : False

[ceph_deploy.rgw][DEBUG ] Deploying rgw, cluster ceph hosts node1:rgw.node1

[node1][DEBUG ] connected to host: node1

[node1][DEBUG ] detect platform information from remote host

[node1][DEBUG ] detect machine type

[ceph_deploy.rgw][INFO  ] Distro info: CentOS Linux 7.3. Core

[ceph_deploy.rgw][DEBUG ] remote host will use systemd

[ceph_deploy.rgw][DEBUG ] deploying rgw bootstrap to node1

[node1][DEBUG ] write cluster configuration to /etc/ceph/{cluster}.conf

[node1][DEBUG ] create path recursively if it doesn't exist

[node1][INFO  ] Running command: ceph --cluster ceph --name client.bootstrap-rgw --keyring /var/lib/ceph/bootstrap-rgw/ceph.keyring auth get-or-create client.rgw.node1 osd allow rwx mon allow rw -o /var/lib/ceph/radosgw/ceph-rgw.node1/keyring

[node1][INFO  ] Running command: systemctl enable ceph-radosgw@rgw.node1

[node1][INFO  ] Running command: systemctl start ceph-radosgw@rgw.node1

[node1][INFO  ] Running command: systemctl enable ceph.target

[ceph_deploy.rgw][INFO  ] The Ceph Object Gateway (RGW) is now running on host node1 and default port
步骤3:验证是否安装成功并启动:
[root@node1 my-cluster]# lsof -i:7480
COMMAND PID USER FD TYPE DEVICE SIZE/OFF NODE NAME
radosgw 1075 ceph 27u IPv4 21579 0t0 TCP *:7480 (LISTEN)
2.2 初始化
创建一个用户
[root@node1 my-cluster]# sudo radosgw-admin user create --secret="123456" --uid="zhangsan" --display-name="zhangsan"
{

    "user_id": "zhangsan",

    "display_name": "dongwang",

    "email": "",

    "suspended": ,

    "max_buckets": ,

    "auid": ,

    "subusers": [],

    "keys": [

        {

            "user": "zhangsan",

            "access_key": "X26CBB6ZDSMHZEBRCYCI",

            "secret_key": ""

        }

    ],

    "swift_keys": [],

    "caps": [],

    "op_mask": "read, write, delete",

    "default_placement": "",

    "placement_tags": [],

    "bucket_quota": {

        "enabled": false,

        "max_size_kb": -,

        "max_objects": -

    },

    "user_quota": {

        "enabled": false,

        "max_size_kb": -,

        "max_objects": -

    },

    "temp_url_keys": []

}
3. 客户端对接
3.1 S3cmd客户端
步骤1:安装s3cmd
[root@node1 ~]# yum -y install s3cmd
步骤2:配置s3cmd
[root@node1 ~]# s3cmd --configure
Enter new values or accept defaults in brackets with Enter.

Refer to user manual for detailed description of all options.

Access key and Secret key are your identifiers for Amazon S3. Leave them empty for using the env variables.

Access Key: X26CBB6ZDSMHZEBRCYCI

Secret Key:

Default Region [US]:

Use "s3.amazonaws.com" for S3 Endpoint and not modify it to the target Amazon S3.

S3 Endpoint [s3.amazonaws.com]: node1:

Use "%(bucket)s.s3.amazonaws.com" to the target Amazon S3. "%(bucket)s" and "%(location)s" vars can be used

if the target S3 system supports dns based buckets.

DNS-style bucket+hostname:port template for accessing a bucket [%(bucket)s.s3.amazonaws.com]: buket

Encryption password is used to protect your files from reading

by unauthorized persons while in transfer to S3

Encryption password:

Path to GPG program [/usr/bin/gpg]:

When using secure HTTPS protocol all communication with Amazon S3

servers is protected from 3rd party eavesdropping. This method is

slower than plain HTTP, and can only be proxied with Python 2.7 or newer

Use HTTPS protocol [Yes]: No

On some networks all internet access must go through a HTTP proxy.

Try setting it here if you can't connect to S3 directly

HTTP Proxy server name:

New settings:

  Access Key: X26CBB6ZDSMHZEBRCYCI

  Secret Key:

  Default Region: US

  S3 Endpoint: node1:

  DNS-style bucket+hostname:port template for accessing a bucket: buket

  Encryption password:

  Path to GPG program: /usr/bin/gpg

  Use HTTPS protocol: False

  HTTP Proxy server name:

  HTTP Proxy server port:

Test access with supplied credentials? [Y/n] n

Save settings? [y/N] y

Configuration saved to '/root/.s3cfg'

[root@node1 ~]#
如果配置有误,修改/root/.s3cfg文件。
步骤3:增删改查:
[root@node1 my-cluster]# s3cmd mb s3://first_bucket

Bucket 's3://first_bucket/' created

[root@node1 my-cluster]# s3cmd -v  ls

-- :  s3://first_bucket

[root@node1 my-cluster]# echo "aaaaa" > file.txt

[root@node1 my-cluster]#  s3cmd put file.txt s3://first_bucket

upload: 'file.txt' -> 's3://first_bucket/file.txt'  [ of ]

  of    % in    1s     3.68 B/s  done

[root@node1 my-cluster]# s3cmd rb s3://first_bucket --force --recursive

WARNING: Bucket is not empty. Removing all the objects from it first. This may take some time...

delete: 's3://first_bucket/file.txt'

Bucket 's3://first_bucket/' removed
3.2 python客户端
安装客户端程序:
[root@node1 s3]# sudo yum -y install python-boto
写python实例:
#-- coding: utf- --

import boto

import boto.s3.connection

access_key = 'X26CBB6ZDSMHZEBRCYCI'

secret_key = ''

conn = boto.connect_s3(

    aws_access_key_id = access_key,

    aws_secret_access_key = secret_key,

    host = 'node1',port=,

    is_secure=False,

    calling_format = boto.s3.connection.OrdinaryCallingFormat()

)

bucket = conn.create_bucket('my-new-bucket')

for bucket in conn.get_all_buckets():

        print "{name}\t{created}".format(

                name = bucket.name,

                created = bucket.creation_date,

)
运行查看结果
[root@node1 s3]# python s3client.py
my-new-bucket 2018-10-19T06:23:18.313Z
从其他客户端查看结果
[root@node1 my-cluster]# s3cmd -v ls
2018-10-19 06:23 s3://my-new-bucket
3.3 Windows客户端
下载客户端:https://s3browser.com/download/s3browser-7-7-7.exe
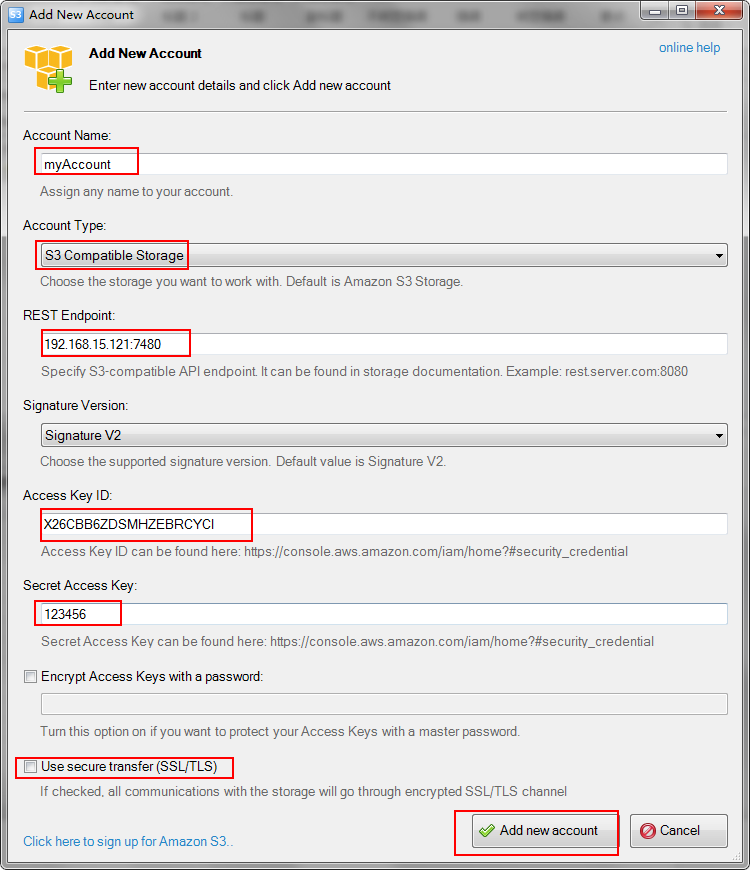
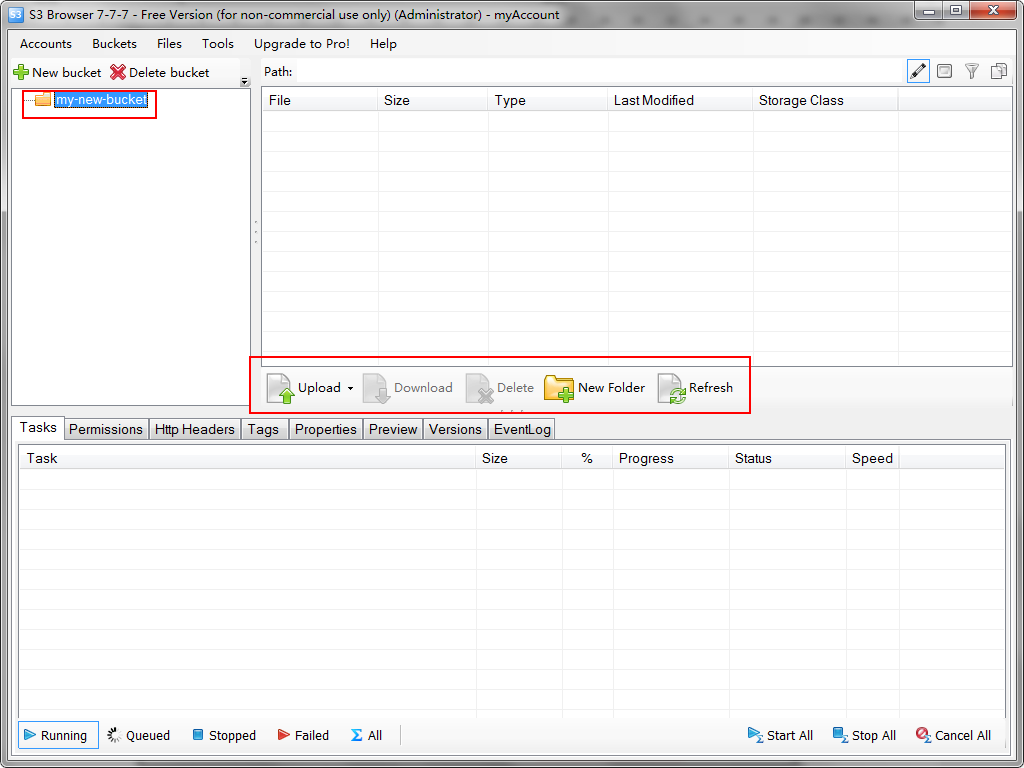
点击Add new account之后,就可以看到刚才python客户端建的buket了,使用客户端可以上传和下载文件了。
ceph使用对象网关的更多相关文章
- 002.RHCS-配置Ceph存储集群
一 前期准备 [kiosk@foundation0 ~]$ ssh ceph@serverc #登录Ceph集群节点 [ceph@serverc ~]$ ceph health #确保集群状态正常 H ...
- 006.Ceph对象存储基础使用
一 Ceph文件系统 1.1 概述 Ceph 对象网关是一个构建在 librados 之上的对象存储接口,它为应用程序访问Ceph 存储集群提供了一个 RESTful 风格的网关 . Ceph 对象存 ...
- 003.Ceph扩展集群
一 基础准备 参考<002.Ceph安装部署>文档部署一个基础集群. 二 扩展集群 2.1 扩展架构 需求:添加Ceph元数据服务器node1.然后添加Ceph Monitor和Ceph ...
- Ceph常用命令
目录 [1.环境准备] [2.部署管理] [3.集群扩容] [4.用户管理] [5.密钥环管理] [6.块设备管理] [7.快照管理] [8.参考链接] 简要说明: 最近心血来潮,对分布式存储感兴趣, ...
- ceph mimic版本 部署安装
ceph 寻址过程 1. file --- object映射, 把file分割成N个相同的对象 2. object - PG 映射, 利用静态hash得到objectID的伪随机值,在 "位 ...
- CEPH Object Gateway
参考文档: CEPH OBJECT GATEWAY:http://docs.ceph.com/docs/master/radosgw/ 一.环境准备 1. Ceph Object Gateway框架 ...
- ceph radosgw-admin的操作
常用操作: 生成一新用户: 在两个集群当中都创建相同的管理用户 radosgw-admin user create --uid=admin --display-name=admin --access_ ...
- ceph 分布式存储安装
[root@localhost ~]# rm -rf /etc/yum.repos.d/*.repo 下载阿里云的base源 [root@localhost ~]# wget -O /etc/yum. ...
- ceph应用情况分析
1.概述 ceph是分布式的开源存储系统,同时支持块存储.对象存储和文件系统,ceph可以满足高性能.高可靠性和高扩展等特性. 目前ceph作为开源分布式存储已经被大量使用,尤其是在云环境下的应用,下 ...
随机推荐
- Oarcle之序列
序列:是一种数据库对象,用来自动产生一组唯一的序号: 序列:是一种共享式的对象,多个用户可以共同使用序列中的序号. 创建序列 create sequence seq_emp_temp incremen ...
- 在 Azure 上部署 Kubernetes 集群
在实验.演示的时候,或者是生产过程中,我经常会需要运行一些 Docker 负载.虽然这在本地计算机上十分容易,但是当你要在云端运行的时候就有点困难了.相比于本地运行,在云端运行真的太复杂了.我尝试了几 ...
- 使用Python的库qrcode生成二维码
现在有很多二维码的生成工具,在线的,或者安装的软件,都可以进行生成二维码.今天我用Python的qrcode库生成二维码.需要预先安装 Image 库 安装 用pip安装 # pip install ...
- sys模块
#python run_case.py #在terminal中执行.py文件 在terminal中执行.py文件: 注: 无法使用terminal来打开那个文件 会显示如下:python: can't ...
- vue-cli3使用webpack-spritesmith配置雪碧图
一.背景问题 项目中如果有大量的小图标,如果不使用阿里的iconfont.UI给一个加一个,加一个引用一个,每个图标虽然很小,但是也是一次请求,每次请求都是消耗性能资源的. 二.解决思路 使用webp ...
- shell脚本-工作练习篇
瞎扯时间 人的惰性真的很难去戒掉,每天工作下班回家后,只想瘫倒在床上,玩玩手游,刷刷抖音,甚至看看无聊至极的“爽文”,对于学习.看书啥的,完全提不起兴趣,也许正是因为如此,我才显得这么平庸而无趣吧. ...
- Java过滤器Filter
过滤器 一. 简介 过滤器一般用于设置字符编码.登录验证.权限验证.敏感词过滤等,减少了代码的冗余,便于代码的复用,但是不一定是每个servlet都必须使用过滤器的. 二. 过滤器的工作流程 图片来源 ...
- Hello2 source analysis
在example目录下的web\servlet\hello2\src\main\java\javaeetutorial\hello2路径里可以找到hello2的GreetingServlet.java ...
- css3常用动效以及总结
(迁移自旧博客2017 08 06) CSS3 文本效果: box-shadow:盒子阴影,可以给卡片添加提高美化效果.可广泛应用于内容展示页面. <div class="card&q ...
- SpringBoot后台接收前台的字符串数据
需求 将前台传入的字符串数据转为int类型. 操作 在pom.xml中添加引用. <dependency> <groupId>org.apache.commons</gr ...