
React Native之通知栏消息提示(ios)
React Native之通知栏消息提示(ios)
一,需求分析与概述
详情请查看:React Native之通知栏消息提示(android)
二,极光推送注册与集成
2.1,注册
详情请查看:React Native之通知栏消息提示(android)
2.2,集成(ios)
第一步:安装
打开终端,进入项目根目录文件夹下,执行以下命令:
1  npm install jpush-react-native --save

2  jpush-react-native 1.4.2 版本以后需要同时安装 jcore-react-native

3  npm install jcore-react-native --save
第二步:配置
自动关联配置
1 # 针对性的link,避免之前手动配置的其它插件重复配置造成报错

2  react-native link jpush-react-native

3  react-native link jcore-react-native
执行完 link 项目后可能会出现报错,这没关系,打开Xcode手动配置一下
手动配置
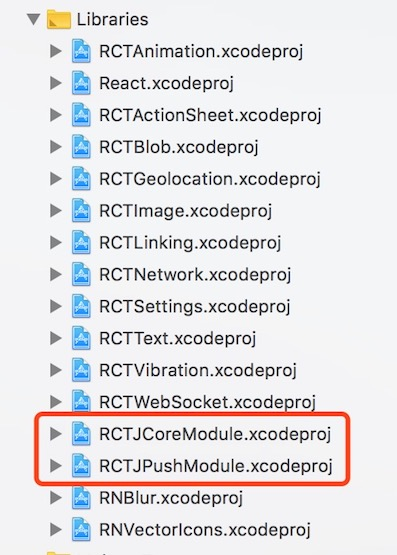
(1),检查Libraries文件夹下有没有RCTJpushModule.xcodproj和RCTJcoreModule.xcodproj文件,没有的话就添加文件,目录在项目文件夹下的:
 /node_modules/jpush-react-native/ios/RCTJPushModule.xcodeproj

 /node_modules/jcore-react-native/ios/RCTJCoreModule.xcodeproj
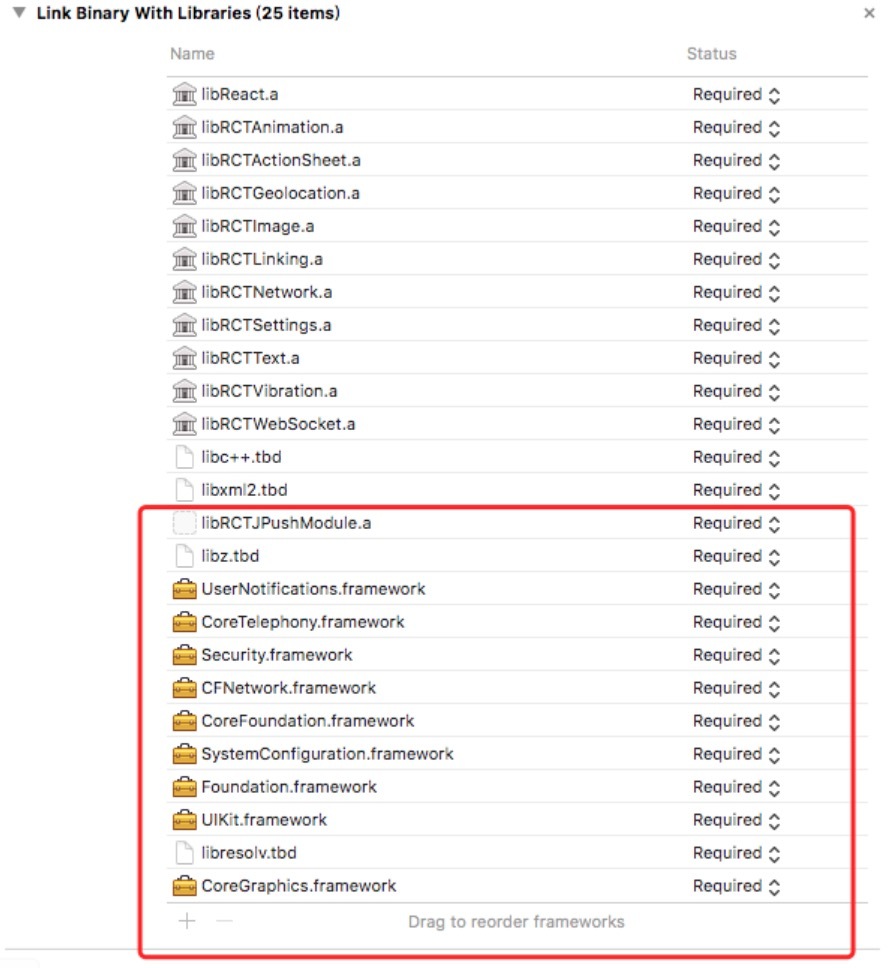
(2),在 iOS 工程 targets 的 General->Link Binary with Libraries 中加入如下库:
 libRCTJpushModule.a

 libRCTJcoreModule.a

 libz.tbd

 CoreTelephony.framework

 Security.framework

 CFNetwork.framework

 CoreFoundation.framework

 SystemConfiguration.framework

 Foundation.framework

 UIKit.framework

 UserNotifications.framework

 libresolv.tbd
(3),在AppDelegate.h文件里边添加如下代码:
 static NSString *appKey = @"";     //填写appkey

 static NSString *channel = @"nil";    //填写channel   一般为nil

 static BOOL isProduction = false;  //填写isProdurion  平时测试时为false ,生产时填写true
(4),在AppDelegate.m文件里边添加如下代码:
 /**

  * Copyright (c) 2015-present, Facebook, Inc.

  *声明部分

  */

 #import <RCTJPushModule.h>

 #ifdef NSFoundationVersionNumber_iOS_9_x_Max

 #import <UserNotifications/UserNotifications.h>

 #endif

 @implementation AppDelegate

 /**

  * Copyright (c) 2015-present, Facebook, Inc.

  *功能模块部分

  */

 - (void)application:(UIApplication *)application didRegisterForRemoteNotificationsWithDeviceToken:(NSData *)deviceToken

 {

   [JPUSHService registerDeviceToken:deviceToken];

 }
为了在收到推送点击进入应用程序能够获取该条件推送内容需要在AppDelegate.m的didReceiveRemoteNotification方法里面添加[[NSNotificationCenter defaultCenter] postNotificationName:kJPFDidReceiveRemoteNotification object:userInfo]方法
注意:这里需要在两个方法里面加一个是iOS7以前的一个是iOS7及以后的,如果AppDelegate.m没有这个两个方法则直接复制这两个方法,在iOS10的设备则可以使用JPush提供的两个方法
 - (void)application:(UIApplication *)application didReceiveRemoteNotification:(NSDictionary *)userInfo

 {

   [[NSNotificationCenter defaultCenter] postNotificationName:kJPFDidReceiveRemoteNotification object:userInfo];

 }

 //iOS 7 Remote Notification

 - (void)application:(UIApplication *)application didReceiveLocalNotification:(UILocalNotification *)notification

 {

   [[NSNotificationCenter defaultCenter] postNotificationName:kJPFDidReceiveRemoteNotification object: notification.userInfo];

 }

 // iOS 10 Support

 - (void)application:(UIApplication *)application didReceiveRemoteNotification:(NSDictionary *)userInfo fetchCompletionHandler:(void (^)   (UIBackgroundFetchResult))completionHandler

 {

   [[NSNotificationCenter defaultCenter] postNotificationName:kJPFDidReceiveRemoteNotification object:userInfo];

 }

 - (void)jpushNotificationCenter:(UNUserNotificationCenter *)center willPresentNotification:(UNNotification *)notification withCompletionHandler:(void (^)(NSInteger))completionHandler

 {

   NSDictionary * userInfo = notification.request.content.userInfo;

   if ([notification.request.trigger isKindOfClass:[UNPushNotificationTrigger class]]) {

     [JPUSHService handleRemoteNotification:userInfo];

     [[NSNotificationCenter defaultCenter] postNotificationName:kJPFDidReceiveRemoteNotification object:userInfo];

   }

   completionHandler(UNNotificationPresentationOptionAlert);

 }
在 didFinishLaunchingWithOptions方法里面添加如下代码:
 JPUSHRegisterEntity * entity = [[JPUSHRegisterEntity alloc] init];

   entity.types = UNAuthorizationOptionAlert|UNAuthorizationOptionBadge|UNAuthorizationOptionSound;

   [JPUSHService registerForRemoteNotificationConfig:entity delegate:self];

   [JPUSHService setupWithOption:launchOptions appKey:appKey channel:channel apsForProduction:isProduction];
(5),#import <RCTJPushModule.h>可能会报找不到的错误,需要在Build Settings->Search Paths->Header Search Paths添加代码:
$(SRCROOT)/../node_modules/jpush-react-native/ios/RCTJPushModule
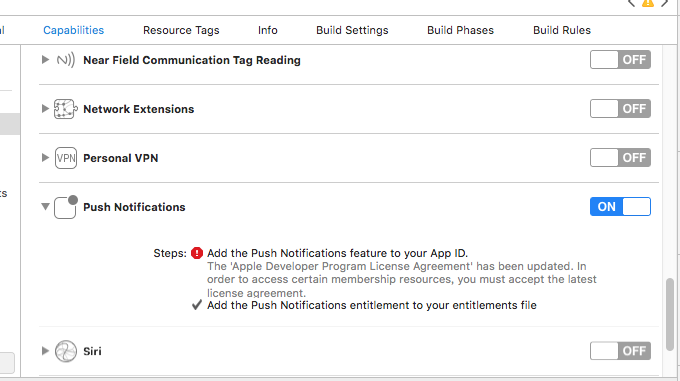
(6),在Capabilities中点开推送Push Notifications以及Background Modes中的Remote notifications
ios的推送证书申请可参考:react native极光推送android和ios证书申请
这样就基本完成了所有的配置。接下来就可以在 JS 中调用插件提供的 API 了。
三,使用与实现
3.1,使用
(1),在js中 1 import React, { PureComponent } from 'react';
 2 import {

 3   Linking,

 4   Alert

 5 } from 'react-native';

 6 import JPushModule from 'jpush-react-native'

 7

 8 ...

 9

10

11 componentDidMount() {

12 /****************************通知 start **************************************************/

13     if (Platform.OS === 'android') {

14       JPushModule.initPush()

15    // 新版本必需写回调函数

16       JPushModule.notifyJSDidLoad(resultCode => {

17         if (resultCode === 0) {

18         }

19       })

20     } else {

21       JPushModule.setupPush()

22     }

23     // 接收自定义消息

24     this.receiveCustomMsgListener = map => {

25       this.setState({

26         pushMsg: map.content

27       })

28       console.log('extras: ' + map.extras)

29     }

30

31         // 接收自定义消息JPushModule.addReceiveCustomMsgListener(this.receiveCustomMsgListener)

32     this.receiveNotificationListener = map => {

33       console.log('alertContent: ' + map.alertContent)

34       console.log('extras: ' + map.extras)

35     }

36     // 接收推送通知

37 JPushModule.addReceiveNotificationListener(this.receiveNotificationListener)

38  // 打开通知

39     this.openNotificationListener = map => {

40       // console.log('Opening notification!')

41     //  console.log('map.extra: ' + map.extras)

42      let webUrl= JSON.parse(map.extras).webUrl

43       let url = webUrl.replace(new RegExp("\/", 'g'), "/")

44       Linking.canOpenURL(url).then(supported => {

45         if (!supported) {

46           Alert.alert('您的系统不支持打开浏览器!')

47         } else {

48           return Linking.openURL(url);

49         }

50       }).catch(err => { });

51

52     }

53     JPushModule.addReceiveOpenNotificationListener(this.openNotificationListener)

54

55     // this.getRegistrationIdListener = registrationId => {

56     //   console.log('Device register succeed, registrationId ' + registrationId)

57     // }

58     // JPushModule.addGetRegistrationIdListener(this.getRegistrationIdListener)

59     /****************************通知 end **************************************************/

60

61

62   }

63   componentWillUnmount() {

64     JPushModule.removeReceiveCustomMsgListener(this.receiveCustomMsgListener)

65     JPushModule.removeReceiveNotificationListener(this.receiveNotificationListener)

66     JPushModule.removeReceiveOpenNotificationListener(this.openNotificationListener)

67     // JPushModule.removeGetRegistrationIdListener(this.getRegistrationIdListener)

68     // console.log('Will clear all notifications')

69     // JPushModule.clearAllNotifications()

70   }

71

72 }

73

74 ...
ios不支持的函数:
setBaseStyle () {

    if (Platform.OS === 'android') {

      JPushModule.setStyleBasic()

    } else {

      Alert.alert('iOS not support this function', '')

    }

  }

  setCustomStyle () {

    if (Platform.OS === 'android') {

      JPushModule.setStyleCustom()

    } else {

      Alert.alert('iOS not support this function', '')

    }
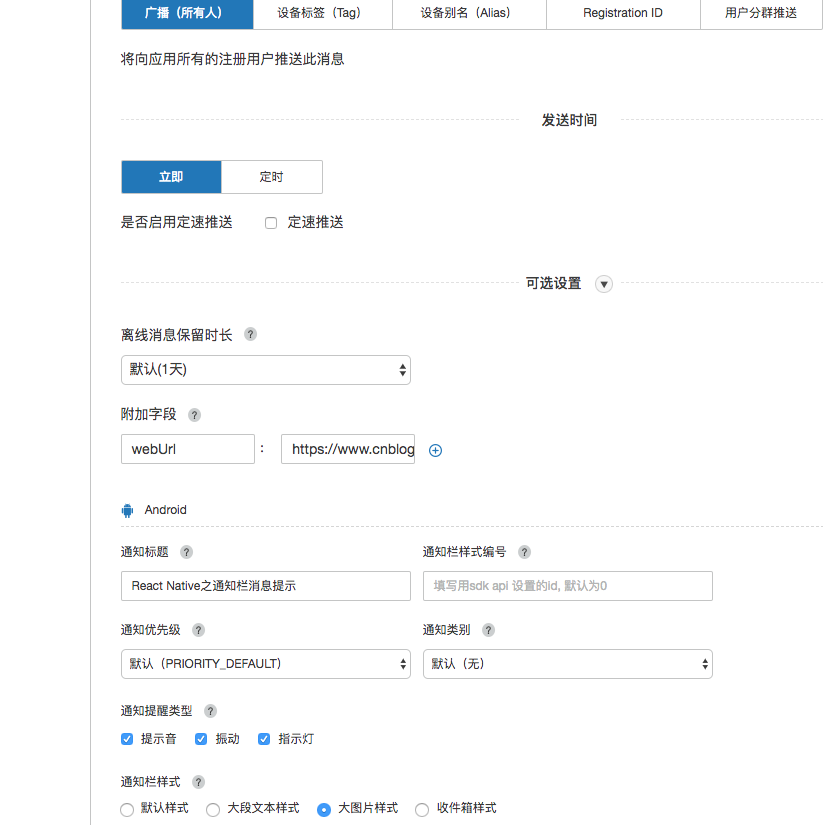
(2),在极光官网上设置与推送
React Native之通知栏消息提示(ios)的更多相关文章
- React Native之通知栏消息提示(android)
React Native之通知栏消息提示(android) 一,需求分析与概述 1.1,推送作为手机应用的基本功能,是手机应用的重要部分,如果自己实现一套推送系统费时费力,所以大部分的应用都会选择使用 ...
- React Native之配置URL Scheme(iOS Android)
React Native之配置URL Scheme(iOS Android) 一,需求分析 1.1,需要在网站中打开/唤起app,或其他app中打开app,则需要设置URL Scheme.比如微信的是 ...
- React Native发布APP之打包iOS应用
用React Native开发好APP之后,如何将APP发布以供用户使用呢?一款APP的发布流程无外乎:签名打包—>发布到各store这两大步骤.本文将向大家分享如何签名打包一款React Na ...
- react native 之 在现有的iOS工程中集成react native
在现有的iOS工程中集成react native, 或者说将react native引入到iOS 项目,是RN和iOS混合开发的必经之路 参考官网教程:https://reactnative.cn/d ...
- React Native 手工搭建环境 之iOS篇
常识 React native 开发服务器 在开发时,我们的框架是这样的:  当正式发布进入到生产环境时,开发服务器上所有的js文件将会被编译成包的形式,直接嵌入到客户端内.这时,已经不再需要开发服 ...
- [React Native] Writing Platform-Specific Components for iOS and Android in React Native
Learn to write components that render differently on iOS and Android, but present the same API. Firs ...
- React Native 简介:用 JavaScript 搭建 iOS 应用(2)
[编者按]本篇文章的作者是 Joyce Echessa--渥合数位服务创办人,毕业于台湾大学,近年来专注于协助客户进行 App 软体以及网站开发.本篇文章中,作者介绍通过 React Native 框 ...
- WebStorm开发工具设置React Native智能提示
最近在做React Native开发的时候,相信大家一般会使用WebStorm,Sublime,Atom等等开发工具.二之前搞前端的对WebStorm会很熟悉,WebStorm最新版是WebStorm ...
- 《React Native 精解与实战》书籍连载「iOS 平台与 React Native 混合开发」
此文是我的出版书籍<React Native 精解与实战>连载分享,此书由机械工业出版社出版,书中详解了 React Native 框架底层原理.React Native 组件布局.组件与 ...
随机推荐
- PHP的异常处理机制
1.PHP中异常的独特性 PHP中的异常的独特性,即PHP中的异常不同于主流语言C++.java中的异常.在Java中,异常是唯一的错误报告方式,而在PHP中却不是这样,而是把所有不正常的情况都视作了 ...
- 拯救老旧工程,记桥接SpringMVC与Stripes框架
背景: 公司基础设施部门推出了自己的微服务框架(以下简称M),要求所有业务应用都要接入进去,但坑爹的是M只提供了SpringMVC工程的support,对于采用Stripes作为MVC框架的应用并不支 ...
- 程序员50题(JS版本)(三)
程序11:判断101~200之间有多少个素数,并输出所有素数 for(var i=101,num=0;i<=200;i++){ for(var j=2;j<=i;j++){ if(i%j= ...
- Sublime 无法安装插件的解决办法
1,打开命令面板 Ctrl + Shift + P 输入:pi 回车 按回车后,出现异常如下图: 解决办法: 1,点击Preferences----Brows Packages ---会到安装目录 ...
- 一对多Excel自定义函数:SVLOOKUP
语法规则 该函数的语法规则如下: SVLOOKUP(lookup_value,table_array,col_index_num,nth_appearance,unique_value) 参数 简单说 ...
- 在java中写出完美的单例模式
1. 前言 单例(Singleton)应该是开发者们最熟悉的设计模式了,并且好像也是最容易实现的——基本上每个开发者都能够随手写出——但是,真的是这样吗? 作为一个Java开发者,也许你觉得自己对单例 ...
- SQL增删改查
1.增 INSERT INTO table_name VALUES (value1, value2,....) INSERT INTO table_name (列1, 列2,...) VALUES ( ...
- SQL Server 2008初次启动
一.关于安装 SQL Server 数据库的安装,经过自己的安装,总体还是比较容易,没有太多难度,安装包在网上也有很多,在此,就跳过安装的这一步. 二.初次启动SQL Server 安装完成数据库后, ...
- 宋宝华:关于Ftrace的一个完整案例【转】
Ftrace简介 Ftrace是Linux进行代码级实践分析最有效的工具之一,比如我们进行一个系统调用,出来的时间过长,我们想知道时间花哪里去了,利用Ftrace就可以追踪到一级级的时间分布. Ftr ...
- thinkphp v5.1 开发笔记
一.安装TP5.1 1.使用git安装 <1>下载Tp git clone https://github.com/top-think/think tp5 <2>安装核心库 gi ...