关于python调用zabbix api接口
因公司业务需要,引进了自动化运维,所用到的监控平台为zbbix3.2,最近正在学习python,计划使用python调用zabbix api接口去做些事情,如生成报表,我想最基本的是要取得zabbix中的数据,这是第一步,今天先体验了一把,已经成功获取得到部分数据,所以记录下来。
操作系统:win10
zabbix版本:3.2
python版本:2.7.14
IDE:PyCharm 2017.2.3
Build #PY-172.3968.37, built on September 1, 2017
Licensed to smile
JRE: 1.8.0_152-release-915-b11 amd64
JVM: OpenJDK 64-Bit Server VM by JetBrains s.r.o
1. user.login方法获取zabbix server的认证密钥。官方地址:https://www.zabbix.com/documentation/3.4/zh/manual/api/reference/user/login
python实现方法:
#!/usr/bin/env python2.7

#coding=utf-8

import json

import urllib2

# based url and required header

url = "http://192.168.0.217/zabbix/api_jsonrpc.php"

header = {"Content-Type":"application/json"}

# auth user and password

data = json.dumps(

{

   "jsonrpc": "2.0",

   "method": "user.login",

   "params": {

   "user": "Admin",

   "password": "zabbix"

},

"id": 0

})

# create request object

request = urllib2.Request(url,data)

for key in header:

   request.add_header(key,header[key])

# auth and get authid

try:

   result = urllib2.urlopen(request)

except urllib2.URLError as e:

   print "Auth Failed, Please Check Your Name AndPassword:",e.reason

else:

   response = json.loads(result.read())

   result.close()

   print"Auth Successful. The Auth ID Is:",response['result']
输出结果:

2.hostgroup.get方法获取所有主机组ID。把第一步获得的认证密钥填写到“auth”中,每次获取数据时都需要认证。此处是获取zabbix server上的所有主机组名称与ID号。
官方地址:https://www.zabbix.com/documentation/3.4/zh/manual/api/reference/hostgroup/get
python实现方法:
#!/usr/bin/env python2.7

#coding=utf-8

import json

import urllib2

# based url and required header

url = "http://192.168.0.217/zabbix/api_jsonrpc.php"

header = {"Content-Type":"application/json"}

# request json

data = json.dumps(

{

   "jsonrpc":"2.0",

   "method":"hostgroup.get",

   "params":{

       "output":["groupid","name"],

   },

   "auth":"4c38be0e3cda326c63e4f4be8f73a056", # theauth id is what auth script returns, remeber it is string

   "id":1,

})

# create request object

request = urllib2.Request(url,data)

for key in header:

   request.add_header(key,header[key])

# get host list

try:

   result = urllib2.urlopen(request)

except urllib2.URLError as e:

   if hasattr(e, 'reason'):

       print 'We failed to reach a server.'

       print 'Reason: ', e.reason

   elif hasattr(e, 'code'):

       print 'The server could not fulfill the request.'

       print 'Error code: ', e.code

else:

   response = json.loads(result.read())

   result.close()

   print "Number Of Hosts: ", len(response['result'])

   #print response

   for group in response['result']:

       print "Group ID:",group['groupid'],"\tGroupName:",group['name']
输出结果:

3.host.get方法获取单个主机组下所有的主机ID。把第二点中获取到的主机组id,填入到下面代码“groupids”中,即可获得该主机组下所有的主机id。
官方地址:https://www.zabbix.com/documentation/3.4/zh/manual/api/reference/host/get
python实现方法:
#!/usr/bin/env python2.7
#coding=utf-8
import json
import urllib2
# based url and required header
url = "http://192.168.0.217/zabbix/api_jsonrpc.php"
header = {"Content-Type":"application/json"}
# request json
data = json.dumps(
{
"jsonrpc":"2.0",
"method":"host.get",
"params":{
"output":["hostid","name"],
"groupids":"",
},
"auth":"4c38be0e3cda326c63e4f4be8f73a056", # theauth id is what auth script returns, remeber it is string
"id":1,
})
# create request object
request = urllib2.Request(url,data)
for key in header:
request.add_header(key,header[key])
# get host list
try:
result = urllib2.urlopen(request)
except urllib2.URLError as e:
if hasattr(e, 'reason'):
print 'We failed to reach a server.'
print 'Reason: ', e.reason
elif hasattr(e, 'code'):
print 'The server could not fulfill the request.'
print 'Error code: ', e.code
else:
response = json.loads(result.read())
result.close()
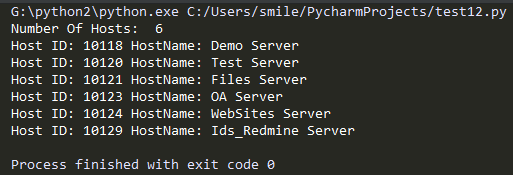
print "Number Of Hosts: ", len(response['result'])
for host in response['result']:
print "Host ID:",host['hostid'],"HostName:",host['name']
输出结果:
4.itemsid.get方法获取单个主机下所有的监控项ID。根据第三点中获取到的所有主机id与名称,找到你想要获取的主机id,填写到下面代码“hostids”中,获取它下面的所有监控项。
官方地址:https://www.zabbix.com/documentation/3.4/zh/manual/api/reference/item/get
python实现方法:
#!/usr/bin/env python2.7
#coding=utf-8
import json
import urllib2
# based url and required header
url = "http://192.168.0.217/zabbix/api_jsonrpc.php"
header = {"Content-Type":"application/json"}
# request json
data = json.dumps(
{
"jsonrpc":"2.0",
"method":"item.get",
"params":{
"output":["itemids","key_"],
"hostids":"",
},
"auth":"4c38be0e3cda326c63e4f4be8f73a056", # theauth id is what auth script returns, remeber it is string
"id":1,
})
# create request object
request = urllib2.Request(url,data)
for key in header:
request.add_header(key,header[key])
# get host list
try:
result = urllib2.urlopen(request)
except urllib2.URLError as e:
if hasattr(e, 'reason'):
print 'We failed to reach a server.'
print 'Reason: ', e.reason
elif hasattr(e, 'code'):
print 'The server could not fulfill the request.'
print 'Error code: ', e.code
else:
response = json.loads(result.read())
result.close()
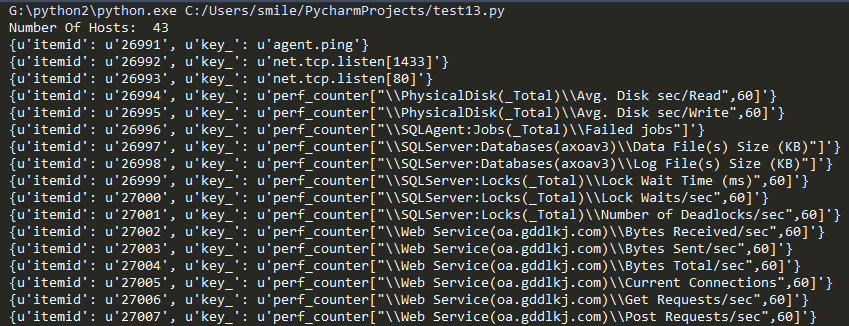
print "Number Of Hosts: ", len(response['result'])
for host in response['result']:
print host
#print "Host ID:",host['hostid'],"HostName:",host['name']
输出结果:
5.history.get方法获取单个监控项的历史数据。根据第4点获取到的所有items id的值,找到想要监控的那项,填写到下面代码“itemids”中,获取它的历史数据。
官方地址:https://www.zabbix.com/documentation/3.4/zh/manual/api/reference/history/get
python实现方法:
#!/usr/bin/env python2.7
#coding=utf-8
import json
import urllib2
# based url and required header
url = "http://192.168.0.217/zabbix/api_jsonrpc.php"
header = {"Content-Type":"application/json"}
# request json
data = json.dumps(
{
"jsonrpc":"2.0",
"method":"history.get",
"params":{
"output":"extend",
"history":3,
"itemids":"",
"limit":10
},
"auth":"4c38be0e3cda326c63e4f4be8f73a056", # theauth id is what auth script returns, remeber it is string
"id":1,
})
# create request object
request = urllib2.Request(url,data)
for key in header:
request.add_header(key,header[key])
# get host list
try:
result = urllib2.urlopen(request)
except urllib2.URLError as e:
if hasattr(e, 'reason'):
print 'We failed to reach a server.'
print 'Reason: ', e.reason
elif hasattr(e, 'code'):
print 'The server could not fulfill the request.'
print 'Error code: ', e.code
else:
response = json.loads(result.read())
result.close()
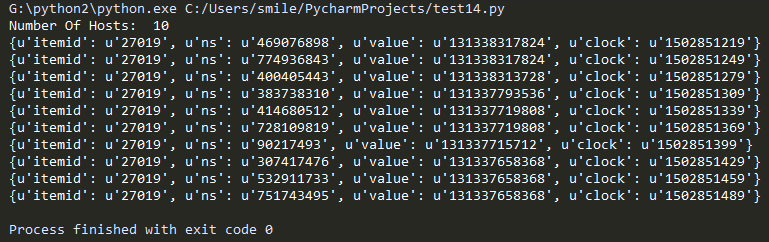
print "Number Of Hosts: ", len(response['result'])
for host in response['result']:
print host
#print "Host ID:",host['hostid'],"HostName:",host['name']
输出结果:
关于python调用zabbix api接口的更多相关文章
- python 调用zabbix api接口实现主机的增删改查
python程序调用zabbix系统的api接口实现对zabbix_server端主机的增删改查,使用相关功能时候,需要打开脚本中的相关函数. 函数说明: zabbixtools() 调用zabbi ...
- python 调用zabbix api实现查询主机信息,输出所有主机ip
之前发现搜索出来的主机调用zabbix api信息都不是那么明确,后来通过zabbix官方文档,查到想要的api信息,随后写一篇自己这次项目中用到的api. #!/usr/bin/env python ...
- 使用Python调用Zabbix API
Zabbix API官方文档: https://www.zabbix.com/documentation/4.0/zh/manual/api 1.向 api_jsonrpc.php 发送HTTP_PO ...
- Python调用zabbix API批量添加主机 (读取Excel)
本文转载自:http://blog.mreald.com/178 Zabbix可以通过自发现添加主机,不过有时候不准确,通过API添加会更加准确! 脚本使用的跟zabbix相关的内容.参考的是zabb ...
- python调用zabbix接口实现Action配置
要写这篇博客其实我的内心是纠结的,老实说,我对zabbix的了解实在不多.但新公司的需求不容置疑,当我顶着有两个头大的脑袋懵懵转入运维领域时,面前摆着两百多组.上千台机器等着写入zabbix监控的需求 ...
- 使用Python调用Flickr API抓取图片数据
Flickr是雅虎旗下的图片分享网站,上面有全世界网友分享的大量精彩图片,被认为是专业的图片网站.其API也很友好,可以实现多种功能.这里我使用了Python调用其API获得了大量的照片数据.需要注意 ...
- 03: zabbix API接口 对 主机、主机组、模板、应用集、监控项、触发器等增删改查
目录:Django其他篇 01: 安装zabbix server 02:zabbix-agent安装配置 及 web界面管理 03: zabbix API接口 对 主机.主机组.模板.应用集.监控项. ...
- Http下的各种操作类.WebApi系列~通过HttpClient来调用Web Api接口
1.WebApi系列~通过HttpClient来调用Web Api接口 http://www.cnblogs.com/lori/p/4045413.html HttpClient使用详解(java版本 ...
- 基于python调用libvirt API
基于python调用libvirt API 1.程序代码 #!/usr/bin/python import libvirt import sys def createConnection(): con ...
随机推荐
- iOS \U7ea2 乱码 转换
通常网络请求的数据,如果不做处理在输出时显示是 \U 之类的编码的: 不需要导入别的类库解决方法 - (NSString *)replaceUnicode:(NSString *)unicodeStr ...
- 微信小程序 - 各种示例
示例更新(后续持续更新): 最后一次更新:2018-11-7 小程序-地图显示(调用高德地图.腾讯App) - (2018-11-1) 小程序-上传图片(上传.预览.展示.删除) - (2018-11 ...
- Hadoop内部的限流机制
前言 文章标题一開始提及到了一个令人感到有些抽象又显得有些非常"大"的词,限流.事实上这个词语在非常多行业都能够用到,比方近期春运,各大主要城市,火车站,地铁站都要做到限流吧,避免 ...
- STS 自动生成 getter 和 setter
1.Source -- Generate Getters and Setters
- 数制转换-栈的应用(C++实现)
本程序实现的是十进制与不同进制之间的的数据转换,利用的数据结构是栈,基本数学方法辗转相除法. conversion.h #include<stack> using namespace st ...
- Google Hack的一些整理
这里是一些关于Google Hack方面的整理 黑客专用信息和资料搜索地址为: http://www.google.com/custom?hl=xx-hacker 这里是google关键字的用法,要设 ...
- TP3.2实例化复杂模型类
1.表名:xxf_witkey_member_oauth M方法,直接实例化对象:M('member_oauth','xxf_witkey_'[,'db_config']); 具体解析:M方法三个参数 ...
- 工具-Memcahce和Redis比较
一.Memcache 1. memecache 把数据全部存在内存之中,断电后会挂掉,数据不能超过内存大小redis有部份存在硬盘上,这样能保证数据的持久性. 2. Memcache ...
- 列表生成式&生成器表达式
一.列表生成式 def func(): return [lambda x:i*x for i in range(4)] print([j(2) for j in func()]) 结果:[6,6,6, ...
- Flyod 算法(两两之间的最短路径)
Flyod 算法(两两之间的最短路径)动态规划方法,通过相邻矩阵, 然后把最后的结果存在这么一个矩阵里面,(i,j), #include <iostream> #include <v ...