Vue Router的入门以及简单使用
Vue Router 是Vue官方的路由管理器,是Vue用来实现SPA的插件。它和 Vue.js 的核心深度集成,让构建单页面应用(SPA)变得易如反掌。
基本概念:
路由:是一种映射关系,是 “path =>组件”的映射
路由器:管理路由的,在路由器里配置路由
1、npm 安装
npm install vue-router
2、相关API说明
(1)路由配置 :route是一条路由的实现, 它是一个对象,由两个部分组成: path和component. 或path和redirect。 path 指路径,component 指的是组件。多个route组成一个routes。
routes:[

{//一般路由

path:'/about',

component:About //组件

},

{//自动跳转路由

path:'/',

redirect:'/about'

}

]
(2)VueRouter():用于创建路由器的构造函数,接受routes参数
new Router({

//多个配置项
routes // routes: routes 的简写
})
(3)注册路由器:把router 实例注入到 vue 根实例中
import router from "./router"; //先引入路由

new Vue({
router,
...
})
(4)使用路由组件标签
①<router-link>:用来生成路由链接
<router-link to="./xxx">go to xxx</router-link>
②<router-view>:用来显示当前路由组件界面,匹配了哪个组件就会显示哪个组件的界面
<router-view></router-view>
执行过程:当用户点击 router-link 标签时,会去寻找它的 to 属性, 它的 to 属性和router/index.js 中配置的路径{ path: '/home', component: Home} path 一一对应,从而找到了匹配的组件, 最后把组件渲染到 <router-view> 标签所在的地方。所有的这些实现是基于hash 实现的。
3、简单使用
一:基本路由
基本目录结构:
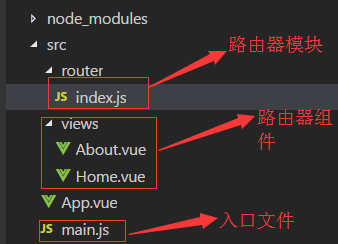
注意:组件包括两种,路由组件和非路由组件,非路由组件放在components文件夹中,路由组件放在另一个文件夹中,通常命名为views或者pages
(1)定义路由器模块 router/index.js
/*

路由器模块

*/

import Vue from 'vue'

import VueRouter from 'vue-router'

//引入路由组件

import About from '../views/About.vue'

import Home from '../views/Home.vue'

Vue.use(VueRouter)

export default new VueRouter({//向外暴露一个路由器

    //n个路由

    routes:[

        {

            path:'/about',

            component:About

        },

        {

            path:'/home',

            component:Home

        },

        {//当请求根路径时,重定向请求home

            path:'/',

            redirect:'/home'

        }

    ]

})
(2)在入口的main.js中引入路由器,并进行配置
import Vue from 'vue'

import App from './App'

import router from './router' //index可以省略不写,引入路由器

new Vue({//配置对象的属性名都是一些默认的属性名,不能随便修改

    el:'#app',

    components:{

        App

    },

    template:'<App/>',

    router

})
(3)App.vue中使用路由组件标签 <router-link>和<router-view>
<template>

    <div class="container">

        <div class="row">

            <div class="col-xs-offset-2 cool-xs-8">

                <div class="page-header"><h2>Router Basic - 01 </h2></div>

            </div>

        </div>

        <div class="row">

            <div class="col-xs-2 col-xs-offset-2">

                <div class="list-group">

                    <router-link to="/home" class="list-group-item">Home</router-link>

                <router-link to="/about" class="list-group-item">About</router-link>

                </div>

            </div>

            <div class="col-xs-6">

                <div class="panel">

                    <div class="panel-body">

                        <router-view></router-view>

                    </div>

                </div>

            </div>

        </div>

    </div>

</template>

<script>

    export default{

    }

</script>

<style>

    .container{

        width:1000px;

        margin:0 auto;

    }

    .router-link-active{

        color:red !important;

    }

</style>
(4)编辑路由组件的内容
Home.vue
<template>

    <div>

        Home

    </div>

</template>

<script>

    export default{

    }

</script>

<style>

</style>
About.vue
<template>

    <div>

        About

    </div>

</template>

<script>

    export default{

    }

</script>

<style>

</style>
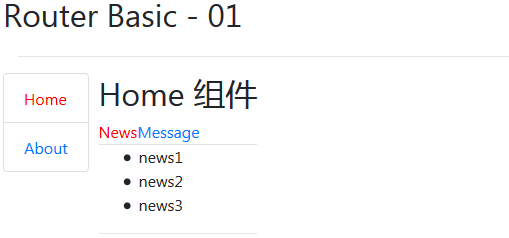
最终呈现结果:

二:嵌套路由:点击一个路由之后,打开的页面中仍然存在路由
效果图:
(1)修改路由器模块( router/index.js)中的routes配置
/*

路由器模块

*/

import Vue from 'vue'

import VueRouter from 'vue-router'

//引入路由组件

import About from '../views/About.vue'

import Home from '../views/Home.vue'

import Message from '../views/Message.vue'

import News from '../views/News.vue'

Vue.use(VueRouter)

export default new VueRouter({//向外暴露一个路由器

    //n个路由

    routes:[

        {

            path:'/about',

            component:About

        },

        {

            path:'/home',

            component:Home,

            children:[

                {

                    path:'/home/message', //path最左侧的斜杠永远代表根路径

                    component:Message

                },

                {

                    path:'/home/news',

                    component:News

                },

                {

                    path:'/home',

                    redirect:'/home/news'

                }

            ]

        },

        {//当请求根路径时,重定向请求home

            path:'/',

            redirect:'/home'

        }

    ]

})
(2)Home组件中,使用路由组件标签 <router-link>和<router-view>
<template>

    <div style="margin-left:10px;">

        <h2>Home 组件</h2>

        <div>

            <ul  class="nav nav-tabs">

                <li><router-link to="/home/news">News</router-link></li>

                <li><router-link to="/home/message">Message</router-link></li>

            </ul>

            <div>

                <router-view></router-view>

                <hr>

            </div>

        </div>

    </div>

</template>

<script>

    export default{

    }

</script>

<style>

</style>
(3)编辑新增的News和Message路由组件的内容
News.vue
<template>

    <div>

        <ul>

            <li v-for="(news,index) in newsArr" :key="index">

                {{news}}

            </li>

        </ul>

    </div>

</template>

<script>

    export default{

        data(){

            return {

                newsArr:['news1','news2','news3']

            }

        }

    }

</script>

<style>

</style>
Message.vue
<template>

    <ul>

        <li v-for="(message,index) in messages" :key="message.id">

            <a href="">{{message.title}}</a>

        </li>

    </ul>

</template>

<script>

    export default{

        data(){

            return {

                messages:[]

            }

        },

        mounted(){

            var that = this;

            //模拟ajax请求从后台请求数据

            setTimeout(()=>{

                const messages = [

                    {id:1,title:'message1'},

                    {id:2,title:'message2'}

                ]

                that.messages = messages;

            },1000)

        }

    }

</script>

<style>

</style>
Vue Router的入门以及简单使用的更多相关文章
- vue router拦截器的简单使用
之前,为了实现router跳转的每个页面的url上都带上addressCode,然后用了一下router拦截器,很好用,当然也可以专门封装一个方法来实现(跳转的页面上带有addressCode),不过 ...
- Vue基础开发入门之简单语法知识梳理(思维导图详解)
基于个人写的以下关于Vue框架基础学习的三篇随笔,在此基础上,做一个阶段性的知识总结,以此来检验自己对Vue这一段时间学习的成果,内容不多,但很值得一看.(思维导图详解)
- Vue Router的简单了解
Vue Router Vue Router官方文档 传统Web项目开发往往采用超链接实现页面之间的切换和跳转.Vue开发的是单页面应用(Single Page Application,SPA),不能使 ...
- .NET Core实战项目之CMS 第六章 入门篇-Vue的快速入门及其使用
写在前面 上面文章我给大家介绍了Dapper这个ORM框架的简单使用,大伙会用了嘛!本来今天这篇文章是要讲Vue的快速入门的,原因是想在后面的文章中使用Vue进行这个CMS系统的后台管理界面的实现.但 ...
- 前端MVC Vue2学习总结(八)——Vue Router路由、Vuex状态管理、Element-UI
一.Vue Router路由 二.Vuex状态管理 三.Element-UI Element-UI是饿了么前端团队推出的一款基于Vue.js 2.0 的桌面端UI框架,手机端有对应框架是 Mint U ...
- python 全栈开发,Day91(Vue实例的生命周期,组件间通信之中央事件总线bus,Vue Router,vue-cli 工具)
昨日内容回顾 0. 组件注意事项!!! data属性必须是一个函数! 1. 注册全局组件 Vue.component('组件名',{ template: `` }) var app = new Vue ...
- vue router 几种方式对比 (转载)
<div id="app"> <h1>Hello App!</h1> <p> <!-- 使用 router-link 组件来导 ...
- 04慕课网《vue.js2.5入门》——Vue-cli开发todolist
主要文件目录: 文件代码: 根实例,初始化vue: <!--index.html,网站入口页面,和main.jsp组成一套.vue文件,包含--> <!DOCTYPE html> ...
- vue router使用query和params传参的使用
传参是前端经常需要用的一个操作,很多场景都会需要用到上个页面的参数,本文将会详细介绍vue router 是如何进行传参的,以及一些小细节问题.有需要的朋友可以做一下参考,希望可以帮到大家. Vue ...
随机推荐
- python函数修饰器(decorator)
python语言本身具有丰富的功能和表达语法,其中修饰器是一个非常有用的功能.在设计模式中,decorator能够在无需直接使用子类的方式来动态地修正一个函数,类或者类的方法的功能.当你希望在不修改函 ...
- C#.net XML的序列化与反序列化
/// <summary> /// 将一个对象序列化为XML字符串 /// </summary> /// <param name="o">要序列 ...
- RHEL7:如何配置I / O调度程序
介绍 I / O调度程序用于优化磁盘上的读/写. RHEL 7中有三种类型的I / O调度程序(也称为I / O电梯): CFQ(C fullly F air Q ueuing)促进来自实时流程的I ...
- 零基础图文傻瓜教程接入Facebook的sdk
零基础图文傻瓜教程接入Facebook的sdk 本人视频教程系类 iOS中CALayer的使用 0. 先解决你的 VPN FQ上外网问题,亲,解决这一步才能进行后续操作^_^. 1. 点击右侧链接 ...
- 生活随记[All]
1. 心灵鸡汤[all] 2. 工作总结 [all] 3. 面试经验[all] 4. 其他
- Hadoop HBase概念学习系列之HBase里的时间戳(二十六)
HBase集群要求每个节点的时间必须同步.HBase对于节点的时间扭曲(time skew)容忍度很低(这和HDFS是不一样的). 这主要是因为HBase需要使用系统时间来产生时间戳.如果系统时间不同 ...
- November 28th 2016 Week 49th Monday
You only live once, but if you do it right, once is enough. 年华不虚度,一生也足矣. One today can win two tomor ...
- 嵌套的ng-repeat双层循环,内层如何获取外层的$index?
html代码: <div> <ul ng-repeat="row in table track by $index"> <li ng-repeat=& ...
- npm发布插件步骤
开发好一个插件后,要想让其他人也能使用该插件需要将插件发布到npm上,具体步骤如下: 1.添加npm用户: npm adduser Username: your name Password: your ...
- C#版谷歌地图下载器设计与实现
关于如何将地球经纬度坐标系统转换成程序中常用到的平面2D坐标系统,网上的文章很多,参考http://www.cnblogs.com/beniao/archive/2010/04/18/1714544. ...