
win10下一分钟快速搭建rtmp推流服务器
为了让大家少踩笔者踩过的坑,目前将工作中搭建rtmp推流服务器的步骤总结如下:
步骤1: 下载 nginx 1.7.11.3 Gryphon
下载链接: http://nginx-win.ecsds.eu/download/nginx 1.7.11.3 Gryphon.zip,下载完成后解压, 将解压后的目录命名为nginx_1.7.11.3_Gryphon
(此处注意千万不要命名为nginx-1.7.11.3-Gryphon,笔者初次搭建rtmp推流服务器时,将解压后的目录命名为nginx-1.7.11.3-Gryphon,出现局域网内的其他电脑都无法访问rtmp服务器的问题,也是花了一天的时间填坑,将主文件名改为nginx_1.7.11.3_Gryphon时,其他电脑才能正常访问。为神马会如此,笔者也是疑问,好歹问题无意间解决了)
步骤2:下载服务器状态检查程序 stat.xsl(注:直接clone到nginx-1.7.11.3-Gryphon目录下)
下载地址https://github.com/arut/nginx-rtmp-module/
此时的目录结构如下图所示:
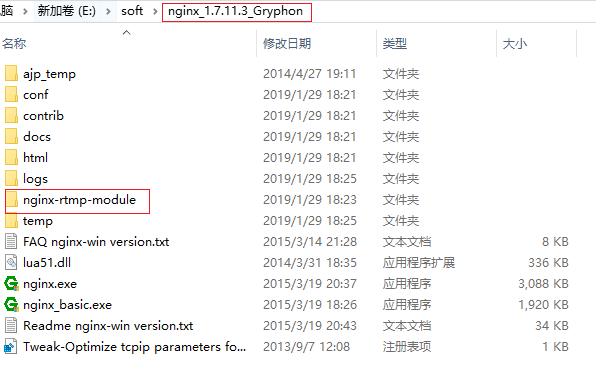
步骤3:配置文件 conf\nginx-win-rtmp.conf 内容如下:
#user  nobody;

# multiple workers works !

worker_processes  2;

#error_log  logs/error.log;

#error_log  logs/error.log  notice;

#error_log  logs/error.log  info;

#pid        logs/nginx.pid;

#worker_rlimit_nofile 100000;   #更改worker进程的最大打开文件数限制

                                               #如果没设置的话, 这个值为操作系统的限制.

                                               #设置后你的操作系统和Nginx可以处理比“ulimit -a”更多的文件

                                               #所以把这个值设高, 这样nginx就不会有“too many open files”问题了

events {

    worker_connections  8192;#设置可由一个worker进程同时打开的最大连接数

                              #如果设置了上面提到的worker_rlimit_nofile, 我们可以将这个值设得很高

    # max value 32768, nginx recycling connections+registry optimization =

    #   this.value * 20 = max concurrent connections currently tested with one worker

    #   C1000K should be possible depending there is enough ram/cpu power

    # multi_accept on;

}

rtmp {

    server {

        listen 1935;#监听端口,若被占用,可以更改

        chunk_size 4000;#上传flv文件块儿的大小

        application live { #创建一个叫live的应用

             live on;#开启live的应用

             allow publish 127.0.0.1;#

             allow play all;

        }

    }

}

http {

    #include      /nginx/conf/naxsi_core.rules;

    include       mime.types;

    default_type  application/octet-stream;

    #log_format  main  '$remote_addr:$remote_port - $remote_user [$time_local] "$request" '

    #                  '$status $body_bytes_sent "$http_referer" '

    #                  '"$http_user_agent" "$http_x_forwarded_for"';

    #access_log  logs/access.log  main;

#     # loadbalancing PHP

#     upstream myLoadBalancer {

#         server 127.0.0.1:9001 weight=1 fail_timeout=5;

#         server 127.0.0.1:9002 weight=1 fail_timeout=5;

#         server 127.0.0.1:9003 weight=1 fail_timeout=5;

#         server 127.0.0.1:9004 weight=1 fail_timeout=5;

#         server 127.0.0.1:9005 weight=1 fail_timeout=5;

#         server 127.0.0.1:9006 weight=1 fail_timeout=5;

#         server 127.0.0.1:9007 weight=1 fail_timeout=5;

#         server 127.0.0.1:9008 weight=1 fail_timeout=5;

#         server 127.0.0.1:9009 weight=1 fail_timeout=5;

#         server 127.0.0.1:9010 weight=1 fail_timeout=5;

#         least_conn;

#     }

    sendfile        off;

    #tcp_nopush     on;

    server_names_hash_bucket_size 128;

## Start: Timeouts ##

    client_body_timeout   10;

    client_header_timeout 10;

    keepalive_timeout     30;

    send_timeout          10;

    keepalive_requests    10;

## End: Timeouts ##

    #gzip  on;

    server {

        listen       8088;

        server_name  localhost;

        #charset koi8-r;

        #access_log  logs/host.access.log  main;

        ## Caching Static Files, put before first location

        #location ~* \.(jpg|jpeg|png|gif|ico|css|js)$ {

        #    expires 14d;

        #    add_header Vary Accept-Encoding;

        #}

# For Naxsi remove the single # line for learn mode, or the ## lines for full WAF mode

        location / {

            #include    /nginx/conf/mysite.rules; # see also http block naxsi include line

            ##SecRulesEnabled;

              ##DeniedUrl "/RequestDenied";

              ##CheckRule "$SQL >= 8" BLOCK;

              ##CheckRule "$RFI >= 8" BLOCK;

              ##CheckRule "$TRAVERSAL >= 4" BLOCK;

              ##CheckRule "$XSS >= 8" BLOCK;

            root   html;

            index  index.html index.htm;

        }

# For Naxsi remove the ## lines for full WAF mode, redirect location block used by naxsi

        ##location /RequestDenied {

        ##    return 412;

        ##}

## Lua examples !

#         location /robots.txt {

#           rewrite_by_lua '

#             if ngx.var.http_host ~= "localhost" then

#               return ngx.exec("/robots_disallow.txt");

#             end

#           ';

#         }

        #error_page  404              /404.html;

        # redirect server error pages to the static page /50x.html

        #

        error_page   500 502 503 504  /50x.html;

        location = /50x.html {

            root   html;

        }

        # proxy the PHP scripts to Apache listening on 127.0.0.1:80

        #

        #location ~ \.php$ {

        #    proxy_pass   http://127.0.0.1;

        #}

        # pass the PHP scripts to FastCGI server listening on 127.0.0.1:9000

        #

        #location ~ \.php$ {

        #    root           html;

        #    fastcgi_pass   127.0.0.1:9000; # single backend process

        #    fastcgi_pass   myLoadBalancer; # or multiple, see example above

        #    fastcgi_index  index.php;

        #    fastcgi_param  SCRIPT_FILENAME  $document_root$fastcgi_script_name;

        #    include        fastcgi_params;

        #}

        # deny access to .htaccess files, if Apache's document root

        # concurs with nginx's one

        #

        #location ~ /\.ht {

        #    deny  all;

        #}

    }

    # another virtual host using mix of IP-, name-, and port-based configuration

    #

    #server {

    #    listen       8000;

    #    listen       somename:8080;

    #    server_name  somename  alias  another.alias;

    #    location / {

    #        root   html;

    #        index  index.html index.htm;

    #    }

    #}

    # HTTPS server

    #

    #server {

    #    listen       443 ssl spdy;

    #    server_name  localhost;

    #    ssl                  on;

    #    ssl_certificate      cert.pem;

    #    ssl_certificate_key  cert.key;

    #    ssl_session_timeout  5m;

    #    ssl_prefer_server_ciphers On;

    #    ssl_protocols TLSv1 TLSv1.1 TLSv1.2;

    #    ssl_ciphers ECDH+AESGCM:ECDH+AES256:ECDH+AES128:ECDH+3DES:RSA+AESGCM:RSA+AES:RSA+3DES:!aNULL:!eNULL:!MD5:!DSS:!EXP:!ADH:!LOW:!MEDIUM;

    #    location / {

    #        root   html;

    #        index  index.html index.htm;

    #    }

    #}

}
nginx-win-rtmp.conf
步骤4:启动服务器
nginx.exe -c conf\nginx-win-rtmp.conf
步骤5:使用推流地址
推流地址:rtmp://lP:监听端口/应用名/home,步骤3配置文件配置出的推流地址为rtmp://192.168.xxxx.xxxx:1935/live/home
通过此推流地址,便可以成功推流
步骤6:其他ngnix常用命令:
(1)终止服务器
nginx.exe -s stop
stop是快速停止nginx,可能并不保存相关信息;
nginx.exe -s quit
quit是完整有序的停止nginx,并保存相关信息。
(2)重新载入Nginx
nginx.exe -s reload
当配置信息修改,需要重新载入这些配置时使用此命令。
(3)重新打开日志文件
nginx.exe -s reopen
>>>>>>>>待续
win10下一分钟快速搭建rtmp推流服务器的更多相关文章
- 在win10下使用docker快速搭建ruby开发环境
docker在windows下发力的时候必将取代各种虚拟机,并改变程序员的开发习惯,或许还会改变infra的工作. 概要: 在Windows下搭建开发环境一直是infra(我)头疼的事情.为了解决这个 ...
- win10下Spark的环境搭建
win10下Spark的环境搭建 2018-08-19 18:36:45 一.jdk 1.8.0 安装与配置 二.scala 2.11.8 安装与配置http://www.scala-lang.or ...
- 全网最新方法:Win10下如何安装和搭建appium自动化测试环境
为了方便大家,下面是本人安装和搭建appium所需要的软件,自取. 链接:https://pan.baidu.com/s/1wl5Xnos4BmnSZsBRd6B5YA#list/path=%2F ...
- 30分钟快速搭建Web CRUD的管理平台--django神奇魔法
加上你的准备的时间,估计30分钟完全够用了,因为最近在做爬虫管理平台,想着快速开发,没想到python web平台下有这么非常方便的框架,简洁而优雅.将自己的一些坑总结出来,方便给大家的使用. 准备环 ...
- 巨杉Tech | 十分钟快速搭建 Wordpress 博客系统
介绍 很多互联网应用程序开发人员第一个接触到的网站项目就是博客系统.而全球使用最广的Wordpress常常被用户用来快速搭建个人博客网站.默认情况下,Wordpress一般在后台使用MySQL关系型数 ...
- 5分钟快速搭建一个springboot的项目
现在开发中90%的人都在使用springboot进行开发,你有没有这样的苦恼,如果让你新建一个springboot开发环境的项目,总是很苦恼,需要花费很长时间去调试.今天来分享下如何快速搭建. 一 ...
- 开源代码Window下搭建rtmp流媒体服务器
合肥程序员群:49313181. 合肥实名程序员群:128131462 (不愿透露姓名和信息者勿加入) Q Q:408365330 E-Mail:egojit@qq.com 综合:有这样需求,将摄像头 ...
- 三分钟快速搭建分布式高可用的Redis集群
这里的Redis集群指的是Redis Cluster,它是Redis在3.0版本正式推出的专用集群方案,有效地解决了Redis分布式方面的需求.当单机内存.并发.流量等遇到瓶颈的时候,可以采用这种Re ...
- 五分钟快速搭建 Serverless 免费邮件服务
1. 引言 本文将带你快速基于 Azure Function 和 SendGrid 构建一个免费的Serverless(无服务器)的邮件发送服务,让你感受下Serverless的强大之处. 该服务可以 ...
随机推荐
- IBM CEO罗睿兰:科技公司屹立百年的3个秘诀
假设有不论什么科技公司能够完美阐释"转型"这个词的含义,那么这家公司非创立103年的IBM莫属. 如今,它的变化更胜以往. 在<財富>杂志周二于美国加利福尼亚州拉古纳尼 ...
- C语言之文件操作07——读取文件数据并计算均值方差标准差
//文件 /* =============================================================== 题目:从文本文件"high.txt" ...
- 【独立开发人员er Cocos2d-x实战 011】Cocos2dx 3.x命令行生成APK具体解释
Cocos2d-x 3.6项目打包生成apk安卓应用文件,搭建安卓环境的步骤有点繁琐.但搭建一次之后,以后就会很快捷! 过程例如以下: 一.下载安卓环境:搭建Android环境须要用到Android ...
- jmeter默认生成测试报告
我的jmeter安装在F:\study\apache-jmeter-3.1\apache-jmeter-3.1下,在bin目录下执行 其中E:\code\jmeterReport\Course-tes ...
- 开源 java CMS - FreeCMS2.2 工作流管理
项目地址:http://www.freeteam.cn/ 工作流管理 从FreeCMS 2.2開始支持 管理系统中使用到的工作流,如信息审核工作流. 1. 工作流组管理 从左側管理菜单点击工作流组管理 ...
- Hadop使用Partitioner后,结果还是一个文件,怎样解决??
近期看了一下partitioner.于是照着写了一个列子.最后发现程序并没有将结果分开写入对应的文件,结果还是一个文件,于是乎感觉是不是没实用集群去执行程序,发现control中还是本地执行的代码: ...
- B3038 上帝造题的七分钟2 线段树
这就是一道变得比较奇怪的线段树,维护每个区间的最大值和区间和,然后关键在于每次取根号的话数值下降的特别快,不用几次就都是1了,所以每次暴力单点修改,然后直接找区间最大值,假如区间最大值是1的话,就直接 ...
- CentOS7 网卡名称重命名为eth*
CentOS7 禁用网卡名称命名规则,启动时传递"net.ifnames=0 biosdevname=0"/etc/default/grupgrup2-mkconfig -o /b ...
- Java 8 实战 P3 Effective Java 8 programming
目录 Chapter 8. Refactoring, testing, and debugging Chapter 9. Default methods Chapter 10. Using Optio ...
- tp 3.1.3 动态切换模板问题
if($this->isMobile()) { C('DEFAULT_THEME', 'mobile'); // 这里定义手机模板目录 C('TMPL_CACHE_PREFIX', 'm_'); ...