
PySide——Python图形化界面入门教程(二)
PySide——Python图形化界面入门教程(二)
——交互Widget和布局容器
——Interactive Widgets and Layout Containers
翻译自:http://pythoncentral.io/pyside-pyqt-tutorial-interactive-widgets-and-layout-containers/
上一个教程中,我们了解了一些QWidget提供的功能,还有一个特殊的子类QLabel。更进一步的,我们完成了一个用来说明简单Python/Qt应用的例子。但是,我们掌握的远远不能满足用户的需求,因为我们只能给他们显示文本,我们的应用只会唱独角戏!我们需要一些方法让用户可以和我们的程序交互,让独角戏变成二人转。Qt提供了丰富的交互式widgets,这里我们将要学习其中的一小部分;我们将使用他们体验如何在图形化(form)上布置widgets。下一个教程,我们将学习如何使用信号和槽来响应用户的交互。
交互式Widgets
Python/Qt有一系列的widgets,可以非常简单的实现与用户交互,并且容易和你的应用逻辑联系。
按钮(Buttons)
一个最简单的交互方式就是让用户点击按钮,Qt中就是QPushButton。QPushButton构造器有三个结构:
 QPushButton(parent=None)

 QPushButton(text, [parent=None])

 QPushButton(icon, text, [parent=None])
parent参数是一个QWidget,text是一个Python string或unicode,icon是一个QIcon。创建一个被some-form拥有的带有文字“Go”的按钮,可以这样:
go_button = QPushButton('Go', some_form)
如果我们想为按钮设置一个键盘快捷键,如Alt-G,我们可以在‘Go’前添加一个‘&G’:
go_button = QPushButton('&Go', some_form)
这还有一些按钮的其他功能,还拿go_button做例子,你可以将其设置为form的默认按键:
go_button.setDefault(True)
还可以设置成平的:
go_button.setFlat(True)
将False传递到方法中会有相反的作用。一个按钮还可以在被点击时弹出一个菜单(menu):传递一个QMenu对象给按钮的setMenu方法。(我们以后再研究菜单)
文本框(Textboxes)
Qt的文本框控件是QLineEdit;它允许用户输入编辑单行的简单文本,其构造器有如下两种:
 QLineEdit(parent=None)

 QLineEdit(text, [parent=None])
他们的不同就是第二个允许用text参数设置包含的文本。QLineEdit对象有许多的方法,但是我们只关心几个最基本的。你可以使用text()方法取回文本,用setText(text)设置文本,使用setMaxLength(chars)设置最大可输入长度。它可以通过setReadOnly(True)设置为只读的,使用setPlaceholderText(text)设置占位文字(placeholder text,就是那种你输入前提示说明的字)。QLineEdit还有更多的高级属性:可以设置输入过滤器,处理选择和输入历史等等。
组合框(Comboboxes)
QComboBox widget是用来给用户提供多个文本或文本/图标的选择,用户必须选择其一。(多项选择参见QListView和QListWidget)它的构造器如下:
QComboBox(parent)
它的构造如此简单,但是目前还没有任何选项。你可以用多种方式添加选项。如果你的所有选项都是文字的,你可以使用addItems(texts),texts是字符串列表。一个一个的添加选项可以使用addItem,它有两个有效的方式
 addItem(icon, text, [userData=None])

 addItem(text, [userData=None])
参数icon是QIcon,text是一个unicode对象,userData是任何对象。你可以使用insertItem插入选项:
 insertItem(index, icon, text, [userData=None])

 insertItem(index, text, [userData=None])
QComboBox是一个灵活的widget,用它还可以做更多的事情。
例子程序:总览
接下来,我们将学习如何把小部件组合成一个表单布局,但在我们可以做到这一点之前,让我们先看一下这个示例应用程序。
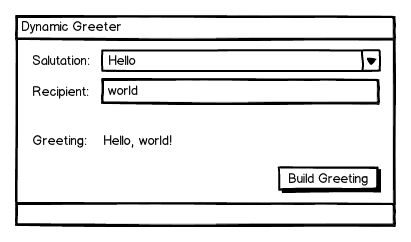
正如你所看到的,这是一个非常简单的应用程序。用户可以选择一个称呼和进入的人的姓名(或其他单位)他们要打招呼,当他们点击“建立问候,问候将在窗体上显示一个标签。
布局管理(Layout Management)
PySide和PyQt有两个可用的方法来管理布局:使用绝对位置,开发者必须明确设置每个widget和位置和大小;使用的布局容器(layout containers),自动安排位置和调整大小。我们将用两种方法构建上面提到的例子程序。
绝对位置
去设置widget的无力位置,你需要使用widget的move(x, y)方法;x和y是水平和垂直距离,这个距离是从外框(form)的左上角到widget的左上角。这是我们使用绝对距离创建的外形:
 # Every Qt application must have one and only one QApplication object;

 # it receives the command line arguments passed to the script, as they

 # can be used to customize the application's appearance and behavior

 qt_app = QApplication(sys.argv)

 class AbsolutePositioningExample(QWidget):

     ''' An example of PySide absolute positioning; the main window

         inherits from QWidget, a convenient widget for an empty window. '''

     def __init__(self):

         # Initialize the object as a QWidget

         QWidget.__init__(self)

         # We have to set the size of the main window

         # ourselves, since we control the entire layout

         self.setMinimumSize(400, 185)

         self.setWindowTitle('Dynamic Greeter')

         # Create the controls with this object as their parent and set

         # their position individually; each row is a label followed by

         # another control

         # Label for the salutation chooser

         self.salutation_lbl = QLabel('Salutation:', self)

         self.salutation_lbl.move(5, 5) # offset the first control 5px

                                        # from top and left

         self.salutations = ['Ahoy',

                             'Good day',

                             'Hello',

                             'Heyo',

                             'Hi',

                             'Salutations',

                             'Wassup',

                             'Yo']

         # Create and fill the combo box to choose the salutation

         self.salutation = QComboBox(self)

         self.salutation.addItems(self.salutations)

         # Allow 100px for the label and 5px each for borders at the

         # far left, between the label and the combobox, and at the far

         # right

         self.salutation.setMinimumWidth(285)

         # Place it five pixels to the right of the end of the label

         self.salutation.move(110, 5)

         # The label for the recipient control

         self.recipient_lbl = QLabel('Recipient:', self)

         # 5 pixel indent, 25 pixels lower than last pair of widgets

         self.recipient_lbl.move(5, 30)

         # The recipient control is an entry textbox

         self.recipient = QLineEdit(self)

         # Add some ghost text to indicate what sort of thing to enter

         self.recipient.setPlaceholderText('world' or 'Matey')

         # Same width as the salutation

         self.recipient.setMinimumWidth(285)

         # Same indent as salutation but 25 pixels lower

         self.recipient.move(110, 30)

         # The label for the greeting widget

         self.greeting_lbl = QLabel('Greeting:', self)

         # Same indent as the others, but 45 pixels lower so it has

         # physical separation, indicating difference of function

         self.greeting_lbl.move(5, 75)

         # The greeting widget is also a label

         self.greeting = QLabel('', self)

         # Same indent as the other controls

         self.greeting.move(110, 75)

         # The build button is a push button

         self.build_button = QPushButton('&Build Greeting', self)

         # Place it at the bottom right, narrower than

         # the other interactive widgets

         self.build_button.setMinimumWidth(145)

         self.build_button.move(250, 150)

     def run(self):

         # Show the form

         self.show()

         # Run the Qt application

         qt_app.exec_()

 # Create an instance of the application window and run it

 app = AbsolutePositioningExample()

 app.run()
不用说,一个大型的应用程序可能会变得非常麻烦。另外,它也没有大小改变的反应;标签只是坐在指定的位置。不仅如此,想象一下,如果有视觉障碍的用户想把他们的字体设置的大一些;使用固定的位置,您设置的控件将不再适当。
布局容器(Layout Containers)
由于上述种种原因,布局容器比绝对位置更为常用,他们更加灵活,替程序员分担了计算确切位置的任务,并且他们可以调整布局去适应不同平台的GUI设置,如GTK+, KDE, Mac OS X等等。这有5个主要的布局容器,他们都是继承自QLayout:
- QHBoxLayout
- QVBoxLayout
- QGridLayout
- QStackedLayout
- QFormLayout
他们用来满足不同的需求。简而言之,QHBoxLayout和QVBoxLayout将widgets一个挨一个的水平(horizontally)、垂直(vertically)排列;QGridLayout可按照任意大小表格布局;QStackedLayout将他们一个放在一个的上面(就像stack栈一样);QFormLayout是一个特殊的两栏布局,它提供特殊的方法用标签安排内容在第一列,在第二列安排相关的空间。这些布局非常有用,但是你的布局选项不局限于他们,你可以将布局嵌套组合来创建更复杂易用的用户接口。现在,我们来看看水平、垂直布局和QFormLayout。
QVBoxLayout和QHBoxLayout
盒子布局(box layouts)非常的直截了当。使用它作为最上层的布局,创建布局非常简单——它的构造器需要任何参数——并且使用望名知义的方法addWidget来添加widget。接下来你就可以设置它所属的窗口。例如:
 win = QWidget()

 # The three labels

 lbl_1 = QLabel("We're")

 lbl_2 = QLabel('stacked')

 lbl_3 = QLabel('up.')

 # A vertical box layout

 layout = QVBoxLayout()

 # Add the widgets to the layout

 layout.addWidget(lbl_1)

 layout.addWidget(lbl_2)

 layout.addWidget(lbl_3)

 # Set layout as the layout for the window

 win.setLayout(layout)
QHBoxLayout也可以被同样使用,尽管它不常作为最上层的布局。它常常被作为子布局。为一个布局中添加另一个布局,使用该布局容器的addLayout方法,例如:
 layout = QVBoxLayout()

 sub_layout = QHBoxLayout()

 # ... Fill the layouts with widgets ...

 layout.addLayout(sub_layout)
盒子布局有另一个更重要并且常用的方法:addStretch。一个常见的布局有很多的控件,他们之间具有灵活的空间。为了完成这个目的,在盒子的开始添加widgets,然后添加一个设置大于0的空闲空间,layout.addStretch(1),然后再添加剩下的widgets。
QFormLayout
QFormLayout非常像QVBoxLayout,但是它可以不用创建子布局就轻松的将每一行分成两列。这通过使用外观布局的addRow方法,它有很多重载(overloaded?)。单参数的版本:
 addRow(QWidget)

 addRow(QLayout)
添加widget或布局在整个QFormLayout的最后。双参数版本:
 unicode, QLayout

 unicode, QWidget

 QWidget, QWidget

 QWidget, QLayout
作为一个“标签”在第一列中初始化元素,第二个是第二列。unicode参数作为QLabel的文本,QWidget可以是任意的widget。
盒子布局的例子(Box Layout Example)
现在我们已经了解了如何创建交互式widget和用灵活的布局管理他们,现在我们重新创建例子应用。我们窗口的主布局是QVBoxLayout,它有两个子布局,一个QformLayout包含所有的标签控件,和一个QHBoxLayout来管理右下角的按钮位置。我们将使用addStretch来分离QFormLayout,并且把按钮挤到QHBoxLayout的右边。你会注意到,许多代码同绝对位置版本是一样的;比如,创建单独控件的时候。
 qt_app = QApplication(sys.argv)

 class LayoutExample(QWidget):

     ''' An example of PySide/PyQt absolute positioning; the main window

         inherits from QWidget, a convenient widget for an empty window. '''

     def __init__(self):

         # Initialize the object as a QWidget and

         # set its title and minimum width

         QWidget.__init__(self)

         self.setWindowTitle('Dynamic Greeter')

         self.setMinimumWidth(400)

         # Create the QVBoxLayout that lays out the whole form

         self.layout = QVBoxLayout()

         # Create the form layout that manages the labeled controls

         self.form_layout = QFormLayout()

         # The salutations that we want to make available

         self.salutations = ['Ahoy',

                             'Good day',

                             'Hello',

                             'Heyo',

                             'Hi',

                             'Salutations',

                             'Wassup',

                             'Yo']

         # Create and fill the combo box to choose the salutation

         self.salutation = QComboBox(self)

         self.salutation.addItems(self.salutations)

         # Add it to the form layout with a label

         self.form_layout.addRow('&Salutation:', self.salutation)

         # Create the entry control to specify a recipient

         # and set its placeholder text

         self.recipient = QLineEdit(self)

         self.recipient.setPlaceholderText("e.g. 'world' or 'Matey'")

         # Add it to the form layout with a label

         self.form_layout.addRow('&Recipient:', self.recipient)

         # Create and add the label to show the greeting text

         self.greeting = QLabel('', self)

         self.form_layout.addRow('Greeting:', self.greeting)

         # Add the form layout to the main VBox layout

         self.layout.addLayout(self.form_layout)

         # Add stretch to separate the form layout from the button

         self.layout.addStretch(1)

         # Create a horizontal box layout to hold the button

         self.button_box = QHBoxLayout()

         # Add stretch to push the button to the far right

         self.button_box.addStretch(1)

         # Create the build button with its caption

         self.build_button = QPushButton('&Build Greeting', self)

         # Add it to the button box

         self.button_box.addWidget(self.build_button)

         # Add the button box to the bottom of the main VBox layout

         self.layout.addLayout(self.button_box)

         # Set the VBox layout as the window's main layout

         self.setLayout(self.layout)

     def run(self):

         # Show the form

         self.show()

         # Run the qt application

         qt_app.exec_()

 # Create an instance of the application window and run it

 app = LayoutExample()

 app.run()
注意到这些对程序员来说是多么的容易。当代码不太短的时候——不是每个便捷都会使代码量减少,创建和嵌套布局有一定的代码开销的时候——精神上的负担就小多了。开发人员只需完成一个组合的布局,产生所需的效果,并创建他们;控件的创建和修改是隔离的,很少再要去考虑其影响到布局和其他控件。下一部分,我们将以这个例子创建的界面,让它实际上做些事。
By Ascii0x03
转载请注明出处:http://www.cnblogs.com/ascii0x03/p/5496699.html
PySide——Python图形化界面入门教程(二)的更多相关文章
- PySide——Python图形化界面入门教程(四)
PySide——Python图形化界面入门教程(四) ——创建自己的信号槽 ——Creating Your Own Signals and Slots 翻译自:http://pythoncentral ...
- PySide——Python图形化界面入门教程(六)
PySide——Python图形化界面入门教程(六) ——QListView和QStandardItemModel 翻译自:http://pythoncentral.io/pyside-pyqt-tu ...
- PySide——Python图形化界面入门教程(五)
PySide——Python图形化界面入门教程(五) ——QListWidget 翻译自:http://pythoncentral.io/pyside-pyqt-tutorial-the-qlistw ...
- PySide——Python图形化界面入门教程(三)
PySide——Python图形化界面入门教程(三) ——使用内建新号和槽 ——Using Built-In Signals and Slots 上一个教程中,我们学习了如何创建和建立交互widget ...
- PySide——Python图形化界面入门教程(一)
PySide——Python图形化界面入门教程(一) ——基本部件和HelloWorld 翻译自:http://pythoncentral.io/intro-to-pysidepyqt-basic-w ...
- PySide——Python图形化界面
PySide——Python图形化界面 PySide——Python图形化界面入门教程(四) PySide——Python图形化界面入门教程(四) ——创建自己的信号槽 ——Creating Your ...
- python+pycharm+PyQt5 图形化界面安装教程
python图形化界面安装教程 配置环境变量 主目录 pip所在目录,及script目录 更新pip(可选) python -m pip install --upgrade pip ps:更新出错一般 ...
- Oracle数据库及图形化界面安装教程详解
百度云盘oracle数据库及图形化界面安装包 链接: https://pan.baidu.com/s/1DHfui-D2n1R6_ND3wDziQw 密码: f934 首先在电脑D盘(或者其他不是C盘 ...
- 如何使用python图形化界面wxPython
GUI库主要有三类:tkinter,wxPython和PyQt5,下面主要是针对wxPython的使用说明. 下面的操作均在win10 + pycharm上进行 wxPython的安装: pip in ...
随机推荐
- [React] Keep Application State in Sync with Browser History
Using pushState and passing route data via context allows our application to respond to route change ...
- active set method(激活集方法)
在优化问题的求解中,如果待优化(最大最小)的目标函数,其解集受限于一组约束条件, g1(x)≥0,-,gk(x)≥0 约束条件定义着可行域(feasible region),对于可行域中的任一点 x ...
- C 语言常见 API(fprintf、fputs、fprintf)
1. fprintf:输出到文件描述符对应的文件 stderr:错误输出也是一种特殊的文件描述符 #define FatalError(str) fprintf(stderr, "%s\n& ...
- tcp注意点
tcp注意点 tcp服务器一般情况下都需要绑定,否则客户端找不到这个服务器 tcp客户端一般不绑定,因为是主动链接服务器,所以只要确定好服务器的ip.port等信息就好,本地客户端可以随机 tcp服务 ...
- 自绘实现半透明水晶按钮(继承CButton,设置BS_OWNERDRAW风格,覆盖DrawItem函数绘制按钮,把父窗口的背景复制到按钮上,实现视觉上的透明,最后通过AlphaBlend实现半透明)
运行效果 实现方法 1.给按钮加上BS_OWNERDRAW样式2.重载DrawItem函数,在这里绘制按钮3.关键之处就是把父窗口的背景复制到按钮上,实现视觉上的透明4.最后通过AlphaBlend实 ...
- 一个完整的Erlang应用
http://blog.chinaunix.net/uid-25876834-id-3308693.html 这里介绍构建一个完整的Erlang/OTP应用的例子,最后还给出了一个在实际生成环境中,如 ...
- Java 中StringBuffer与StringBuilder区别(转)及String类的一些基本操作代码
String 字符串常量StringBuffer 字符串变量(线程安全) 多个线程访问时,不会产生问题(Synchronized)StringBuilder 字符串变量(非线程安全) 多个线程访问时 ...
- javascript数据结构与算法 零(前记+前言)
前记 这本书Data Structure and Algorithm with Javascript 我将其翻译成<< javascript 数据结构和算法>> 为什么这么翻译 ...
- 函数模板“偏特化” (C++)
模板是C++中很重要的一个特性,利用模板可以编写出类型无关的通用代码,极大的减少了代码量,提升工作效率.C++中包含类模板.函数模板,对于需要特殊处理的类型,可以通过特化的方式来实现特定类型 ...
- Struts2——(5)转发和重定向(跨业务模块)
一.重定向redirect(默认是转发dispatcher)和转发的区别? 1.重定向浏览器的网址发生变化(相当于请求了两次),转发浏览器的网址不发生变化(只请求了一次). 2.重定向的过程:发送请求 ...