最简单易懂的linux系统基础优化
第10章 linux的系统优化
10.1 系统的版本,内核查看
10.1.1 系统版本的查看
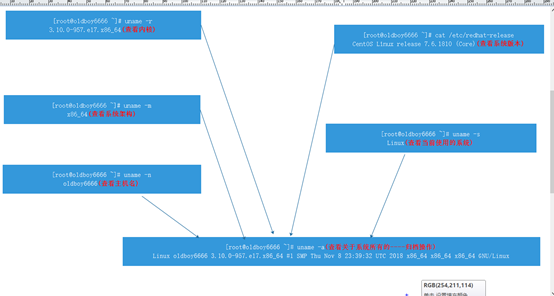
[root@oldboy6666 ~]# cat /etc/redhat-release
CentOS Linux release 7.6.1810 (Core)
[root@oldboy6666 ~]#
10.1.2 系统内核的查看
[root@oldboy6666 ~]# uname -r
3.10.0-957.el7.x86_64
10.1.3 系统系统架构的查看
[root@oldboy6666 ~]# uname -m
x86_64
10.1.4 当前使用的系统查看
[root@oldboy6666 ~]# uname -s
Linux
[root@oldboy6666 ~]#
10.1.5 系统信息全部查看
[root@oldboy6666 ~]# uname -a
Linux oldboy6666 3.10.0-957.el7.x86_64 #1 SMP Thu Nov 8 23:39:32 UTC 2018 x86_64 x86_64 x86_64 GNU/Linux
10.1.6 系统主机名的查看
[root@oldboy6666 ~]# uname -n
oldboy6666
10.1.7 系统版本,内核查看的图示
10.2 系统的用户优化
10.2.1 用户的创建
[root@oldboy6666 ~]# useradd oldboy101
[root@oldboy6666 ~]#
10.2.2 用户密码的修改
10.2.2.1 root用户修改密码(密码可以随便写)
[root@oldboy6666 ~]# passwd
Changing password for user root.
New password:
BAD PASSWORD: The password is shorter than 8 characters
Retype new password:
passwd: all authentication tokens updated successfully.
[root@oldboy6666 ~]#
10.2.2.2 普通用户修改密码
[oldboy101@oldboy6666 ~] $ passwd
Changing password for user oldboy101.
Changing password for oldboy101.
(current) UNIX password:
New password:
BAD PASSWORD: The password is too similar to the old one 这个密码和旧密码太相似
New password:
[oldboy101@oldboy6666 ~] $ passwd
Changing password for user oldboy101.
Changing password for oldboy101.
(current) UNIX password:
New password:
BAD PASSWORD: The password is shorter than 8 characters 这个密码少于8个字符
New password:
Retype new password:
Sorry, passwords do not match.
New password:
Retype new password:
passwd: all authentication tokens updated successfully.
[oldboy101@oldboy6666 ~] $
10.2.2.3 普通用户修改密码注意事项
- (1).普通用户修改密码不可以过于简单,且必须大于等于8位字符
- (2).普通用户修改密码必须有数字字母特殊字符组成
- (3).普通用户修改密码必须有大小写字母
10.2.3 用户密码无交互方式修改
[root@oldboy6666 ~]# echo "123456" | passwd --stdin oldboy101
Changing password for user oldboy101.
10.2.4 用户切换
10.2.4.1 root用户往普通用户切换(不需要密码)
- su – oldboy101:切换到oldboy101:
[root@oldboy6666 ~]# su - oldboy101
Last login: Wed Sep 11 15:51:15 CST 2019 on pts/4
[oldboy101@oldboy6666 ~] $
10.2.4.2 普通用户往root用户切换
[root@oldboy6666 ~]# su - oldboy101
Last login: Wed Sep 11 15:51:15 CST 2019 on pts/4
[oldboy101@oldboy6666 ~] $ su - root
Password:
Last login: Wed Sep 11 15:11:23 CST 2019 from 10.0.0.1 on pts/3
[root@oldboy6666 ~] $
10.2.4.3 图示切换用户
10.2.5 用户的查看
[root@oldboy6666 ~] $ id
uid=0(root) gid=0(root) groups=0(root) context=unconfined_u:unconfined_r:unconfined_t:s0-s0:c0.c1023
[root@oldboy6666 ~] $
10.2.6 查看当前登陆的用户
[root@oldboy6666 ~] $ whoami 直接查看当前登陆的用户
root
[root@oldboy6666 ~] $
[oldboy101@oldboy6666 ~] $ su – root 切换成功,则证明有这个用户
Password:
Last login: Wed Sep 11 15:11:23 CST 2019 from 10.0.0.1 on pts/3
[root@oldboy6666 ~] $
10.3 命令提示符的优化
10.3.1 提示符信息的修改
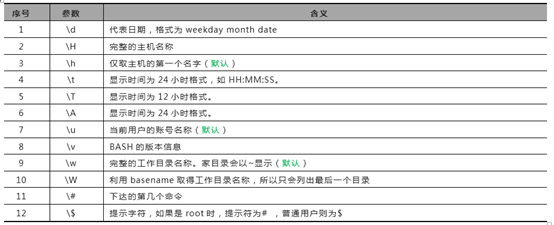
10.3.1.1 提示信息的字符介绍
- \u 显示当前登陆的系统用户
- \h 显示系统的主机名(简写)
- \W 显示当前所在的系统路径(简写)
- \H 显示系统的主机名(详细的)
- \w 显示绝对路径
- \d 代表日期
- \t 显示时间,24小时格式的
- \T 显示时间,12小时格式的
- \v 显示版本的信息
- \$ 提示字符(如果是root,则为#,如果是其他,则为$)
10.3.1.2 临时修改
[root@oldboyedu ~]# echo $PS1
[\u@\h \W]\$
[root@oldboyedu ~]#
[root@oldboyedu ~]#
[root@oldboyedu ~]#
[root@oldboyedu ~]# PS1='[\u@\H \w]\$'
[root@oldboyedu.com ~]#echo $PS1
[\u@\H \w]\$
[root@oldboyedu.com ~]#
10.3.1.3 永久修改
[root@oldboyedu.com ~]#echo "export PS1='[\u@\H \w]\$'" >> /etc/profile
[root@oldboyedu.com ~]#
10.3.4 提示符颜色的修改
- echo -e "\033[字体颜色;背景颜色m 输入的内容 \033[0m"
- export PS1='\[\e[30;1m\][\u@\h \W]\\$ \[\e[0m\]' 灰色
- export PS1='\[\e[31;1m\][\u@\h \W]\\$ \[\e[0m\]' 红色
- export PS1='\[\e[32;1m\][\u@\h \W]\\$ \[\e[0m\]' 绿色
- export PS1='\[\e[33;1m\][\u@\h \W]\\$ \[\e[0m\]' 黄色
- export PS1='\[\e[34;1m\][\u@\h \W]\\$ \[\e[0m\]' 蓝色
- export PS1='\[\e[35;1m\][\u@\h \W]\\$ \[\e[0m\]' 紫色
- export PS1='\[\e[36;1m\][\u@\h \W]\\$ \[\e[0m\]' 浅蓝色
- export PS1='\[\e[37;1m\][\u@\h \W]\\$ \[\e[0m\]' 白色
10.3.3 提示符优化的好处
可以方便的查看文件内容较多的文本
10.4 yum源的优化
10.4.1 yum源优化的里程碑
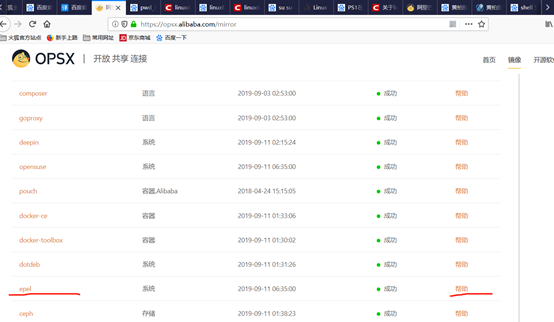
10.4.1.1 访问阿里云网站
网址为:mirrors.aliyun.com
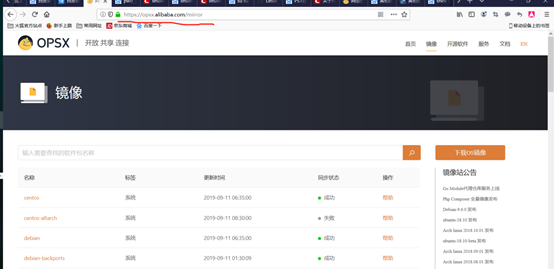
10.4.1.2 查找你需要的源(centos)
- 点击centos后面的帮助,将centos7的软件下载路径复制出来

更新阿里云的下载路径
curl -o /etc/yum.repos.d/CentOS-Base.repo http://mirrors.aliyun.com/repo/Centos-7.repo
查看文件(cat /etc/yum.repos.d/CentOS-Base.repo)--------------------base源
[base]
name=CentOS-$releasever - Base - mirrors.aliyun.com
failovermethod=priority
baseurl=http://mirrors.aliyun.com/centos/$releasever/os/$basearch/
http://mirrors.aliyuncs.com/centos/$releasever/os/$basearch/
http://mirrors.cloud.aliyuncs.com/centos/$releasever/os/$basearch/
gpgcheck=1
gpgkey=http://mirrors.aliyun.com/centos/RPM-GPG-KEY-CentOS-7
- $releasever(/etc/redhat) 代表查看的版本
- $basearch(uname -m) 架构(x86_64)
查找epel源

点击帮助,将路径复制出来进行更新
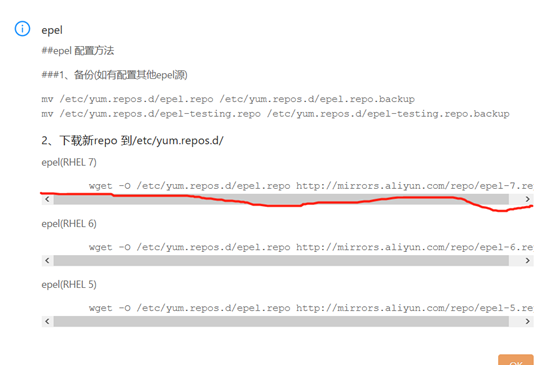
更新阿里云(epel)的路径
curl -o /etc/yum.repos.d/epel.repo http://mirrors.aliyun.com/repo/epel-7.repo
查看文件(cat /etc/yum.repos.d/ epel.repo)
[epel]
name=Extra Packages for Enterprise Linux 7 - $basearch
baseurl=http://mirrors.aliyun.com/epel/7/$basearch
failovermethod=priority
enabled=1
gpgcheck=0
gpgkey=file:///etc/pki/rpm-gpg/RPM-GPG-KEY-EPEL-7
$basearch:查看系统的架构(X86_64)
10.4.1.3 安装软件
yum install -y vim wget net-tools telnet sl cowsay bash-completion tree lrzsz
vim -- vi命令升级版, 编辑文件信息
wget -- 用于下载文件或者软件信息 下载工具
net-tools -- 网络相关工具包
telnet -- 测试网络服务端口是否正常
bash-completion --- 让systemctl后面参数信息具有补全功能
lrzsz -- 将windows主机数据可以上传到linux系统中 rz -y
-- 将linux主机数据可以下载到windows系统中 sz -y
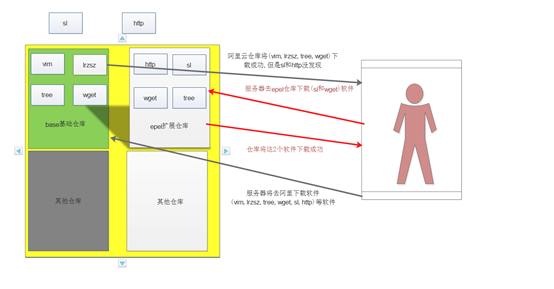
10.4.2 图示yum源的连接
10.4.3 阿里云种base的优化
点击centos后面的帮助,将centos7的软件下载路径复制出来

更新阿里云的下载路径
curl -o /etc/yum.repos.d/CentOS-Base.repo http://mirrors.aliyun.com/repo/Centos-7.repo
查看文件(cat /etc/yum.repos.d/CentOS-Base.repo)--------------------base源
[base]
name=CentOS-$releasever - Base - mirrors.aliyun.com
failovermethod=priority
baseurl=http://mirrors.aliyun.com/centos/$releasever/os/$basearch/
http://mirrors.aliyuncs.com/centos/$releasever/os/$basearch/
http://mirrors.cloud.aliyuncs.com/centos/$releasever/os/$basearch/
gpgcheck=1
gpgkey=http://mirrors.aliyun.com/centos/RPM-GPG-KEY-CentOS-7
$releasever(/etc/redhat):代表查看的版本
$basearch(uname -m):架构(x86_64)
10.4.4 阿里云种epel的优化
查找epel源
点击帮助,将路径复制出来进行更新

更新阿里云(epel)的路径
curl -o /etc/yum.repos.d/epel.repo http://mirrors.aliyun.com/repo/epel-7.repo
查看文件(cat /etc/yum.repos.d/ epel.repo)
[epel]
name=Extra Packages for Enterprise Linux 7 - $basearch
baseurl=http://mirrors.aliyun.com/epel/7/$basearch
failovermethod=priority
enabled=1
gpgcheck=0
gpgkey=file:///etc/pki/rpm-gpg/RPM-GPG-KEY-EPEL-7
$basearch:查看系统的架构(X86_64)
10.5 系统安全优化
10.5.1 centos7防火墙安全配置
10.5.1.1 临时配置
- (1).查看防火墙当前的状态(正在运行)
[root@oldboy6666 scripts] # systemctl status firewalld.service
● firewalld.service - firewalld - dynamic firewall daemon
Loaded: loaded (/usr/lib/systemd/system/firewalld.service; disabled; vendor preset: enabled)
Active: active (running) since Thu 2019-09-12 15:25:50 CST; 2s ago
Docs: man:firewalld(1)
Main PID: 7839 (firewalld)
CGroup: /system.slice/firewalld.service
└─7839 /usr/bin/python -Es /usr/sbin/firewalld --nofork --nopid
Sep 12 15:25:49 oldboy6666 systemd[1]: Starting firewalld - dynamic firewall daemon...
Sep 12 15:25:50 oldboy6666 systemd[1]: Started firewalld - dynamic firewall daemon.
[root@oldboy6666 scripts] #
- (2).关闭防火墙,并且查看防火墙的状态
[root@oldboy6666 scripts] # systemctl stop firewalld.service 关闭防火墙
[root@oldboy6666 scripts] # systemctl status firewalld.service 查看防火墙的状态
● firewalld.service - firewalld - dynamic firewall daemon
Loaded: loaded (/usr/lib/systemd/system/firewalld.service; disabled; vendor preset: enabled)
Active: inactive (dead)
Docs: man:firewalld(1)
Sep 12 15:25:49 oldboy6666 systemd[1]: Starting firewalld - dynamic firewall daemon...
Sep 12 15:25:50 oldboy6666 systemd[1]: Started firewalld - dynamic firewall daemon.
Sep 12 15:27:35 oldboy6666 systemd[1]: Stopping firewalld - dynamic firewall daemon...
Sep 12 15:27:36 oldboy6666 systemd[1]: Stopped firewalld - dynamic firewall daemon.
[root@oldboy6666 scripts] #
10.5.2.2 永久配置
[root@oldboy6666 scripts] # systemctl status firewalld
● firewalld.service - firewalld - dynamic firewall daemon
Loaded: loaded (/usr/lib/systemd/system/firewalld.service; disabled; vendor preset: enabled)
Active: inactive (dead)
Docs: man:firewalld(1)
Sep 12 15:25:49 oldboy6666 systemd[1]: Starting firewalld - dynamic firewall daemon...
Sep 12 15:25:50 oldboy6666 systemd[1]: Started firewalld - dynamic firewall daemon.
Sep 12 15:27:35 oldboy6666 systemd[1]: Stopping firewalld - dynamic firewall daemon...
Sep 12 15:27:36 oldboy6666 systemd[1]: Stopped firewalld - dynamic firewall daemon.
[root@oldboy6666 scripts] #
10.5.2 centos6防火墙安全配置
10.5.2.1 临时配置
- (1).查看防火墙的状态(防火墙是开启的)
[root@oldboyedu ~] # /etc/init.d/iptables status
Table: filter
Chain INPUT (policy ACCEPT)
num target prot opt source destination
1 ACCEPT all -- 0.0.0.0/0 0.0.0.0/0 state RELATED,ESTABLISHED
2 ACCEPT icmp -- 0.0.0.0/0 0.0.0.0/0
3 ACCEPT all -- 0.0.0.0/0 0.0.0.0/0
4 ACCEPT tcp -- 0.0.0.0/0 0.0.0.0/0 state NEW tcp dpt:22
5 REJECT all -- 0.0.0.0/0 0.0.0.0/0 reject-with icmp-host-prohibited
Chain FORWARD (policy ACCEPT)
num target prot opt source destination
1 REJECT all -- 0.0.0.0/0 0.0.0.0/0 reject-with icmp-host-prohibited
Chain OUTPUT (policy ACCEPT)
num target prot opt source destination
[root@oldboyedu ~] #
(2).关闭防火墙
[root@oldboyedu ~] # /etc/init.d/iptables stop
iptables: Setting chains to policy ACCEPT: filter [ OK ]
iptables: Flushing firewall rules: [ OK ]
iptables: Unloading modules: [ OK ]
[root@oldboyedu ~] # /etc/init.d/iptables status
iptables: Firewall is not running.
10.5.2.2 永久配置
[root@oldboyedu.com ~]#chkconfig --list | grep iptables 查看当前防火墙的状态
iptables 0:off 1:off 2:on 3:on 4:on 5:on 6:off
[root@oldboyedu.com ~]#chkconfig iptables off 关闭防火墙
[root@oldboyedu.com ~]#chkconfig --list | grep iptables 再次查看防火墙
iptables 0:off 1:off 2:off 3:off 4:off 5:off 6:off
[root@oldboyedu.com ~]#
10.5.3 selinux系统安全的配置
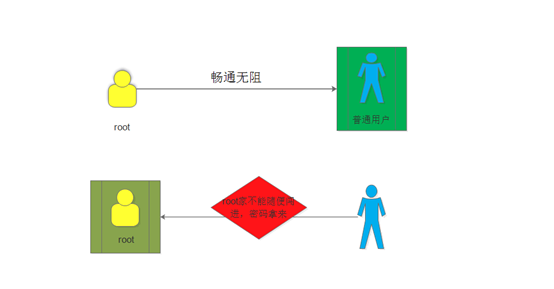
10.5.3.1 selinux安全优化的好处
selinux开启是为了限制root用户的权限,可以让root在使用的时候权力受到限制
由于在公司root用户一般是经理或者更高级别的人才可以拥有,导致selinux虽然可以限制,但是为了操作更加方便,一般都是关闭
10.5.3.2 selinux临时配置
- (1).查看selinux的状态(现在是开启的)
[root@oldboy6666 scripts] # getenforce
Enforcing
[root@oldboy6666 scripts] #
- (2).关闭selinux
[root@oldboy6666 scripts] # setenforce 0
[root@oldboy6666 scripts] # getenforce
Permissive
[root@oldboy6666 scripts] #
10.5.3.3 selinux永久配置
- (1).修改配置文件
[root@oldboy6666 scripts] # cat /etc/selinux/config 配置文件路径
# This file controls the state of SELinux on the system.
# SELINUX= can take one of these three values:
# enforcing - SELinux security policy is enforced. selinux安全策略是开启的
# permissive - SELinux prints warnings instead of enforcing. selinux打印警告信息代替开启
# disabled - No SELinux policy is loaded. 没有selinux策略的加载
SELINUX=enforcing
要改成disabled
# SELINUXTYPE= can take one of three values:
# targeted - Targeted processes are protected,
# minimum - Modification of targeted policy. Only selected processes are protected.
# mls - Multi Level Security protection.
SELINUXTYPE=targeted
- (2).利用sed命令来进行修改
[root@oldboy6666 scripts] # sed -i 's#SELINUX=enforcing#SELINUX=disabled#g' /etc/selinux/config
[root@oldboy6666 scripts] # cat /etc/selinux/config
# This file controls the state of SELinux on the system.
# SELINUX= can take one of these three values:
# enforcing - SELinux security policy is enforced.
# permissive - SELinux prints warnings instead of enforcing.
# disabled - No SELinux policy is loaded.
SELINUX=disabled
已经关闭
# SELINUXTYPE= can take one of three values:
# targeted - Targeted processes are protected,
# minimum - Modification of targeted policy. Only selected processes are protected.
# mls - Multi Level Security protection.
SELINUXTYPE=targeted
[root@oldboy6666 scripts] #
10.6 系统字符集优化
10.6.1 为什么要优化字符集
优化字符集可以防止在输入命令或者文件信息的时候出现乱码
可以显示中文信息
10.6.2 临时修改字符设置
[root@oldboy6666 scripts] # LANG="en_US.GBK"
[root@oldboy6666 scripts] # echo $LANG
en_US.GBK
[root@oldboy6666 scripts] #
10.6.3 永久修改字符设置(centos7)
- (1).配置文件的修改
[root@oldboy6666 scripts] # cat /etc/locale.conf
LANG=en_US.UTF-8
[root@oldboy6666 scripts] #
- (2).命令的修改
[root@oldboy6666 ~] # localectl set-locale 'LANG=zh_CN.UTF-8' 命令
[root@oldboy6666 ~] # echo $LANG
zh_CN.UTF-8
[root@oldboy6666 ~] #
10.6.4 永久修改字符设置(centos6)
[root@oldboyedu ~] # cat /etc/sysconfig/i18n
LANG="en_US.UTF-8"
SYSFONT="latarcyrheb-sun16"
[root@oldboyedu ~] #
10.7 系统时间优化
10.7.1 查看时间的方法
[root@oldboy6666 ~] # date
Thu Sep 12 16:55:49 CST 2019
[root@oldboy6666 ~] #
10.7.2 手动更新时间
[root@oldboy6666 ~] # ntpdate ntp1.aliyun.com
12 Sep 16:57:03 ntpdate[8479]: adjust time server 120.25.115.20 offset 0.000488 sec
[root@oldboy6666 ~] #
10.7.3 自动更新时间
10.7.3.1 自动更新时间常用的参数
[root@oldboy6666 ~] # timedatectl
list-timezones 显示所有时区(timedatectl list-timezones)
set-local-rtc 更新硬件(bios)时间(timedatectl set-local-rtc 1)
1:代表开启 0代表关闭
set-ntp ntp服务器时间的更新(timedatectl set-ntp 1)
1:代表开启 0代表关闭
set-time 更新时间(timedatectl set-time 20190528)
set-timezone 设置时区(timedatectl set-timezone +时区)
[root@oldboy6666 ~] # timedatectl
10.7.3.2 ntp服务器的讲解
- (1).ntp服务器的作用
ntp服务器用于在时间服务器和客户端进行同步的操作
- (2).ntp服务器同步操作
[root@oldboy6666 ~] # timedatectl set-ntp 1 设置1为同步开启
[root@oldboy6666 ~] # timedatectl
Local time: Thu 2019-09-12 17:25:22 CST
Universal time: Thu 2019-09-12 09:25:22 UTC
RTC time: Thu 2019-09-12 09:25:22
Time zone: Asia/Shanghai (CST, +0800)
NTP enabled: yes
NTP synchronized: yes
RTC in local TZ: yes
DST active: n/a
Warning: The system is configured to read the RTC time in the local time zone.
This mode can not be fully supported. It will create various problems
with time zone changes and daylight saving time adjustments. The RTC
time is never updated, it relies on external facilities to maintain it.
If at all possible, use RTC in UTC by calling
'timedatectl set-local-rtc 0'.
[root@oldboy6666 ~] #
[root@oldboy6666 ~] # timedatectl set-ntp 0 ntp服务器同步关闭
[root@oldboy6666 ~] # timedatectl
Local time: Thu 2019-09-12 17:27:28 CST
Universal time: Thu 2019-09-12 09:27:28 UTC
RTC time: Thu 2019-09-12 09:27:28
Time zone: Asia/Shanghai (CST, +0800)
NTP enabled: no
NTP synchronized: yes
RTC in local TZ: yes
DST active: n/a
Warning: The system is configured to read the RTC time in the local time zone.
This mode can not be fully supported. It will create various problems
with time zone changes and daylight saving time adjustments. The RTC
time is never updated, it relies on external facilities to maintain it.
If at all possible, use RTC in UTC by calling
'timedatectl set-local-rtc 0'.
[root@oldboy6666 ~] #
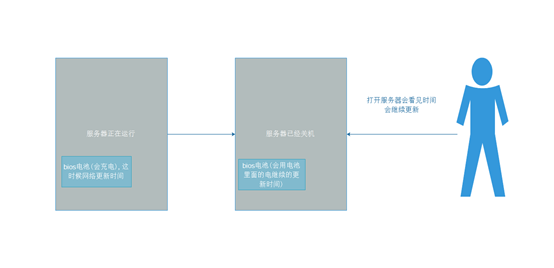
10.7.3.3 硬件时间的讲解
硬件时间简称(bios),由于服务器断电,但是bios电池有电,还会继续的更新时间,这也就是为啥偶尔关机服务器的时间开机以后也可以是正确的原因
10.8 ssh的优化
打开:vim /etc/ssh/sshd_config
79 GSSAPIAuthentication yes 改为 no
115 UseDNS yes 改为 no
重启sshd服务
systemctl restart sshd
最简单易懂的linux系统基础优化的更多相关文章
- Linux实战教学笔记06:Linux系统基础优化
第六节 Linux系统基础优化 标签(空格分隔):Linux实战教学笔记-陈思齐 第1章 基础环境 第2章 使用网易163镜像做yum源 默认国外的yum源速度很慢,所以换成国内的. 第一步:先备份 ...
- Linu之linux系统基础优化和基本命令
Linux系统基础优化和基本命令 网络参数设定命令 ifconfig: 查询,设置网卡和ip等参数 ifup,ifdown: 脚本命令,更简单的方式 ip: 符合指令,直接修改上述功能 编辑网卡配置文 ...
- Linux 系统基础优化和常用命令
目录 Linux 系统基础优化和常用命令 软连接 tar解压命令 gzip命令 netstart命令 ps命令 kill命令 killall命令 SELinux功能 iptables防火墙 Linux ...
- 运维 07 Linux系统基础优化及常用命令
Linux系统基础优化及常用命令 Linux基础系统优化 引言没有,只有一张图. Linux的网络功能相当强悍,一时之间我们无法了解所有的网络命令,在配置服务器基础环境时,先了解下网络参数设定命令 ...
- Linux系统基础优化
一.关闭防火墙iptables: (1)关闭 /etc/init.d/iptables stop (2)检查 ...
- Linux系统基础优化及常用命令
Linux基础系统优化 引言没有,只有一张图. Linux的网络功能相当强悍,一时之间我们无法了解所有的网络命令,在配置服务器基础环境时,先了解下网络参数设定命令. ifconfig 查询.设置网卡和 ...
- 8,Linux系统基础优化及常用命令
Linux基础系统优化 引言没有,只有一张图. Linux的网络功能相当强悍,一时之间我们无法了解所有的网络命令,在配置服务器基础环境时,先了解下网络参数设定命令. ifconfig 查询.设置网卡和 ...
- linux系统基础优化及高级操作命令
Linux基础系统优化 引言没有,只有一张图. Linux的网络功能相当强悍,一时之间我们无法了解所有的网络命令,在配置服务器基础环境时,先了解下网络参数设定命令. ifconfig 查询.设置网卡和 ...
- linux系统基础优化16条知识汇总
优化的总结: 1.不用root管理,以普通用户的名义通过sudo授权管理. 2.更改默认的远程连接SSH服务端口,禁止root用户远程连接,甚至 要更改只监听内网IP. 3.定时自动更新服务区时间,使 ...
随机推荐
- yum.rpm一点点
rpm 1.rpm -qi查询包的详细信息 [root@centos7 tmp]# rpm -qi tree Name : tree Version : 1.6.0 Release : 10.el7 ...
- js常用的array方法
1. splice() splice()方法向/从数组中添加/删除项目,然后返回被删除的项目.(注释:该方法会改变原始数组.) arrayObject.splice(index,howmany,i ...
- mysql 不需要使用密码就可以登录
最近发现一个问题, 就是我等了mysql客户端可以不输入密码. 直接输入mysql -u root 回车 或者 输入一个错的密码,都可进入到下面的界面. 在Navicat不用输入密码, 或者数据错的密 ...
- nyoj 3 多边形重心问题
多边形重心问题 时间限制:3000 ms | 内存限制:65535 KB 难度:5 描述 在某个多边形上,取n个点,这n个点顺序给出,按照给出顺序将相邻的点用直线连接, (第一个和最后一个连接 ...
- pat 1011 World Cup Betting(20 分)
1011 World Cup Betting(20 分) With the 2010 FIFA World Cup running, football fans the world over were ...
- 搭建Nginx七层反向代理
基于https://www.cnblogs.com/Dfengshuo/p/11911406.html这个基础上,在来补充下七层代理的配置方式.简单理解下四层和七层协议负载的区别吧,四层是网络层,负载 ...
- 添加ssh服务构建新镜像-docker commit 方式01
添加ssh服务构建新镜像-docker commit 方式 1:docker commit构建自定义镜像---一般不推荐使用这种方式构建新镜像 1:ubuntu基础镜像下载 ubuntu@ubuntu ...
- vi指令详解
★ vi的模式(命令模式.插入模式.ex模式) 1)命令模式: 在我们刚刚通过vi新建或打开一个已经存在的文件时,首先默认被读取的模式就是“命令模式”,命令模式的特征就是,在编辑器窗口左下角的位置上没 ...
- Spring Data Jpa的四种查询方式
一.调用接口的方式 1.基本介绍 通过调用接口里的方法查询,需要我们自定义的接口继承Spring Data Jpa规定的接口 public interface UserDao extends JpaR ...
- SpringMVC 前端传递list到后台
---恢复内容开始--- 1.前端获取传入后台的list 2.ajax写法: $.ajax({ type: 'post', url: url, async:false, dataType:" ...